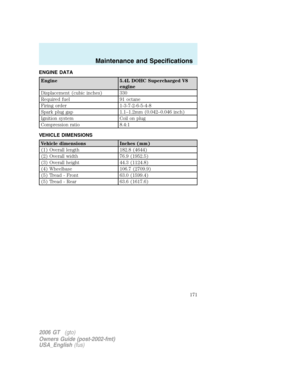
Page 73 of 200

•Drive carefully and avoid abrupt steering maneuvers.
• Periodically monitor tire inflation pressure in the affected tire; if the
tire is losing pressure, have the vehicle towed.
• Read the information in the Tips for use of the tire inflation kit
section to ensure safe operation of the tire inflation kit and your
vehicle.
Tips for use of the tire inflation kit
Read the following list of tips to ensure safe operation of the tire
inflation kit:
• Before operating the inflation kit, make sure your vehicle is safely off
the road and away from moving traffic.
• Always set the parking brake to ensure the vehicle doesn’t move
unexpectedly.
• Do not remove any foreign objects, such as nails or screws, from the
tire.
• When using the inflation kit, leave the engine running (only if the
vehicle is outdoors or in a well-ventilated area) so the
compressor doesn’t drain the vehicle’s battery.
• Do not allow the compressor to operate continuously for more than 10
minutes; this will help prevent the compressor from overheating.
• Never leave the inflation kit unattended when it is operating.
• Keep the inflation kit away from children.
• Only use the inflation kit when the ambient temperature is above
–20°F.
• Only use the inflation kit for sealing/inflating the tires on your vehicle.
Do not use the kit for inflating tires on motorcycles, bicycles or any
other type of tire.
• Only use the sealing compound before the expiration date. The
expiration date is labeled on the unit.
• Do not store the inflation kit inside the passenger compartment of the
vehicle as it may cause injury during a sudden stop or collision. Store
the kit in its proper location.
2006GT (gto)
Owners Guide (post-2002-fmt)
USA_English (fus)
Tires, Wheels and Loading
73
Page 74 of 200
What to do when a tire is punctured
A tire puncture within the tire’s tread area can be repaired in two stages
with the tire inflation kit:
•In the first stage, the tire will be reinflated with a sealing compound
and air. After the tire has been reinflated, you will need to drive the
vehicle a short distance (approximately two miles) to activate the
sealing compound inside the tire.
• In the second stage, you will need to check the tire pressure and, if
necessary, adjust tire inflation to its proper pressure.
First stage: Reinflating the tire with sealing compound and air
1. Remove the hose (1) and the cable with the electrical plug (2) from
the kit’s storage compartment (3).
2. Remove the valve cap from the punctured tire, then screw the hose
firmly onto the tire’s air valve.
3. Insert the electrical plug into the vehicle’s dash mounted power point.
2006 GT (gto)
Owners Guide (post-2002-fmt)
USA_English (fus)
Tires, Wheels and Loading
74
Page 75 of 200
4. Loosen the safety latch (4) on
the sealing compound container (5)
and rotate the container until it is
upright and clicks into place.
5. Peel the speed limit sticker (6)
off the side of the container and
affix it to the center of the steering
wheel or the instrument panel so it
can be seen in plain view.
6. Start the engine(only if the
vehicle is outdoors or in a
well-ventilated area) to prevent
the vehicle’s battery from draining.
Do not start your vehicle in
a closed garage or in other
enclosed areas. The carbon
monoxide in exhaust fumes can be
toxic. Always open the garage
door before you start the engine.
7. Turn the air compressor on by
pressing the “I” side of the orange
button.
2006 GT (gto)
Owners Guide (post-2002-fmt)
USA_English (fus)
Tires, Wheels and Loading
75
Page 76 of 200

Note:When the sealing compound
is first added into the tire, the air
pressure gauge reading (7) on the
compressor unit may increase up to
90 psi; this is normal and should be
no reason for concern. The pressure
will drop after about 30 seconds of
operation.
Do not stand next to the damaged tire while it is inflating. If you
notice any unusual bulges or deformations in the tire’s sidewall
during inflation, stop the air compressor and deflate the tire using the
pressure release valve.
8. Inflate the tire for nine minutes or until the pressure reaches 22 psi,
then turn the air compressor off by pressing the “O” side of the orange
button.
Note: If the damaged tire does not reach 22 psi within nine minutes, the
tire is too severely damaged and the car must not be driven. Call for
roadside assistance.
9. Once the tire pressure reaches 22 psi, quickly unscrew the hose from
the tire’s air valve and reinstall the valve cap. Unplug the electrical plug
from the power point. Turn the sealing compound container back to its
original position and close the safety latch. Stow the inflation kit in an
easily accessible place since you will need it to check the tire’s air
pressure again in the second stage of this operation.
10. Immediately, and cautiously, drive the vehicle a short distance
(approximately two miles) to activate the sealing compound within the
damaged tire. Do not exceed 50 mph.
Note: If you experience any unusual vibration, ride disturbance or noise
while driving, reduce your speed until you can safely pull off to the side
of the road to call for roadside assistance. Do not proceed to the
second stage of this operation.
2006 GT (gto)
Owners Guide (post-2002-fmt)
USA_English (fus)
Tires, Wheels and Loading
76
Page 77 of 200

Second stage: Checking tire pressure
1. Stop driving after approximately two miles. Refer to theTips for use
of the tire inflation kit for safe operation of the tire inflation kit. Then
check the air pressure of the damaged tire as follows:
• Ensure the compressor is turned off by pressing the “O” side of the
orange button.
• Remove the hose and the cable with the electrical plug from the kit’s
storage compartment.
• Remove the valve cap from the sealed tire, then screw the hose firmly
onto the tire’s air valve.
• Start the engine (only if the vehicle is outdoors or in a
well-ventilated area) to prevent the vehicle’s battery from draining.
• Insert the electrical plug into the vehicle’s power point.
• Read the air pressure gauge on the inflation kit.
2. If the air pressure reads 19 psi or higher, switch the air compressor on
by pressing the “I” side of the orange button and adjust the air pressure
to the recommended pressure. This pressure can be found on a label
affixed to the B-Pillar. If the air pressure is higher than the label states,
reduce the excess pressure by pressing down on the pressure release
valve (8).
2006 GT (gto)
Owners Guide (post-2002-fmt)
USA_English (fus)
Tires, Wheels and Loading
77
Page 78 of 200

Note:Before driving any further, adjust the tire pressure to the
recommended pressure.
3. Turn the air compressor off by pressing the “O” side of the orange
button, then unscrew the hose from the tire’s air valve, reinstall the tire
valve cap, unplug the electrical plug from the power point and stow the
inflation kit in its proper place.
What to do after the tire has been sealed
After using the inflation kit to seal you tire, you will need to replace the
sealing compound and hose. Sealing compound and spare parts can be
obtained and replaced at an authorized Ford Motor Company dealership
or tire dealer. Empty sealing compound bottles may be disposed of at
home; however, liquid residue from the sealing compound should be
disposed by your local Ford Motor Company dealership or tire dealer, or
in accordance with local waste disposal regulations.
Note: After the sealing compound has been used, the maximum vehicle
speed is 50 mph and the maximum driving distance is 120 miles. The
sealed tire should be replaced immediately, or at least within the 120 miles.
2006 GT (gto)
Owners Guide (post-2002-fmt)
USA_English (fus)
Tires, Wheels and Loading
78
Page 79 of 200

Note:If you experience any unusual vibration, ride disturbance or noise
while driving, reduce your speed until you can safely pull off to the side
of the road to call for roadside assistance.
You can check the tire pressure any time within the 120 miles by
performing the following:
1. Ensure the compressor is turned off by pressing the “O” side of the
orange button.
2. Remove the hose and the cable with the electrical plug from the kit’s
storage compartment.
3. Remove the valve cap from the sealed tire, then screw the hose firmly
onto the tire’s air valve.
4. Insert the electrical plug into the vehicle’s power point.
5. Start the engine (only if the vehicle is outdoors or in a
well-ventilated area) to prevent the vehicle’s battery from draining.
6. Read the air pressure gauge on the inflation kit.
If the tire pressure needs to be increased, operate the air compressor
and inflate the tire to the recommended pressure as indicated on the
label on the B-Pillar.
WHEEL LUG NUT TORQUE SPECIFICATIONS
Retighten the lug nuts to the specified torque at 500 miles (800 km)
after any wheel disturbance (tire rotation, changing a flat tire, wheel
removal, etc.).
Bolt size Wheel lug nut torque* lb.ft. N•m
1 2x 20 100 135
* Torque specifications are for nut and bolt threads free of dirt and
rust. Use only Ford recommended replacement fasteners.
When a wheel is installed, always remove any corrosion, dirt or
foreign materials present on the mounting surfaces of the wheel
or the surface of the front disc brake hub and rotor that contacts the
wheel. Installing wheels without correct metal-to-metal contact at
the wheel mounting surfaces can cause the wheel nuts to loosen
and the wheel to come off while the vehicle is in motion, resulting in
loss of control.
2006 GT (gto)
Owners Guide (post-2002-fmt)
USA_English (fus)
Tires, Wheels and Loading
79
Page 80 of 200

INFORMATION CONTAINED ON THE TIRE SIDEWALL
Federal law requires tire manufacturers to place standardized
information on the sidewall of all tires. This information identifies and
describes the fundamental characteristics of the tire and also provides a
U.S. DOT Tire Identification Number for safety standard certification and
in case of a recall.
Information on “P” type tires
P215/65R15 95H is an example of a
tire size, load index and speed
rating. The definitions of these
items are listed below. (Note that
the tire size, load index and speed
rating for your vehicle may be
different from this example.)
1.P: Indicates a tire, designated by
the Tire and Rim Association
(T&RA), that may be used for
service on cars, SUVs, minivans and
light trucks.
Note: If your tire size does not
begin with a letter this may mean it
is designated by either ETRTO
(European Tire and Rim Technical Organization) or JATMA (Japan Tire
Manufacturing Association).
2. 215: Indicates the nominal width of the tire in millimeters from
sidewall edge to sidewall edge. In general, the larger the number, the
wider the tire.
3. 65: Indicates the aspect ratio which gives the tire’s ratio of height to
width.
4. R: Indicates a “radial” type tire.
5. 15: Indicates the wheel or rim diameter in inches. If you change your
wheel size, you will have to purchase new tires to match the new wheel
diameter.
6. 95: Indicates the tire’s load index. It is an index that relates to how
much weight a tire can carry. You may find this information in your
Owner’s Guide. If not, contact a local tire dealer.
Note: You may not find this information on all tires because it is not
required by federal law.
2006 GT (gto)
Owners Guide (post-2002-fmt)
USA_English (fus)
Tires, Wheels and Loading
80