2006 FORD EXPLORER warning
[x] Cancel search: warningPage 136 of 328

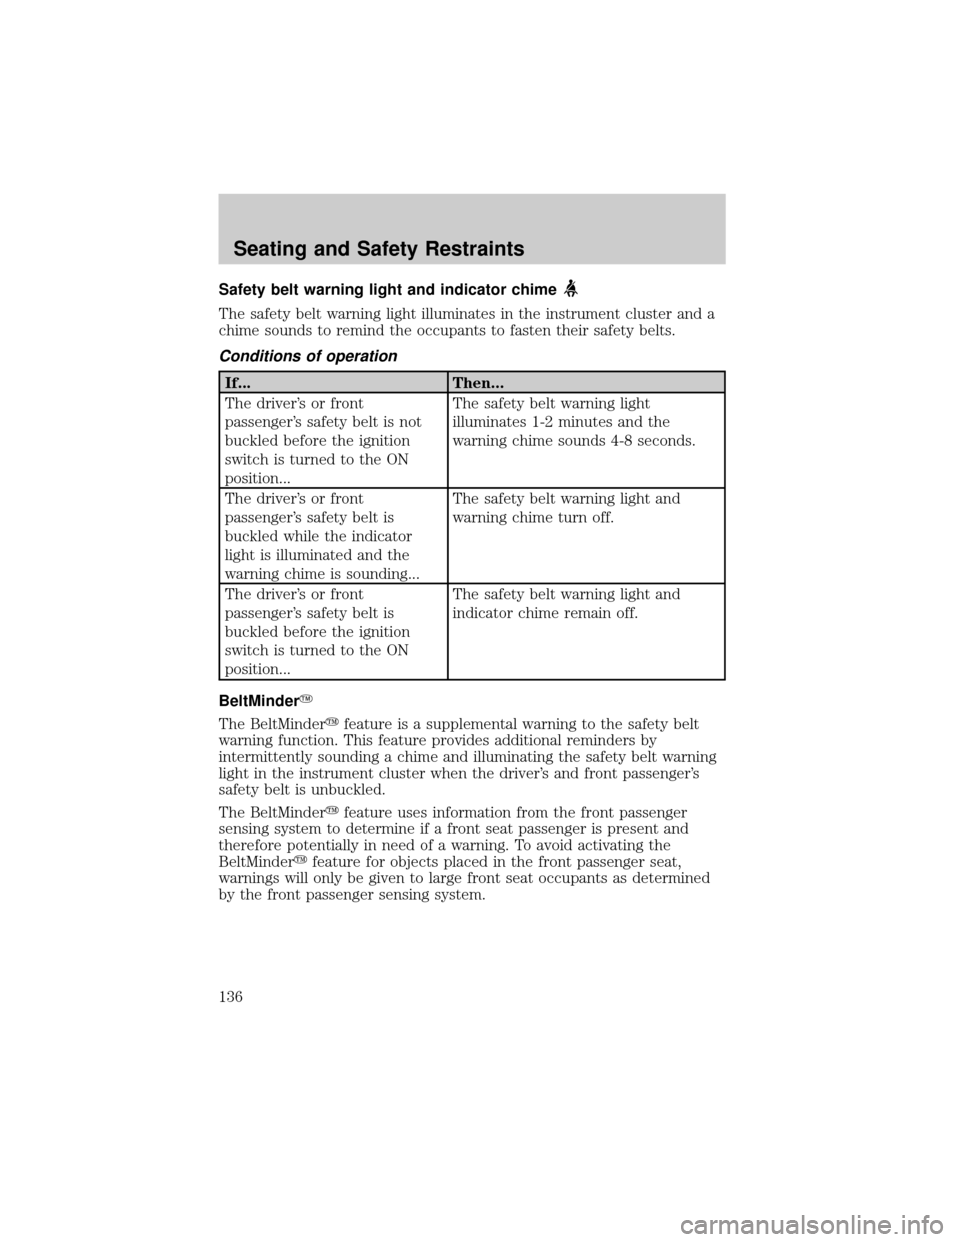
Safety belt warning light and indicator chime
The safety belt warning light illuminates in the instrument cluster and a
chime sounds to remind the occupants to fasten their safety belts.
Conditions of operation
If... Then...
The driver's or front
passenger's safety belt is not
buckled before the ignition
switch is turned to the ON
position...The safety belt warning light
illuminates 1-2 minutes and the
warning chime sounds 4-8 seconds.
The driver's or front
passenger's safety belt is
buckled while the indicator
light is illuminated and the
warning chime is sounding...The safety belt warning light and
warning chime turn off.
The driver's or front
passenger's safety belt is
buckled before the ignition
switch is turned to the ON
position...The safety belt warning light and
indicator chime remain off.
BeltMinderY
The BeltMinderyfeature is a supplemental warning to the safety belt
warning function. This feature provides additional reminders by
intermittently sounding a chime and illuminating the safety belt warning
light in the instrument cluster when the driver's and front passenger's
safety belt is unbuckled.
The BeltMinderyfeature uses information from the front passenger
sensing system to determine if a front seat passenger is present and
therefore potentially in need of a warning. To avoid activating the
BeltMinderyfeature for objects placed in the front passenger seat,
warnings will only be given to large front seat occupants as determined
by the front passenger sensing system.
Seating and Safety Restraints
136
Page 137 of 328

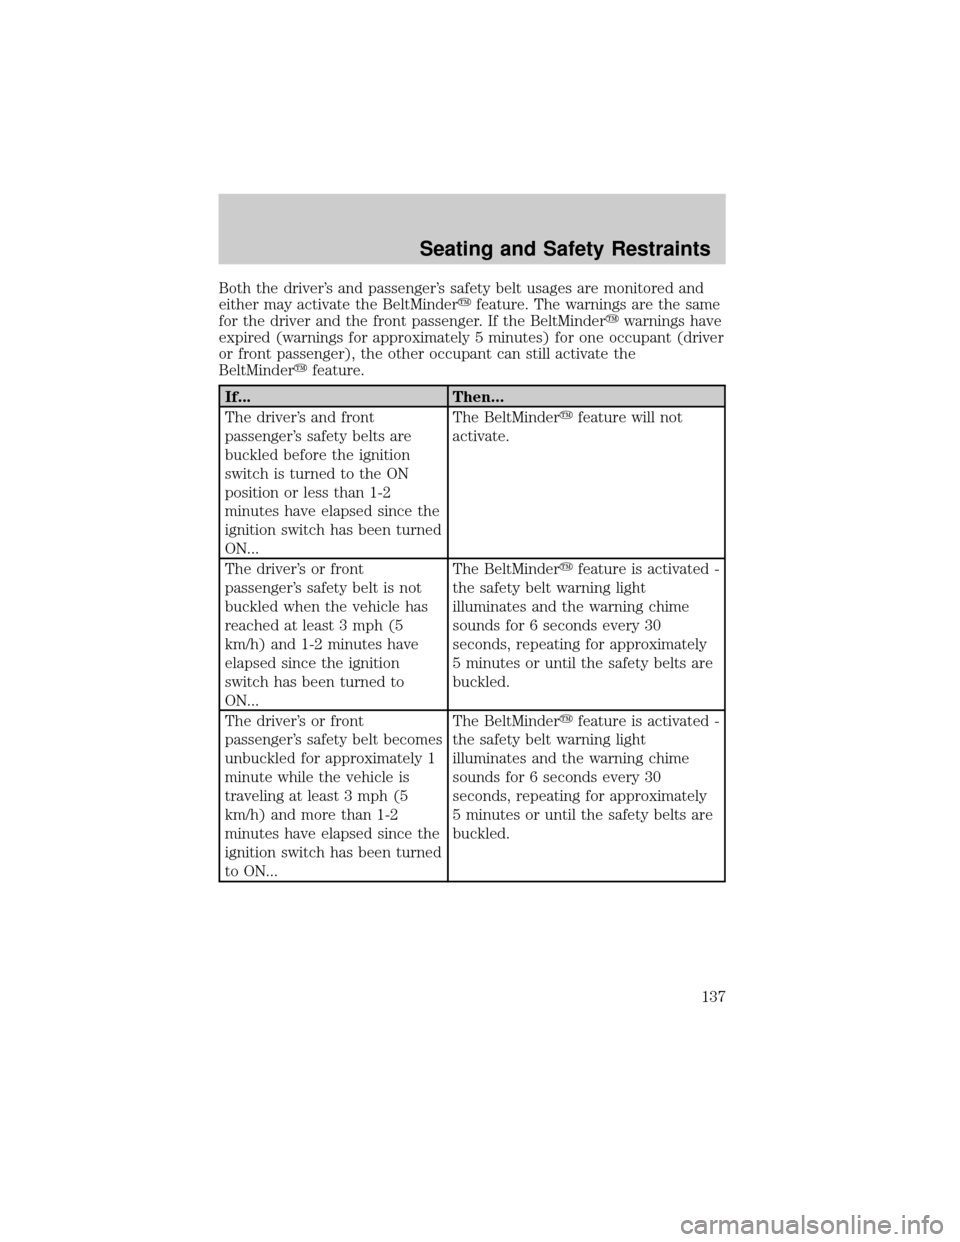
Both the driver's and passenger's safety belt usages are monitored and
either may activate the BeltMinderyfeature. The warnings are the same
for the driver and the front passenger. If the BeltMinderywarnings have
expired (warnings for approximately 5 minutes) for one occupant (driver
or front passenger), the other occupant can still activate the
BeltMinderyfeature.
If... Then...
The driver's and front
passenger's safety belts are
buckled before the ignition
switch is turned to the ON
position or less than 1-2
minutes have elapsed since the
ignition switch has been turned
ON...The BeltMinderyfeature will not
activate.
The driver's or front
passenger's safety belt is not
buckled when the vehicle has
reached at least 3 mph (5
km/h) and 1-2 minutes have
elapsed since the ignition
switch has been turned to
ON...The BeltMinderyfeature is activated -
the safety belt warning light
illuminates and the warning chime
sounds for 6 seconds every 30
seconds, repeating for approximately
5 minutes or until the safety belts are
buckled.
The driver's or front
passenger's safety belt becomes
unbuckled for approximately 1
minute while the vehicle is
traveling at least 3 mph (5
km/h) and more than 1-2
minutes have elapsed since the
ignition switch has been turned
to ON...The BeltMinderyfeature is activated -
the safety belt warning light
illuminates and the warning chime
sounds for 6 seconds every 30
seconds, repeating for approximately
5 minutes or until the safety belts are
buckled.
Seating and Safety Restraints
137
Page 140 of 328

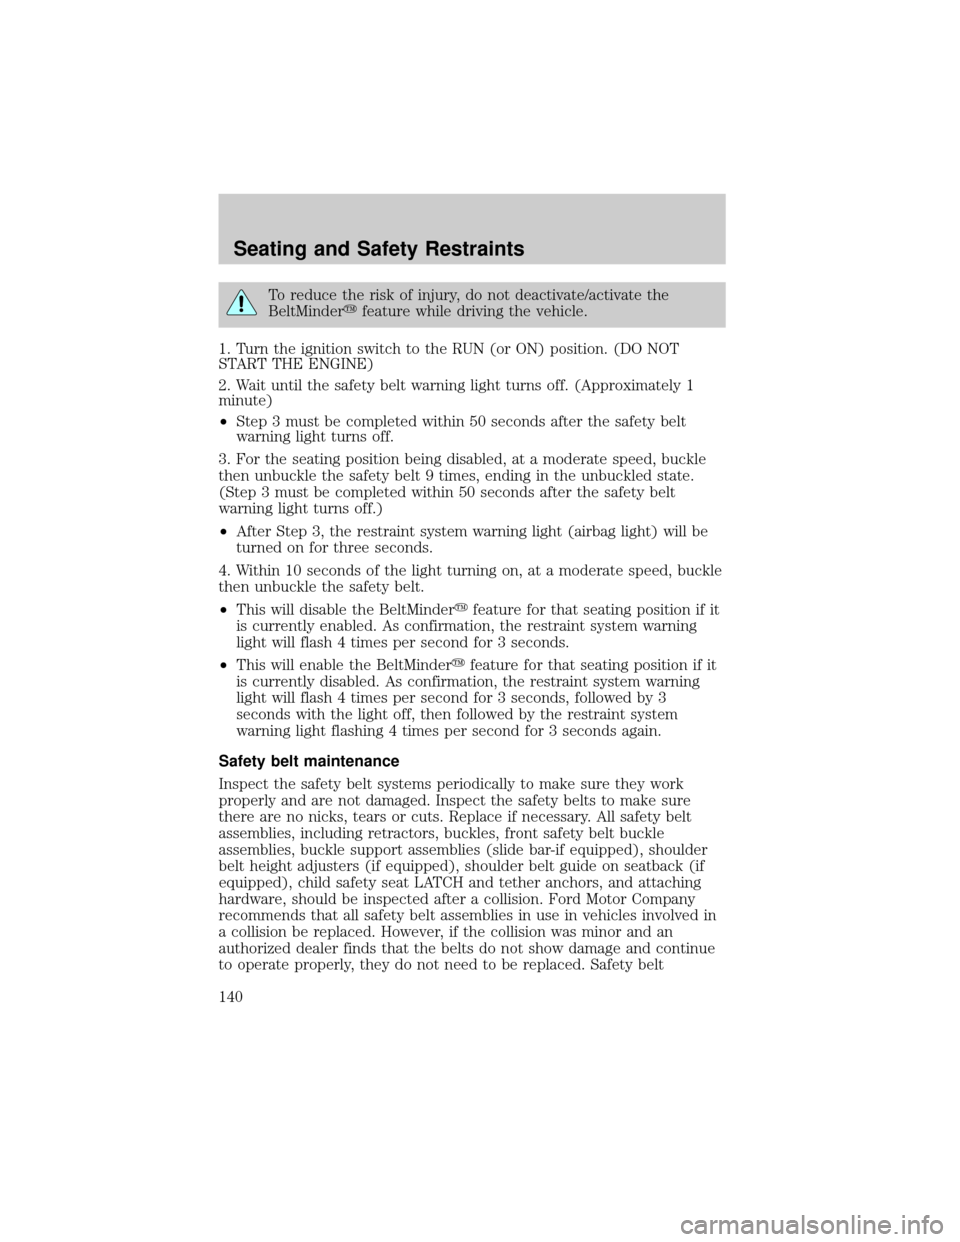
To reduce the risk of injury, do not deactivate/activate the
BeltMinderyfeature while driving the vehicle.
1. Turn the ignition switch to the RUN (or ON) position. (DO NOT
START THE ENGINE)
2. Wait until the safety belt warning light turns off. (Approximately 1
minute)
²Step 3 must be completed within 50 seconds after the safety belt
warning light turns off.
3. For the seating position being disabled, at a moderate speed, buckle
then unbuckle the safety belt 9 times, ending in the unbuckled state.
(Step 3 must be completed within 50 seconds after the safety belt
warning light turns off.)
²After Step 3, the restraint system warning light (airbag light) will be
turned on for three seconds.
4. Within 10 seconds of the light turning on, at a moderate speed, buckle
then unbuckle the safety belt.
²This will disable the BeltMinderyfeature for that seating position if it
is currently enabled. As confirmation, the restraint system warning
light will flash 4 times per second for 3 seconds.
²This will enable the BeltMinderyfeature for that seating position if it
is currently disabled. As confirmation, the restraint system warning
light will flash 4 times per second for 3 seconds, followed by 3
seconds with the light off, then followed by the restraint system
warning light flashing 4 times per second for 3 seconds again.
Safety belt maintenance
Inspect the safety belt systems periodically to make sure they work
properly and are not damaged. Inspect the safety belts to make sure
there are no nicks, tears or cuts. Replace if necessary. All safety belt
assemblies, including retractors, buckles, front safety belt buckle
assemblies, buckle support assemblies (slide bar-if equipped), shoulder
belt height adjusters (if equipped), shoulder belt guide on seatback (if
equipped), child safety seat LATCH and tether anchors, and attaching
hardware, should be inspected after a collision. Ford Motor Company
recommends that all safety belt assemblies in use in vehicles involved in
a collision be replaced. However, if the collision was minor and an
authorized dealer finds that the belts do not show damage and continue
to operate properly, they do not need to be replaced. Safety belt
Seating and Safety Restraints
140
Page 151 of 328

Do not attempt to service, repair, or modify the airbag SRS, its
fuses or the seat cover on a seat containing an airbag. See your
authorized dealer.
All occupants of the vehicle should always wear their safety belts
even when an airbag SRS is provided.
How does the side airbag system work?
The design and development of the side airbag system included
recommended testing procedures that were developed by a group of
automotive safety experts known as the Side Airbag Technical Working
Group. These recommended testing procedures help reduce the risk of
injuries related to the deployment of side airbags.
The side airbag system consists of
the following:
²An inflatable nylon bag (airbag)
with a gas generator concealed
behind the outboard bolster of
the driver and front passenger
seatbacks.
²A special seat cover designed to
allow airbag deployment.
²The same warning light,
electronic control and diagnostic
unit as used for the front airbags.
²Crash sensors located on the
front doors and C pillars (one
sensor on each pillar on each side
of the vehicle).
Side airbags, in combination with seat belts, can help reduce the risk of
severe injuries in the event of a significant side impact collision.
The side airbags are fitted on the outboard side of the seatbacks of the
front seats. In certain lateral collisions, the airbag on the side affected by
the collision will be inflated. If the front passenger sensing system
detects an empty seat, the front passenger seat-mounted side airbag will
be deactivated. The airbag was designed to inflate between the door
panel and occupant to further enhance the protection provided
occupants in side impact collisions.
Seating and Safety Restraints
151
Page 153 of 328

Do not attempt to service, repair, or modify the Safety Canopyy
system, its fuses, the A, B, or C pillar trim, or the headliner on a
vehicle containing a Safety Canopyy. See your authorized dealer.
All occupants of the vehicle including the driver should always
wear their safety belts even when an airbag SRS and Safety
Canopyysystem is provided.
To reduce risk of injury, do not obstruct or place objects in the
deployment path of the inflatable Safety Canopyy.
How does the Safety CanopyYsystem work?
The design and development of the
Safety Canopyysystem included
recommended testing procedures
that were developed by a group of
automotive safety experts known as
the Side Airbag Technical Working
Group. These recommended testing
procedures help reduce the risk of
injuries related to the deployment of
side airbags (including the Safety
Canopyy).
The Safety Canopyysystem
consists of the following:
²An inflatable nylon curtain with a
gas generator concealed behind
the headliner and above the doors
(one on each side of the vehicle).
²A headliner that will flex to open
above the side doors to allow Safety Canopyydeployment.
²The same warning light, electronic control and diagnostic unit as used
for the front airbags.
²Two side crash sensors mounted at the front doors (one on each side
of the vehicle).
²Two side crash sensors located at the c-pillar behind the rear doors
(one on each side of the vehicle).
²Roll over sensor in the restraints control module (RCM).
Seating and Safety Restraints
153
Page 156 of 328

require that children use approved booster seats until they are eight
years old. Check your local and state or provincial laws for specific
requirements regarding the safety of children in your vehicle. When
possible, always place children under age 12 in the rear seat of your
vehicle. Accident statistics suggest that children are safer when properly
restrained in the rear seating positions than in the front seating position.
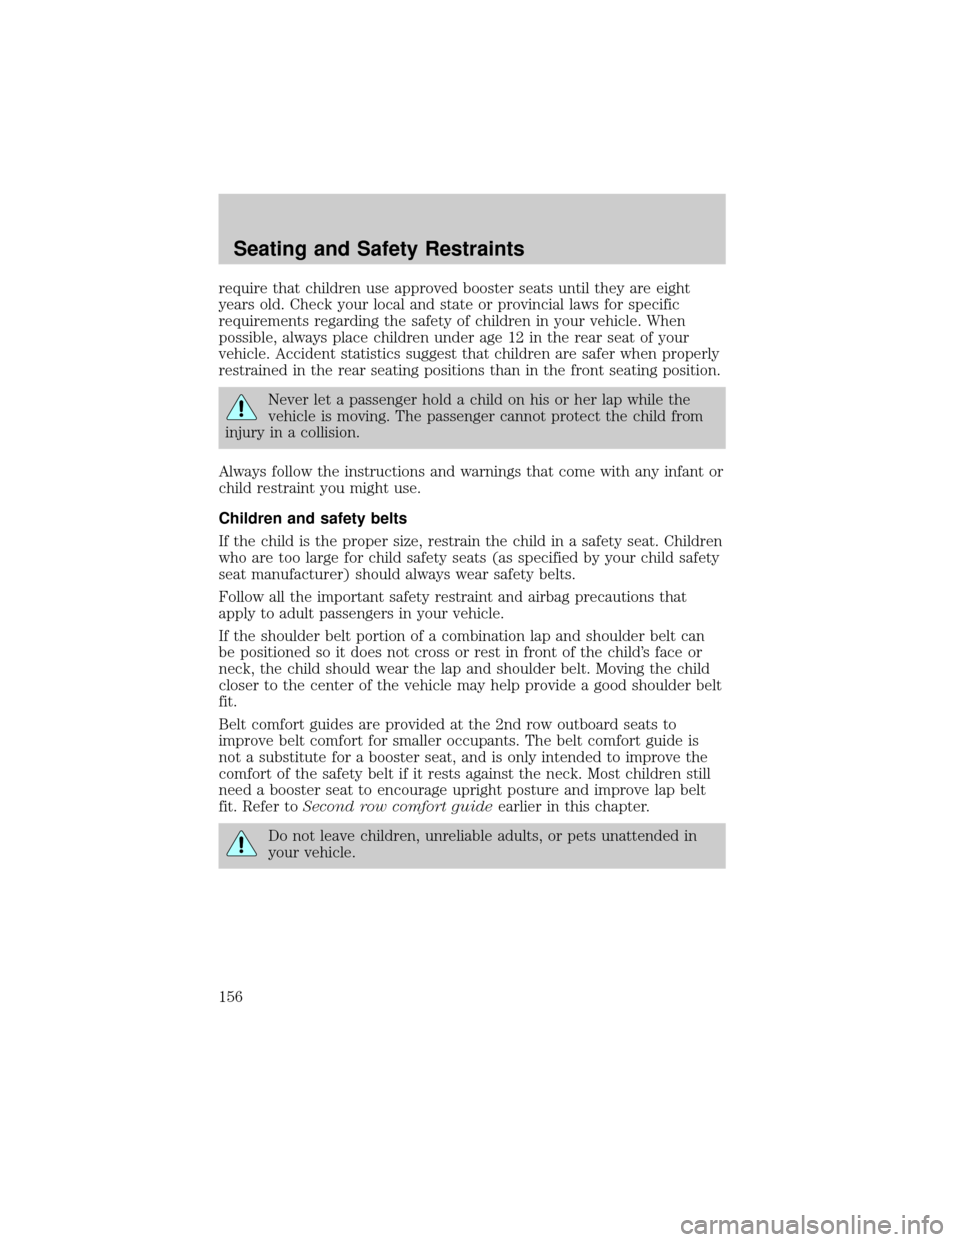
Never let a passenger hold a child on his or her lap while the
vehicle is moving. The passenger cannot protect the child from
injury in a collision.
Always follow the instructions and warnings that come with any infant or
child restraint you might use.
Children and safety belts
If the child is the proper size, restrain the child in a safety seat. Children
who are too large for child safety seats (as specified by your child safety
seat manufacturer) should always wear safety belts.
Follow all the important safety restraint and airbag precautions that
apply to adult passengers in your vehicle.
If the shoulder belt portion of a combination lap and shoulder belt can
be positioned so it does not cross or rest in front of the child's face or
neck, the child should wear the lap and shoulder belt. Moving the child
closer to the center of the vehicle may help provide a good shoulder belt
fit.
Belt comfort guides are provided at the 2nd row outboard seats to
improve belt comfort for smaller occupants. The belt comfort guide is
not a substitute for a booster seat, and is only intended to improve the
comfort of the safety belt if it rests against the neck. Most children still
need a booster seat to encourage upright posture and improve lap belt
fit. Refer toSecond row comfort guideearlier in this chapter.
Do not leave children, unreliable adults, or pets unattended in
your vehicle.
Seating and Safety Restraints
156
Page 179 of 328

10.Tire Ply Composition and Material Used:Indicates the number of
plies or the number of layers of rubber-coated fabric in the tire tread and
sidewall. Tire manufacturers also must indicate the ply materials in the
tire and the sidewall, which include steel, nylon, polyester, and others.
11.Maximum Load:Indicates the maximum load in kilograms and
pounds that can be carried by the tire. Refer to the Safety Compliance
Certification Label, which is located on the B-Pillar or the edge of the
driver's door, for the correct tire pressure for your vehicle.
12.Treadwear, Traction and Temperature Grades
²Treadwear:The treadwear grade is a comparative rating based on the
wear rate of the tire when tested under controlled conditions on a
specified government test course. For example, a tire graded 150
would wear one and one-half (1
1¤2) times as well on the government
course as a tire graded 100.
²Traction:The traction grades, from highest to lowest are AA, A, B,
and C. The grades represent the tire's ability to stop on wet pavement
as measured under controlled conditions on specified government test
surfaces of asphalt and concrete. A tire marked C may have poor
traction performance.
²Temperature:The temperature grades are A (the highest), B and C,
representing the tire's resistance to the generation of heat and its
ability to dissipate heat when tested under controlled conditions on a
specified indoor laboratory test wheel.
13.Maximum Permissible Inflation Pressure:Indicates the tire
manufacturers' maximum permissible pressure and/or the pressure at
which the maximum load can be carried by the tire. This pressure is
normally higher than the manufacturer's recommended cold inflation
pressure which can be found on the Safety Compliance Certification
Label or Tire Label which is located on the B-Pillar or the edge of the
driver's door. The cold inflation pressure should never be set lower than
the recommended pressure on the vehicle label.
The tire suppliers may have additional markings, notes or warnings such
as standard load, radial tubeless, etc.
Tires, Wheels and Loading
179
Page 187 of 328

The Tire Pressure Monitoring System is NOT a substitute for
manually checking tire pressure. The tire pressure should be
checked periodically (at least monthly) using a tire gauge, see
Inflating your tiresin this chapter. Failure to properly maintain your
tire pressure could increase the risk of tire failure, loss of control,
vehicle rollover and personal injury.
Changing tires with TPMS
Each road tire is equipped with
a tire pressure sensor fastened
to the inside rim of the wheel.
The pressure sensor is covered
by the tire and is not visible
unless the tire is removed. The
pressure sensor is located
opposite (180 degrees) from the
valve stem. Care must be taken
when changing the tire to avoid
damaging the sensor.It is
recommended that you always have
your tires serviced by an authorized
dealer.
The tire pressure should be checked
periodically (at least monthly) using
an accurate tire gauge, refer to
Inflating your tiresin this chapter.
Understanding your Tire Pressure Monitoring System (TPMS)
The Tire Pressure Monitoring System measures pressure in your four
road tires and sends the tire pressure readings to your vehicle every
minute while you are driving and once every 6 hours when your vehicle
is parked. The Low Tire Warning Lamp will turn ON if the tire pressure
is 25% below the pressure listed on the Safety Compliance Certification
Label (approximately 6 to 9 psi below the manufacturer's recommend
tire pressure). If the tire pressure increases 2 psi above the ªLight ONº
threshold, then the TPMS light will turn OFF. Once the light is
illuminated, your tires are under inflated and need to be inflated to the
manufacturer's recommended tire pressure. Even if the light turns ON
and a short time later turns OFF, your tire pressure still needs to be
checked.
Tires, Wheels and Loading
187