Page 177 of 274

176
WARNING
LIGHTS AND
MESSAGES
CAR
MAINTENANCE
TECHNICAL
SPECIFICATIONS
IINDEX
DASHBOARD
AND CONTROLS
SAFETY
DEVICES
CORRECT USE
OF THE CAR
IN AN
EMERGENCY
Versions with alloy rims
Proceed as follows:
❒Tighten the pin A-fig. 10in one of the
fastening bolt holes on the wheel hub;
❒Insert the wheel on the pin and, using
the wrench provided, tighten the four
bolts available. This is facilitated by the
extension provided B;
❒Loosen the pin Aand tighten the last
fastening bolt;
❒Lower the car and remove the jack;
❒Using the wrench provided, fully tight-
en the bolts in the sequence shown
previously for the space-saver spare
wheel (see fig. 9).When you have finished
❒Stow the space-saver spare wheel G-
fig. 11in the space provided in the
boot;
❒Insert the partially open jack into the
container Fand force it slightly into its
seat so that it does not vibrate when
the car is moving;
❒ Put the tools back into their places in
the container;
❒Stow the container complete with tools
on the spare wheel and secure every-
thing with the clamping device E;
❒Correctly reposition the boot stiff cov-
er.
fig. 10F0C0217m
fig. 11F0C0392m
Page 178 of 274

177
WARNING
LIGHTS AND
MESSAGES
CAR
MAINTENANCE
TECHNICAL
SPECIFICATIONS
INDEX
DASHBOARD
AND CONTROLS
SAFETY
DEVICES
CORRECT USE
OF THE CAR
IN AN
EMERGENCY
QUICK TYRE REPAIR
KIT FIX & GO
automatic
The quick tyre repair kit Fix & Go auto-
matic is located in the appropriate con-
tainer in the boot .
The quick tyre repair kit includes fig. 12:
❒bottle A containing sealer and fitted
with:
– filler hose B
– sticker Cwith caution “max. 80
km/h”, to be affixed in a visible posi-
tion for the driver (instrument panel)
after repairing the tyre
❒instruction brochure (see fig. 13), to
be used for prompt and proper use of
the quick repair kit and to be then
handed to the personnel charged with
handling the treated tyre
fig. 12F0C0510mfig. 13F0C0511m
Hand the instruction
brochure to the personnel
charged with treating the tyre re-
paired with the kit.
WARNING
In the event of a puncture
caused by foreign bodies, it is
possible to repair tyres show-
ing damages on the track or
shoulder up to max 4 mm diameter.
Holes and damages on the
tyre side walls cannot be re-
paired. Do not use the quick tyre re-
pair kit if damaging is due to running
with flat tyre.
WARNING
❒compressor Dincluding gauge and con-
nections
❒a pair of protection gloves located in
the side space of the compressor
❒adapters for inflating different elements.
Page 179 of 274

178
WARNING
LIGHTS AND
MESSAGES
CAR
MAINTENANCE
TECHNICAL
SPECIFICATIONS
IINDEX
DASHBOARD
AND CONTROLS
SAFETY
DEVICES
CORRECT USE
OF THE CAR
IN AN
EMERGENCY
IT SHOULD BE NOTICED THAT:
The sealing fluid of the quick tyre repair
kit is effective with external temperatures
between –20 °C and +50 °C. INFLATING PROCEDURE
The compressor shall not be
operated for more than 20
minutes. Risk of overheating!. Tyres
repaired with the quick tyre repair kit
shall be used temporarily only.
WARNING
The cylinder contains ethyl-
ene glycol. The cylinder con-
tains latex: it can cause allergic re-
actions. It is harmful if ingested or in-
haled and irritant for the eyes and in
case of contact. In case of contact
rinse immediately with water and
take off contaminated clothes. If
swallowed, do not induce vomit, rinse
out the mouth, drink a lot of water
and call the doctor immediately.
Keep away from children. This prod-
uct must not be used by asthmatics.
Do not inhale vapours. Call the doc-
tor immediately in case of allergic re-
actions. Keep the cylinder in the
space provided for the purpose and
far from heat. The sealing fluid has
limited life. Replace the cylinder if
sealer has run out.
WARNING
fig. 14F0C0513m
Put on the protection gloves
provided together with quick
tyre repair kit.
WARNING
❒Pull up the handbrake. Loosen tyre
inflation valve cap, take out the filler
hose A-fig. 14and screw the ring nut
Bon the tyre valve;
Repairs are not possible in
case of damages on the
wheel rim (bad groove distortion
causing air loss). Do not remove for-
eign bodies (screws or nails) from the
tyre.
WARNING
Do not throw away the cylin-
der and the sealing fluid.
Have the sealing fluid and the
cylinder disposed of in com-
pliance with national and local regu-
lations.
Page 180 of 274

179
WARNING
LIGHTS AND
MESSAGES
CAR
MAINTENANCE
TECHNICAL
SPECIFICATIONS
INDEX
DASHBOARD
AND CONTROLS
SAFETY
DEVICES
CORRECT USE
OF THE CAR
IN AN
EMERGENCY
❒make sure the compressor switch E-
fig. 16is set to 0(off), start the en-
gine and fit plug D-fig. 15into the cig-
ar lighter outlet and then turn on the
compressor by setting switch E-fig. 16
to I(on). Inflate the tyre to the pres-
sure specified in paragraph “Cold tyre
inflation pressure” in section “Techni-
cal Specifications”. Check tyre pressure
on gauge F-fig. 16with compressor off
to obtain precise reading; ❒If after 5 minutes it is still impossible
to reach at least 1.5 bar, disengage com-
pressor from valve and current outlet,
then move the car forth for approx. ten
metres in order to distribute the seal-
ing fluid inside the tyre evenly, then re-
peat the inflation operation;
❒If after this operation it is still impossi-
ble after 5 minutes to reach at least 1.8
bar, do not start driving since the tyre
is excessively damaged and the quick
tyre repair kit cannot guarantee suit-
able sealing, contact Fiat Dealership;
fig. 15F0C0515mfig. 16F0C0516m
Apply the sticker in a visible
position for the driver to in-
dicate that the tyre has been treat-
ed with the quick tyre repair kit. Dri-
ve carefully especially when corner-
ing. Do not exceed 80 km/h. Avoid
heavy braking and accelerating.
WARNING
❒after driving for about 10 minutes stop
and check again the tyre pressure; pull
up the handbrake;
If the pressure falls below 1.8
bars, do not drive any fur-
ther: the quick tyre repair kit Fix & Go
automatic cannot guarantee proper
hold because the tyre is too much
damaged. Contact Fiat Dealership.
WARNING
❒If reaching the tyre pressure specified
in paragraph “Cold tyre inflation pres-
sure” in section “Technical Specifica-
tions”, start driving immediately;
Page 181 of 274

180
WARNING
LIGHTS AND
MESSAGES
CAR
MAINTENANCE
TECHNICAL
SPECIFICATIONS
IINDEX
DASHBOARD
AND CONTROLS
SAFETY
DEVICES
CORRECT USE
OF THE CAR
IN AN
EMERGENCY
❒if at least 1.8 bar pressure is read, re-
store proper pressure (with engine
running and handbrake on) and restart;
❒drive with the utmost care to the near-
est Fiat Dealership.
It is of vital importance to
communicate that the tyre
has been repaired using the quick tyre
repair kit. Hand the instruction
brochure to the personnel charged
with treating the tyre repaired with
the kit.
WARNING
FOR CHECKING AND
RESTORING PRESSURE ONLY
The compressor can be also used just for
restoring pressure. Disconnect the quick
connection and connect it directly to the
tyre valve fig. 17; in this way the cylinder
is not connected to compressor and the
sealing fluid will not flow into the tyre. CYLINDER REPLACEMENT
PROCEDURE
To replace the cylinder proceed as fol-
lows:
❒disconnect connection B-fig. 18;
❒turn counter-clockwise the cylinder to
replace and raise it;
❒fit the new cylinder and turn it clock-
wise;
❒connect connection Bto the cylinder
and fit the transparent tube Ainto the
proper space.
fig. 17F0C0517mfig. 18F0C0512m
Page 182 of 274

181
WARNING
LIGHTS AND
MESSAGES
CAR
MAINTENANCE
TECHNICAL
SPECIFICATIONS
INDEX
DASHBOARD
AND CONTROLS
SAFETY
DEVICES
CORRECT USE
OF THE CAR
IN AN
EMERGENCY
WHEN NEEDING TO
CHANGE A BULB
GENERAL INSTRUCTIONS
❒When a light is not working, check that
the corresponding fuse is intact before
changing a bulb. For the location of fus-
es, refer to the paragraph “If a fuse
blows” in this section;
❒ Before changing a bulb check the con-
tacts for oxidation;
❒Burnt bulbs must be replaced by oth-
ers of the same type and power;
❒ Always check the height of the head-
light beam after changing a bulb.Halogen bulbs must be han-
dled touching only the metal-
lic part. If the transparent bulb
is touched with the fingers, its
lighting intensity is reduced and life of
the bulb may be compromised. If
touched accidentally, rub the bulb with
a cloth moistened with alcohol and al-
low to dry.
Modifications or repairs to
the electrical system (elec-
tronic control units) carried out in-
correctly and without bearing the fea-
tures of the system in mind can cause
malfunctions with the risk of fire.
WARNING
Halogen bulbs contain pres-
surised gas which, if broken,
may cause small fragments of glass to
be projected outwards.
WARNING
Due to high voltage, the bulb
of (Xenon) gas-discharge
headlights must only be replaced by
experts: danger of death! Contact Fi-
at Dealership.
WARNING
IMPORTANT The headlight inner surface
may be lightly misted over: this is not a
fault but a natural fact due to low tem-
perature and the level of air humidity. It
will disappear as soon the headlights are
turned on. The presence of drops inside
the headlights means water infiltration,
therefore contact Fiat Dealership.
Page 183 of 274
182
WARNING
LIGHTS AND
MESSAGES
CAR
MAINTENANCE
TECHNICAL
SPECIFICATIONS
IINDEX
DASHBOARD
AND CONTROLS
SAFETY
DEVICES
CORRECT USE
OF THE CAR
IN AN
EMERGENCY
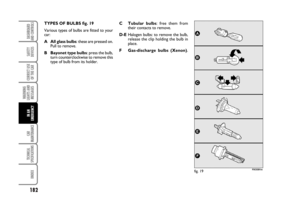
TYPES OF BULBS fig. 19
Various types of bulbs are fitted to your
car:
A All glass bulbs: these are pressed on.
Pull to remove.
B Bayonet type bulbs: press the bulb,
turn counterclockwise to remove this
type of bulb from its holder.
F0C0391m
C Tubular bulbs: free them from
their contacts to remove.
D-EHalogen bulbs: to remove the bulb,
release the clip holding the bulb in
place.
F Gas-discharge bulbs (Xenon).
fig. 19
Page 184 of 274

183
WARNING
LIGHTS AND
MESSAGES
CAR
MAINTENANCE
TECHNICAL
SPECIFICATIONS
INDEX
DASHBOARD
AND CONTROLS
SAFETY
DEVICES
CORRECT USE
OF THE CAR
IN AN
EMERGENCY
E
D
D
F
A
E
B
A
B
B
B
B
B
B
B
A
B
B
A
C
A
C
C
C
A
CH1
H7
H7
D2R
W5W
H1
PY21W
WY5W
P21W
W5W
P4/21W
P21/5W
P21W
R5W
P21W
W2,3W
P21W
P21W
W5W
C5W
W5W
C5W
C10W
C5W
W5W
C5W55W
55W
55W
35W
5W
55W
21W
5W
21W
5W
4W/21W
21W/5W
21W
5W
21W
2,3W
21W
21W
5W
5W
5W
5W
10W
5W
5W
5W
Bulbs Figure 19 Type Power
Main beam headlights
Longlife dipped beam headlights
Dipped beam headlights
Gas-discharge low beam headlights (where provided)
Front sidelights (2 per headlight) longlife
Front fog lights (where provided)
Front direction indicators
Side direction indicators
Rear direction indicators
Taillights (3-door versions)
Taillights/Rear fog lights (5-door versions)
Taillights/Brake lights
(Multi Wagon versions)
Taillights (Multi Wagon versions)
(side fixed light unit)
Taillights (Multi Wagon versions)
(tailgate light unit)
Brake lights (3-door versions)
Third brake light (additional brake light)
Reversing light
Rear fog lights
Number plate light (saloon versions)
Number plate light (Multi Wagon versions)
Puddle/door lights
Front roof light
Rear roof light (where provided)
Glovebox light
Boot light
Courtesy mirror light (where provided)