2006 CHEVROLET TRAIL BLAZER ECO mode
[x] Cancel search: ECO modePage 278 of 534
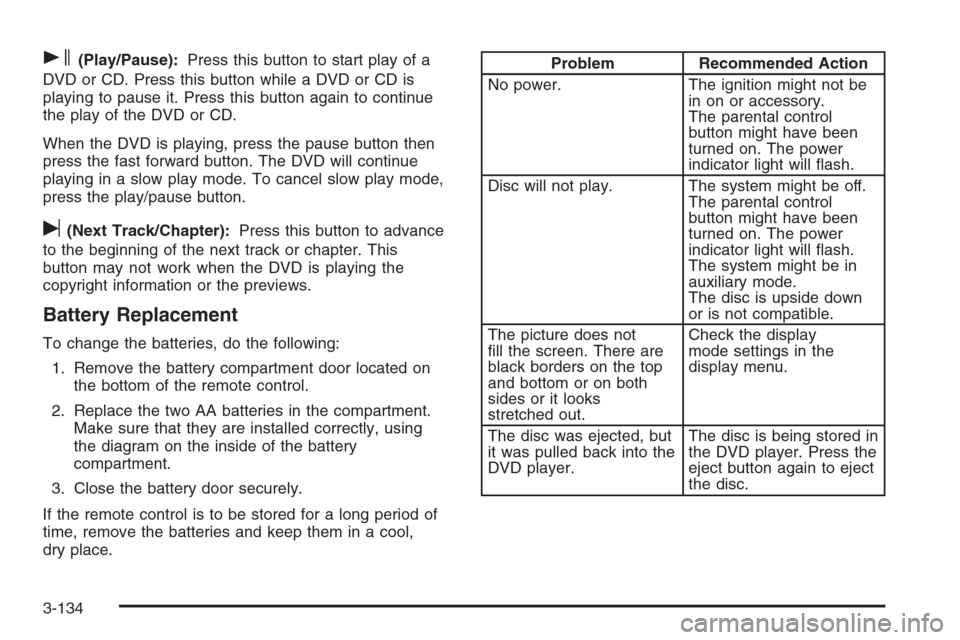
s(Play/Pause):Press this button to start play of a
DVD or CD. Press this button while a DVD or CD is
playing to pause it. Press this button again to continue
the play of the DVD or CD.
When the DVD is playing, press the pause button then
press the fast forward button. The DVD will continue
playing in a slow play mode. To cancel slow play mode,
press the play/pause button.
u(Next Track/Chapter):Press this button to advance
to the beginning of the next track or chapter. This
button may not work when the DVD is playing the
copyright information or the previews.
Battery Replacement
To change the batteries, do the following:
1. Remove the battery compartment door located on
the bottom of the remote control.
2. Replace the two AA batteries in the compartment.
Make sure that they are installed correctly, using
the diagram on the inside of the battery
compartment.
3. Close the battery door securely.
If the remote control is to be stored for a long period of
time, remove the batteries and keep them in a cool,
dry place.
Problem Recommended Action
No power. The ignition might not be
in on or accessory.
The parental control
button might have been
turned on. The power
indicator light will �ash.
Disc will not play. The system might be off.
The parental control
button might have been
turned on. The power
indicator light will �ash.
The system might be in
auxiliary mode.
The disc is upside down
or is not compatible.
The picture does not
�ll the screen. There are
black borders on the top
and bottom or on both
sides or it looks
stretched out.Check the display
mode settings in the
display menu.
The disc was ejected, but
it was pulled back into the
DVD player.The disc is being stored in
the DVD player. Press the
eject button again to eject
the disc.
3-134
Page 279 of 534
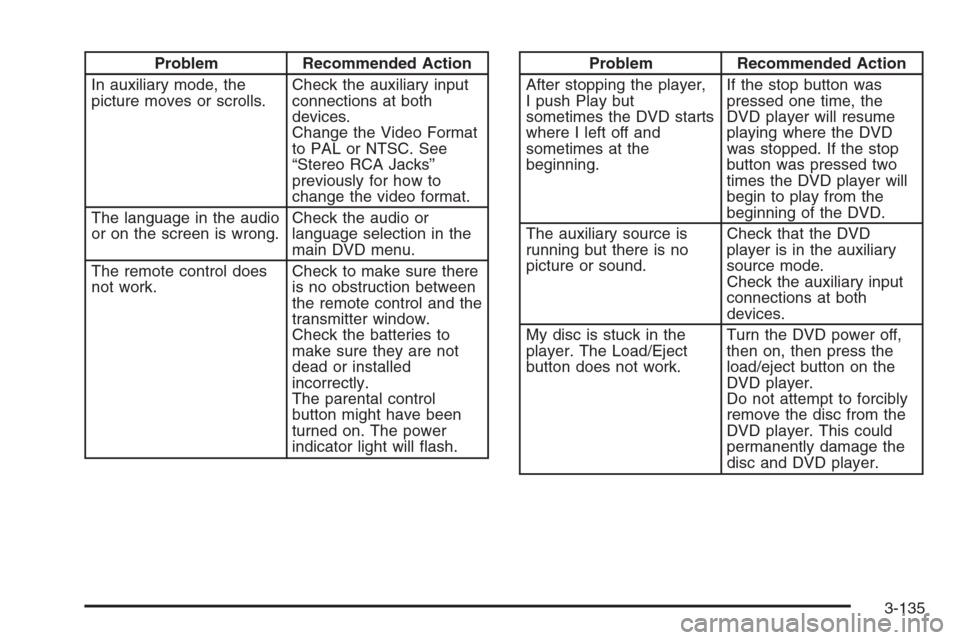
Problem Recommended Action
In auxiliary mode, the
picture moves or scrolls.Check the auxiliary input
connections at both
devices.
Change the Video Format
to PAL or NTSC. See
“Stereo RCA Jacks”
previously for how to
change the video format.
The language in the audio
or on the screen is wrong.Check the audio or
language selection in the
main DVD menu.
The remote control does
not work.Check to make sure there
is no obstruction between
the remote control and the
transmitter window.
Check the batteries to
make sure they are not
dead or installed
incorrectly.
The parental control
button might have been
turned on. The power
indicator light will �ash.Problem Recommended Action
After stopping the player,
I push Play but
sometimes the DVD starts
where I left off and
sometimes at the
beginning.If the stop button was
pressed one time, the
DVD player will resume
playing where the DVD
was stopped. If the stop
button was pressed two
times the DVD player will
begin to play from the
beginning of the DVD.
The auxiliary source is
running but there is no
picture or sound.Check that the DVD
player is in the auxiliary
source mode.
Check the auxiliary input
connections at both
devices.
My disc is stuck in the
player. The Load/Eject
button does not work.Turn the DVD power off,
then on, then press the
load/eject button on the
DVD player.
Do not attempt to forcibly
remove the disc from the
DVD player. This could
permanently damage the
disc and DVD player.
3-135
Page 280 of 534
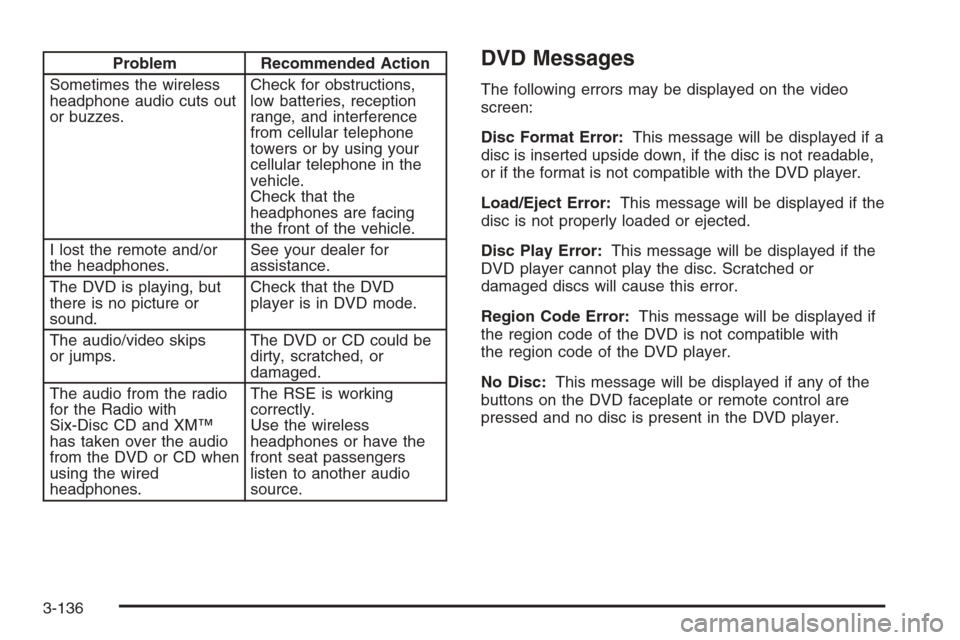
Problem Recommended Action
Sometimes the wireless
headphone audio cuts out
or buzzes.Check for obstructions,
low batteries, reception
range, and interference
from cellular telephone
towers or by using your
cellular telephone in the
vehicle.
Check that the
headphones are facing
the front of the vehicle.
I lost the remote and/or
the headphones.See your dealer for
assistance.
The DVD is playing, but
there is no picture or
sound.Check that the DVD
player is in DVD mode.
The audio/video skips
or jumps.The DVD or CD could be
dirty, scratched, or
damaged.
The audio from the radio
for the Radio with
Six-Disc CD and XM™
has taken over the audio
from the DVD or CD when
using the wired
headphones.The RSE is working
correctly.
Use the wireless
headphones or have the
front seat passengers
listen to another audio
source.DVD Messages
The following errors may be displayed on the video
screen:
Disc Format Error:This message will be displayed if a
disc is inserted upside down, if the disc is not readable,
or if the format is not compatible with the DVD player.
Load/Eject Error:This message will be displayed if the
disc is not properly loaded or ejected.
Disc Play Error:This message will be displayed if the
DVD player cannot play the disc. Scratched or
damaged discs will cause this error.
Region Code Error:This message will be displayed if
the region code of the DVD is not compatible with
the region code of the DVD player.
No Disc:This message will be displayed if any of the
buttons on the DVD faceplate or remote control are
pressed and no disc is present in the DVD player.
3-136
Page 299 of 534
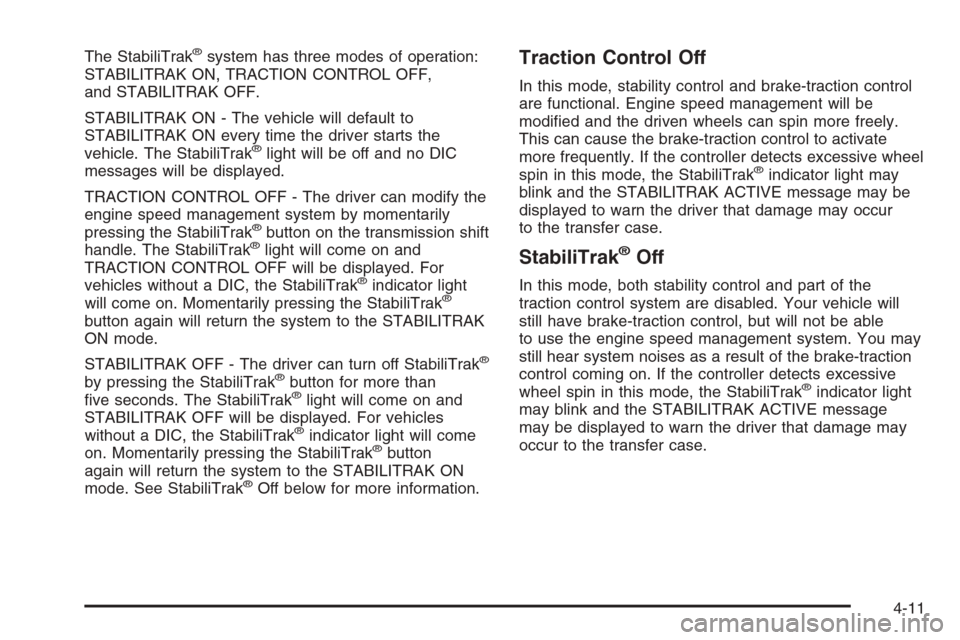
The StabiliTrak®system has three modes of operation:
STABILITRAK ON, TRACTION CONTROL OFF,
and STABILITRAK OFF.
STABILITRAK ON - The vehicle will default to
STABILITRAK ON every time the driver starts the
vehicle. The StabiliTrak
®light will be off and no DIC
messages will be displayed.
TRACTION CONTROL OFF - The driver can modify the
engine speed management system by momentarily
pressing the StabiliTrak
®button on the transmission shift
handle. The StabiliTrak®light will come on and
TRACTION CONTROL OFF will be displayed. For
vehicles without a DIC, the StabiliTrak
®indicator light
will come on. Momentarily pressing the StabiliTrak®
button again will return the system to the STABILITRAK
ON mode.
STABILITRAK OFF - The driver can turn off StabiliTrak
®
by pressing the StabiliTrak®button for more than
�ve seconds. The StabiliTrak®light will come on and
STABILITRAK OFF will be displayed. For vehicles
without a DIC, the StabiliTrak
®indicator light will come
on. Momentarily pressing the StabiliTrak®button
again will return the system to the STABILITRAK ON
mode. See StabiliTrak
®Off below for more information.
Traction Control Off
In this mode, stability control and brake-traction control
are functional. Engine speed management will be
modi�ed and the driven wheels can spin more freely.
This can cause the brake-traction control to activate
more frequently. If the controller detects excessive wheel
spin in this mode, the StabiliTrak
®indicator light may
blink and the STABILITRAK ACTIVE message may be
displayed to warn the driver that damage may occur
to the transfer case.
StabiliTrak®Off
In this mode, both stability control and part of the
traction control system are disabled. Your vehicle will
still have brake-traction control, but will not be able
to use the engine speed management system. You may
still hear system noises as a result of the brake-traction
control coming on. If the controller detects excessive
wheel spin in this mode, the StabiliTrak
®indicator light
may blink and the STABILITRAK ACTIVE message
may be displayed to warn the driver that damage may
occur to the transfer case.
4-11
Page 300 of 534
It is recommended to leave the system on for normal
driving conditions, but it may be necessary to turn
the system off if your vehicle is stuck in sand, mud, ice
or snow, and you may want to “rock” your vehicle in
an attempt to free it. It may also be necessary to turn off
the system when driving in extreme off-road conditions
where high wheel spin is required. SeeIf Your
Vehicle is Stuck in Sand, Mud, Ice, or Snow on
page 4-46for more information.For vehicles with four-wheel drive, when the transfer
case is in 4LO, the stability system is automatically
disabled. The StabiliTrak
®light will come on and the
STABILITRAK OFF message will appear on the
DIC. The StabiliTrak
®system cannot be turned on until
the vehicle is switched to 2HI, 4HI, or 4AWD.
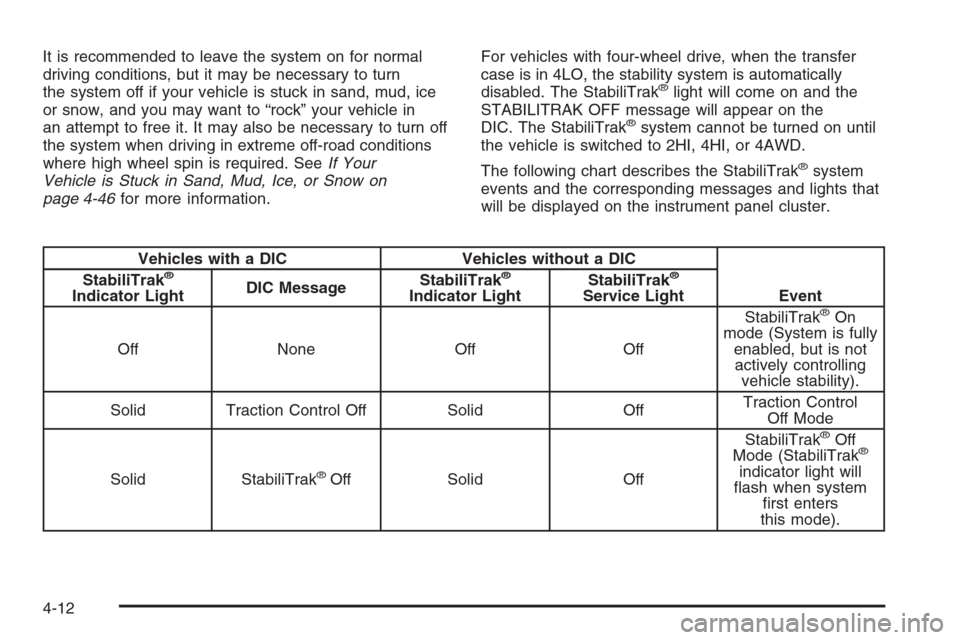
The following chart describes the StabiliTrak
®system
events and the corresponding messages and lights that
will be displayed on the instrument panel cluster.
Vehicles with a DIC Vehicles without a DIC
Event StabiliTrak®
Indicator LightDIC MessageStabiliTrak
®
Indicator LightStabiliTrak
®
Service Light
Off None Off OffStabiliTrak®On
mode (System is fully
enabled, but is not
actively controlling
vehicle stability).
Solid Traction Control Off Solid OffTraction Control
Off Mode
Solid StabiliTrak
®Off Solid OffStabiliTrak
®Off
Mode (StabiliTrak®
indicator light will
�ash when system
�rst enters
this mode).
4-12
Page 347 of 534
Overload Protection
The air suspension system is equipped with overload
protection. Overload protection is designed to protect the
air suspension system, and it is an indicator to the
driver that the vehicle is overloaded. When the overload
protection mode is on, it will not allow damage to the
air compressor. However, do not overload the vehicle.
SeeLoading Your Vehicle on page 4-48.
If the suspension remains at a low height, the rear axle
load has exceeded GAWR (Gross Axle Weight
Rating). When the overload protection mode is activated,
the compressor operates for about 30 seconds to
one minute without raising the vehicle depending on the
amount of overload. This will continue each time the
ignition is turned on until the rear axle load is reduced
below GAWR.
Indicator Light
The indicator light on the in�ator switch in the rear
passenger compartment also serves as an indicator for
internal system error. If the indicator light is �ashing
without the load leveling function or the in�ator being
active, turn off the ignition. The next day turn on
the ignition and check the indicator light. The vehicle
can be driven with the light �ashing, but if it is you
should have the vehicle serviced as soon as possible.
Towing a Trailer
{CAUTION:
If you do not use the correct equipment and
drive properly, you can lose control when you
pull a trailer. For example, if the trailer is too
heavy, the brakes may not work well — or even
at all. You and your passengers could be
seriously injured. You may also damage your
vehicle; the resulting repairs would not be
covered by your warranty. Pull a trailer only if
you have followed all the steps in this section.
Ask your dealer for advice and information
about towing a trailer with your vehicle.
Notice:Pulling a trailer improperly can damage
your vehicle and result in costly repairs that would
not be covered by your warranty. Always follow
the instructions in this section and check with your
dealer for more information about towing a trailer
with your vehicle.
To identify the trailering capacity of your vehicle, you
should read the information in “Weight of the Trailer” that
appears later in this section.
4-59
Page 423 of 534
Load Index:An assigned number ranging from
1 to 279 that corresponds to the load carrying capacity
of a tire.
Maximum In�ation Pressure:The maximum air
pressure to which a cold tire may be in�ated. The
maximum air pressure is molded onto the sidewall.
Maximum Load Rating:The load rating for a tire at the
maximum permissible in�ation pressure for that tire.
Maximum Loaded Vehicle Weight:The sum of curb
weight, accessory weight, vehicle capacity weight,
and production options weight.
Normal Occupant Weight:The number of occupants a
vehicle is designed to seat multiplied by 150 lbs (68 kg).
SeeLoading Your Vehicle on page 4-48.
Occupant Distribution:Designated seating positions.
Outward Facing Sidewall:The side of an
asymmetrical tire that has a particular side that faces
outward when mounted on a vehicle. The side of the tire
that contains a whitewall, bears white lettering, or
bears manufacturer, brand, and/or model name molding
that is higher or deeper than the same moldings on
the other sidewall of the tire.Passenger (P-Metric) Tire:A tire used on passenger
cars and some light duty trucks and multipurpose
vehicles.
Recommended In�ation Pressure:Vehicle
manufacturer’s recommended tire in�ation pressure as
shown on the tire placard. SeeIn�ation - Tire
Pressure on page 5-64andLoading Your Vehicle on
page 4-48.
Radial Ply Tire:A pneumatic tire in which the ply cords
that extend to the beads are laid at 90 degrees to the
centerline of the tread.
Rim:A metal support for a tire and upon which the tire
beads are seated.
Sidewall:The portion of a tire between the tread and
the bead.
Speed Rating:An alphanumeric code assigned to a
tire indicating the maximum speed at which a tire
can operate.
Traction:The friction between the tire and the road
surface. The amount of grip provided.
Tread:The portion of a tire that comes into contact
with the road.
5-63
Page 511 of 534
Additional Program Information
Courtesy Transportation is available during the
Bumper-to-Bumper warranty coverage period, but it is
not part of the New Vehicle Limited Warranty. A separate
booklet entitledWarranty and Owner Assistance
Informationfurnished with each new vehicle provides
detailed warranty coverage information.
Courtesy Transportation is available only at participating
dealers and all program options, such as shuttle service,
may not be available at every dealer. Please contact
your dealer for speci�c information about availability.
All Courtesy Transportation arrangements will be
administered by appropriate dealer personnel.
Canadian Vehicles:For warranty repairs during the
Complete Vehicle Coverage period of the General
Motors of Canada New Vehicle Limited Warranty,
alternative transportation may be available under the
Courtesy Transportation Program. Please consult
your dealer for details.
General Motors reserves the right to unilaterally modify,
change or discontinue Courtesy Transportation at any
time and to resolve all questions of claim eligibility
pursuant to the terms and conditions described
herein at its sole discretion.
Vehicle Data Collection and Event
Data Recorders
Your vehicle, like other modern motor vehicles, has a
number of sophisticated computer systems that monitor
and control several aspects of the vehicle’s performance.
Your vehicle uses on-board vehicle computers to monitor
emission control components to optimize fuel economy,
to monitor conditions for airbag deployment and, if so
equipped, to provide anti-lock braking and to help the
driver control the vehicle in difficult driving situations.
Some information may be stored during regular
operations to facilitate repair of detected malfunctions;
other information is stored only in a crash event by
computer systems, such as those commonly called
event data recorders (EDR).
In a crash event, computer systems, such as the Airbag
Sensing and Diagnostic Module (SDM) in your vehicle
may record information about the condition of the vehicle
and how it was operated, such as data related to engine
speed, brake application, throttle position, vehicle speed,
safety belt usage, airbag readiness, airbag performance,
and the severity of a collision. If your vehicle is equipped
with StabiliTrak
®, steering performance, including yaw
rate, steering wheel angle, and lateral acceleration, is
also recorded. This information has been used to improve
vehicle crash performance and may be used to improve
crash performance of future vehicles and driving safety.
7-9