2006 CHEVROLET SILVERADO ignition
[x] Cancel search: ignitionPage 231 of 594
The following are the possible messages that can be
displayed and some information about them.
BATTERY NOT CHARGING
On some vehicles, if the battery is not charging during
operation, this message will appear on the DIC.
Driving with this problem could drain your battery.
Have the electrical system checked by your GM dealer
as soon as possible. Pressing any of the four DIC
buttons will acknowledge the message and clear it from
the DIC display. If your vehicle does not have the
four DIC buttons, pressing the trip odometer reset stem
will acknowledge the message and clear it from the
DIC display. SeeBattery Warning Light on page 3-39
andVoltmeter Gage on page 3-39.
BUCKLE PASSENGER
If your vehicle has the passenger sensing system, this
message reminds you to buckle the passenger’s
seat belt. SeePassenger Sensing System on page 1-80.
This message will display and a chime will sound when
the ignition is on, the driver’s seat belt is buckled, the
passenger’s seat belt is unbuckled with the passenger
airbag enabled, and the vehicle is in motion. You should
have the passenger buckle their seat belt.This reminder will be repeated if the ignition is on, the
vehicle is in motion, the driver is buckled and the
passenger is still unbuckled, and the passenger airbag
is enabled. If the passenger’s seat belt is already
buckled, this message and chime will not come on.
Pressing any of the four DIC buttons will acknowledge
the message and clear it from the DIC display. If
your vehicle does not have the four DIC buttons,
pressing the trip odometer reset stem will acknowledge
the message and clear it from the DIC display.
BUCKLE SEATBELT
If your vehicle has the passenger sensing system, this
message reminds you to buckle the driver’s seat
belt. SeePassenger Sensing System on page 1-80.
This message will display and a chime will sound when
the ignition is on, the driver’s seat belt is unbuckled,
and the vehicle is in motion. You should buckle
your seat belt.
If the driver remains unbuckled when the ignition is
on and the vehicle is in motion, the reminder will
be repeated. If the driver’s seat belt is already buckled,
this message and chime will not come on.
3-55
Page 232 of 594

This message is an additional reminder to the Safety
Belt Reminder Light in the instrument panel cluster.
SeeSafety Belt Reminder Light on page 3-33for more
information.
Pressing any of the four DIC buttons will acknowledge
the message and clear it from the DIC display.
If your vehicle does not have the four DIC buttons,
pressing the trip odometer reset stem will acknowledge
the message and clear it from the DIC display.
CHANGE ENGINE OIL
This message is displayed when the engine oil needs to
be changed.
When you change the engine oil, be sure to reset the
CHANGE ENGINE OIL message. SeeEngine Oil
Life System (Gasoline Engine) on page 5-23,Engine
Oil (Gasoline Engine) on page 5-20, andScheduled
Maintenance (Gasoline Engine) on page 6-4for more
information.
CHARGING SYSTEM FAILURE
On some vehicles, if there is a problem with the
generator and battery charging system, this message
will appear on the DIC, a chime will sound, and the
battery warning light on the instrument panel cluster will
come on. Driving with this problem could drain your
battery. Turn off all unnecessary accessories. Stop and
turn off the vehicle as soon as it is safe to do so.
Have the electrical system checked by your GM dealer
immediately. SeeBattery Warning Light on page 3-39
andVoltmeter Gage on page 3-39for more information.
CHECK OIL LEVEL
If your vehicle has an oil level sensor, and the oil level
in the vehicle is low, this message will appear on
the DIC. Check the oil level and correct it as necessary.
You may need to let the vehicle cool or warm up and
cycle the ignition to be sure this message will clear.
Once the problem is corrected, pressing any of the
four DIC buttons will acknowledge the message
and clear it from the DIC display. If your vehicle does
not have the four DIC buttons, pressing the trip
odometer reset stem will acknowledge the message and
clear it from the DIC display. SeeEngine Oil (Gasoline
Engine) on page 5-20for additional information.
3-56
Page 240 of 594
TURN SIGNAL ON
If a turn signal is left on for 3/4 of a mile (1.2 km), this
message will appear on the display and you will hear a
chime. Move the turn signal/multifunction lever to the
off position. Pressing any of the four DIC buttons
will acknowledge the message and clear it from the
DIC display. If your vehicle does not have the four DIC
buttons, pressing the trip odometer reset stem will
acknowledge the message and clear it from the DIC
display.
DIC Vehicle Customization
Your vehicle may have customization capabilities that
allow you to program some features to one setting
based on your preference. All of the customizable
options listed may not be available on your vehicle.
Only the options available will be displayed on
your Driver Information Center (DIC).
The default settings for the customization features were
set when your vehicle left the factory, but may have
been changed from their default state since then.To change feature preferences, make sure the ignition
is on and the vehicle is in PARK (P). Press the
customization button to scroll through the available
customizable options.
After pressing the customization button, VEHICLE
SETTINGS will momentarily display before going to a
customization option.
Lock Doors (Automatic Transmission only)
If you have an automatic transmission vehicle, press
the customization button until LOCK DOORS appears in
the display. To select your preference for automatic
locking, press the select button while LOCK DOORS is
displayed on the DIC. Pressing the select button will
scroll through the following choices:
LOCK DOORS: IN GEAR (default):The doors will lock
when the vehicle is shifted out of PARK (P).
LOCK DOORS: WITH SPEED:The doors will lock
when the vehicle speed is above 8 mph (13 km/h) for
three seconds.
Choose one of the available options and press the
customization button while it is displayed on the DIC to
select it and move on to the next feature. For more
information on automatic door locks, seeProgrammable
Automatic Door Locks on page 2-10.
3-64
Page 241 of 594
Unlock Doors (Automatic
Transmission only)
If you have an automatic transmission vehicle, press the
customization button until UNLOCK DOORS appears
in the display. To select your preference for automatic
unlocking, press the select button while UNLOCK
DOORS is displayed on the DIC. Pressing the select
button will scroll through the following choices:
UNLOCK DOORS: IN PARK (default):All of the doors
will unlock when the vehicle is shifted into PARK (P).
UNLOCK DRIVER: IN PARK:The driver’s door will be
unlocked when the vehicle is shifted into PARK (P).
UNLOCK DOORS: KEY OUT:All of the doors
will unlock when the key is taken out of the ignition.
UNLOCK DOORS: MANUALLY:The doors will not be
unlocked automatically.
Choose one of the available options and press the
customization button while it is displayed on the DIC to
select it and move on to the next feature. For more
information on automatic door locks, seeProgrammable
Automatic Door Locks on page 2-10.
Door Lock Delay (Crew Cab only)
If your DIC does not have this feature, you still may be
able to program the delayed locking feature. See
Delayed Locking on page 2-9for more information.
When locking the doors with the power lock switch or
the keyless entry transmitter and a door is open,
the delayed locking feature will delay locking the doors
until �ve seconds after the last door is closed.
Press the customization button until DOOR LOCK
DELAY appears in the display. To select your
preference for delayed locking, press the select button
while DOOR LOCK DELAY is displayed on the DIC.
Pressing the select button will scroll through the
following choices:
DOOR LOCK DELAY: OFF (default):The doors will
lock immediately when pressing the power lock switch or
the lock button on the keyless entry transmitter.
DOOR LOCK DELAY: ON:The doors will not lock until
�ve seconds after the last door is closed. You will
hear three chimes to signal that the delayed locking
feature is in use. You can temporarily override delayed
locking by pressing the lock button on the door or
keyless entry transmitter a second time.
Choose one of the available options and press the
customization button while it is displayed on the DIC to
select it and move on to the next feature.
This feature will not operate if the key is in the ignition.
3-65
Page 244 of 594
EASY EXIT SEAT: ON:The driver’s seat will move to
the exit position when the key is removed from the
ignition.
Choose one of the available options and press the
customization button while it is displayed on the DIC to
select it and move on to the next feature. For more
information on seat position exit, seeMemory Seat on
page 2-79.
Curb View
Press the customization button until CURB VIEW
appears in the display. To select your preference for
curb view, press the select button while CURB VIEW is
displayed on the DIC. Pressing the select button will
scroll through the following choices:
CURB VIEW: OFF (default):Neither outside mirror will
be tilted down when the vehicle is shifted into
REVERSE (R).
CURB VIEW: PASSENGER:The passenger’s outside
mirror will be tilted down when the vehicle is shifted
into REVERSE (R).
CURB VIEW: DRIVER:The driver’s outside mirror will
be tilted down when the vehicle is shifted into
REVERSE (R).
CURB VIEW: BOTH:The driver’s and passenger’s
outside mirror will be tilted down when the vehicle
is shifted into REVERSE (R).Choose one of the available options and press the
customization button while it is displayed on the DIC to
select it and move on to the next feature. For more
information on tilt mirror in reverse, seeOutside Curb
View Assist Mirrors on page 2-68.
Alarm Warning
Press the customization button until ALARM WARNING
appears in the display. To select your preference for
alarm warning, press the select button while ALARM
WARNING is displayed on the DIC. Pressing the select
button will scroll through the following choices:
ALARM WARNING: BOTH (default):The headlamps
will �ash and the horn will chirp when the alarm is
active.
ALARM WARNING: OFF:There will be no alarm
warning on activation.
ALARM WARNING: HORN:The horn will chirp when
the alarm is active.
ALARM WARNING: LAMPS:The headlamps will �ash
when the alarm is active.
Choose one of the available options and press the
customization button while your choice is displayed on
the DIC to select it and move on to the next feature.
For more information on alarm warning type, see
Content Theft-Deterrent on page 2-18.
3-68
Page 247 of 594

Notice:The chime signals related to safety belts,
parking brake, and other functions of your vehicle
operate through the radio/entertainment system.
If that equipment is replaced or additional equipment
is added to your vehicle, the chimes may not
work. Make sure that replacement or additional
equipment is compatible with your vehicle before
installing it. SeeAccessories and Modifications
on page 5-4.
Your vehicle may have a feature called Retained
Accessory Power (RAP). With RAP, the audio system
can be played even after the ignition is turned off.
SeeRetained Accessory Power (RAP) on page 2-22for
more information.
Setting the Time for Radios without
Radio Data Systems (RDS)
Press and hold HR until the correct hour appears on the
display. Press and hold MIN until the correct minute
appears on the display. There is an initial two-second
delay before the clock goes into time-set mode.
Display the time with the ignition off, by pressing RCL,
HR, or MIN.
Setting the Time for Radios with
Radio Data Systems (RDS)
The radio may have a button marked with an H or HR
to represent hours and an M or MN to represent
minutes.
Press and hold the hour button until the correct hour
appears on the display. Press and hold the minute
button until the correct minute appears on the display.
The time can be set with the ignition on or off.
To synchronize the time with an FM station broadcasting
Radio Data System (RDS) information, press and
hold the hour and minute buttons at the same time until
RDS TIME appears on the display. To accept this
time, press and hold the hour and minute buttons, at the
same time, for another two seconds. If the time is not
available from the station, NO UPDAT will appear on the
display.
RDS time is broadcast once a minute. After tuning to an
RDS broadcast station, it may take a few minutes for
the time to update.
3-71
Page 248 of 594
AM-FM Radio
Playing the Radio
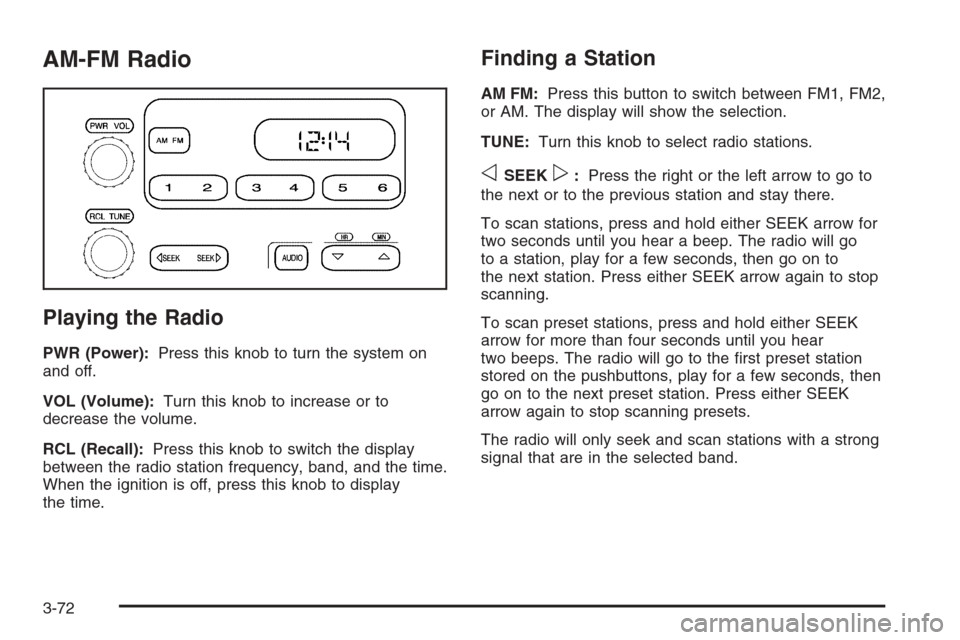
PWR (Power):Press this knob to turn the system on
and off.
VOL (Volume):Turn this knob to increase or to
decrease the volume.
RCL (Recall):Press this knob to switch the display
between the radio station frequency, band, and the time.
When the ignition is off, press this knob to display
the time.
Finding a Station
AM FM:Press this button to switch between FM1, FM2,
or AM. The display will show the selection.
TUNE:Turn this knob to select radio stations.
oSEEKp:Press the right or the left arrow to go to
the next or to the previous station and stay there.
To scan stations, press and hold either SEEK arrow for
two seconds until you hear a beep. The radio will go
to a station, play for a few seconds, then go on to
the next station. Press either SEEK arrow again to stop
scanning.
To scan preset stations, press and hold either SEEK
arrow for more than four seconds until you hear
two beeps. The radio will go to the �rst preset station
stored on the pushbuttons, play for a few seconds, then
go on to the next preset station. Press either SEEK
arrow again to stop scanning presets.
The radio will only seek and scan stations with a strong
signal that are in the selected band.
3-72
Page 251 of 594
Radio Data System (RDS)
The audio system has a Radio Data System (RDS).
RDS features are available for use only on FM stations
that broadcast RDS information.
With RDS, the radio can do the following:
Seek to stations broadcasting the selected type of
programming
Receive announcements concerning local and
national emergencies
Display messages from radio stations
This system relies upon receiving speci�c information
from these stations and will only work when the
information is available. In rare cases, a radio station
may broadcast incorrect information that will cause
the radio features to work improperly. If this happens,
contact the radio station.
While the radio is tuned to an RDS station, the station
name or call letters will appear on the display instead of
the frequency. RDS stations may also provide the
time of day, a program type (PTY) for current
programming, and the name of the program being
broadcast.
XM™ Satellite Radio Service
XM™ is a satellite radio service that is based in the
48 contiguous United States and in Canada (if available).
XM™ offers over 100 coast-to-coast channels including
music, news, sports, talk, and children’s programming.
XM™ provides digital quality audio and text information
that includes song title and artist name. A service fee is
required in order to receive the XM™ service. For more
information, contact XM™ at www.xmradio.com or call
1-800-852-XMXM (9696).
Playing the Radio
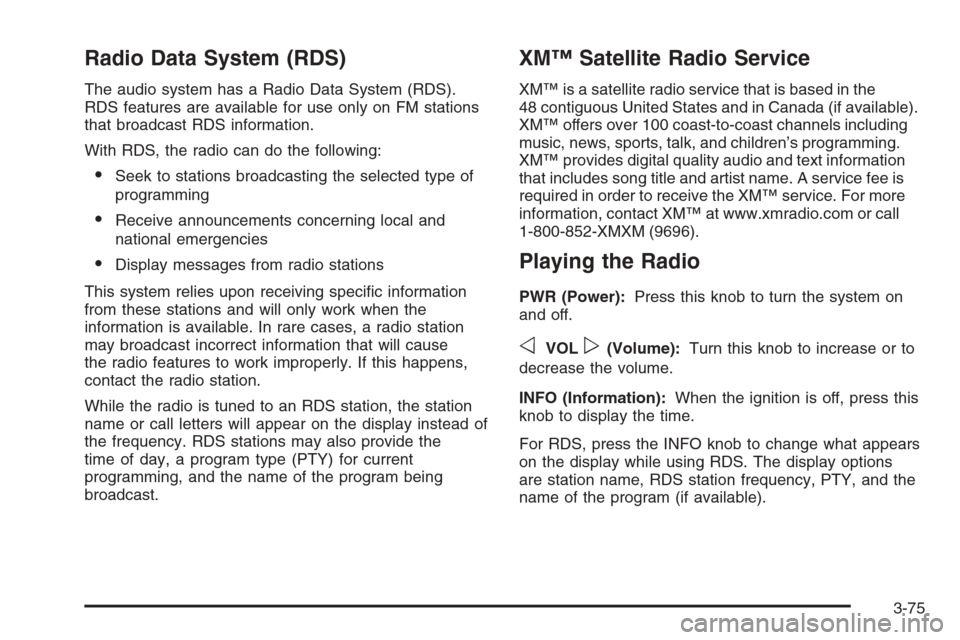
PWR (Power):Press this knob to turn the system on
and off.
oVOLp(Volume):Turn this knob to increase or to
decrease the volume.
INFO (Information):When the ignition is off, press this
knob to display the time.
For RDS, press the INFO knob to change what appears
on the display while using RDS. The display options
are station name, RDS station frequency, PTY, and the
name of the program (if available).
3-75