2006 CHEVROLET EPICA sensor
[x] Cancel search: sensorPage 64 of 368
Passenger Sensing System
Your vehicle has a passenger sensing system for the
right front passenger position. The passenger airbag
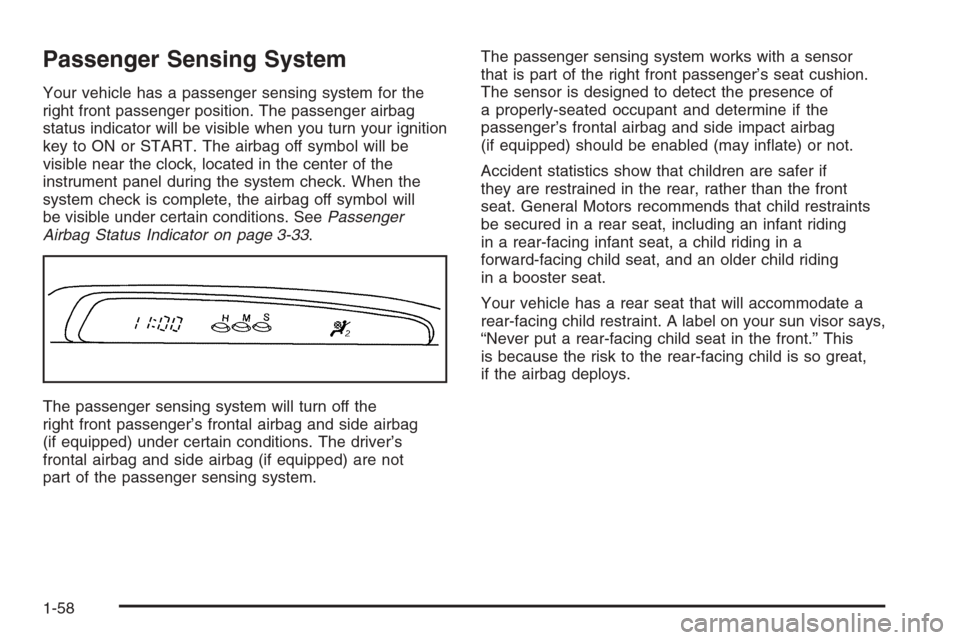
status indicator will be visible when you turn your ignition
key to ON or START. The airbag off symbol will be
visible near the clock, located in the center of the
instrument panel during the system check. When the
system check is complete, the airbag off symbol will
be visible under certain conditions. SeePassenger
Airbag Status Indicator on page 3-33.
The passenger sensing system will turn off the
right front passenger’s frontal airbag and side airbag
(if equipped) under certain conditions. The driver’s
frontal airbag and side airbag (if equipped) are not
part of the passenger sensing system.The passenger sensing system works with a sensor
that is part of the right front passenger’s seat cushion.
The sensor is designed to detect the presence of
a properly-seated occupant and determine if the
passenger’s frontal airbag and side impact airbag
(if equipped) should be enabled (may inflate) or not.
Accident statistics show that children are safer if
they are restrained in the rear, rather than the front
seat. General Motors recommends that child restraints
be secured in a rear seat, including an infant riding
in a rear-facing infant seat, a child riding in a
forward-facing child seat, and an older child riding
in a booster seat.
Your vehicle has a rear seat that will accommodate a
rear-facing child restraint. A label on your sun visor says,
“Never put a rear-facing child seat in the front.” This
is because the risk to the rear-facing child is so great,
if the airbag deploys.
1-58
Page 68 of 368
Servicing Your Airbag-Equipped
Vehicle
Airbags affect how your vehicle should be serviced.
There are parts of the airbag system in several places
around your vehicle. You do not want the system to
inflate while someone is working on your vehicle.
Your dealer and the service manual have information
about servicing your vehicle and the airbag system.
To purchase a service manual, seeService Publications
Ordering Information on page 7-14.
{CAUTION:
For up to 10 seconds after the ignition key is
turned off and the battery is disconnected,
an airbag can still in�ate during improper
service. You can be injured if you are close
to an airbag when it in�ates. Avoid yellow
connectors. They are probably part of the
airbag system. Be sure to follow proper
service procedures, and make sure the person
performing work for you is quali�ed to do so.
The airbag system does not need regular maintenance.
Adding Equipment to Your
Airbag-Equipped Vehicle
Q:Is there anything I might add to the front or
sides of the vehicle that could keep the
airbags from working properly?
A:Yes. If you add things that change your vehicle’s
frame, bumper system, front end or side sheet
metal or height, they may keep the airbag system
from working properly. Also, the airbag system may
not work properly if you relocate any of the airbag
sensors. If you have any questions about this,
you should contact Customer Assistance before
you modify your vehicle. The phone numbers
and addresses for Customer Assistance are in
Step Two of the Customer Satisfaction Procedure
in this manual. SeeCustomer Satisfaction
Procedure on page 7-2.
1-62
Page 102 of 368
At night, when the glare is too high, the mirror will
gradually darken to reduce glare. This change may
take a few seconds. The mirror will return to its clear
daytime state when the glare is reduced.
To activate the automatic dimming feature, press the
button (B) located below the rearview mirror. To turn
the feature off, press the button (B) again.
The ignition must be turned to ON to use the automatic
dimming rearview mirror. The indicator light (C) will
illuminate while this feature is active.
There are two light sensors (A) which detect ambient
light level and glare from vehicles behind you.
Do not cover the sensors as this will cancel the
automatic dimming operation.Outside Power Mirrors
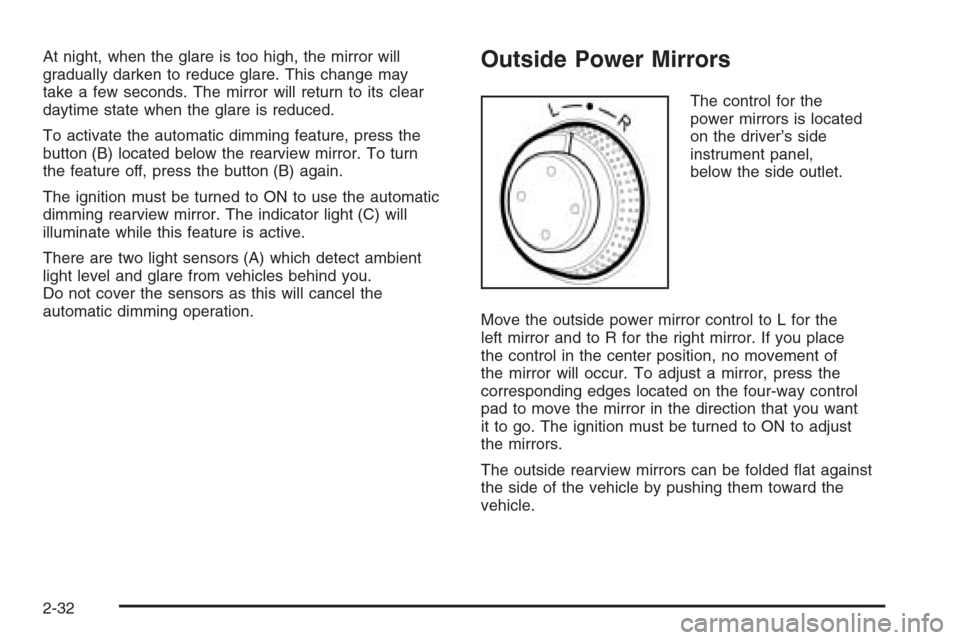
The control for the
power mirrors is located
on the driver’s side
instrument panel,
below the side outlet.
Move the outside power mirror control to L for the
left mirror and to R for the right mirror. If you place
the control in the center position, no movement of
the mirror will occur. To adjust a mirror, press the
corresponding edges located on the four-way control
pad to move the mirror in the direction that you want
it to go. The ignition must be turned to ON to adjust
the mirrors.
The outside rearview mirrors can be folded flat against
the side of the vehicle by pushing them toward the
vehicle.
2-32
Page 129 of 368
Do not cover the solar sensor located in the center of
the instrument panel, near the windshield. For more
information on the solar sensor, see “Sensors” later
in this section.
Manual Operation
w9x
(Fan):Press the up arrow to increase the fan
speed and the down arrow to decrease the fan speed.
AUTO mode is cancelled when this button is pressed.
MODE:Press this button repeatedly to cycle through
and choose the mode of air delivery into the vehicle. The
system will stay in the selected mode until MODE is
pressed again or until the AUTO button is pressed.
Whenever MODE is pressed, the display will show
the current system settings for five seconds before
returning the display to the exterior temperature.
E(Vent):This mode directs air to the instrument
panel outlets.
((Bi-level):This mode directs about half of the air
to the instrument panel outlets, and then directs
the remaining air to the floor outlets.
5(Floor):This mode directs most of the air to the
floor outlets. If your vehicle has rear outlets, some of the
air will also be directed to them. Be sure to keep the
area under the front seats clear to allow the flow of air
to the rear compartment.The mode button can also be used to select the defog
mode. Information on defogging and defrosting can
be found later in this section.
?(Recirculation):Press this button to keep outside
air from coming in the vehicle. It can be used to
prevent outside air and odors from entering your vehicle
or to help heat or cool the air inside your vehicle
more quickly. Press this button to turn the recirculation
mode on or off.
Using the recirculation mode for extended periods may
cause your windows to fog. If this happens, select
the defrost mode.
A/C (Air Conditioning):Press this button to override
the automatic system and turn the air conditioning
system on or off. When A/C is pressed, the indicator
light on the display panel will come on to let you know
that it is activated.
Press this button again to turn the air conditioning
system off, or press the OFF button to turn the entire
system off.
On hot days, open the windows to let hot inside air
escape; then close them. This helps to reduce the
time it takes for your vehicle to cool down. It also
helps the system to operate more efficiently.
3-23
Page 130 of 368
For quick cool down on hot days, press the AUTO
button and the system will automatically enter
recirculation mode and the temperature will be at
the full cold position for maximum cooling.
Using these settings together for long periods of time
may cause the air inside of your vehicle to become too
dry. To prevent this from happening, after the air in
your vehicle has cooled, turn the recirculation mode off.
The air conditioning system removes moisture from
the air, so you may sometimes notice a small amount
of water dripping underneath your vehicle while idling
or after turning off the engine. This is normal.
Outside Temperature:To display the outside
temperature, press the temperature control knob.
Pressing this knob again will cancel the outside
temperature display, otherwise the display will return
to the temperature inside of the vehicle after about
five seconds.
The outside temperature sensor is located near the
front bumper, so the displayed temperature may
be affected by road or engine heat while the vehicle is
idling or traveling at slow speeds. For this reason,
the displayed temperature will be most accurate at
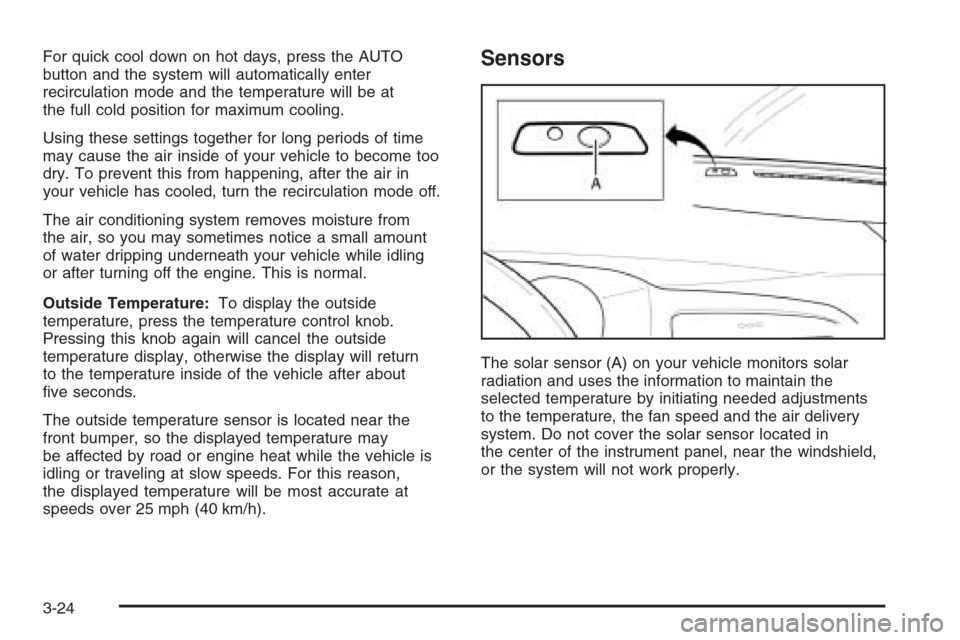
speeds over 25 mph (40 km/h).Sensors
The solar sensor (A) on your vehicle monitors solar
radiation and uses the information to maintain the
selected temperature by initiating needed adjustments
to the temperature, the fan speed and the air delivery
system. Do not cover the solar sensor located in
the center of the instrument panel, near the windshield,
or the system will not work properly.
3-24
Page 131 of 368
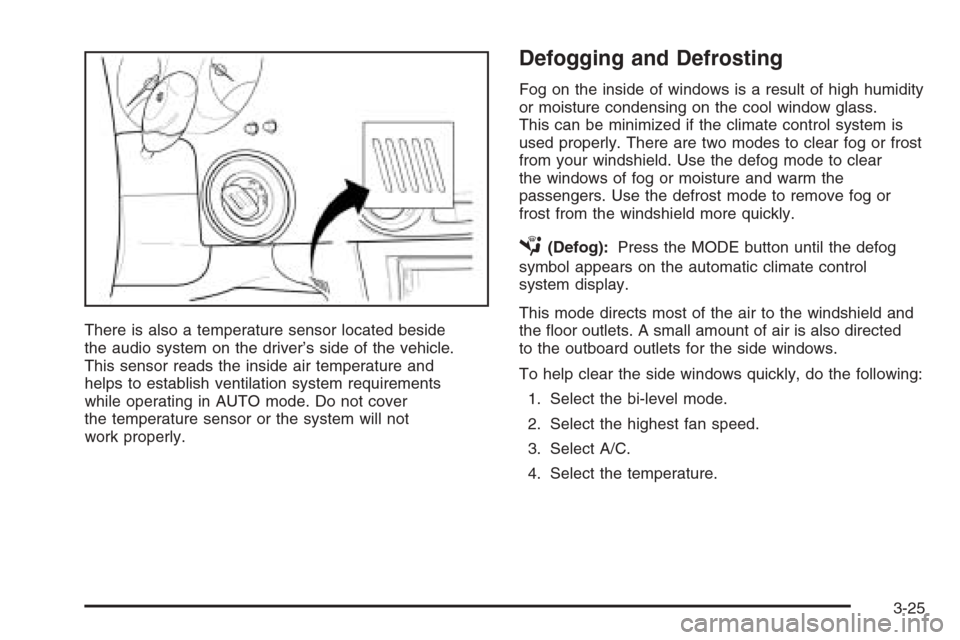
There is also a temperature sensor located beside
the audio system on the driver’s side of the vehicle.
This sensor reads the inside air temperature and
helps to establish ventilation system requirements
while operating in AUTO mode. Do not cover
the temperature sensor or the system will not
work properly.
Defogging and Defrosting
Fog on the inside of windows is a result of high humidity
or moisture condensing on the cool window glass.
This can be minimized if the climate control system is
used properly. There are two modes to clear fog or frost
from your windshield. Use the defog mode to clear
the windows of fog or moisture and warm the
passengers. Use the defrost mode to remove fog or
frost from the windshield more quickly.
É(Defog):Press the MODE button until the defog
symbol appears on the automatic climate control
system display.
This mode directs most of the air to the windshield and
the floor outlets. A small amount of air is also directed
to the outboard outlets for the side windows.
To help clear the side windows quickly, do the following:
1. Select the bi-level mode.
2. Select the highest fan speed.
3. Select A/C.
4. Select the temperature.
3-25
Page 138 of 368
Safety Belt Reminder Light
The safety belt light
will come on and stay
on until the driver’s
safety belt is buckled.
If the driver’s belt is already buckled, the light will
not come on.
Safety Belt Reminder Tone
If your vehicle has this feature, a tone will sound
for several seconds when the ignition is turned to
ON to remind people to fasten their safety belts.
The tone will not sound if the driver’s safety belt
is already buckled.
Airbag Readiness Light
There is an airbag readiness light on the instrument
panel, which shows the airbag symbol. The system
checks the airbag’s electrical system for malfunctions.
The light tells you if there is an electrical problem.
The system check includes the airbag sensors, the
airbag modules, the wiring and the diagnostic module.
For more information on the airbag system, see
Airbag System on page 1-50.
This light will come on for
about seven seconds
when you start your
vehicle. Then the light
should go out. This means
the system is ready.
If the airbag readiness light stays on after you star
the vehicle or comes on when you are driving, your
airbag system may not work properly. Have your
vehicle serviced right away.
3-32
Page 305 of 368
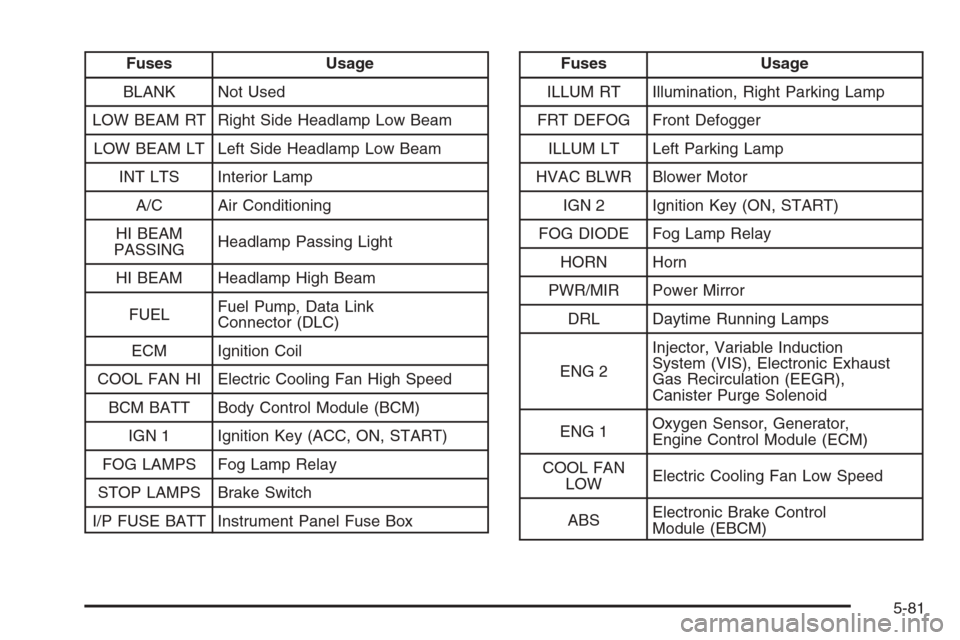
Fuses Usage
BLANK Not Used
LOW BEAM RT Right Side Headlamp Low Beam
LOW BEAM LT Left Side Headlamp Low Beam
INT LTS Interior Lamp
A/C Air Conditioning
HI BEAM
PASSINGHeadlamp Passing Light
HI BEAM Headlamp High Beam
FUELFuel Pump, Data Link
Connector (DLC)
ECM Ignition Coil
COOL FAN HI Electric Cooling Fan High Speed
BCM BATT Body Control Module (BCM)
IGN 1 Ignition Key (ACC, ON, START)
FOG LAMPS Fog Lamp Relay
STOP LAMPS Brake Switch
I/P FUSE BATT Instrument Panel Fuse BoxFuses Usage
ILLUM RT Illumination, Right Parking Lamp
FRT DEFOG Front Defogger
ILLUM LT Left Parking Lamp
HVAC BLWR Blower Motor
IGN 2 Ignition Key (ON, START)
FOG DIODE Fog Lamp Relay
HORN Horn
PWR/MIR Power Mirror
DRL Daytime Running Lamps
ENG 2Injector, Variable Induction
System (VIS), Electronic Exhaust
Gas Recirculation (EEGR),
Canister Purge Solenoid
ENG 1Oxygen Sensor, Generator,
Engine Control Module (ECM)
COOL FAN
LOWElectric Cooling Fan Low Speed
ABSElectronic Brake Control
Module (EBCM)
5-81