Page 287 of 368
Removing the Flat Tire and
Installing the Spare Tire
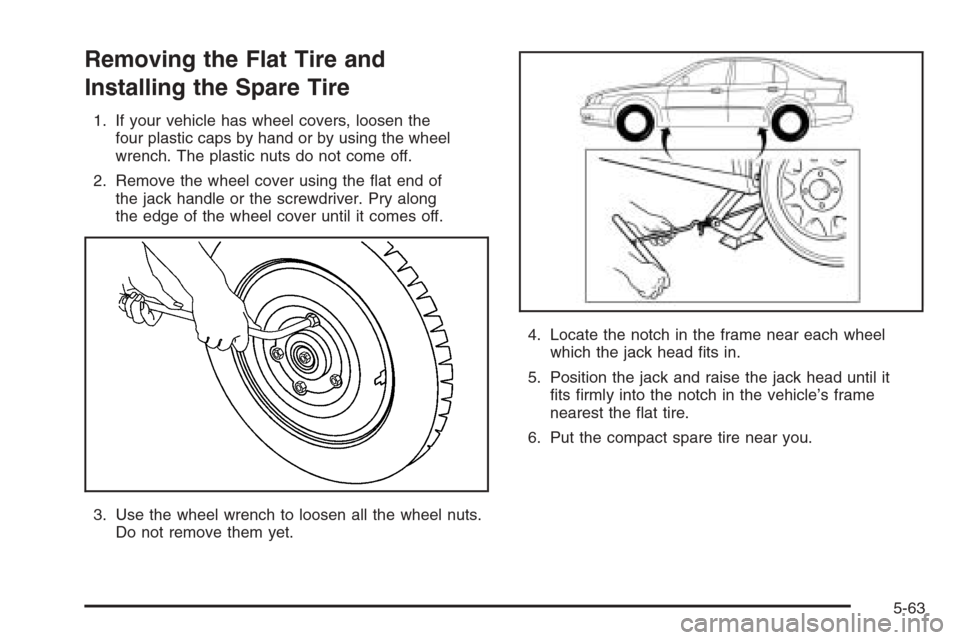
1. If your vehicle has wheel covers, loosen the
four plastic caps by hand or by using the wheel
wrench. The plastic nuts do not come off.
2. Remove the wheel cover using the flat end of
the jack handle or the screwdriver. Pry along
the edge of the wheel cover until it comes off.
3. Use the wheel wrench to loosen all the wheel nuts.
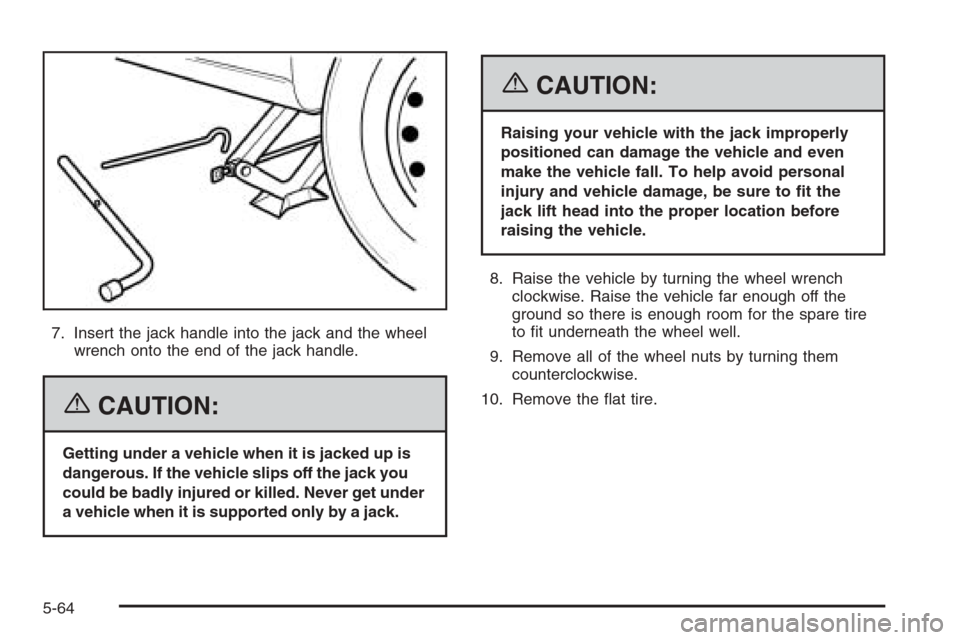
Do not remove them yet.4. Locate the notch in the frame near each wheel
which the jack head fits in.
5. Position the jack and raise the jack head until it
fits firmly into the notch in the vehicle’s frame
nearest the flat tire.
6. Put the compact spare tire near you.
5-63
Page 288 of 368
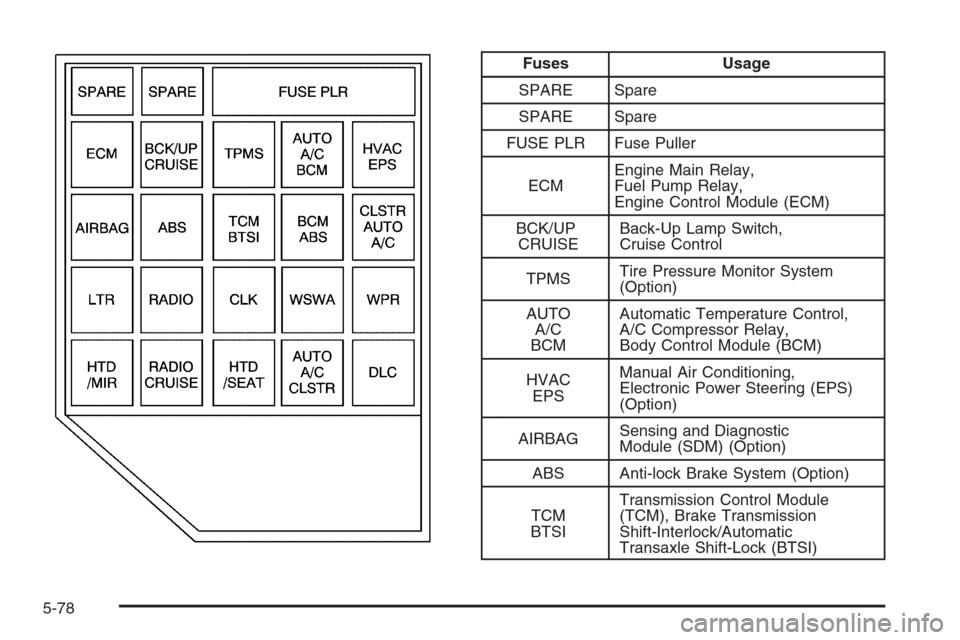
7. Insert the jack handle into the jack and the wheel
wrench onto the end of the jack handle.
{CAUTION:
Getting under a vehicle when it is jacked up is
dangerous. If the vehicle slips off the jack you
could be badly injured or killed. Never get under
a vehicle when it is supported only by a jack.
{CAUTION:
Raising your vehicle with the jack improperly
positioned can damage the vehicle and even
make the vehicle fall. To help avoid personal
injury and vehicle damage, be sure to t the
jack lift head into the proper location before
raising the vehicle.
8. Raise the vehicle by turning the wheel wrench
clockwise. Raise the vehicle far enough off the
ground so there is enough room for the spare tire
to fit underneath the wheel well.
9. Remove all of the wheel nuts by turning them
counterclockwise.
10. Remove the flat tire.
5-64
Page 289 of 368
{CAUTION:
Rust or dirt on the wheel, or on the parts to
which it is fastened, can make the wheel nuts
become loose after a time. The wheel could
come off and cause an accident. When you
change a wheel, remove any rust or dirt from
the places where the wheel attaches to the
vehicle. In an emergency, you can use a cloth
or a paper towel to do this; but be sure to use
a scraper or wire brush later, if needed, to get
all the rust or dirt off.
11. Remove any rust or dirt
from the wheel bolts,
mounting surfaces
and spare wheel.12. Place the compact spare tire on the wheel-mounting
surface.{CAUTION:
Never use oil or grease on studs or nuts. If you
do, the nuts might come loose. Your wheel
could fall off, causing a serious accident.
13. Install the wheel nuts with the rounded end of the
nuts toward the wheel. Tighten each nut by hand
clockwise until the wheel is held against the hub.
14. Lower the vehicle by turning the wheel wrench
counterclockwise. Lower the jack completely.
5-65
Page 290 of 368
{CAUTION:
Incorrect wheel nuts or improperly tightened
wheel nuts can cause the wheel to come loose
and even come off. This could lead to an
accident. Be sure to use the correct wheel
nuts. If you have to replace them, be sure to
get new GM original equipment wheel nuts.
Stop somewhere as soon as you can and have
the nuts tightened with a torque wrench to the
proper torque specication. SeeCapacities
and Specifications on page 5-83for wheel nut
torque specication.
Notice:Improperly tightened wheel nuts can lead
to brake pulsation and rotor damage. To avoid
expensive brake repairs, evenly tighten the wheel
nuts in the proper sequence and to the proper torque
specication. SeeCapacities and Specifications on
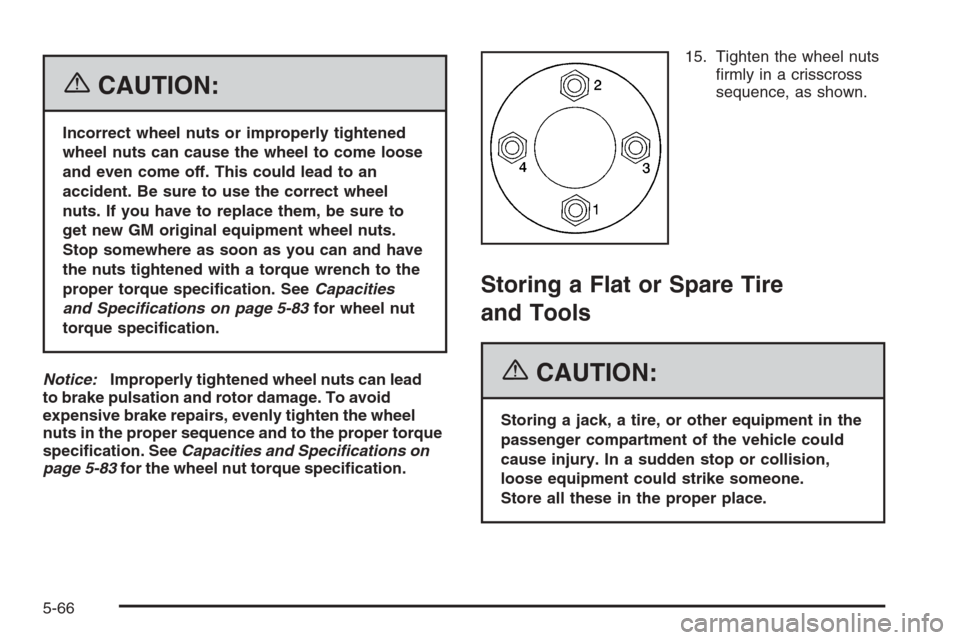
page 5-83for the wheel nut torque specication.15. Tighten the wheel nuts
firmly in a crisscross
sequence, as shown.
Storing a Flat or Spare Tire
and Tools
{CAUTION:
Storing a jack, a tire, or other equipment in the
passenger compartment of the vehicle could
cause injury. In a sudden stop or collision,
loose equipment could strike someone.
Store all these in the proper place.
5-66
Page 291 of 368
To store a flat or compact spare tire and tools,
do the following:
1. Store the flat or compact spare tire in the
spare tire compartment.
2. Place the tire in the compartment, then
secure the retainer.
3. Store the jack in its foam tray in the trunk.
4. Store the tools securely in the trunk.
5. Replace the trim cover.
The compact spare tire is for temporary use only.
Replace the compact spare tire with a full-size tire
as soon as you can. SeeCompact Spare Tire
on page 5-67.
Compact Spare Tire
Although the compact spare tire was fully inflated
when your vehicle was new, it can lose air after
a time. Check the inflation pressure regularly.
It should be 60 psi (420 kPa).
After installing the compact spare on your
vehicle, you should stop as soon as possible and
make sure your spare tire is correctly inflated.The compact spare is made to perform well at speeds
up to 50 mph (80 km/h), so you can finish your trip
and have your full-size tire repaired or replaced where
you want. Of course, it is best to replace your spare with
a full-size tire as soon as you can. Your spare will last
longer and be in good shape in case you need it again.
Notice:When the compact spare is installed,
do not take your vehicle through an automatic car
wash with guide rails. The compact spare can
get caught on the rails. That can damage the tire
and wheel, and maybe other parts of your vehicle.
Do not use your compact spare on other vehicles.
And do not mix your compact spare tire or wheel
with other wheels or tires. They will not fit. Keep your
spare tire and its wheel together.
Notice:Tire chains will not t your compact spare.
Using them can damage your vehicle and can
damage the chains too. Do not use tire chains
on your compact spare.
5-67
Page 302 of 368
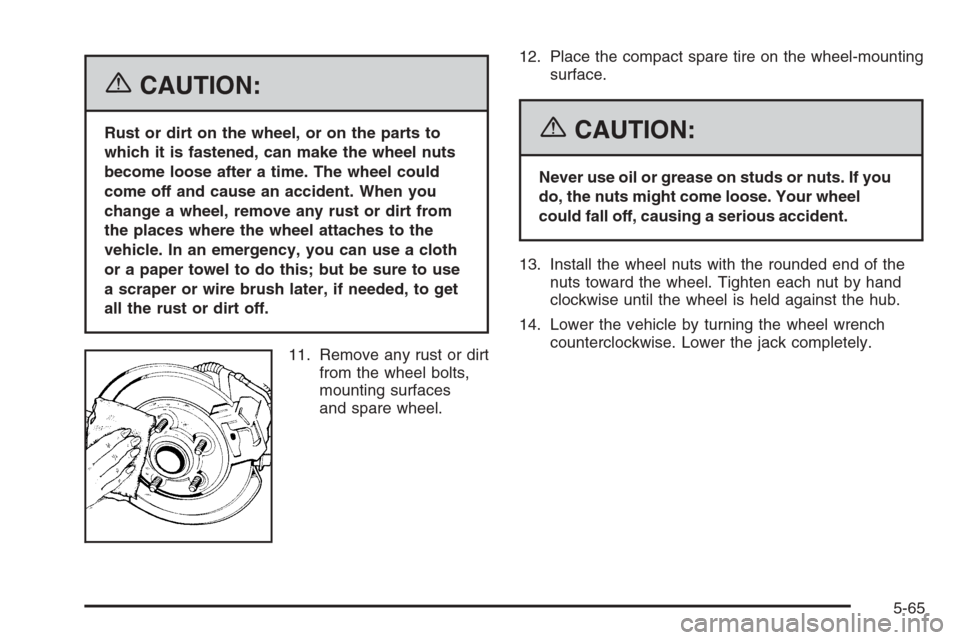
Fuses Usage
SPARE Spare
SPARE Spare
FUSE PLR Fuse Puller
ECMEngine Main Relay,
Fuel Pump Relay,
Engine Control Module (ECM)
BCK/UP
CRUISEBack-Up Lamp Switch,
Cruise Control
TPMSTire Pressure Monitor System
(Option)
AUTO
A/C
BCMAutomatic Temperature Control,
A/C Compressor Relay,
Body Control Module (BCM)
HVAC
EPSManual Air Conditioning,
Electronic Power Steering (EPS)
(Option)
AIRBAGSensing and Diagnostic
Module (SDM) (Option)
ABS Anti-lock Brake System (Option)
TCM
BTSITransmission Control Module
(TCM), Brake Transmission
Shift-Interlock/Automatic
Transaxle Shift-Lock (BTSI)
5-78
Page 327 of 368

Part B: Owner Checks and Services
Listed in this part are owner checks and services
which should be performed at the intervals specified to
help ensure the safety, dependability and emission
control performance of your vehicle.
Be sure any necessary repairs are completed at once.
Whenever any fluids or lubricants are added to your
vehicle, make sure they are the proper ones, as
shown in Part D.
At Each Fuel Fill
It is important for you or a service station attendant
to perform these underhood checks at each fuel fill.
Engine Oil Level Check
Check the engine oil level and add the proper oil if
necessary. SeeEngine Oil on page 5-13for further
details.
Engine Coolant Level Check
Check the engine coolant level and add the proper
coolant mixture if necessary. SeeEngine Coolant on
page 5-19for further details.
Windshield Washer Fluid Level Check
Check the windshield washer fluid level in the windshield
washer fluid reservoir and add the proper fluid if
necessary. SeeWindshield Washer Fluid on page 5-30
for further details.
At Least Once a Month
Tire Ination Check
Visually inspect your tires and make sure tires are
inflated to the correct pressures. Do not forget to check
your spare tire. SeeTires on page 5-46for further
details.
6-19
Page 344 of 368
Roadside Assistance Program
As the owner of a new Chevrolet vehicle, you are
automatically enrolled in the Chevrolet Roadside
Assistance program. This value-added service is
intended to provide you with peace of mind as
you drive in the city or travel the open road. Call
Chevrolet’s Roadside Assistance at1-800-CHEV-USA,
(1-800-243-8872)24 hours a day, 365 days a year
to speak with a Chevrolet Roadside Assistance
representative.
We will provide the following services during the
Bumper-to-Bumper warranty period, at no expense
to you:
•Fuel Delivery:Delivery of enough fuel
($5 maximum) for the customer to get to the
nearest service station.
•Lock-out Service (identication required):
Replacement keys or locksmith service will
be covered at no charge if you are unable to gain
entry into your vehicle. Delivery of the replacement
key will be covered within 10 miles (16 km).
•Emergency Tow:Tow to the nearest dealership
for warranty service or in the event of a
vehicle-disabling accident. Assistance provided
when the vehicle is mired in sand, mud, or snow.
•Flat Tire Change:Installation of a spare tire will be
covered at no charge. The customer is responsible
for the repair or replacement of the tire if not
covered by a warrantable failure.
•Jump Start:No-start occurrences which require a
battery jump start will be covered at no charge.
•Dealer Locator Service
In many instances, mechanical failures are covered
under Chevrolet’s Bumper-to-Bumper warranty.
However, when other services are utilized, our
Roadside Assistance Representatives will explain
any payment obligations you might incur.
For prompt and efficient assistance when calling,
please provide the following to the Roadside Assistance
Representative:
•Your name, home address, and home
telephone number.
•Telephone number of your location.
•Location of the vehicle.
•Model, year, color, and license plate number.
•Mileage, Vehicle Identification Number (VIN),
and delivery date of the vehicle.
•Description of the problem.
7-6