2006 CHEVROLET CORVETTE automatic transmission
[x] Cancel search: automatic transmissionPage 135 of 426

To recall a memory position, do one of the following:
If you have an automatic transmission vehicle,
press and release the desired button 1 or 2 while
the vehicle is in PARK (P).
A single beep will sound and the memory position
will be recalled after a brief delay.
If the vehicle is not in PARK (P), three beeps will
sound and the memory position will not be recalled.
If you have a manual transmission vehicle, press and
release the desired button 1 or 2. If the vehicle is on,
the parking brake needs to be set to recall the
memory position.
A single beep will sound and the memory position
will be recalled after a brief delay.
If the vehicle is on and the parking brake is not set,
three beeps will sound and the memory position will
not be recalled.If your vehicle has the Auto Memory Recall feature and
it is turned on in the Driver Information Center (DIC),
the seat, mirrors, and telescopic steering column
position will automatically adjust to their programmed
positions when the engine is started. See “Auto Memory
Recall” underDIC Vehicle Personalization on page 3-68
for more information.
To stop recall movement of the memory feature at any
time, press one of the power seat controls, power mirror
control buttons, memory buttons, or the telescopic
steering column switch.
2-73
Page 136 of 426

Easy Exit Seat
Two personalized exit positions can also be programmed
to allow for an easy exit or entry into the vehicle. The
controls for this memory function are located on the
driver’s door.
B(Easy Exit Seat):This button is used to program
and recall the desired driver’s seat exit position.
To program an exit position, use the following steps:
1. Recall the desired driving position by pressing
button 1 or 2.
The seat will move to the programmed memory
position.
2. Position the seat and the telescopic steering
column position to a comfortable exit position.
3. Press and hold the exit button until two beeps
sound.
Your exit position is now programmed.
A second exit position can be programmed by repeating
the above steps and pressing the other memory button.To recall an exit position, do one of the following:
If you have an automatic transmission vehicle,
press and release the exit button while the vehicle
is in PARK (P).
One beep will sound and the exit position for the
currently identi�ed driver will be recalled.
If you have a manual transmission vehicle, press
and release the exit button. The parking brake
needs to be set to recall the memory position.
One beep will sound and the exit position for the
currently identi�ed driver will be recalled.
If your vehicle has the Auto Exit Recall feature and it is
turned on in the DIC, automatic seat and telescopic
steering column movement to the exit position will
occur when you use the keyless access transmitter to
unlock your vehicle or when you turn the engine off and
open the driver’s door. See “Auto Exit Recall” under
DIC Vehicle Personalization on page 3-68for more
information.
2-74
Page 137 of 426

Instrument Panel Overview...............................3-4
Hazard Warning Flashers................................3-6
Other Warning Devices...................................3-6
Horn .............................................................3-6
Tilt Wheel.....................................................3-6
Turn Signal/Multifunction Lever.........................3-8
Turn and Lane-Change Signals (Auto Signal).....3-8
Headlamp High/Low-Beam Changer..................3-9
Flash-to-Pass.................................................3-9
Windshield Wipers..........................................3-9
Windshield Washer.......................................3-10
Cruise Control..............................................3-11
Exterior Lamps.............................................3-15
Wiper Activated Headlamps............................3-16
Headlamps on Reminder................................3-16
Daytime Running Lamps (DRL).......................3-16
Fog Lamps ..................................................3-17
Twilight Sentinel
®..........................................3-18
Exterior Lighting Battery Saver........................3-19
Instrument Panel Brightness...........................3-19
Courtesy Lamps...........................................3-19
Entry/Exit Lighting.........................................3-19
Reading Lamps............................................3-20
Battery Run-Down Protection..........................3-20
Head-Up Display (HUD).................................3-20
Accessory Power Outlet(s).............................3-24
Ashtray(s) and Cigarette Lighter......................3-25Climate Controls............................................3-25
Dual Automatic Climate Control System...........3-25
Outlet Adjustment.........................................3-30
Passenger Compartment Air Filter...................3-31
Warning Lights, Gages, and Indicators............3-32
Instrument Panel Cluster................................3-33
Speedometer and Odometer...........................3-34
Tachometer.................................................3-34
Safety Belt Reminder Light.............................3-34
Airbag Readiness Light..................................3-34
Passenger Airbag Status Indicator...................3-35
Voltmeter Gage............................................3-37
One-to-Four Shift Light
(Manual Transmission)...............................3-38
Brake System Warning Light..........................3-38
Anti-Lock Brake System Warning Light.............3-39
Traction Control System (TCS) Warning Light . . .3-40
Active Handling System Light.........................3-40
Engine Coolant Temperature Gage..................3-41
Tire Pressure Light.......................................3-42
Malfunction Indicator Lamp.............................3-42
Engine Oil Pressure Gage.............................3-45
Security Light...............................................3-46
Fog Lamp Light............................................3-46
Lights On Reminder......................................3-46
Highbeam On Light.......................................3-46
Fuel Gage...................................................3-47
Section 3 Instrument Panel
3-1
Page 141 of 426

The main components of your instrument panel are the following:
A. Air Outlet. SeeOutlet Adjustment on page 3-30.
B. Head-Up Display Controls (If Equipped). SeeHead-Up
Display (HUD) on page 3-20.
C. Turn Signal/Multifunction Lever. SeeTurn
Signal/Multifunction Lever on page 3-8. Cruise Control.
SeeCruise Control on page 3-11. Fog Lamps. See
Fog Lamps on page 3-17. Headlamp Controls.
SeeExterior Lamps on page 3-15.
D. Manual Shift Paddles (If Equipped). SeeAutomatic
Transmission Operation on page 2-26.
E. Driver Information Center (DIC). SeeDriver
Information Center (DIC) on page 3-48.
F. Instrument Panel Cluster. SeeInstrument Panel
Cluster on page 3-33.
G. Windshield Wiper/Washer Lever. SeeWindshield
Wipers on page 3-9andWindshield Washer on
page 3-10.
H. Driver Information Center (DIC) Controls. SeeDIC
Controls and Displays on page 3-48.
I. Center Air Outlets. SeeOutlet Adjustment on page 3-30.
J. Hazard Warning Flasher Button. SeeHazard Warning
Flashers on page 3-6.
K. Audio System. SeeAudio System(s) on page 3-77.
L. Climate Controls. SeeDual Automatic Climate Control
System on page 3-25.
M. Fuel Door Release Button. SeeFilling the Tank on
page 5-7. Hatch/Trunk Release Button. See “Hatch/
Trunk Lid Release” underHatch/Trunk on page 2-14.N. Instrument Panel Brightness Control. SeeInstrument
Panel Brightness on page 3-19.
O. Power Folding Top Switch (If Equipped). See
Convertible Top (Manual) on page 2-60orConvertible
Top (Power) on page 2-67.
P. Tilt Wheel Lever. SeeTilt Wheel on page 3-6.
Q. Telescopic Wheel Button (If Equipped). SeeTilt Wheel
on page 3-6.
R. Ignition Switch. SeeIgnition Positions on page 2-22.
S. Heated Seat Controls (If Equipped). SeeHeated Seats
on page 1-4.
T. Shift Lever (Automatic Shown). SeeAutomatic
Transmission Operation on page 2-26orManual
Transmission Operation on page 2-30.
U. Active Handling Button. SeeActive Handling System on
page 4-10.
V. Accessory Power Outlet. SeeAccessory Power
Outlet(s) on page 3-24.
W. Center Console Cupholder. SeeCupholder(s) on
page 2-51.
X. Ashtray and Cigarette Lighter. SeeAshtray(s) and
Cigarette Lighter on page 3-25.
Y. Parking Brake. SeeParking Brake on page 2-33.
Z. Glove Box. SeeGlove Box on page 2-51.
AA. Instrument Panel Fuse Block. SeeInstrument Panel
Fuse Block on page 5-94.
3-5
Page 150 of 426

Cruise Control in Sport (S) and Manual
Paddle Shift Gear Selection
When your vehicle is in Sport (S) and the manual
paddle shift controls are not being used, cruise control
will operate in the same manner as Drive (D).
When your vehicle is in Sport (S) and the manual
paddle shift controls are being used, cruise control will
operate as follows:
If cruise control is active and a gear is selected with
the manual paddle shift controls, the vehicle will
maintain vehicle speed in the driver selected gear
and will not automatically up-shift or down-shift
the transmission while the driver’s gear selection
is active.
If driving in hilly terrain, cruise control may not be
able to maintain vehicle speed if an up-shift or
down-shift is not selected by the driver. While
driving on hilly terrain and cruise control is active
with a manual paddle shift gear selection, the driver
must select the proper gear for the terrain or
select Drive (D) on the gear range selector for full
automatic transmission operation.
Ending Cruise Control
To end a cruise control session, step lightly on the
brake pedal. If your vehicle has a manual transmission,
lightly tapping the clutch will also end a cruise control
session.
Move the cruise control switch to off to turn the system
completely off.
When cruise control is disengaged, the CRUISE
DISENGAGED message will display on the Driver
Information Center (DIC). SeeDIC Warnings and
Messages on page 3-53.
Erasing Speed Memory
When you turn off the cruise control or the ignition, your
cruise control set speed memory is erased.
3-14
Page 157 of 426

Manual Paddle Shift Gear Indicator (If Equipped)
These lights on the HUD are for use when using
the manual paddle shift controls to shift the
transmission. See “Manual Paddle Shift” in
Automatic Transmission Operation on page 2-26.
Shift Light
This light is used for performance driving to indicate
that the vehicle’s best performance level has been
reached to shift the transmission into the next higher
gear. An arrow pointing up will light up on the display
just prior to reaching the engine fuel cut-off mode.
This cut-off is about 6,500 RPM for the LS2 engine
and 7,000 RPM for the LS7 engine.
Check Gages Warning
Engine Coolant Temperature Gage
Transmission Fluid Temperature Gage,
(Automatic Transmission Vehicles Only)
Engine Oil Temperature Gage
Engine Oil Pressure Gage
G-Force Gage
Audio Functions, Street Mode Only
Navigation, Only with Navigation Radio, Street
Mode OnlyThere are three HUD modes that you can choose to view
in the HUD display. By pressing the MODE button, you
can scroll through these modes in the following order:
Street Mode supports
audio and navigation
functions with your choice
of tachometer settings.
Track Mode 1 supports the
G-Force gage and minor
gages with a circular
tachometer.
3-21
Page 169 of 426

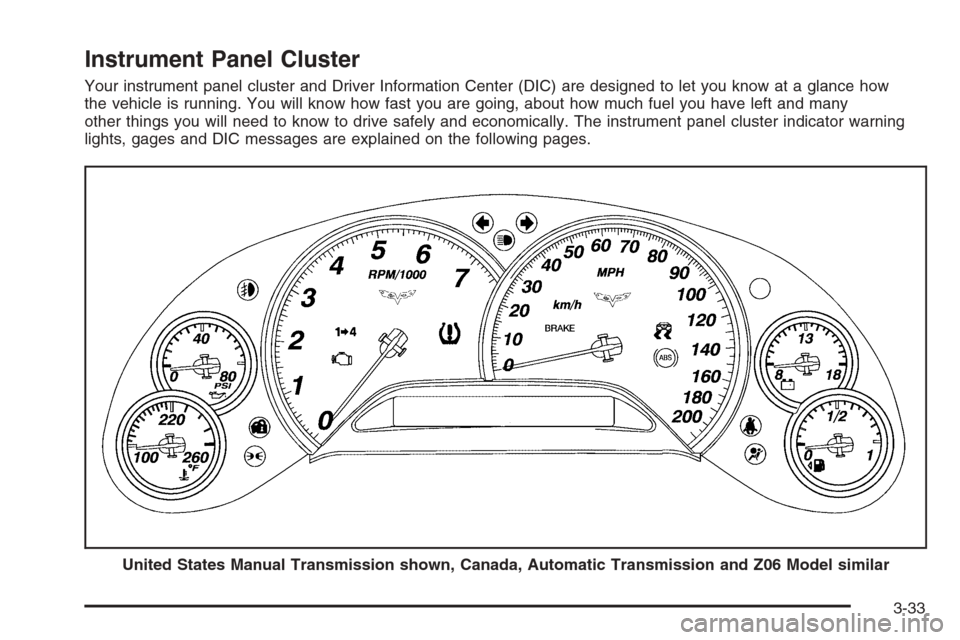
Instrument Panel Cluster
Your instrument panel cluster and Driver Information Center (DIC) are designed to let you know at a glance how
the vehicle is running. You will know how fast you are going, about how much fuel you have left and many
other things you will need to know to drive safely and economically. The instrument panel cluster indicator warning
lights, gages and DIC messages are explained on the following pages.
United States Manual Transmission shown, Canada, Automatic Transmission and Z06 Model similar
3-33
Page 185 of 426

2(Gages):Press this button to display gage
information like oil pressure and temperature, coolant
temperature, automatic transmission �uid temperature, if
equipped, battery voltage, and front/rear tire pressures.
TRIP:Press this button to display your total and
trip distance driven, the elapsed time function, your
average speed, and the engine oil life.
OPTION:Press this button to choose personal options
that are available on your vehicle, depending on the
options your vehicle is equipped with, such as door
locks, easy entry seats, and language.
RESET:Press this button, used along with the other
buttons, to reset system functions, select personal
options, and turn off or acknowledge messages on
the DIC.
FUEL Button
The fuel button displays average fuel economy and
instantaneous fuel economy, calculated for your speci�c
driving conditions, and range information.
Average Fuel Economy:The average fuel economy is
viewed as a long-term approximation of your overall
driving conditions. You should reset the average fuel
economy display every time you refuel. If you press the
RESET button in this mode while you are driving, the
system will reset this display and begin �guring fuel
economy from that point in time.Press the fuel button to display average fuel economy,
such as:
AVERAGE FUEL ECONOMY 20.1 MPG or
AVERAGE FUEL ECONOMY 11.7 L/100 km
Instantaneous Fuel Economy:Instantaneous fuel
economy re�ects only the fuel economy that the vehicle
has right now and will change frequently as driving
conditions change. Unlike average fuel economy, this
menu item cannot be reset.
Press the fuel button again to display instantaneous fuel
economy, such as:
INSTANT FUEL ECONOMY 20.1 MPG or
INSTANT FUEL ECONOMY 11.7 L/100 km
Fuel Range:The range calculates the remaining
distance you can drive without refueling. It is based on
fuel economy and the fuel remaining in the tank.
Press the fuel button again to display the range,
such as:
RANGE 30 MI or
RANGE 48 km
If the LOW FUEL warning is displayed or if RANGE
is less than 40 miles (64 km), the display will read
RANGE LOW.
3-49