Page 103 of 426

Cleaning the Mirror
When cleaning the mirror, use a paper towel or similar
material dampened with glass cleaner. Do not spray
glass cleaner directly on the mirror as that may cause
the liquid cleaner to enter the mirror housing.
Automatic Dimming Rearview Mirror
with Compass
If the vehicle has this feature, an automatic dimming
mirror automatically dims to the proper level to minimize
glare at night from lights behind your vehicle.
The mirror also includes a compass display in the upper
right corner of the mirror face.
P(On/Off):This is the on/off button.
Automatic Dimming Mirror Operation
The automatic dimming mirror function is turned on each
time the ignition is started. A light near the on/off button
will come on to indicate the automatic dimming is on.
Press the on/off button for about six seconds to
manually turn the automatic dimming function on or off.
Compass Display
Press the on/off button, located to the far left, brie�y to
turn the compass display on or off.
If the display reads CAL, the compass needs to be
calibrated. For more information, see “Compass
Calibration” later in this section.
To adjust between Fahrenheit and Celsius:
1. Press and hold the on/off button for approximately
four seconds until either a �ashing °F, or °C
appears.
2. Press the button again to change the display to the
desired unit of measurement. After approximately
four seconds of inactivity, the new unit will be locked
in and the compass/temperature display will return.
If an abnormal temperature reading is displayed for an
extended period of time, please consult your dealer.
Under certain circumstances, a delay in updating
the temperature is normal.
2-41
Page 118 of 426
Notice:If you drop or rest a roof panel on its edges,
the roof panel, paint and/or weatherstripping may be
damaged. Always place the roof panel in the stowage
receivers after removing it from the vehicle.
1. Park on a level surface and set the parking brake.
Shift an automatic transmission into PARK (P).
Shift a manual transmission into NEUTRAL.
2. Make sure the ignition is turned to OFF.
3. Lower both sun visors.
4. Open the rear hatch and remove any items that may
interfere with proper storage of the roof panel.
5. Lower the windows.
There are two release latches on the front of the
roof panel and one rear release latch on the back
of the roof panel.
6. To unlock the release latches on the front of the
roof panel, grasp each handle with your �ngers
and pull it outward. Driver’s Side Front Roof Panel Release Latch
2-56
Page 123 of 426

Notice:Leaving the convertible top down and
exposing the interior of your vehicle to outdoor
conditions may cause damage. Always close
the convertible top if leaving your vehicle outdoors.
Notice:Lowering the convertible top when there are
objects in the storage area could damage it or break
the glass rear window. Always verify that no objects
are in the storage area before lowering the
convertible top.
Notice:Lowering the top if it is damp, wet, or dirty
can cause stains, mildew, and damage to the inside
of your vehicle. Dry off the top before lowering it.
Notice:If you lower the top on your vehicle in cold
weather (0°F/-18°C or lower), you may damage top
components. Do not lower the top in cold weather.
Notice:If you raise or lower the convertible top
while the vehicle is in motion, you could damage the
top or the top mechanism. The repairs would not be
covered by your warranty. Always put an automatic
transmission in PARK (P) or a manual transmission
in NEUTRAL before raising or lowering the
convertible top.Lowering the Manual Convertible Top
1. Park on a level surface. Shift an automatic
transmission into PARK (P) and set the parking
brake. Shift a manual transmission into NEUTRAL
and set the parking brake.
2. Make sure the ignition is turned off.
3. Make sure the trunk is closed and the rear trunk
partition in the rear storage area is in the fastened
upright position. See “Rear Trunk Partition”
underRear Storage Area on page 2-52.
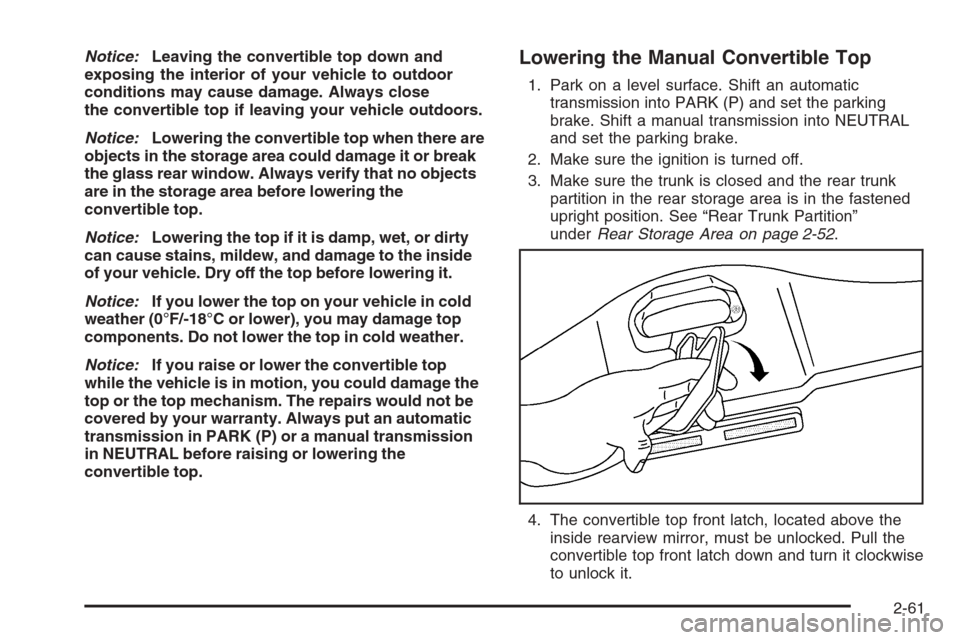
4. The convertible top front latch, located above the
inside rearview mirror, must be unlocked. Pull the
convertible top front latch down and turn it clockwise
to unlock it.
2-61
Page 127 of 426
Raising the Manual Convertible Top
1. Park on a level surface. Shift an automatic
transmission into PARK (P) and set the parking
brake. Shift a manual transmission into NEUTRAL
and set the parking brake.
2. Lower both windows.
3. Make sure the ignition is turned off.
4. Tilt the driver’s seat forward and press the tonneau
cover release button, or use the manual release
cable if battery power has been lost. See
step six under “Lowering the Manual Convertible
Top” earlier in this section.
After pressing the release button, the driver and
passenger door glass should retract to the full-down
position, if they have not already been lowered.
5. Lift the tonneau cover.6. Pull the convertible top up by �rmly gripping the
front edge (A) near the center and applying a
brisk upward and forward motion to get the top in
the full-up position.
2-65
Page 141 of 426

The main components of your instrument panel are the following:
A. Air Outlet. SeeOutlet Adjustment on page 3-30.
B. Head-Up Display Controls (If Equipped). SeeHead-Up
Display (HUD) on page 3-20.
C. Turn Signal/Multifunction Lever. SeeTurn
Signal/Multifunction Lever on page 3-8. Cruise Control.
SeeCruise Control on page 3-11. Fog Lamps. See
Fog Lamps on page 3-17. Headlamp Controls.
SeeExterior Lamps on page 3-15.
D. Manual Shift Paddles (If Equipped). SeeAutomatic
Transmission Operation on page 2-26.
E. Driver Information Center (DIC). SeeDriver
Information Center (DIC) on page 3-48.
F. Instrument Panel Cluster. SeeInstrument Panel
Cluster on page 3-33.
G. Windshield Wiper/Washer Lever. SeeWindshield
Wipers on page 3-9andWindshield Washer on
page 3-10.
H. Driver Information Center (DIC) Controls. SeeDIC
Controls and Displays on page 3-48.
I. Center Air Outlets. SeeOutlet Adjustment on page 3-30.
J. Hazard Warning Flasher Button. SeeHazard Warning
Flashers on page 3-6.
K. Audio System. SeeAudio System(s) on page 3-77.
L. Climate Controls. SeeDual Automatic Climate Control
System on page 3-25.
M. Fuel Door Release Button. SeeFilling the Tank on
page 5-7. Hatch/Trunk Release Button. See “Hatch/
Trunk Lid Release” underHatch/Trunk on page 2-14.N. Instrument Panel Brightness Control. SeeInstrument
Panel Brightness on page 3-19.
O. Power Folding Top Switch (If Equipped). See
Convertible Top (Manual) on page 2-60orConvertible
Top (Power) on page 2-67.
P. Tilt Wheel Lever. SeeTilt Wheel on page 3-6.
Q. Telescopic Wheel Button (If Equipped). SeeTilt Wheel
on page 3-6.
R. Ignition Switch. SeeIgnition Positions on page 2-22.
S. Heated Seat Controls (If Equipped). SeeHeated Seats
on page 1-4.
T. Shift Lever (Automatic Shown). SeeAutomatic
Transmission Operation on page 2-26orManual
Transmission Operation on page 2-30.
U. Active Handling Button. SeeActive Handling System on
page 4-10.
V. Accessory Power Outlet. SeeAccessory Power
Outlet(s) on page 3-24.
W. Center Console Cupholder. SeeCupholder(s) on
page 2-51.
X. Ashtray and Cigarette Lighter. SeeAshtray(s) and
Cigarette Lighter on page 3-25.
Y. Parking Brake. SeeParking Brake on page 2-33.
Z. Glove Box. SeeGlove Box on page 2-51.
AA. Instrument Panel Fuse Block. SeeInstrument Panel
Fuse Block on page 5-94.
3-5
Page 142 of 426

Hazard Warning Flashers
Your hazard warning �ashers let you warn others. They
also let police know you have a problem. Your front
and rear turn signal lamps will �ash on and off.
The hazard warning
�asher button is located
near the center of the
instrument panel.
Your hazard warning �ashers work no matter what
mode the ignition is in, even if the ignition is turned off.
Press the button to make the front and rear turn
signal lamps �ash on and off. Press the button again to
turn the �ashers off.
When the hazard warning �ashers are on, your turn
signals will not work.
Other Warning Devices
If you carry re�ective triangles, you can set them up at
the side of the road about 300 feet (100 m) behind
your vehicle.
Horn
Press near or on the horn symbols on your steering
wheel pad to sound the horn.
Tilt Wheel
A tilt wheel allows you to adjust the steering wheel
before you drive. You can raise it to the highest level to
give your legs more room when you exit and enter
the vehicle.
The lever that allows you to tilt the steering wheel is
located on the left side of the steering column.
3-6
Page 150 of 426

Cruise Control in Sport (S) and Manual
Paddle Shift Gear Selection
When your vehicle is in Sport (S) and the manual
paddle shift controls are not being used, cruise control
will operate in the same manner as Drive (D).
When your vehicle is in Sport (S) and the manual
paddle shift controls are being used, cruise control will
operate as follows:
If cruise control is active and a gear is selected with
the manual paddle shift controls, the vehicle will
maintain vehicle speed in the driver selected gear
and will not automatically up-shift or down-shift
the transmission while the driver’s gear selection
is active.
If driving in hilly terrain, cruise control may not be
able to maintain vehicle speed if an up-shift or
down-shift is not selected by the driver. While
driving on hilly terrain and cruise control is active
with a manual paddle shift gear selection, the driver
must select the proper gear for the terrain or
select Drive (D) on the gear range selector for full
automatic transmission operation.
Ending Cruise Control
To end a cruise control session, step lightly on the
brake pedal. If your vehicle has a manual transmission,
lightly tapping the clutch will also end a cruise control
session.
Move the cruise control switch to off to turn the system
completely off.
When cruise control is disengaged, the CRUISE
DISENGAGED message will display on the Driver
Information Center (DIC). SeeDIC Warnings and
Messages on page 3-53.
Erasing Speed Memory
When you turn off the cruise control or the ignition, your
cruise control set speed memory is erased.
3-14
Page 151 of 426

Exterior Lamps
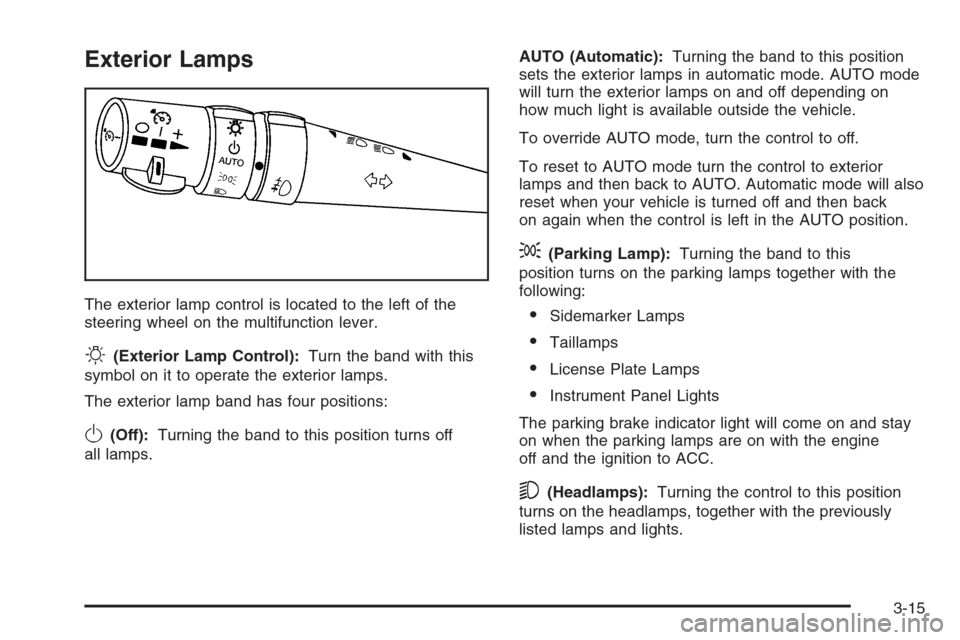
The exterior lamp control is located to the left of the
steering wheel on the multifunction lever.
O(Exterior Lamp Control):Turn the band with this
symbol on it to operate the exterior lamps.
The exterior lamp band has four positions:
O(Off):Turning the band to this position turns off
all lamps.AUTO (Automatic):Turning the band to this position
sets the exterior lamps in automatic mode. AUTO mode
will turn the exterior lamps on and off depending on
how much light is available outside the vehicle.
To override AUTO mode, turn the control to off.
To reset to AUTO mode turn the control to exterior
lamps and then back to AUTO. Automatic mode will also
reset when your vehicle is turned off and then back
on again when the control is left in the AUTO position.
;(Parking Lamp):Turning the band to this
position turns on the parking lamps together with the
following:
Sidemarker Lamps
Taillamps
License Plate Lamps
Instrument Panel Lights
The parking brake indicator light will come on and stay
on when the parking lamps are on with the engine
off and the ignition to ACC.
5(Headlamps):Turning the control to this position
turns on the headlamps, together with the previously
listed lamps and lights.
3-15