2006 CHEVROLET CORVETTE fuses
[x] Cancel search: fusesPage 82 of 426

Arming the System
Use one of the three following items listed here to arm
the system:
Press the lock button on the keyless access
transmitter.
Open the door. Lock the door with the power door
lock switch. The security light should �ash.
Remove the keyless access transmitter from inside
the vehicle and close the door. The security light
will stop �ashing and stay on. After 30 seconds, the
light should turn off.
The vehicle can be programmed to automatically
lock the doors and arm the theft-deterrent system
when you exit the vehicle. SeeDIC Vehicle
Personalization on page 3-68.
Now, if a door or the hatch/trunk is opened without
the keyless access transmitter, the alarm will go
off. Your horn will sound for two minutes, then it will go
off to save battery power. Your vehicle will not start
without a keyless access transmitter present.
The theft-deterrent system will not arm if you lock the
driver’s door with the power door lock switch after
the doors are closed.
If your passenger stays in the vehicle when you leave
with the keyless access transmitter, have the passenger
lock the vehicle after the doors are closed. This way the
alarm will not arm, and your passenger will not set it off.
Testing the Alarm
Do the following to test the system:
1. Make sure the trunk lid/hatch is latched.
2. Lower the window on the driver’s door.
3. Manually arm the system.
4. Close the doors and wait 30 seconds.
5. Reach through the open window and manually pull
the release lever on the �oor.
6. Turn off the alarm by pressing the unlock button on
the transmitter.
If the alarm is inoperative, check to see if the horn
works. If not, check the horn fuse. SeeFuses and Circuit
Breakers on page 5-93. If the horn works, but the
alarm doesn’t go off, see your dealer.
Disarming the System
Always use your keyless access transmitter to unlock
a door either by pressing the unlock button on the
transmitter or by squeezing the door handle sensor while
you have the transmitter with you. Unlocking a door
any other way will set off the alarm. If your alarm
sounds, press the unlock button on the keyless access
transmitter to disarm it.
2-20
Page 144 of 426
Turn Signal/Multifunction Lever
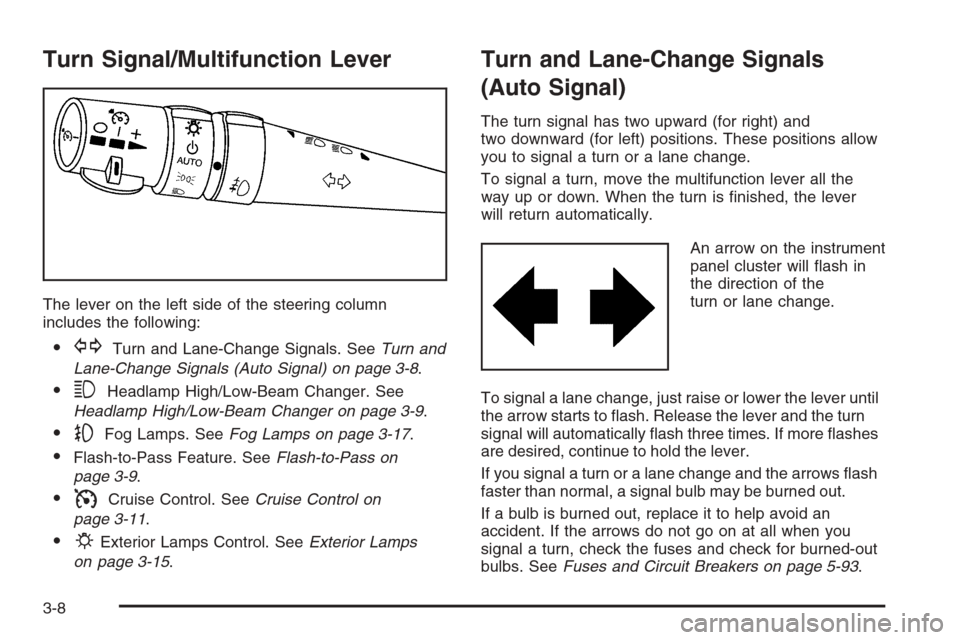
The lever on the left side of the steering column
includes the following:
GTurn and Lane-Change Signals. SeeTurn and
Lane-Change Signals (Auto Signal) on page 3-8.
3Headlamp High/Low-Beam Changer. See
Headlamp High/Low-Beam Changer on page 3-9.
-Fog Lamps. SeeFog Lamps on page 3-17.
Flash-to-Pass Feature. SeeFlash-to-Pass on
page 3-9.
ICruise Control. SeeCruise Control on
page 3-11.
PExterior Lamps Control. SeeExterior Lamps
on page 3-15.
Turn and Lane-Change Signals
(Auto Signal)
The turn signal has two upward (for right) and
two downward (for left) positions. These positions allow
you to signal a turn or a lane change.
To signal a turn, move the multifunction lever all the
way up or down. When the turn is �nished, the lever
will return automatically.
An arrow on the instrument
panel cluster will �ash in
the direction of the
turn or lane change.
To signal a lane change, just raise or lower the lever until
the arrow starts to �ash. Release the lever and the turn
signal will automatically �ash three times. If more �ashes
are desired, continue to hold the lever.
If you signal a turn or a lane change and the arrows �ash
faster than normal, a signal bulb may be burned out.
If a bulb is burned out, replace it to help avoid an
accident. If the arrows do not go on at all when you
signal a turn, check the fuses and check for burned-out
bulbs. SeeFuses and Circuit Breakers on page 5-93.
3-8
Page 160 of 426
To clean the HUD, spray household glass cleaner on a
soft, clean cloth. Wipe the HUD lens gently, then dry
it. Do not spray cleaner directly on the lens because the
cleaner could leak into the unit.
If the ignition is on and you can’t see the HUD image,
check to see if:
Something is covering the HUD unit.
The HUD dimmer control is adjusted properly.
The HUD image is adjusted to the proper height.
Ambient light is low, in the direction your vehicle is
facing.
A fuse is blown. SeeFuses and Circuit Breakers on
page 5-93.
Keep in mind that your windshield is part of the HUD
system. SeeWindshield Replacement on page 5-54.
Accessory Power Outlet(s)
The accessory power outlet can be used to connect
electrical equipment such as a cellular phone or
CB radio.
The accessory power outlet is located inside the center
console storage compartment, on the forward left side.
To use the outlet, remove the tethered cap. When not
using it, always cover the outlet with the protective cap.Notice:Leaving electrical equipment on for
extended periods will drain the battery. Always turn
off electrical equipment when not in use and do
not plug in equipment that exceeds the maximum
amperage rating.
Certain electrical accessories may not be compatible
with the accessory power outlet and could result
in blown vehicle or adapter fuses. If you experience a
problem, see your dealer for additional information
on accessory power outlets.
Notice:Adding any electrical equipment to your
vehicle may damage it or keep other components
from working as they should. The repairs would
not be covered by your warranty. Do not use
equipment exceeding maximum amperage rating of
20 amperes. Check with your dealer before adding
electrical equipment.
When adding electrical equipment, be sure to follow the
installation instructions included with the equipment.
We recommend that you see a quali�ed technician or
your dealer for the proper installation of your equipment.
Notice:Improper use of the power outlet can cause
damage not covered by your warranty. Do not hang
any type of accessory or accessory bracket from the
plug because the power outlets are designed for
accessory power plugs only.
3-24
Page 278 of 426
When It Is Time for New Tires.......................5-69
Buying New Tires.........................................5-70
Different Size Tires and Wheels......................5-71
Uniform Tire Quality Grading..........................5-72
Wheel Alignment and Tire Balance..................5-73
Wheel Replacement......................................5-73
Tire Chains..................................................5-76
Lifting Your Vehicle.......................................5-76
If a Tire Goes Flat........................................5-81
Appearance Care............................................5-82
Cleaning the Inside of Your Vehicle.................5-82
Fabric/Carpet...............................................5-83
Coated Moldings...........................................5-84
Leather.......................................................5-84
Instrument Panel, Vinyl, and Other
Plastic Surfaces........................................5-85
Cargo Cover and Convenience Net.................5-85
Care of Safety Belts......................................5-85
Weatherstrips...............................................5-85
Washing Your Vehicle...................................5-86
Cleaning Exterior Lamps/Lenses.....................5-86
Finish Care..................................................5-86Windshield and Wiper Blades.........................5-87
Removable Roof Panel..................................5-88
Convertible Top............................................5-88
Aluminum Wheels.........................................5-89
Tires...........................................................5-89
Finish Damage.............................................5-90
Underbody Maintenance................................5-90
Fiberglass Springs........................................5-90
Chemical Paint Spotting.................................5-90
Vehicle Care/Appearance Materials..................5-91
Vehicle Identi�cation......................................5-92
Vehicle Identi�cation Number (VIN).................5-92
Service Parts Identi�cation Label.....................5-92
Electrical System............................................5-92
Add-On Electrical Equipment..........................5-92
Headlamp Wiring..........................................5-93
Windshield Wiper Fuses................................5-93
Power Windows and Other Power Options.......5-93
Fuses and Circuit Breakers............................5-93
Instrument Panel Fuse Block..........................5-94
Engine Compartment Fuse Block....................5-98
Capacities and Speci�cations........................5-101
Section 5 Service and Appearance Care
5-2
Page 369 of 426
Headlamp Wiring
The headlamp wiring is protected by fuses. An electrical
overload will cause the lamps to remain off. If this
happens, have your headlamp wiring checked right away.
Windshield Wiper Fuses
The windshield wiper motor is protected by a fuse and
an internal circuit breaker. If the motor overheats due to
heavy snow, etc., the wiper will stop until the motor cools.
If the overload is caused by some electrical problem and
not snow, etc., be sure to get it �xed.
Power Windows and Other
Power Options
Circuit breakers protect the power seats, power
windows, and other power accessories. When the
current load is too heavy, the circuit breaker opens and
closes, protecting the circuit until the problem is �xed
or goes away.
Fuses and Circuit Breakers
The wiring circuits in your vehicle are protected from
short circuits by a combination of J-Case fuses,
mini-fuses and circuit breakers. This greatly reduces the
chance of �res caused by electrical problems.
Look at the silver-colored band inside the fuse. If the
band is broken or melted, replace the fuse. Be sure you
replace a bad fuse with a new one of the identical
size and rating.
If you ever have a problem on the road and do not have
a spare fuse, you can borrow one that has the same
amperage. Just pick some feature of your vehicle
that you can get along without — like the radio or
cigarette lighter — and use its fuse, if it is the correct
amperage. Replace it as soon as you can.
5-93
Page 370 of 426
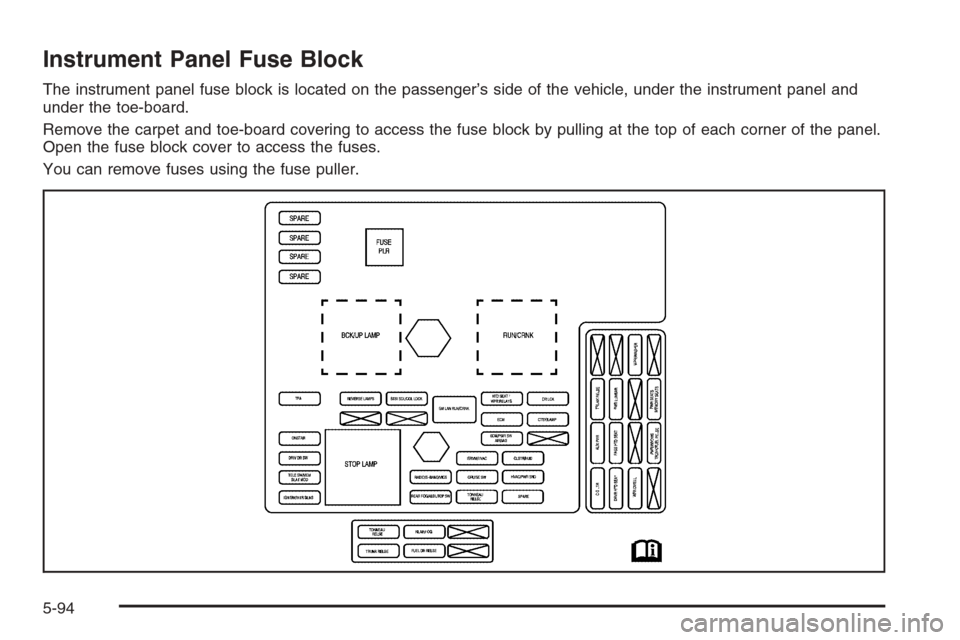
Instrument Panel Fuse Block
The instrument panel fuse block is located on the passenger’s side of the vehicle, under the instrument panel and
under the toe-board.
Remove the carpet and toe-board covering to access the fuse block by pulling at the top of each corner of the panel.
Open the fuse block cover to access the fuses.
You can remove fuses using the fuse puller.
5-94
Page 371 of 426
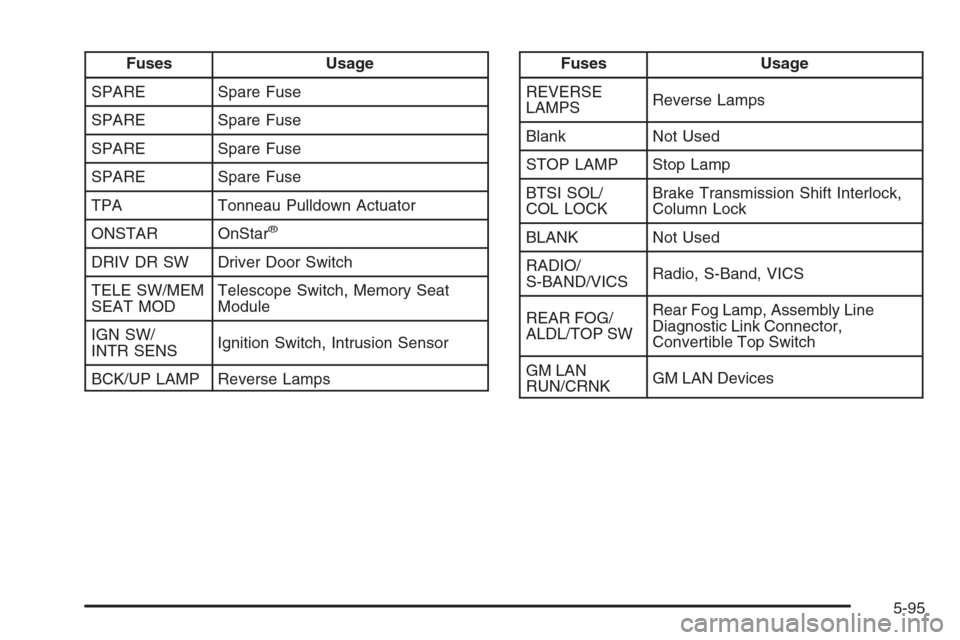
Fuses Usage
SPARE Spare Fuse
SPARE Spare Fuse
SPARE Spare Fuse
SPARE Spare Fuse
TPA Tonneau Pulldown Actuator
ONSTAR OnStar
®
DRIV DR SW Driver Door Switch
TELE SW/MEM
SEAT MODTelescope Switch, Memory Seat
Module
IGN SW/
INTR SENSIgnition Switch, Intrusion Sensor
BCK/UP LAMP Reverse Lamps
Fuses Usage
REVERSE
LAMPSReverse Lamps
Blank Not Used
STOP LAMP Stop Lamp
BTSI SOL/
COL LOCKBrake Transmission Shift Interlock,
Column Lock
BLANK Not Used
RADIO/
S-BAND/VICSRadio, S-Band, VICS
REAR FOG/
ALDL/TOP SWRear Fog Lamp, Assembly Line
Diagnostic Link Connector,
Convertible Top Switch
GM LAN
RUN/CRNKGM LAN Devices
5-95
Page 372 of 426

Fuses Usage
ISRVM/ HVACElectric Inside Rearview Mirror,
Heating Ventilation, Air Conditioning
CRUISE SW Cruise Control Switch
TONNEAU
RELSETonneau Release
RUN CRNK Run/Crank Relay
HTD SEAT/
WPR RELAYSHeated Seat, Wiper Relays
ECM Engine Control Module
SDM/PSIR SW
AIRBAGSensing and Diagnostic Module,
Automatic Occupant Sensing Module
CLSTR/HUD Cluster, Heads-Up Display
HVAC/
PWR SNDHeating, Ventilation/Air Conditioning,
Power Sounder
SPARESpare (Coupe, Convertible); Exhaust
Module (Z06)Fuses Usage
DR LCK Door Locks
CTSY/LAMP Courtesy Lamp
BLANK Not Used
Fuses Usage
TONNEAU
RELSETonneau Release
TRUNK RELSE Trunk Release
REAR/FOG Rear Fog Lamps
FUEL DR
RELSEFuel Door Release
BLANK Not Used
BLANK Not Used
5-96