2006 CHEVROLET CORVETTE maintenance
[x] Cancel search: maintenancePage 188 of 426
Both of the trip odometers can be used simultaneously.
TRIP A could be used to track the distance to a
destination. TRIP B could be used to track maintenance
periods. The trip odometers can be reset by pressing
the RESET button on the DIC.
There is also a miles since last ignition feature that
displays the number of miles (kilometers) driven since
you last started the vehicle. Press and hold the
RESET button for three seconds, then release it. The
miles (kilometers) since the last ignition cycle will be set
into the trip odometer.
Elapsed Timer:Press the TRIP button until ELAPSED
TIMER is displayed, such as ELAPSED TIMER .00.
When the ignition is in on, the DIC can be used
as a stopwatch. The display can show hours, minutes
and seconds. The elapsed time indicator will record
up to 23 hours, 59 minutes and 59 seconds, then it
will reset to zero and continue counting. The display
appears as ELAPSED TIMER .00 in the elapsed
time function.
You can start or stop the elapsed time by pressing the
RESET button. To reset the elapsed time to zero,
press the RESET button for three seconds while the
timer is displayed.
Pressing and holding the RESET button for at least
10 seconds will reset the timer display to the time since
last ignition cycle.Average Speed:Press the TRIP button until the
average speed is displayed, such as:
AVERAGE SPEED 62 MPH or
AVERAGE SPEED 100 km/h
Press and hold the RESET button to reset to
0.0 mph (km/h).
Engine Oil Life:Press the TRIP button until the engine
oil life is displayed, such as OIL LIFE REMAINING 89%.
This is an estimate of the engine oil’s remaining
useful life. It will show 100% when the system is reset
after an oil change. It will alert you to change your oil
on a schedule consistent with your driving conditions.
When the remaining oil life is low, the system will
alert you with the message CHANGE ENGINE OIL.
Remember, you must reset the engine oil life system
yourself after each oil change. It will not reset itself.
To reset the system, seeEngine Oil Life System
on page 5-23. Be careful not to reset the engine oil life
system accidentally at any time other than when the
oil has just been changed. It cannot be reset accurately
until the next oil change.
SeeScheduled Maintenance on page 6-4andEngine
Oil on page 5-16for more information.
3-52
Page 191 of 426
BUCKLE SEATBELT:This message reminds you to
buckle the driver’s seat belt.
This message will display and a chime will sound when
the ignition is on, the driver’s seat belt is unbuckled,
and the vehicle is in motion. You should buckle
your seat belt.
If the driver remains unbuckled when the ignition is
on and the vehicle is in motion, the reminder will
be repeated. If the driver’s seat belt is already buckled,
this message and chime will not come on.
This message is an additional reminder to the Safety
Belt Reminder Light in the instrument panel cluster.
SeeSafety Belt Reminder Light on page 3-34for more
information.
CHANGE ENGINE OIL:This message will appear when
the life of the engine oil has expired. SeeScheduled
Maintenance on page 6-4. After an oil change, the engine
oil life system must be reset. See “Engine Oil Life” under
DIC Controls and Displays on page 3-48. Also, see
Engine Oil on page 5-16andEngine Oil Life System on
page 5-23for more information.
CHECK BRAKE FLUID:This message will appear, a
chime will sound, and the brake system warning light on
the instrument panel cluster will be on if the ignition is
on to inform the driver that the brake �uid level is
low. SeeBrake System Warning Light on page 3-38.
Have the brake system serviced by your GM dealer as
soon as possible. SeeBrakes on page 5-42.CHECK COOLANT LEVEL:This message will appear
when there is a low level of engine coolant. Have
the cooling system serviced by your GM dealer as soon
as possible. SeeEngine Coolant on page 5-29.
CHECK GAS CAP:If the gas cap has not been fully
tightened, this message will appear. You should
check your gas cap to ensure that it is on properly.
Once tightened, it will take at least one overnight park
to reset or clear this message. If there is a CHECK GAS
CAP message and a malfunction indicator lamp on in
the instrument panel cluster, you may need to see your
GM dealer for service. SeeMalfunction Indicator
Lamp on page 3-42for more information.
CHECK OIL LEVEL:Press the RESET button to
acknowledge that you have read the message and to
remove it from the display. The message will reappear
every 10 minutes until this condition changes. Once
the vehicle senses a change in the engine oil level, the
light will remain off.
You will hear two chimes when this message is
displayed. If this message appears after starting your
engine, your engine oil level may be too low. You
may need to add oil. SeeEngine Overheating on
page 5-32.
3-55
Page 237 of 426
Care of the CD Player
The use of CD lens cleaners for CD players is not
advised, due to the risk of contaminating the internal
lens of the CD optics with lubricants.
Diversity Antenna System
The AM-FM antenna is a hidden self tuning system. It
optimizes the AM and FM signals relative to the vehicle’s
position and radio station source. No maintenance or
adjustments are needed.
XM™ Satellite Radio Antenna
System (Roof or Trunk Mounted)
The XM™ Satellite Radio antenna is located on the roof
or on the trunk lid of your vehicle. Keep this antenna
clear of snow and ice build up for clear radio reception.
XM™ Satellite Radio Antenna
System (Diversity System)
Your vehicle may have the XM™ Satellite Radio
antennas that are located in the outside rear view
mirrors. These antennas are hidden from view and are
not accessible.
Chime Level Adjustment
The radio is used to adjust the vehicle’s chime level.
To change the volume level of the chime, press and hold
pushbutton 6 with the ignition on and the radio power off.
The volume level will change from the normal level to
loud, and LOUD will appear on the radio display. To
change back to the default or normal setting, press and
hold pushbutton 6 again. The volume level will change
from the loud level to normal, and NORMAL will appear
on the radio display. Only one chime will be heard when
changing from the normal to the loud setting. Each time
the chime volume is changed, three chimes will sound as
an example of the new volume selected. Removing the
radio and not replacing it with a factory radio or chime
module will disable vehicle chimes.
3-101
Page 256 of 426
Of course, traction is reduced when water, snow, ice,
gravel, or other material is on the road. For safety, you
will want to slow down and adjust your driving to
these conditions. It is important to slow down on slippery
surfaces because stopping distance will be longer and
vehicle control more limited.
While driving on a surface with reduced traction, try
your best to avoid sudden steering, acceleration, or
braking, including reducing vehicle speed by shifting to
a lower gear. Any sudden changes could cause the tires
to slide. You may not realize the surface is slippery until
your vehicle is skidding. Learn to recognize warning
clues — such as enough water, ice, or packed snow on
the road to make a mirrored surface — and slow down
when you have any doubt.
Remember: Any Anti-Lock Brake System (ABS) helps
avoid only the braking skid.
Racing or Other Competitive Driving
See your warranty book before using your vehicle for
racing or other competitive driving.
Notice:If you use your vehicle for racing or other
competitive driving, the engine may use more oil than
it would with normal use. Low oil levels can damage
the engine. For information on how to add oil, see
Engine Oil on page 5-16.Z06 Only: Be sure to check the oil level often during
racing or other competitive driving and keep the
level at or near the upper mark that shows the
proper operating range on the engine oil dipstick.
Except Z06: Be sure to check the oil level often
during racing or other competitive driving and keep
the level at or near 1 quart (1 L) above the upper
mark that shows the proper operating range on the
engine oil dipstick. After the competitive driving,
remove excess oil so that the level on the dipstick is
not above the upper mark that shows the proper
operating range.
Vehicles with the Z51 performance package have
greaseable outer ends on both of the rear toe-links.
Under normal use, lubrication should be performed as
described in the maintenance schedule. SeeScheduled
Maintenance on page 6-4andRecommended Fluids
and Lubricants on page 6-12. If you use the vehicle for
racing, lubrication should be performed at the end of
each racing day. See your dealer for lubrication
and make sure any needed repairs are made at once.
Proper procedures for performing these services can be
found in the service manual. SeeService Publications
Ordering Information on page 7-14.
4-18
Page 278 of 426
When It Is Time for New Tires.......................5-69
Buying New Tires.........................................5-70
Different Size Tires and Wheels......................5-71
Uniform Tire Quality Grading..........................5-72
Wheel Alignment and Tire Balance..................5-73
Wheel Replacement......................................5-73
Tire Chains..................................................5-76
Lifting Your Vehicle.......................................5-76
If a Tire Goes Flat........................................5-81
Appearance Care............................................5-82
Cleaning the Inside of Your Vehicle.................5-82
Fabric/Carpet...............................................5-83
Coated Moldings...........................................5-84
Leather.......................................................5-84
Instrument Panel, Vinyl, and Other
Plastic Surfaces........................................5-85
Cargo Cover and Convenience Net.................5-85
Care of Safety Belts......................................5-85
Weatherstrips...............................................5-85
Washing Your Vehicle...................................5-86
Cleaning Exterior Lamps/Lenses.....................5-86
Finish Care..................................................5-86Windshield and Wiper Blades.........................5-87
Removable Roof Panel..................................5-88
Convertible Top............................................5-88
Aluminum Wheels.........................................5-89
Tires...........................................................5-89
Finish Damage.............................................5-90
Underbody Maintenance................................5-90
Fiberglass Springs........................................5-90
Chemical Paint Spotting.................................5-90
Vehicle Care/Appearance Materials..................5-91
Vehicle Identi�cation......................................5-92
Vehicle Identi�cation Number (VIN).................5-92
Service Parts Identi�cation Label.....................5-92
Electrical System............................................5-92
Add-On Electrical Equipment..........................5-92
Headlamp Wiring..........................................5-93
Windshield Wiper Fuses................................5-93
Power Windows and Other Power Options.......5-93
Fuses and Circuit Breakers............................5-93
Instrument Panel Fuse Block..........................5-94
Engine Compartment Fuse Block....................5-98
Capacities and Speci�cations........................5-101
Section 5 Service and Appearance Care
5-2
Page 280 of 426
Doing Your Own Service Work
{CAUTION:
You can be injured and your vehicle could be
damaged if you try to do service work on a
vehicle without knowing enough about it.
Be sure you have sufficient knowledge,
experience, the proper replacement parts,
and tools before you attempt any vehicle
maintenance task.
Be sure to use the proper nuts, bolts,
and other fasteners. English and metric
fasteners can be easily confused. If you
use the wrong fasteners, parts can later
break or fall off. You could be hurt.
If you want to do some of your own service work, you will
want to use the proper service manual. It tells you much
more about how to service your vehicle than this manual
can. To order the proper service manual, seeService
Publications Ordering Information on page 7-14.Your vehicle has an airbag system. Before attempting
to do your own service work, seeServicing Your
Airbag-Equipped Vehicle on page 1-52.
You should keep a record with all parts receipts and list
the mileage and the date of any service work you
perform. SeeMaintenance Record on page 6-16.
Adding Equipment to the Outside
of Your Vehicle
Things you might add to the outside of your vehicle
can affect the air�ow around it. This may cause wind
noise and affect windshield washer performance.
Check with your dealer before adding equipment to
the outside of your vehicle.
Fuel
The 8th digit of your vehicle identi�cation number (VIN)
shows the code letter or number that identi�es your
engine. You will �nd the VIN at the top left of the
instrument panel. SeeVehicle Identi�cation Number
(VIN) on page 5-92.
5-4
Page 297 of 426
2. Once the oil has been drained from the engine,
remove the engine oil �lter and allow the oil
to drain.
3. Re-install both drain plugs and tighten them to
18 lb ft (25Y).
4. Replace the oil �lter and tighten it to 18 lb ft
(25Y). SeeNormal Maintenance Replacement
Parts on page 6-14for the correct �lter.
5. Oil is �lled through the opening in the top of the
external engine oil tank. Remove the oil �ll cap.6. Add eight quarts (7.6 L) of oil to the oil tank.
SeeCapacities and Speci�cations on page 5-101.
7. Install the oil �ll cap and insert the dipstick, if
removed.
8. Start the engine and let it run at idle for at least
15 seconds. This will circulate the fresh engine
oil through the lubrication system.
9. Shut off the engine and check the oil level as
described under “Checking Engine Oil (Z06 Only).”
5-21
Page 302 of 426
When to Inspect the Engine
Air Cleaner/Filters
Inspect the air cleaner/�lters at the MaintenanceII
intervals and replace them at the �rst oil change after
each 50,000 mile (83 000 km) interval. SeeScheduled
Maintenance on page 6-4for more information.
If you are driving in dusty/dirty conditions, inspect the
�lters at each engine oil change.
How to Inspect the Engine
Air Cleaner/Filters (6.0L V8 Engine)
To inspect the air cleaner/�lters, remove the �lters from
the vehicle and lightly shake the �lters to release
loose dust and dirt. If the �lters remain caked with dirt,
new �lters are required.To inspect or replace the engine air cleaner/�lters,
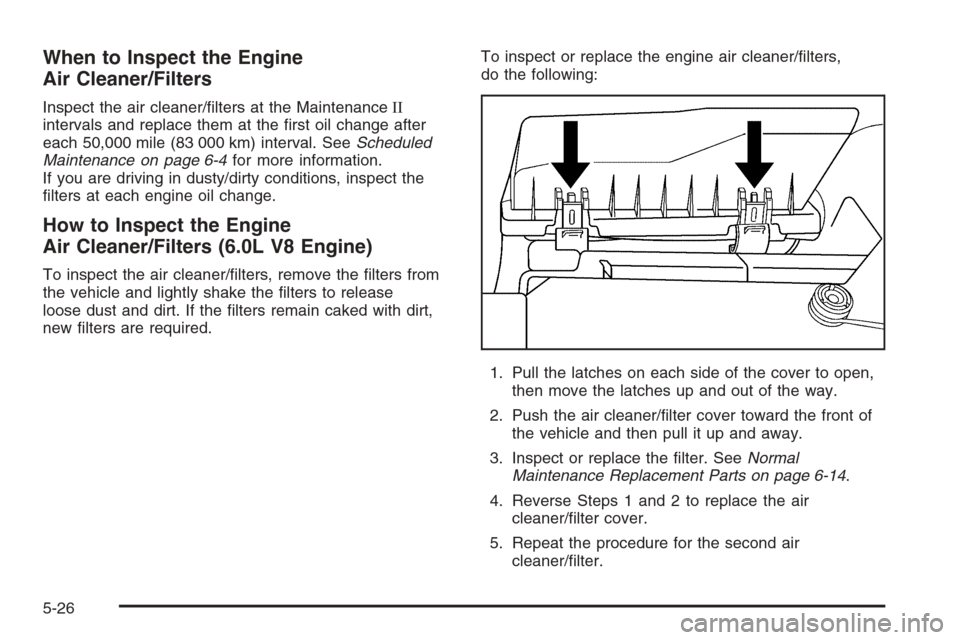
do the following:
1. Pull the latches on each side of the cover to open,
then move the latches up and out of the way.
2. Push the air cleaner/�lter cover toward the front of
the vehicle and then pull it up and away.
3. Inspect or replace the �lter. SeeNormal
Maintenance Replacement Parts on page 6-14.
4. Reverse Steps 1 and 2 to replace the air
cleaner/�lter cover.
5. Repeat the procedure for the second air
cleaner/�lter.
5-26