2006 CHEVROLET CORVETTE instrument panel
[x] Cancel search: instrument panelPage 60 of 426

Restraint System Check
Checking the Restraint Systems
Now and then, make sure the safety belt reminder light
and all your belts, buckles, latch plates, retractors
and anchorages are working properly. Look for any other
loose or damaged safety belt system parts. If you see
anything that might keep a safety belt system from doing
its job, have it repaired. SeeCare of Safety Belts on
page 5-85.
Torn or frayed safety belts may not protect you in a
crash. They can rip apart under impact forces. If a belt
is torn or frayed, get a new one right away.
Also look for any opened or broken airbag covers, and
have them repaired or replaced. The airbag system
does not need regular maintenance.
Notice:If you damage the covering for the driver’s
or the right front passenger’s frontal airbag, or
an airbag covering (if equipped) on a seatback, the
airbag may not work properly. You may have to
replace the airbag module in the steering wheel,
both the airbag module and the instrument panel for
the right front passenger’s frontal airbag, or both
the airbag module and the seatback for seating
positions with a side impact airbag (if equipped.)
Do not open or break the airbag coverings.
Replacing Restraint System Parts
After a Crash
{CAUTION:
A crash can damage the restraint systems in
your vehicle. A damaged restraint system
may not properly protect the person using it,
resulting in serious injury or even death in a
crash. To help make sure your restraint
systems are working properly after a crash,
have them inspected and any necessary
replacements made as soon as possible.
If you have had a crash, do you need new belts or
LATCH system (if equipped) parts?
After a very minor collision, nothing may be necessary.
But if the belts were stretched, as they would be if worn
during a more severe crash, then you need new parts.
1-54
Page 76 of 426

Hatch/Trunk
{CAUTION:
It can be dangerous to drive with the
hatch/trunk lid open because carbon
monoxide (CO) gas can come into your
vehicle. You can not see or smell CO. It can
cause unconsciousness and even death. If you
must drive with the hatch/trunk lid open or if
electrical wiring or other cable connections
must pass through the seal between the body
and the hatch/trunk lid:
Make sure all other windows are shut.
Turn the fan on your heating or cooling
system to its highest speed and select the
control setting that will force outside air
into your vehicle. SeeDual Automatic
Climate Control System on page 3-25.
If you have air outlets on or under the
instrument panel, open them all the way.
SeeEngine Exhaust on page 2-36.Notice:Closing the hatch/trunk lid forcefully or
from the sides can cause damage to the glass, the
defogger or the weather stripping. Be sure objects
will �t in the hatch/trunk area before closing the
hatch/trunk lid. When closing the hatch/trunk
lid, gently pull down from the center.
Notice:Do not store heavy or sharp objects in
the rear storage compartments located in the
hatch/trunk area. If you do, the objects could
damage the underbody.
Hatch/Trunk Lid Release
There are several ways to release the hatch/trunk lid.
If your vehicle has an automatic transmission, the
shift lever must be in PARK (P). For manual
transmission vehicles, the parking brake must be set
when the ignition is started for the hatch/trunk release to
operate. The parking brake does not need to be set
when the ignition is off for the hatch/trunk release
to operate. SeeParking Brake on page 2-33.
V(Hatch/Trunk):Press the hatch/trunk lid
release button located on the instrument panel
to the left of the steering wheel. The theft-deterrent
alarm system must not be armed.
}(Hatch/Trunk):Press the hatch/trunk lid
release button on the keyless access transmitter.
SeeKeyless Access System on page 2-4.
2-14
Page 85 of 426

Retained Accessory Power (RAP)
With RAP, your power windows and the audio system
will continue to work for up to 10 minutes after the
engine is turned off or until either door is opened. If a
door is opened, the power windows and audio system
will shut off.
Starting the Engine
Move the shift lever to PARK (P) or NEUTRAL (N) for
an automatic transmission. For a manual transmission
the vehicle can be started in NEUTRAL or any other
gear as long as the clutch is depressed. To restart
a manual when you are already moving, use the
NEUTRAL position only. To restart an automatic when
you are already moving, use NEUTRAL (N).
The keyless access transmitter must be inside the
vehicle for the ignition to work.
Cell phone chargers may interfere with the operation of
the Keyless Access System. Battery chargers should
not be plugged in when starting or turning off the engine.
Notice:Do not try to shift to PARK (P) if your
vehicle is moving. If you do, you could damage the
transmission. Shift to PARK (P) only when your
vehicle is stopped.To start you vehicle, do the following:
1. For an automatic transmission, with your foot on the
brake pedal, press the START button located on the
instrument panel. For a manual transmission, while
pressing in the clutch, press the START button.
If there is not a keyless access transmitter in the
vehicle or if there is something causing interference
with it, the DIC will display NO FOB DETECTED.
SeeDIC Warnings and Messages on page 3-53for
more information.
2. When the engine begins cranking, let go of the
button. The idle speed will decrease as your
engine gets warm.
If the battery in the keyless access transmitter
is weak, the DIC will display FOB BATTERY LOW.
You can still drive the vehicle. See “Battery
Replacement” underKeyless Access System
Operation on page 2-5for more information.
3. If the engine does not start and no DIC message is
displayed, wait 15 seconds before trying again.
Notice:Your engine is designed to work with the
electronics in your vehicle. If you add electrical
parts or accessories, you could change the way the
engine operates. Before adding electrical equipment,
check with your dealer. If you do not, your engine
might not perform properly. Any resulting damage
would not be covered by your vehicle’s warranty.
2-23
Page 86 of 426

Stopping Your Engine
If your vehicle has an automatic transmission, move the
shift lever to PARK (P) and press the ACC button
located on the instrument panel. If the shifter is not in
PARK (P), the vehicle will go into accessory mode
and the DIC will display SHIFT TO PARK. Once the
shifter is moved to PARK (P), the vehicle will turn off.
If your vehicle has a manual transmission, move the shift
lever to REVERSE (R).
If the keyless access transmitter is not detected inside
the vehicle when it is turned to off, the DIC will
display NO FOB – OFF OR RUN?.
SeeDIC Warnings and Messages on page 3-53for
more information.
Engine Coolant Heater
Your vehicle may be equipped with an engine coolant
heater.
In very cold weather, 0°F (−18°C) or colder, the engine
coolant heater can help. You will get easier starting
and better fuel economy during engine warm-up.
Usually, the coolant heater should be plugged in a
minimum of four hours prior to starting your vehicle.
At temperatures above 32°F (0°C), use of the coolant
heater is not required. Your vehicle may also have
an internal thermostat in the plug end of the cord. This
will prevent operation of the engine coolant heater
when the temperature is at or above 0°F (−18°C) as
noted on the cord.
2-24
Page 131 of 426

4. Push and hold the
bottom of the power
convertible top button,
located to the left of the
steering wheel, on the
instrument panel.
The windows will automatically lower and the convertible
top will lower into the rear of the vehicle. A chime will
sound when the convertible top has lowered completely.
If the radio is on the sound may be muted for a brief time.
If the convertible top is operated multiple times, the
engine should be running to prevent drain on the
vehicle’s battery. Under certain conditions, the Driver
Information Center (DIC) may display a message
regarding the power convertible top. SeeDIC Warnings
and Messages on page 3-53for more information.Raising the Power Convertible Top
Notice:If you raise or lower the convertible top
while the vehicle is in motion, you could damage the
top or the top mechanism. The repairs would not
be covered by your warranty. Always put an
automatic transmission in PARK (P) or a manual
transmission in NEUTRAL before raising or lowering
the convertible top.
1. Park on a level surface. The vehicle must be
running or in ACC. Shift an automatic transmission
into PARK (P) and set the parking brake. Shift a
manual transmission into NEUTRAL and set
the parking brake.
2. Make sure the trunk lid is closed and the rear trunk
partition in the rear storage area is in the fastened
upright position, and that no objects are forward
of the divider. See “Rear Trunk Partition” under
Rear Storage Area on page 2-52.
3. Push and hold the top of the power convertible top
button. The top will raise and the windows will lower
if they were in the raised position. A chime will
sound when the top is raised completely.
2-69
Page 137 of 426

Instrument Panel Overview...............................3-4
Hazard Warning Flashers................................3-6
Other Warning Devices...................................3-6
Horn .............................................................3-6
Tilt Wheel.....................................................3-6
Turn Signal/Multifunction Lever.........................3-8
Turn and Lane-Change Signals (Auto Signal).....3-8
Headlamp High/Low-Beam Changer..................3-9
Flash-to-Pass.................................................3-9
Windshield Wipers..........................................3-9
Windshield Washer.......................................3-10
Cruise Control..............................................3-11
Exterior Lamps.............................................3-15
Wiper Activated Headlamps............................3-16
Headlamps on Reminder................................3-16
Daytime Running Lamps (DRL).......................3-16
Fog Lamps ..................................................3-17
Twilight Sentinel
®..........................................3-18
Exterior Lighting Battery Saver........................3-19
Instrument Panel Brightness...........................3-19
Courtesy Lamps...........................................3-19
Entry/Exit Lighting.........................................3-19
Reading Lamps............................................3-20
Battery Run-Down Protection..........................3-20
Head-Up Display (HUD).................................3-20
Accessory Power Outlet(s).............................3-24
Ashtray(s) and Cigarette Lighter......................3-25Climate Controls............................................3-25
Dual Automatic Climate Control System...........3-25
Outlet Adjustment.........................................3-30
Passenger Compartment Air Filter...................3-31
Warning Lights, Gages, and Indicators............3-32
Instrument Panel Cluster................................3-33
Speedometer and Odometer...........................3-34
Tachometer.................................................3-34
Safety Belt Reminder Light.............................3-34
Airbag Readiness Light..................................3-34
Passenger Airbag Status Indicator...................3-35
Voltmeter Gage............................................3-37
One-to-Four Shift Light
(Manual Transmission)...............................3-38
Brake System Warning Light..........................3-38
Anti-Lock Brake System Warning Light.............3-39
Traction Control System (TCS) Warning Light . . .3-40
Active Handling System Light.........................3-40
Engine Coolant Temperature Gage..................3-41
Tire Pressure Light.......................................3-42
Malfunction Indicator Lamp.............................3-42
Engine Oil Pressure Gage.............................3-45
Security Light...............................................3-46
Fog Lamp Light............................................3-46
Lights On Reminder......................................3-46
Highbeam On Light.......................................3-46
Fuel Gage...................................................3-47
Section 3 Instrument Panel
3-1
Page 138 of 426

Driver Information Center (DIC).......................3-48
DIC Controls and Displays.............................3-48
DIC Warnings and Messages.........................3-53
Other Messages...........................................3-67
DIC Vehicle Personalization............................3-68
Audio System(s).............................................3-77
Setting the Time...........................................3-78
Radio with CD..............................................3-79
Navigation/Radio System...............................3-99Theft-Deterrent Feature..................................3-99
Radio Reception.........................................3-100
Care of Your CDs.......................................3-100
Care of the CD Player.................................3-101
Diversity Antenna System.............................3-101
XM™ Satellite Radio Antenna System
(Roof or Trunk Mounted)..........................3-101
XM™ Satellite Radio Antenna System
(Diversity System)....................................3-101
Chime Level Adjustment...............................3-101
Section 3 Instrument Panel
3-2
Page 140 of 426

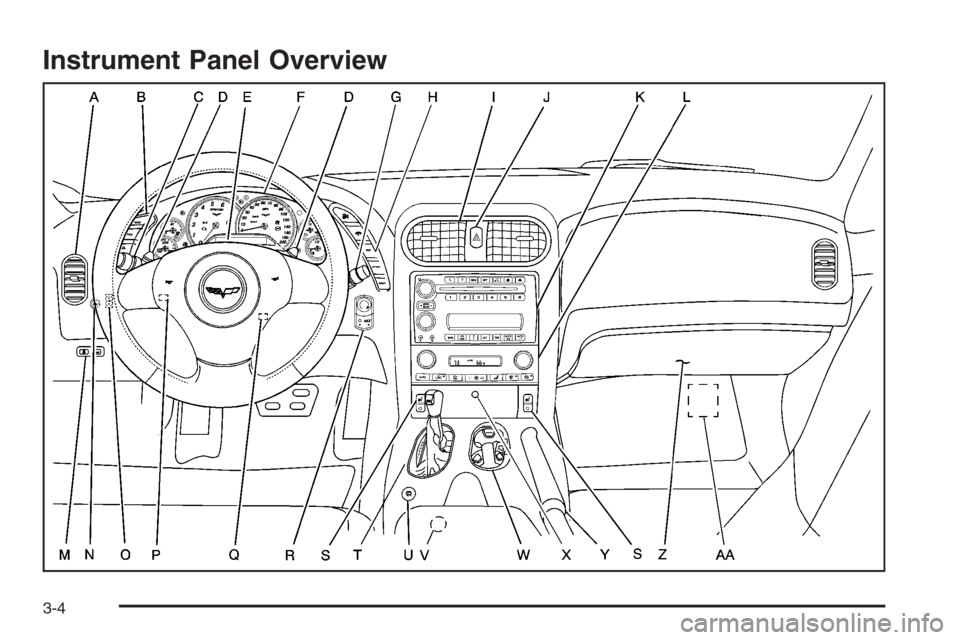
Instrument Panel Overview
3-4