2006 CHEVROLET COLORADO stop start
[x] Cancel search: stop startPage 112 of 434
Manual Transmission Operation
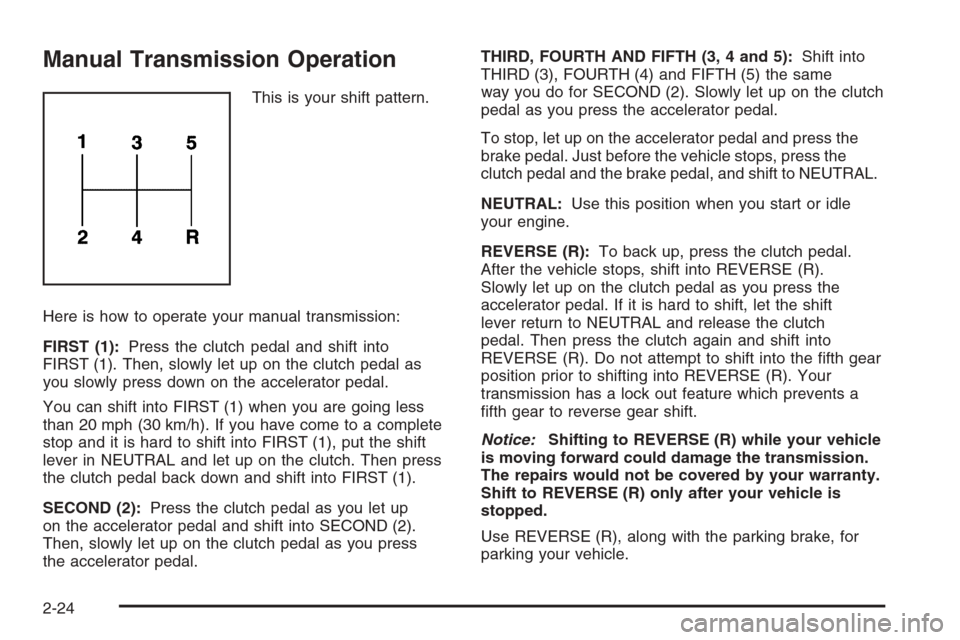
This is your shift pattern.
Here is how to operate your manual transmission:
FIRST (1):Press the clutch pedal and shift into
FIRST (1). Then, slowly let up on the clutch pedal as
you slowly press down on the accelerator pedal.
You can shift into FIRST (1) when you are going less
than 20 mph (30 km/h). If you have come to a complete
stop and it is hard to shift into FIRST (1), put the shift
lever in NEUTRAL and let up on the clutch. Then press
the clutch pedal back down and shift into FIRST (1).
SECOND (2):Press the clutch pedal as you let up
on the accelerator pedal and shift into SECOND (2).
Then, slowly let up on the clutch pedal as you press
the accelerator pedal.THIRD, FOURTH AND FIFTH (3, 4 and 5):Shift into
THIRD (3), FOURTH (4) and FIFTH (5) the same
way you do for SECOND (2). Slowly let up on the clutch
pedal as you press the accelerator pedal.
To stop, let up on the accelerator pedal and press the
brake pedal. Just before the vehicle stops, press the
clutch pedal and the brake pedal, and shift to NEUTRAL.
NEUTRAL:Use this position when you start or idle
your engine.
REVERSE (R):To back up, press the clutch pedal.
After the vehicle stops, shift into REVERSE (R).
Slowly let up on the clutch pedal as you press the
accelerator pedal. If it is hard to shift, let the shift
lever return to NEUTRAL and release the clutch
pedal. Then press the clutch again and shift into
REVERSE (R). Do not attempt to shift into the �fth gear
position prior to shifting into REVERSE (R). Your
transmission has a lock out feature which prevents a
�fth gear to reverse gear shift.
Notice:Shifting to REVERSE (R) while your vehicle
is moving forward could damage the transmission.
The repairs would not be covered by your warranty.
Shift to REVERSE (R) only after your vehicle is
stopped.
Use REVERSE (R), along with the parking brake, for
parking your vehicle.
2-24
Page 142 of 434

Turn and Lane-Change Signals
The turn signal has two upward (for right) and
two downward (for left) positions. These positions
allow you to signal a turn or a lane change.
To signal a turn, move the lever all the way up or down.
When the turn is �nished, the lever will automatically
return to the off position.
To signal a lane change, raise or lower the lever until
the arrow starts to �ash. Hold it there until the change is
completed. The lever will return by itself when released.
An arrow on the instrument
panel cluster will �ash
in the direction of the turn
or lane change.
As you signal a turn or a lane change, if the arrows
�ash more quickly than normal, a signal bulb may
be burned out and other drivers will not see your
vehicle’s turn signal.If a bulb is burned out, replace it to help avoid an
accident. If the arrows do not go on at all when signaling
a turn, check for a burned-out bulb or a blown fuse.
For bulb replacement, seeTaillamps, Turn Signal,
Stoplamps and Back-up Lamps on page 5-49. For a
blown fuse or circuit breaker, seeFuses and Circuit
Breakers on page 5-99
Turn Signal On Chime
If a turn signal is left on for more than 3/4 of a mile
(1.2 km), a chime will sound at each �ash of the turn
signal and the message TURN SIGNAL will also appear
in the DIC. To turn the chime and message off, move
the turn signal lever to the off position.
See “TURN SIGNAL” underDIC Warnings and
Messages on page 3-41DIC Warnings and Messages
for more information.
3-8
Page 143 of 434

Headlamp High/Low-Beam Changer
53(Headlamp High/Low Beam Changer):
To change the headlamps from low to high beam, push
the lever toward the instrument panel. To return to
low-beam headlamps, pull the multifunction lever toward
you. Then release it.
When the high beams are
on, this indicator light on
the instrument panel
cluster will also be on.
Flash-to-Pass
This feature lets you use your high-beam headlamps to
signal a driver in front of you that you want to pass.
It works even if your headlamps are in the automatic
position.To use it, pull the turn signal lever toward you, then
release it.
If your headlamps are in the automatic position or on
low beam, your high-beam headlamps will turn on.
They’ll stay on as long as you hold the lever toward you.
The high-beam indicator on the instrument panel
cluster will come on. Release the lever to return to
normal operation.
Windshield Wipers
You control the windshield wipers by turning the band
with the wiper symbol on it.
The windshield wipers work in all ignition positions,
except off. This includes the Retained Access Power
mode. SeeRetained Accessory Power (RAP) on
page 2-18.
8(Mist):For a single wiping cycle, turn the band to
mist. Hold it there until the wipers start. Then let go.
The wipers will stop after one wipe. If you want
more wipes, hold the band on mist longer.
3-9
Page 165 of 434
When the ignition is on, the brake system warning light
will also come on when you set your parking brake.
SeeParking Brake on page 2-30for more information.
The light will stay on if your parking brake does not
release fully. If it stays on after your parking brake is
fully released, it means you have a brake problem.
If the light comes on while you are driving, pull off the
road and stop carefully. You may notice that the pedal
is harder to push, or the pedal may go closer to the
�oor. It may take longer to stop. If the light is still
on, have the vehicle towed for service. SeeTowing
Your Vehicle on page 4-50.
{CAUTION:
Your brake system may not be working properly
if the brake system warning light is on. Driving
with the brake system warning light on can lead
to an accident. If the light is still on after you
have pulled off the road and stopped carefully,
have the vehicle towed for service.
Anti-Lock Brake System
Warning Light
With the anti-lock brake
system, this light will
come on brie�y when
you start your engine
to show it is working.
Then it will turn off.
This is normal.
If the light stays on, or comes on when you’re driving,
your vehicle needs service. If the regular brake
system warning light isn’t on, you still have brakes,
but you don’t have anti-lock brakes. If the regular
brake system warning light is also on, you don’t have
anti-lock brakes and there’s a problem with your regular
brakes. SeeBrake System Warning Light on page 3-30.
The anti-lock brake system warning light should
come on brie�y when you turn the ignition key to ON.
If the light doesn’t come on then, have it �xed so it
will be ready to warn you if there is a problem.
3-31
Page 167 of 434

Notice:Modi�cations made to the engine,
transmission, exhaust, intake, or fuel system of
your vehicle or the replacement of the original tires
with other than those of the same Tire Performance
Criteria (TPC) can affect your vehicle’s emission
controls and may cause this light to come on.
Modi�cations to these systems could lead to costly
repairs not covered by your warranty. This may
also result in a failure to pass a required Emission
Inspection/Maintenance test. SeeAccessories
and Modifications on page 5-3.
This light should come on, as a check to show you it
is working, when the ignition is on and the engine is not
running. If the light does not come on, have it repaired.
This light will also come on during a malfunction in
one of two ways:
Light Flashing— A mis�re condition has been
detected. A mis�re increases vehicle emissions
and may damage the emission control system
on your vehicle. Diagnosis and service may
be required.
Light On Steady— An emission control system
malfunction has been detected on your vehicle.
Diagnosis and service may be required.
If the Light is Flashing
The following may prevent more serious damage to
your vehicle:
Reducing vehicle speed
Avoiding hard accelerations
Avoiding steep uphill grades
If you are towing a trailer, reduce the amount of
cargo being hauled as soon as it is possible
If the light stops �ashing and remains on steady, see
“If the Light Is On Steady” following.
If the light continues to �ash, when it is safe to do
so, stop the vehicle. Find a safe place to park your
vehicle. Turn the key off, wait at least 10 seconds and
restart the engine. If the light remains on steady, see
“If the Light Is On Steady” following. If the light is
still �ashing, follow the previous steps, and see your
dealer for service as soon as possible.
3-33
Page 192 of 434
Playing a CD
Insert a CD partway into the slot, label side up. The
player will pull it in, and READING will appear on
the display. The CD should begin playing. If you want
to insert a CD with the ignition off, �rst press the
eject button or the DISPL knob.
If the ignition or radio is turned off with a CD in the
player it will stay in the player. When the ignition or radio
is turned on, the CD will start to play where it stopped,
if it was the last selected audio source.
When the CD is inserted, the CD symbol will appear
on the display. As each new track starts to play,
the track number will appear on the display.
The CD player can play the smaller 3 inch (8 cm) single
CDs with an adapter ring. Full-size CDs and the
smaller CDs are loaded in the same manner.
If playing a CD-R, the sound quality may be reduced
due to CD-R quality, the method of recording, the quality
of the music that has been recorded, and the way the
CD-R has been handled. There may be an increase
in skipping, difficulty in �nding tracks, and/or difficulty in
loading and ejecting. If these problems occur, check
the bottom surface of the CD. If the surface of the CD
is damaged, such as cracked, broken, or scratched,
the CD will not play properly. If the surface of the CD is
soiled, seeCare of Your CDs on page 3-77for more
information.If there is no apparent damage, try a known good CD.
Do not add any label to a CD, it could get caught in the
CD player. If a CD is recorded on a personal computer
and a description label is needed, try labeling the top of
the recorded CD with a marking pen instead.
Notice:If you add any label to a CD, insert more
than one CD into the slot at a time, or attempt
to play scratched or damaged CDs, you could
damage the CD player. When using the CD player,
use only CDs in good condition without any
label, load one CD at a time, and keep the CD player
and the loading slot free of foreign materials,
liquids, and debris.
If an error appears on the display, see “CD Messages”
later in this section.
1 FLD
x(Previous):This button is inactive when
playing a CD.
2 FLD
w(Next):This button is inactive when playing
a CD.
3 REV (Reverse):Press and hold this pushbutton to
reverse quickly within a track. Press and hold this
pushbutton for less than two seconds to reverse at
10 times the normal playing speed. Press and hold it
for more than two seconds to reverse at 20 times
the normal playing speed. Release this pushbutton to
play the passage. ET and the elapsed time of the track
will appear on the display.
3-58
Page 193 of 434
4 FWD (Forward):Press and hold this pushbutton to
advance quickly within a track. Press and hold this
pushbutton for less than two seconds to advance at
six times the normal playing speed. Press and hold it
for more than two seconds to advance at 17 times
the normal playing speed. Release this pushbutton to
play the passage. ET and the elapsed time of the track
will appear on the display.
6 RDM (Random):Press this pushbutton to hear the
tracks in random, rather than sequential, order. RDM ON
will appear on the display. RDM and the track number
will appear on the display when each track starts to play.
Press RDM again to turn off random play. RDM OFF
will appear on the display.
qSEEKr:Press the left arrow to go to the start
of the current or the previous track. Press the right arrow
to go to the start of the next track. Pressing either
arrow for more than two seconds will scan the next
tracks, playing the �rst eight seconds of each track until
all of the tracks have been previewed. Press the
button again to stop scanning and to play the track.
oTUNEp:Turning the TUNE knob will fast
track reverse or advance through tracks. The track
number will appear on the display for each track.DISPL (Display):Press this knob to see how long the
current track has been playing. ET and the elapsed
time of the track will appear on the display. To change
the default on the display (track or elapsed time),
press this knob until you see the display you want, then
press and hold the knob for two seconds. The radio
will produce one beep and the selected display will now
be the default.
BAND:Press this button to listen to the radio when
a CD is playing. The inactive CD will remain safely
inside the radio for future listening.
CD AUX (Auxiliary):Press this button to play a CD
when listening to the radio. The CD symbol will appear
on the display when a CD is loaded.
Z(Eject):Press this button to eject a CD. Eject may
be activated with either the ignition or radio off. CDs
may be loaded with the ignition and radio off if this
button is pressed �rst.
3-59
Page 196 of 434
Playing an MP3
Insert a CD partway into the slot, label side up. The
player will pull it in, and READING will appear on
the display. The CD should begin playing and the CD
symbol will appear on the display. If you want to insert
a CD with the ignition off, �rst press the eject button
or the DISPL knob.
If the ignition or radio is turned off with a CD in the
player it will stay in the player. When the ignition or radio
is turned on, the CD will start to play where it stopped,
if it was the last selected audio source.
As each new track starts to play, the track number will
appear on the display.
The CD player can play the smaller 3 inch (8 cm) single
CDs with an adapter ring. Full-size CDs and the
smaller CDs are loaded in the same manner.
If playing a CD-R, the sound quality may be reduced
due to CD-R quality, the method of recording, the quality
of the music that has been recorded, and the way the
CD-R has been handled. There may be an increase
in skipping, difficulty in �nding tracks, and/or difficulty in
loading and ejecting. If these problems occur, check
the bottom surface of the CD. If the surface of the CD
is damaged, such as cracked, broken, or scratched,
the CD will not play properly. If the surface of the CD
is soiled, seeCare of Your CDs on page 3-77for
more information.If there is no apparent damage, try a known good CD.
Do not add any label to a CD, it could get caught in the
CD player. If a CD is recorded on a personal computer
and a description label is needed, try labeling the top
of the recorded CD with a marking pen instead.
Notice:If you add any label to a CD, insert more
than one CD into the slot at a time, or attempt
to play scratched or damaged CDs, you could
damage the CD player. When using the CD player,
use only CDs in good condition without any
label, load one CD at a time, and keep the CD player
and the loading slot free of foreign materials,
liquids, and debris.
If an error appears on the display, see “CD Messages”
later in this section.
1 FLD
x(Previous Folder):Press this pushbutton
to go to the �rst track in the previous folder. Pressing
this button while in folder random mode will take you
to the previous folder and random the tracks in that
folder.
2 FLD
w(Next Folder):Press this pushbutton to
go to the �rst track in the next folder. Pressing
this button while in folder random mode will take you
to the next folder and random the tracks in that folder.
3-62