Page 394 of 480

Notice:Lifting your vehicle improperly can damage
your vehicle and result in costly repairs not
covered by your warranty. To lift your vehicle
properly, follow the advice in this part.
To help prevent vehicle damage:
Be sure the jack you are using meets the weight
standards for your vehicle and is in good
working order.
Be sure to place a block or pad between the
jack and the vehicle.
Make sure the jack you are using only contacts
the jacking location lift points and is not leaning
on any other vehicle components such as the
rocker panels, the �oor pan, or the stone guard
moldings.
Lift only in the areas shown in the following
pictures.
Lifting From the Front
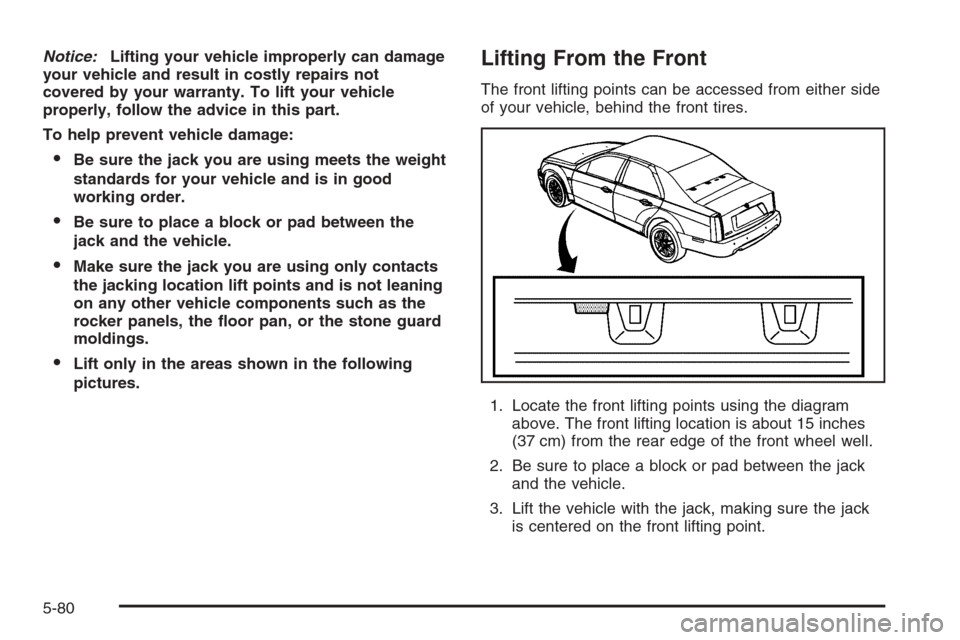
The front lifting points can be accessed from either side
of your vehicle, behind the front tires.
1. Locate the front lifting points using the diagram
above. The front lifting location is about 15 inches
(37 cm) from the rear edge of the front wheel well.
2. Be sure to place a block or pad between the jack
and the vehicle.
3. Lift the vehicle with the jack, making sure the jack
is centered on the front lifting point.
5-80
Page 395 of 480

Lifting From the Rear
The rear lifting points can be accessed from either side
of your vehicle, in front of the rear tires.
1. Locate the rear lifting points using the diagram
above. The rear lifting location is about 7 inches
(17 cm) from the front edge of the rear wheel well.
2. Be sure to place a block or pad between the jack
and the vehicle.
3. Lift the vehicle with the jack, making sure the jack
is centered on the rear lifting point.
SeeDoing Your Own Service Work on page 5-4.
If a Tire Goes Flat
It is unusual for a tire to blowout while you are driving,
especially if you maintain your tires properly. See
Tires on page 5-56. If air goes out of a tire, It is much
more likely to leak out slowly. But if you should ever
have a blowout, here are a few tips about what to expect
and what to do:
If a front tire fails, the �at tire will create a drag that
pulls the vehicle toward that side. Take your foot off the
accelerator pedal and grip the steering wheel �rmly.
Steer to maintain lane position, and then gently brake to
a stop well out of the traffic lane.
A rear blowout, particularly on a curve, acts much like a
skid and may require the same correction you would
use in a skid. In any rear blowout, remove your foot from
the accelerator pedal. Get the vehicle under control
by steering the way you want the vehicle to go. It may
be very bumpy and noisy, but you can still steer. Gently
brake to a stop, well off the road if possible.
5-81
Page 401 of 480
3. Find the vehicle’s jacking location using the
diagram above and corresponding hoisting notches
located in the plastic molding on the vehicle’s
frame. The notches in the plastic molding are
marked with a triangle shape to help you �nd them.
4. Attach the wheel wrench to the jack.
{CAUTION:
Getting under a vehicle when it is jacked up is
dangerous. If the vehicle slips off the jack you
could be badly injured or killed. Never get under
a vehicle when it is supported only by a jack.
{CAUTION:
Raising your vehicle with the jack improperly
positioned can damage the vehicle and even
make the vehicle fall. To help avoid personal
injury and vehicle damage, be sure to �t the
jack lift head into the proper location before
raising the vehicle.
5-87
Page 407 of 480
Compact Spare Tire and Tools
Use the following diagram as a guide for storing the
compact spare tire and tools in the trunk:
A. Compact Spare
Tire Cover
B. Plastic Wing Nut
C. Retainer
D. Jack Container Package
(With Wheel Wrench
and Jack)E. Compact Spare Tire
F. Foam Support
G. Bolt
H. Wheel Wrench
I. Jack
J. Jack Container1. Open the trunk. SeeTrunk on page 2-14.
2. Ensure the foam support (F) is in place in the
trunk area.
3. Reinstall the compact spare tire (E) with the valve
stem up, and line up the wheel nut hole with the
bolt (G) or wheel center and place on the
compartment �oor.
4. Insert the jack container (J) with wheel wrench (H)
and jack (I) into the center of the compact spare
tire making sure to line up the wheel nut hole with
the bolt (G) on the compartment �oor.
5. Secure the tire and wheel with the retainer (C) and
wing nut (B).
6. Reinstall the compact spare tire cover (A).
5-93