2006 BMW M3 COUPE key
[x] Cancel search: keyPage 96 of 170

96
If – for example for valet parking –
you turn over only your spare key,
refer to page 28, then access to the
glove compartment and to the luggage
compartment is not possible.<
Storage compartmentsFront center armrest*To open: press the button and fold up.Additional compartments and
netsYou will find additional storage areas in
the doors and in the center console
above the ashtray. Storage nets are
located on the backrests of the front
seats.
Beverage holders, coin boxA coin box and two beverage holders
are provided in the center console.
Do not place any glass containers
in the beverage holders, as this
increases the risk of injury in the event
of an accident.<
Glove compartment
Page 98 of 170

98
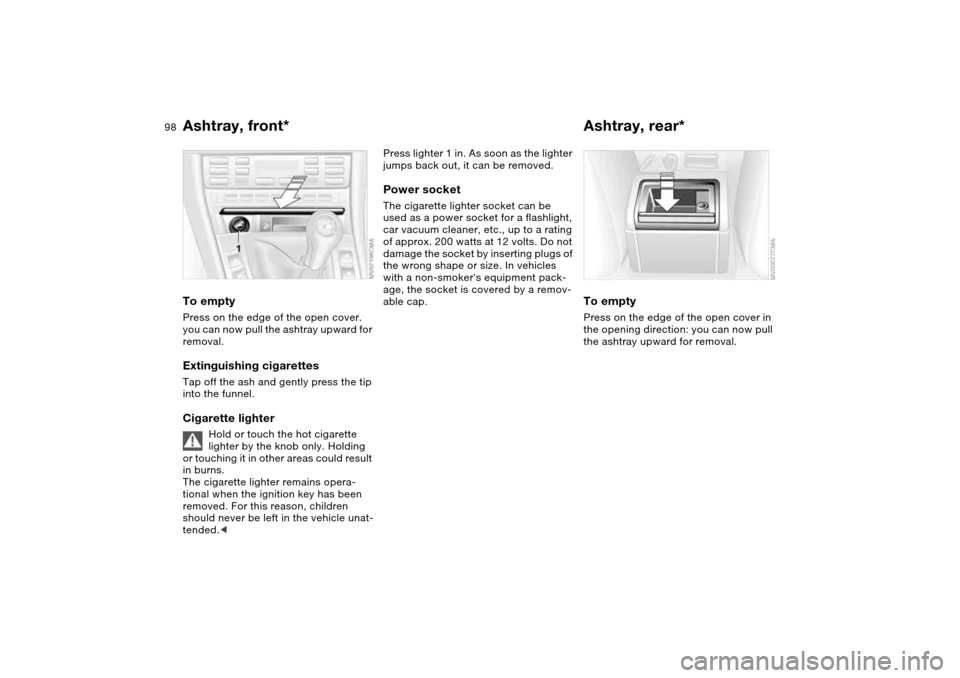
Ashtray, front*To emptyPress on the edge of the open cover.
you can now pull the ashtray upward for
removal.Extinguishing cigarettesTap off the ash and gently press the tip
into the funnel.Cigarette lighter
Hold or touch the hot cigarette
lighter by the knob only. Holding
or touching it in other areas could result
in burns.
The cigarette lighter remains opera-
tional when the ignition key has been
removed. For this reason, children
should never be left in the vehicle unat-
tended.<
Press lighter 1 in. As soon as the lighter
jumps back out, it can be removed.Power socketThe cigarette lighter socket can be
used as a power socket for a flashlight,
car vacuum cleaner, etc., up to a rating
of approx. 200 watts at 12 volts. Do not
damage the socket by inserting plugs of
the wrong shape or size. In vehicles
with a non-smoker's equipment pack-
age, the socket is covered by a remov-
able cap.
Ashtray, rear*To emptyPress on the edge of the open cover in
the opening direction: you can now pull
the ashtray upward for removal.
Page 139 of 170

139
Using the M Mobility systemTo repair a flat tire using the M Mobility
system, proceed as follows:
>Fill with sealant, refer to page 139
>Distribute the sealant, refer to
page 139
>Restore tire inflation pressure, refer
to page 139.
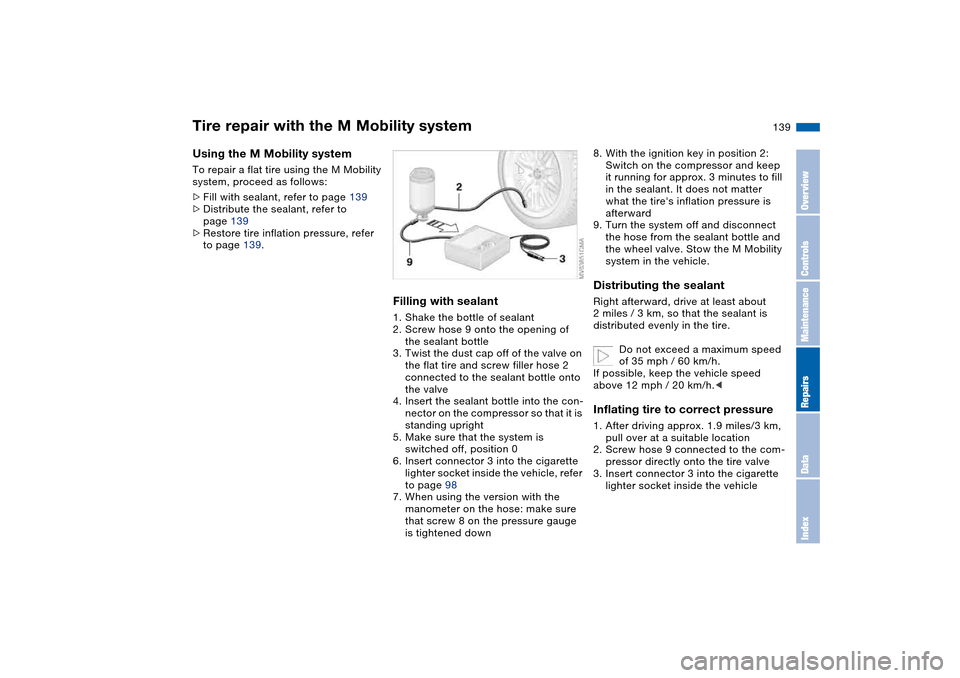
Filling with sealant1. Shake the bottle of sealant
2. Screw hose 9 onto the opening of
the sealant bottle
3. Twist the dust cap off of the valve on
the flat tire and screw filler hose 2
connected to the sealant bottle onto
the valve
4. Insert the sealant bottle into the con-
nector on the compressor so that it is
standing upright
5. Make sure that the system is
switched off, position 0
6. Insert connector 3 into the cigarette
lighter socket inside the vehicle, refer
to page 98
7. When using the version with the
manometer on the hose: make sure
that screw 8 on the pressure gauge
is tightened down
8. With the ignition key in position 2:
Switch on the compressor and keep
it running for approx. 3 minutes to fill
in the sealant. It does not matter
what the tire's inflation pressure is
afterward
9. Turn the system off and disconnect
the hose from the sealant bottle and
the wheel valve. Stow the M Mobility
system in the vehicle.Distributing the sealantRight afterward, drive at least about
2 miles / 3 km, so that the sealant is
distributed evenly in the tire.
Do not exceed a maximum speed
of 35 mph / 60 km/h.
If possible, keep the vehicle speed
above 12 mph / 20 km/h.
2. Screw hose 9 connected to the com-
pressor directly onto the tire valve
3. Insert connector 3 into the cigarette
lighter socket inside the vehicle
Tire repair with the M Mobility system
OverviewControlsMaintenanceRepairsDataIndex
Page 140 of 170

140
4. Adjust the tire inflation pressure to
29 psi / 200 kilopascal. For this pur-
pose, with the ignition key in
position 2:
>Increase the tire pressure: switch
on the compressor, position I. To
check the current inflation pres-
sure, turn off the device briefly
>Reduce the tire pressure: press
button 8, or turn screw 8 on the
manometer.
Do not run the compressor for
longer than 10 minutes, otherwise
the unit may overheat and be dam-
aged.<
If the tire fails to hold the pres-
sure, drive the vehicle again, see
Distributing the sealant. Then repeat
Steps 1 through 4 once.
The use of the M Mobility system may
be ineffective if the damaged area in
the tire is larger than approx. 1/8 in /
4 mm. If the tire cannot be temporarily
repaired with the M Mobility system,
please consult the nearest BMW cen-
ter, or a workshop that has appropri-
ately trained personnel working in
accordance with BMW specifications,<
The tire pressure must be at least
29 psi / 200 kilopascal. Otherwise,
do not continue driving.<
Driving on
Do not exceed the maximum
speed limit of 45 mph / 80 km/h;
otherwise, accidents may occur.<
Have the damaged tire replaced
as soon as possible. Reinitialize
the Flat Tire Monitor, and refer to
page 84 for further information.
Have the sealant bottle of the M Mobil-
ity system replaced.<
Battery
Battery posts, terminals, and
related accessories contain lead
and lead compounds. Wash hands after
handling.<
MaintenanceThe battery is completely maintenance-
free. This means that the original bat-
tery acid will normally last for the ser-
vice life of the battery under moderate
climate conditions. Your BMW center
will be glad to advise you if you have
any questions concerning the battery.
Please consult your BMW center
whenever you have any questions
concerning the battery.
connections provided in the engine
compartment. Terminals, refer to Jump-
starting, page 143.
Tire repair with the M Mobility system
Page 142 of 170

142Giving and receiving assistance
Receiving assistanceThe BMW Group's Mobile Service
offers you 24-hour assistance in the
event of a breakdown, even on week-
ends and holidays.
The telephone numbers of the Mobile
Service control center in your country
are listed in the Contact brochure.
If your vehicle has the necessary equip-
ment, you can contact the Mobile Ser-
vice or issue an emergency call using
buttons in the interior rearview mirror.
When an emergency call is initiated, a
telephone connection is established
with the BMW Assist response center.Fold down the cover.
1Emergency call
2Mobile Service
Requirements for initiating an emer-
gency call or contacting Mobile Service:
>Ignition key in position 1 or higher
>The car phone must be registered
with a mobile network
>The emergency call system must be
operational.
Initiating an emergency call*Press button 1 for at least 2 seconds.
The indicator lamp above the buttons
lights up. As soon as a telephone con-
nection has been set up to the BMW
Assist response center, the indicator
lamp flashes.
If the situation permits you to do so,
wait in the vehicle until the voice con-
nection is established. You can then
provide detailed information to the
response center.
If your vehicle is equipped with an acti-
vated BMW Assist and the current loca-
tion of the vehicle can be determined,
this location is transmitted to the BMW
Assist response center.
If the navigation system has failed,
the current location of the vehicle
is not transmitted.<
If the indicator lamp is flashing but you
cannot hear the BMW Assist response
center over the hands-free system, it is
possible that e.g. the hands-free sys-
tem is malfunctioning. The BMW Assist
response center can still hear you,
however.
If certain requirements are met, an
emergency call is automatically initiated
after a serious accident. The automatic
emergency call will not be hindered by
pressing the button.
For technical reasons, the emer-
gency call function cannot be
guaranteed in certain unfavorable con-
ditions.<
Page 145 of 170

145
Towing and tow-starting the vehicle
Always observe all applicable
towing laws and regulations.<
Using the towing eyeletThe screw-in towing eyelet is stored in
the luggage compartment under the
floor panel and must remain with the
vehicle at all times. It can be attached
at the front or rear of your BMW.
Observe the following instruc-
tions in order to avoid damaging
the towing eyelet or the vehicle: use
only the towing eyelet supplied with the
vehicle, and screw it in firmly until it
stops. Use the towing eyelet for towing
on paved roads only. Avoid subjecting
the towing eyelet to lateral loads, e.g.
do not lift the vehicle using the towing
eyelet.<
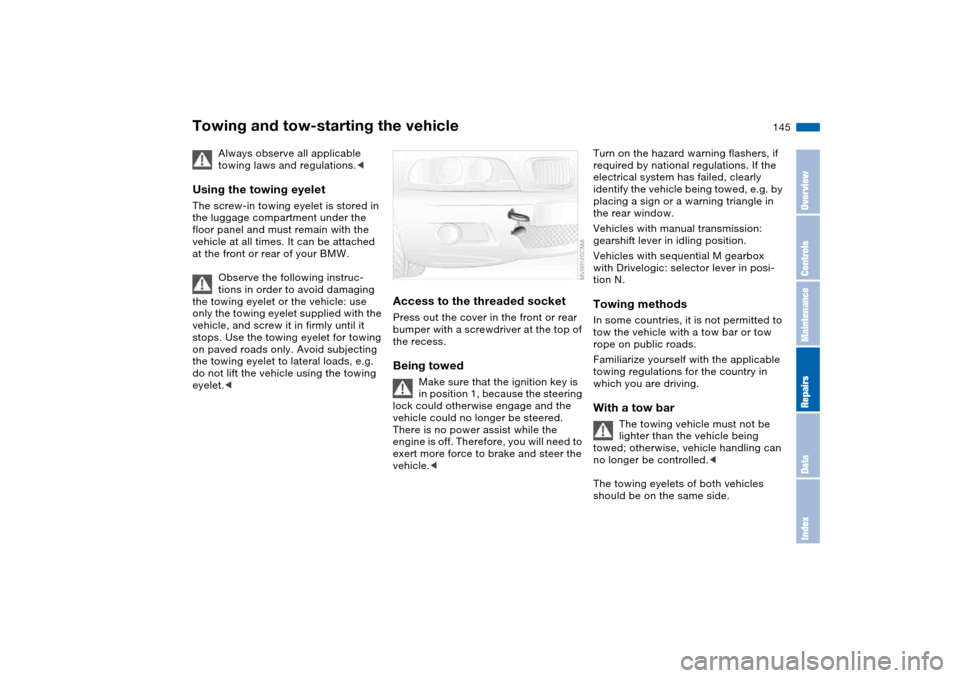
Access to the threaded socketPress out the cover in the front or rear
bumper with a screwdriver at the top of
the recess.Being towed
Make sure that the ignition key is
in position 1, because the steering
lock could otherwise engage and the
vehicle could no longer be steered.
There is no power assist while the
engine is off. Therefore, you will need to
exert more force to brake and steer the
vehicle.<
Turn on the hazard warning flashers, if
required by national regulations. If the
electrical system has failed, clearly
identify the vehicle being towed, e.g. by
placing a sign or a warning triangle in
the rear window.
Vehicles with manual transmission:
gearshift lever in idling position.
Vehicles with sequential M gearbox
with Drivelogic: selector lever in posi-
tion N.Towing methodsIn some countries, it is not permitted to
tow the vehicle with a tow bar or tow
rope on public roads.
Familiarize yourself with the applicable
towing regulations for the country in
which you are driving.With a tow bar
The towing vehicle must not be
lighter than the vehicle being
towed; otherwise, vehicle handling can
no longer be controlled.<
The towing eyelets of both vehicles
should be on the same side.
OverviewControlsMaintenanceRepairsDataIndex
Page 146 of 170

146
If the tow bar can only be used in a
diagonal position, please note the fol-
lowing:
>Clearance is restricted while you are
driving around corners
>The inclination of the tow bar pro-
duces lateral force.
Only attach the tow bar to the
towing eyelets. Other parts of the
vehicles could otherwise be dam-
aged.
Use nylon ropes or straps for tow-
ing because they prevent sudden
jerking movements. Attach the tow rope
only to the towing eyelets. Other parts
of the vehicles could otherwise be
damaged.<
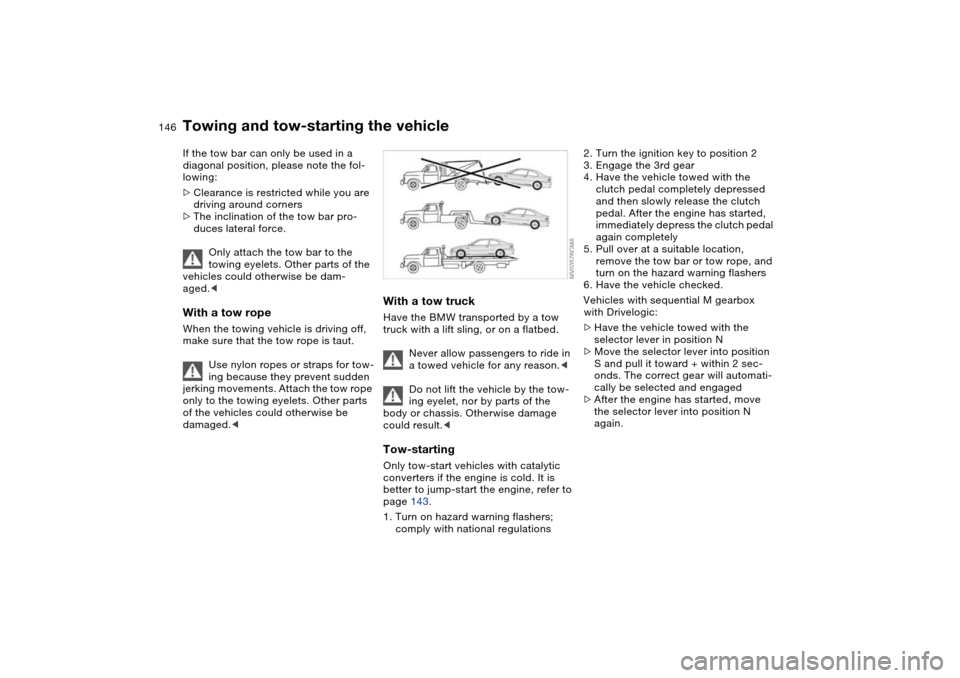
With a tow truckHave the BMW transported by a tow
truck with a lift sling, or on a flatbed.
Never allow passengers to ride in
a towed vehicle for any reason.<
Do not lift the vehicle by the tow-
ing eyelet, nor by parts of the
body or chassis. Otherwise damage
could result.
better to jump-start the engine, refer to
page 143.
1. Turn on hazard warning flashers;
comply with national regulations
2. Turn the ignition key to position 2
3. Engage the 3rd gear
4. Have the vehicle towed with the
clutch pedal completely depressed
and then slowly release the clutch
pedal. After the engine has started,
immediately depress the clutch pedal
again completely
5. Pull over at a suitable location,
remove the tow bar or tow rope, and
turn on the hazard warning flashers
6. Have the vehicle checked.
Vehicles with sequential M gearbox
with Drivelogic:
>Have the vehicle towed with the
selector lever in position N
>Move the selector lever into position
S and pull it toward + within 2 sec-
onds. The correct gear will automati-
cally be selected and engaged
>After the engine has started, move
the selector lever into position N
again.
Towing and tow-starting the vehicle
Page 157 of 170

Everything from A to Z
157
Blower
automatic climate
control 92
BMW Maintenance
System 126
BMW sports seat 44
Bore, refer to Engine
data 150
Bottle holders, see Bever-
age holders 96, 97
Brake fluid 125
indicator lamp 18, 125
level 125
Brake force display 86
Brake lamps
bulb replacement 135
indicator lamp, defective
lamp 77
Brake lamps, refer to Brake
force display 86
Brake pads
brake fluid level 18, 125
breaking in 108
Brake rotors
breaking in 108
Brake system
brake pads, indicator
lamp 19
Brake wear warning
indicator lamp 19Brakes
ABS 111
brake fluid 125
brake force display 86
brake pads 110
breaking in 108
driving notes 109
indicator/warning
lamp 18, 19
parking brake 64
Break-in procedures 108
Bridging, refer to Jump-
starting 143
Bulb replacement 133
Bulb replacement, refer to
Lamps and bulbs 133
Buttons in steering wheel 22
C
California Proposition 65
warning 6
Can holders, see Beverage
holders 96, 97
Capacities 153
Car battery 140
Car care, refer to the Caring
for your vehicle brochure
Car keys, refer to Keys 28
Car phone hookup
microphone 97
Car radio, refer to the
Owner's Manual for RadioCar telephone, refer to the
separate Owner's Manual
Car vacuum cleaner, con-
necting 98
Car wash, refer to the Caring
for your vehicle brochure
Caring for headlamp cov-
ers, refer to the Caring for
your vehicle brochure 133
Carpet care, refer to the
Caring for your vehicle
brochure
Cassette operation, refer to
the Owner's Manual for
Radio/Onboard Computer
CBC Cornering Brake Con-
trol 111
warning lamp 19
CD changer, refer to the
Owner's Manual for
Radio/Onboard Computer
CD operation, refer to the
Owner's Manual for
Radio/Onboard Computer
Center high-mount brake
lamp
bulb replacement 136
Central locking system 28
button 33
passenger
compartment 33
Charge indicator lamp 18Check Control 77
Check Gas Cap
indicator lamp 19
Child seats, refer to Child-
restraint systems 55
Child-restraint systems 55
Cigarette lighter 98
Cleaning chrome parts, refer
to the Caring for your vehi-
cle brochure
Cleaning light alloy wheels,
refer to the Caring for your
vehicle brochure
Cleaning the vehicle, refer to
the Caring for your vehicle
brochure
Cleaning windshield 73
Clock 78
12-/24-hour mode 78
setting, refer also to the
Owner's Manual for
Radio/Onboard Computer
Closing
from inside 33
from outside 29
Clothes hooks 99
Clutch
breaking in 108
Cockpit 14
Code, refer to the Owner's
Manual for Radio/Onboard
Computer
OverviewControlsMaintenanceRepairsDataIndex