2006 BMW M3 COUPE ECO mode
[x] Cancel search: ECO modePage 78 of 170

78
ClockIf you wish to have a permanent time
display, you can make this adjustment
in the car radio display, refer to the
Owner's Manual for Radio.
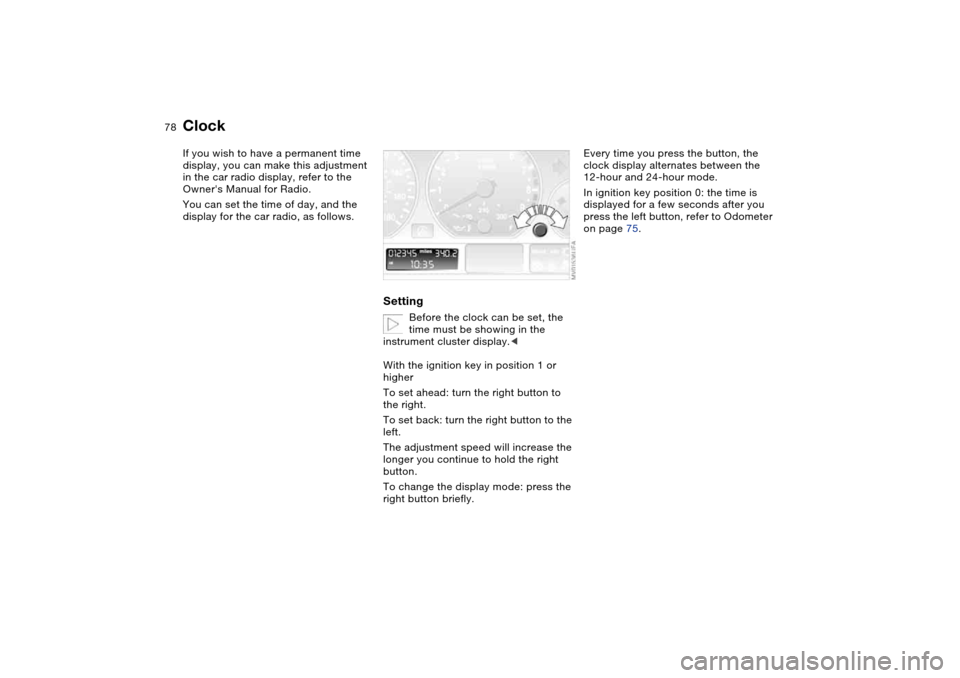
You can set the time of day, and the
display for the car radio, as follows.
Setting
Before the clock can be set, the
time must be showing in the
instrument cluster display.<
With the ignition key in position 1 or
higher
To set ahead: turn the right button to
the right.
To set back: turn the right button to the
left.
The adjustment speed will increase the
longer you continue to hold the right
button.
To change the display mode: press the
right button briefly.
Every time you press the button, the
clock display alternates between the
12-hour and 24-hour mode.
In ignition key position 0: the time is
displayed for a few seconds after you
press the left button, refer to Odometer
on page 75.
Page 82 of 170

82
Dynamic Stability Control (DSC)The conceptDSC supports vehicle stability, even in
critical driving situations.
DSC optimizes driving stability and
traction during acceleration and when
you are starting from a standstill. In
addition, it also recognizes unstable
vehicle conditions, such as understeer-
ing and oversteering. By reducing
engine power and applying brakes at
the wheels, DSC helps to keep the
vehicle on a steady course within phys-
ically feasible limits.
DSC starts up automatically each time
you start the engine.
The laws of physics cannot be
repealed, even with DSC. The
driver remains responsible for the con-
sequences of any inadequate driving
style. Therefore, do not take any risks
because of the additional safety pro-
vided. Do not make any modifications
to the DSC system. Allow only autho-
rized technicians to perform service
procedures on the DSC.<
Indicator lamp for DSC
The indicator lamp in the instru-
ment cluster will go out shortly
after the ignition has been
switched on, refer to page 20.
>The indicator lamp flashes: DSC is
active and is controlling the drive
torque based on driving conditions
>The indicator lamp does not go out
after the engine is started or lights up
continuously while you are driving:
DSC has been deactivated via the
button or is defective.
You can continue to drive the vehicle
normally without DSC. In the event of a
malfunction, contact a BMW center or a
workshop that works according to
BMW requirements with appropriately
trained personnel.
M Track mode*M track mode is a feature of the
Dynamic Stability Control DSC,
designed for driving on dry roads. It
allows you to drive with higher longitu-
dinal and lateral acceleration, whereas
driving stability is somewhat reduced.
Only in its absolute limit range will the
system try to stabilize the vehicle by
reducing engine power and applying
brakes to the wheels. Under these driv-
ing conditions the driver must be pre-
pared to perform corrective steering
movements if necessary.
By default, M Track mode is off after
each engine start.
While M Track mode is active, sta-
bilising interventions are per-
formed to a reduced extent only.<
To maintain vehicle stability,
always drive with DSC switched
on and M Track mode switched off
whenever possible.
shortly after the ignition is
switched on.
>Indicator lamp stays on: M Track
mode ist on
>Indicator lamp stays on and DSC
indicator lamp flashes:
M Track mode is actively regulating
drive torque and braking forces.
Page 85 of 170

85
Flat tire
The indicator lamp in the instru-
ment cluster lights up red. In
addition, an acoustic signal is
sounded.
1. Carefully reduce speed and come to
a stop. Avoid sudden braking and
steering maneuvers
2. Determine which wheel is damaged
If this cannot be determined, con-
tact your BMW center.<
3. Fix the flat tire using the M Mobility
system, refer to page 137
4. Press the button for approx.
4 seconds. The red indicator lamp
goes out.
After replacing the damaged tire, initial-
ize the system.
System malfunction
The indicator lamp in the instru-
ment cluster lights up yellow.
The Flat Tire Monitor is malfunc-
tioning or out of order. Please contact
your BMW center for additional infor-
mation.
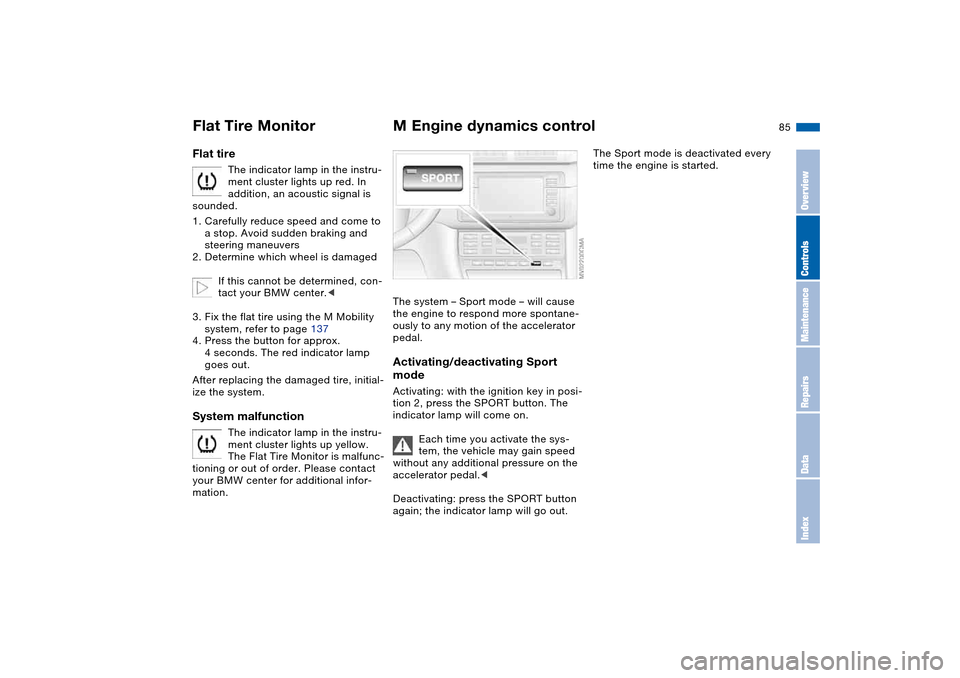
M Engine dynamics controlThe system – Sport mode – will cause
the engine to respond more spontane-
ously to any motion of the accelerator
pedal.Activating/deactivating Sport
modeActivating: with the ignition key in posi-
tion 2, press the SPORT button. The
indicator lamp will come on.
Each time you activate the sys-
tem, the vehicle may gain speed
without any additional pressure on the
accelerator pedal.<
Deactivating: press the SPORT button
again; the indicator lamp will go out.
The Sport mode is deactivated every
time the engine is started.
Flat Tire Monitor
OverviewControlsMaintenanceRepairsDataIndex
Page 92 of 170

92
Tips for pleasant drivingUse the automatic mode – switch on
with AUTO button 6. Select the desired
interior temperature.
Detailed setting options are described
for you in the following sections.
You can make the settings of your
vehicle in such a manner that,
when you unlock the vehicle with the
remote control of your personal key,
your own personalized setting for the
automatic climate control is initiated.
air supply and the air distribu-
tion to the windshield and the side win-
dows, towards the upper body and to
the footwells, and in addition adapts
the temperature to external influences:
summer, winter.
The cooling function is automatically
switched on when you are using the
AUTO program.
Individual air distribution
You can cancel the AUTO pro-
gram by selecting specific dis-
tribution patterns to suit your
own individual requirements.
While the AUTO program is then deacti-
vated, the automatic airflow control
remains in operation. Air flows onto
the windows , toward the upper
body , and into the footwell . You
can reactivate the automatic air supply
by pressing the AUTO button.Temperature
The interior temperature that
appears in the display panel is a
general figure intended for refer-
ence purposes. We recommend 727/
+226 as a comfortable setting, even if
the air conditioning is on. When you
start the vehicle, the system ensures
that the selected temperature is
reached as quickly as possible. It then
maintains this temperature, regardless
of the season.
To select the units of measure 7/6 of
the display, refer to page 79.
Air supply/Blower
By pressing the upper or lower
button, you can vary the air sup-
ply. This deactivates the auto-
matic air supply – the AUTO display dis-
appears from the panel. Nevertheless,
the automatic air distribution remains
unchanged. You can reactivate the
automatic air supply by pressing the
AUTO button.
When the lowest blower speed is set
and you press the lower button, all of
the displays are canceled: the blower,
heating and air conditioner are
switched off, and the air supply is
stopped. You can reactivate the system
by pressing any button for the auto-
matic climate control.To defrost windows and remove
condensation
This program quickly removes
ice and condensation from the
windshield and the side windows.
Air conditioning
The air is cooled and dehumidi-
fied and – depending on the
temperature setting – rewarmed.
Depending on the weather, the wind-
shield may fog over briefly when the
engine is started. Air conditioning helps
prevent the windows from fogging up.
The cooling function is automatically
switched on when you are using the
AUTO program.
Automatic climate control
Page 117 of 170

117
The correct wheels and tires
BMW recommends using only
wheels and tires that have been
tested and approved by BMW for the
particular vehicle model, as otherwise
body contact and serious accidents can
result despite the use of the same nom-
inal size, e.g. due to manufacturing tol-
erances. If non-approved wheels and
tires are used, BMW cannot evaluate
their suitability, and therefore cannot be
held liable for driving safety.<
To maintain good handling and vehicle
response, use only tires of a single
brand and tread configuration. After a
flat tire, have the previous wheel and
tire combination restored as soon as
possible.
Recommended tire sizes and
brandsFor each tire size, certain tire brands
have been tested, classified as road-
safe and approved by BMW. You can
find out about these from a professional
tire center, preferably your BMW cen-
ter. Observe any country-specific regu-
lations, e.g. on making a corresponding
entry in the vehicle documents.
The factory-approved radial belt tires
are matched to your vehicle and pro-
vide optimum safety and driving com-
fort when used properly.Special characteristics of winter
tiresBMW recommends the use of winter
tires for operation under winter road
conditions. While all-season tires with
M+S designation provide better winter
traction than summer tires, they gener-
ally do not achieve the full performance
of winter tires.Observing speed ratings
Never exceed the maximum
speed for which the winter tires
are rated. Unprofessional attempts by
laymen to service tires can lead to dam-
age and accidents. Have this work per-
formed by skilled professionals only.
The technicians at your BMW center
will be glad to assist you with the
required professional knowledge and
specialized equipment.<
StorageAlways store tires in a cool, dry place.
Store them away from light whenever
possible. Protect the tires against con-
tact with oil, grease and fuel. Do not
exceed the maximum tire inflation pres-
sures specified on the tire sidewall.
New wheels and tires
OverviewControlsMaintenanceRepairsDataIndex
Page 123 of 170

123
Adding engine oilOnly add engine oil when the oil level
has dropped to just above the lower
mark on the dipstick.
Do not fill beyond the upper mark on
the dipstick. Excess oil will damage the
engine.
Before checking the engine oil level
after topping up, restart the engine and
allow it to run to obtain a correct dis-
play. Then proceed as described under
Checking the oil level.
Continuous exposure to used oil
has caused cancer in laboratory
testing. For this reason, thoroughly
wash any areas of skin that come into
contact with oil using soap and water.
Store oils, grease and similar materials
so that they are inaccessible to chil-
dren. Comply with warning labels and
information on containers.<
Comply with the applicable envi-
ronmental laws regulating the dis-
posal of used oil.<
Recommendation: have the oil changed
at your BMW center.
Specified engine oilsThe quality of the engine oil is
extremely important for the function
and life of an engine. Based on exten-
sive testing, BMW has approved only
certain grades of engine oil.
Use only oils approved for your vehicle
model.
Ask your BMW center for details
concerning oils that have been
approved. You can also call BMW of
North America toll-free at 1-800-831-
1117 or visit this website:
www.bmwusa.com to obtain this infor-
mation.<
BMW engines are designed to
operate without oil additives; the
use of additives could even lead to
damage in some cases.<
Alternative oil typesIf a High Performance Synthetic Oil
approved by BMW should be unavail-
able, you may use small volumes of
other oils for topping up between oil
changes. The following data must
appear on the packaging:
>Viscosity
preferred: SAE 10W-60
alternative: SAE 5W-40 or
SAE 10W-40
>Specifications
preferred: API SJ/CF
alternative: API SJ – also SK, SL, S
etc.
Engine oil
OverviewControlsMaintenanceRepairsDataIndex
Page 124 of 170

124
Low ambient temperaturesThe oils used by BMW at the factory for
your vehicle model can be used at virtu-
ally any ambient temperature.
However, if the vehicle is exposed to
temperatures below –47/–206 for
extended periods, please have your
BMW center recommend a suitable oil.
Coolant
Do not open the cooling system
when the engine is hot. If you do,
escaping coolant can cause burns.<
Coolant consists of water and coolant
additives. Not all commercially available
additives are suitable for your BMW.
Your BMW center knows which addi-
tives are appropriate.
Only use approved additives, as
the engine could otherwise be
damaged. The additives are hazardous
to health.<
Comply with the applicable envi-
ronmental laws regulating
the disposal of coolant additives.<
Checking the coolant level1. The engine must be at ambient tem-
perature
2. Open the cap for the expansion tank
by turning it slightly counterclock-
wise to allow accumulated pressure
to escape. Then open
3. The coolant level is correct when the
upper end of the red float is even
with the upper edge of the filler neck,
refer to the arrow in the illustration or
to the schematic diagram next to the
filler neck
4. If necessary, slowly add coolant until
the correct level is reached; do not
overfill
5. Close the cap by turning until it is
well tight
6. Have the cause for the coolant loss
removed as soon as possible.
Engine oil
Page 127 of 170

127
Have your BMW center perform
maintenance and repair.
Be sure that all maintenance work is
recorded in the Service and Warranty
Information Booklet for US models, or
in the Warranty and Service Guide
Booklet for Canadian models. These
entries are your verification for the reg-
ular maintenance of your vehicle and
are required for the performance of
warranty repairs.<
CareYou can find everything you need to
know on this topic by consulting the
separate Caring for your vehicle bro-
chure.BMW Maintenance System
OverviewControlsMaintenanceRepairsDataIndex