2006 BMW 750I display
[x] Cancel search: displayPage 100 of 247
Technology for comfort, convenience and safety
98 3.Select the menu item and press the control-
ler:
>"Zoom":
At higher speeds, the image is zoomed
in.
>"Curve mode":
Depending on the steering angle and
other parameters, the image section fol-
lows the course of the road to some
degree.
>"Full screen":
The image is shown on the entire Con-
trol Display.
>"Contrast":
The contrast of the screen can be
adjusted, refer to page170.
>"Brightness":
The brightness of the screen can be
adjusted, refer to page170.
The "Curve mode" can only be activated
with the "Zoom" function switched on.
With "Full screen" activated, "Curve mode" and
"Zoom" cannot be selected.<
The settings are stored for the remote control
currently in use.
To exit the menu:
The image will automatically disappear after
approx. 5 seconds, or select the return arrow
and press the controller to exit sooner.
Cleaning camera
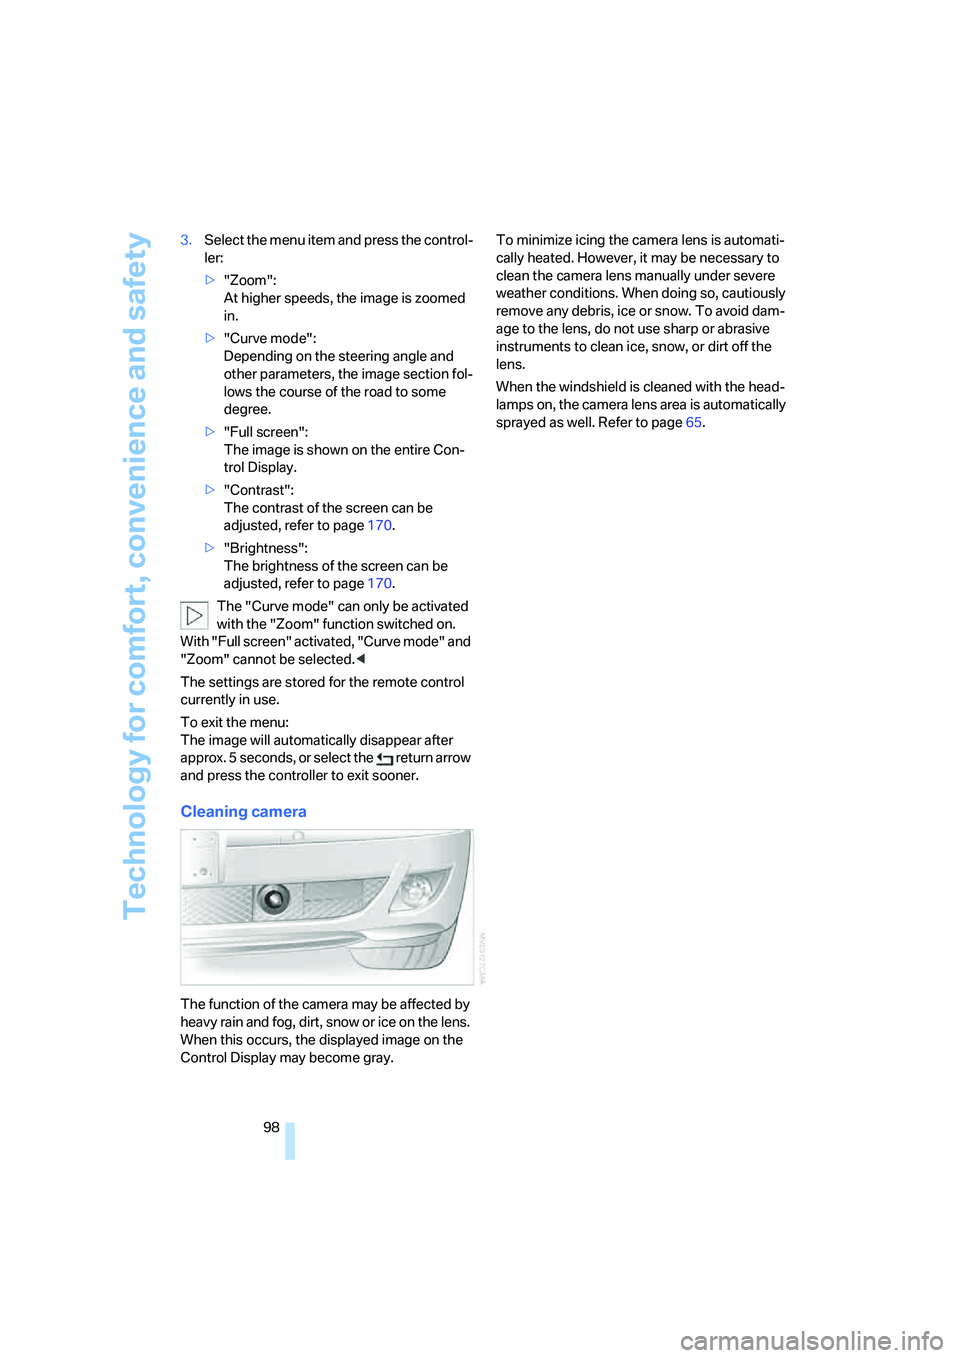
The function of the camera may be affected by
heavy rain and fog, dirt, snow or ice on the lens.
When this occurs, the displayed image on the
Control Display may become gray.To minimize icing the camera lens is automati-
cally heated. However, it may be necessary to
clean the camera lens manually under severe
weather conditions. When doing so, cautiously
remove any debris, ice or snow. To avoid dam-
age to the lens, do not use sharp or abrasive
instruments to clean ice, snow, or dirt off the
lens.
When the windshield is cleaned with the head-
lamps on, the camera lens area is automatically
sprayed as well. Refer to page65.
Page 103 of 247

Controls
101Reference
At a glance
Driving tips
Communications
Navigation
Entertainment
Mobility
Manually switching between high and
low beams
You can intervene at any time you wish or the
situation requires.
>If the high-beam assistant has switched on
the high beams, but you want to use the low
beams, simply switch to the low beams with
the turn signal lever. The high-beam assis-
tant is deactivated in the process.
To reactivate the system, briefly press the
turn signal lever in the high beam direction
again.
>If the high-beam assistant has switched on
the low beams, but you want to use the high
beams, switch to the high beams in the
accustomed manner. The system is deacti-
vated in the process and you must switch to
the low beams manually.
To reactivate the system, briefly press the
turn signal lever in the high beam direction
again.
>You use the headlamp flasher as usual with
low beams.
System limits
The high-beam assistant cannot replace
personal decisions on the benefits of
using the high beams. In situations which
require this, you should therefore switch to the
low beams manually to avoid a safety risk.<
In the following example situations, the system
either does not operate or only operates to a
limited degree and a personal reaction may be
required:
>Under extremely unfavorable weather con-
ditions, such as heavy fog or precipitation.
>For perceiving road users with poor lighting
of their own, e.g. pedestrians, cyclists, peo-
ple on horseback, horse-drawn vehicles,
with train or ship traffic close to the road and
wild animals crossing the road.
>In tight curves, on steep crowns or depres-
sions, with cross traffic or partially con-
cealed oncoming traffic on the freeway.
>In poorly lit places and with highly reflective
signs.>In the low speed range.
>When the windshield is dirty or covered with
stickers, decals etc. in the area of the inside
rearview mirror.
>When the sensor is dirty. Clean the sensor
on the front side of the inside rearview mir-
ror with a cloth moistened with a small
amount of glass cleaner.
Fog lamps
Briefly press the button to switch on/off.
Front fog lamps
The parking lamps or low beams must be
switched on for the fog lamps to operate. The
green indicator lamp on the Info Display lights
up whenever the fog lamps are on.
If the automatic headlamp control is acti-
vated, the low beams will come on auto-
matically when you switch on the fog lamps.<
Instrument lighting
You can adjust the lighting intensity with the
knurled wheel.
Page 106 of 247
Climate
104
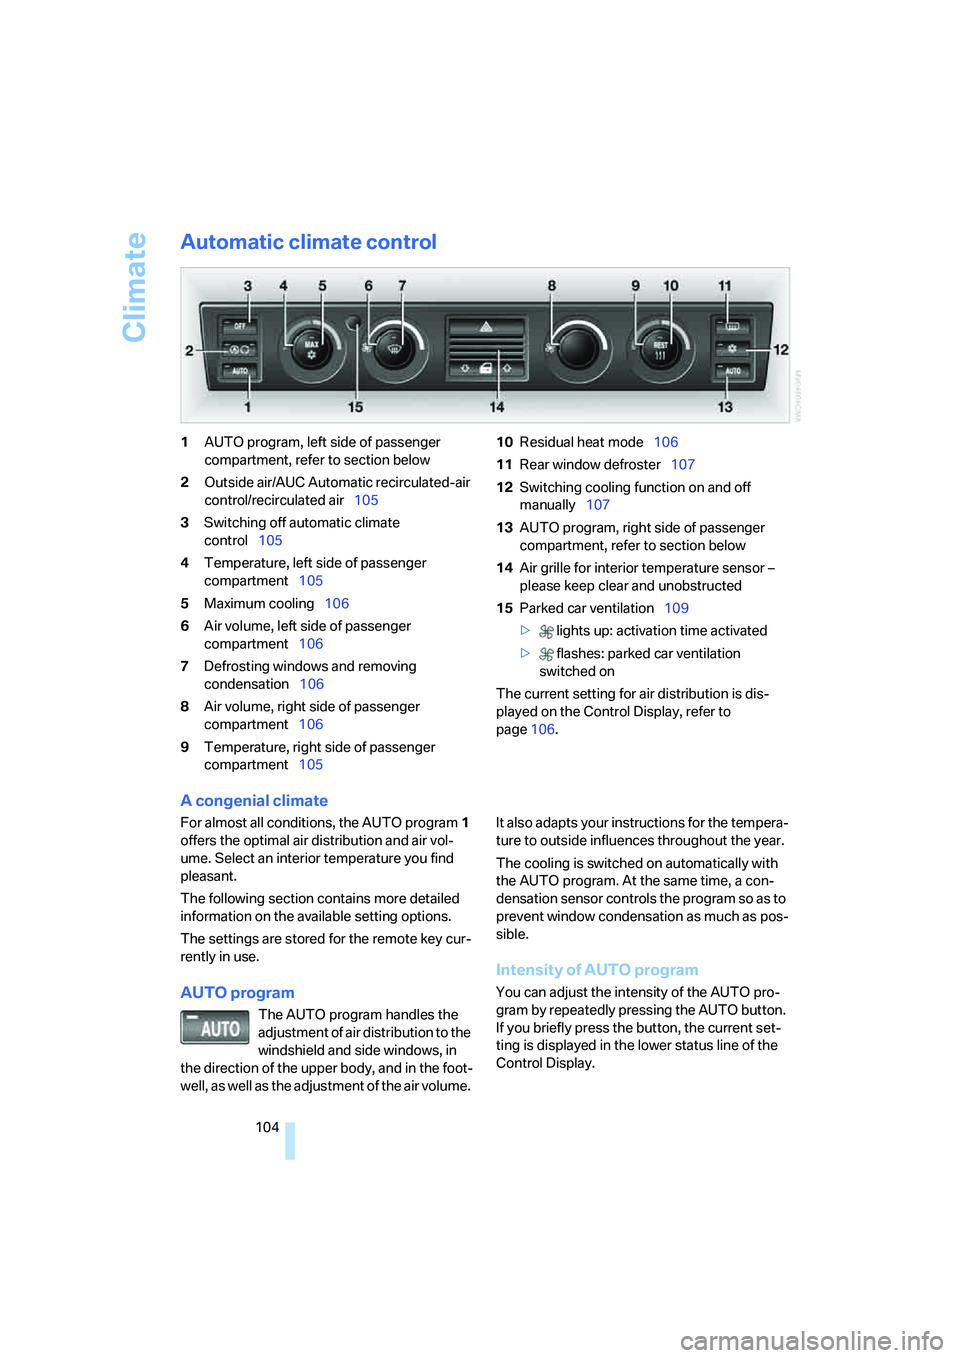
Automatic climate control
1AUTO program, left side of passenger
compartment, refer to section below
2Outside air/AUC Automatic recirculated-air
control/recirculated air105
3Switching off automatic climate
control105
4Temperature, left side of passenger
compartment105
5Maximum cooling106
6Air volume, left side of passenger
compartment106
7Defrosting windows and removing
condensation106
8Air volume, right side of passenger
compartment106
9Temperature, right side of passenger
compartment10510Residual heat mode106
11Rear window defroster107
12Switching cooling function on and off
manually107
13AUTO program, right side of passenger
compartment, refer to section below
14Air grille for interior temperature sensor –
please keep clear and unobstructed
15Parked car ventilation109
> lights up: activation time activated
> flashes: parked car ventilation
switched on
The current setting for air distribution is dis-
played on the Control Display, refer to
page106.
A congenial climate
For almost all conditions, the AUTO program1
offers the optimal air distribution and air vol-
ume. Select an interior temperature you find
pleasant.
The following section contains more detailed
information on the available setting options.
The settings are stored for the remote key cur-
rently in use.
AUTO program
The AUTO program handles the
adjustment of air distribution to the
windshield and side windows, in
the direction of the upper body, and in the foot-
well, as well as the adjustment of the air volume. It also adapts your instructions for the tempera-
ture to outside influences throughout the year.
The cooling is switched on automatically with
the AUTO program. At the same time, a con-
densation sensor controls the program so as to
prevent window condensation as much as pos-
sible.
Intensity of AUTO program
You can adjust the intensity of the AUTO pro-
gram by repeatedly pressing the AUTO button.
If you briefly press the button, the current set-
ting is displayed in the lower status line of the
Control Display.
Page 107 of 247
Controls
105Reference
At a glance
Driving tips
Communications
Navigation
Entertainment
Mobility
You can also adjust the intensity of the AUTO
program via iDrive.
iDrive, for principle details, refer to page16.
1.Press the button to open the start
menu.
2.Move the controller toward "Climate".
3.Turn the controller to select driver's side or
passenger side.
4.Turn the controller to select the field.
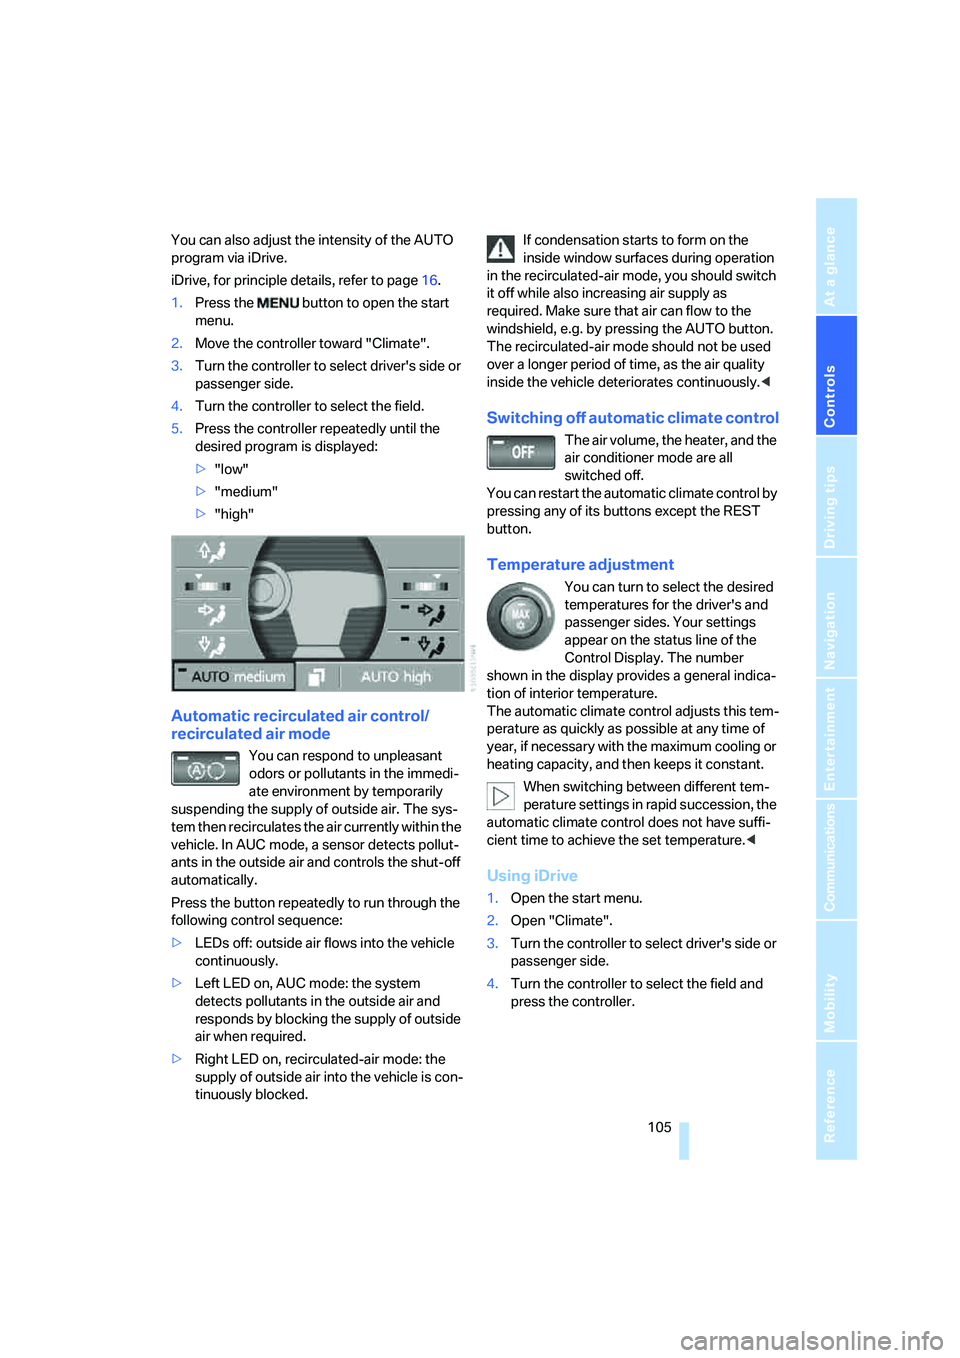
5.Press the controller repeatedly until the
desired program is displayed:
>"low"
>"medium"
>"high"
Automatic recirculated air control/
recirculated air mode
You can respond to unpleasant
odors or pollutants in the immedi-
ate environment by temporarily
suspending the supply of outside air. The sys-
tem then recirculates the air currently within the
vehicle. In AUC mode, a sensor detects pollut-
ants in the outside air and controls the shut-off
automatically.
Press the button repeatedly to run through the
following control sequence:
>LEDs off: outside air flows into the vehicle
continuously.
>Left LED on, AUC mode: the system
detects pollutants in the outside air and
responds by blocking the supply of outside
air when required.
>Right LED on, recirculated-air mode: the
supply of outside air into the vehicle is con-
tinuously blocked.If condensation starts to form on the
inside window surfaces during operation
in the recirculated-air mode, you should switch
it off while also increasing air supply as
required. Make sure that air can flow to the
windshield, e.g. by pressing the AUTO button.
The recirculated-air mode should not be used
over a longer period of time, as the air quality
inside the vehicle deteriorates continuously.<
Switching off automatic climate control
The air volume, the heater, and the
air conditioner mode are all
switched off.
You can restart the automatic climate control by
pressing any of its buttons except the REST
button.
Temperature adjustment
You can turn to select the desired
temperatures for the driver's and
passenger sides. Your settings
appear on the status line of the
Control Display. The number
shown in the display provides a general indica-
tion of interior temperature.
The automatic climate control adjusts this tem-
perature as quickly as possible at any time of
year, if necessary with the maximum cooling or
heating capacity, and then keeps it constant.
When switching between different tem-
perature settings in rapid succession, the
automatic climate control does not have suffi-
cient time to achieve the set temperature.<
Using iDrive
1.Open the start menu.
2.Open "Climate".
3.Turn the controller to select driver's side or
passenger side.
4.Turn the controller to select the field and
press the controller.
Page 109 of 247
Controls
107Reference
At a glance
Driving tips
Communications
Navigation
Entertainment
Mobility
The interior temperature, air volume, and air
distribution can be set starting from the radio
ready state.
Switching cooling function on and off
manually
When activated, the air conditioner
mode cools and dehumidifies the
incoming air, reheating it as
required, depending on the temperature set-
ting. Depending on the weather, the windshield
may fog over briefly when the engine is started.
The cooling function is switched on automati-
cally with the AUTO program. The passenger
compartment can only be cooled with the
engine running.
Rear window defroster
The rear window defroster
switches off automatically after a
while.
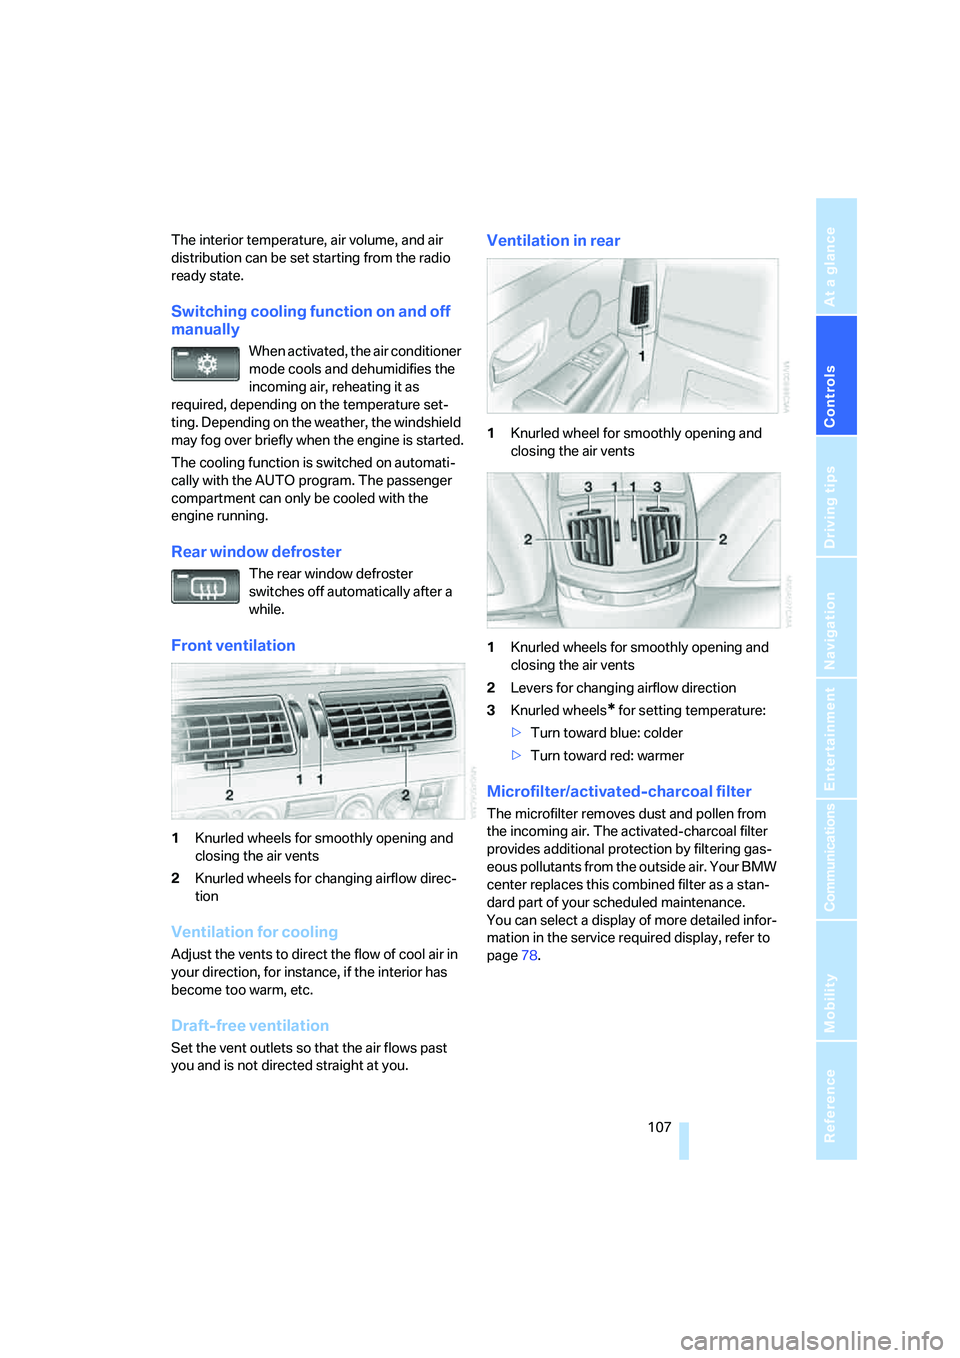
Front ventilation
1Knurled wheels for smoothly opening and
closing the air vents
2Knurled wheels for changing airflow direc-
tion
Ventilation for cooling
Adjust the vents to direct the flow of cool air in
your direction, for instance, if the interior has
become too warm, etc.
Draft-free ventilation
Set the vent outlets so that the air flows past
you and is not directed straight at you.
Ventilation in rear
1Knurled wheel for smoothly opening and
closing the air vents
1Knurled wheels for smoothly opening and
closing the air vents
2Levers for changing airflow direction
3Knurled wheels
* for setting temperature:
>Turn toward blue: colder
>Turn toward red: warmer
Microfilter/activated-charcoal filter
The microfilter removes dust and pollen from
the incoming air. The activated-charcoal filter
provides additional protection by filtering gas-
eous pollutants from the outside air. Your BMW
center replaces this combined filter as a stan-
dard part of your scheduled maintenance.
You can select a display of more detailed infor-
mation in the service required display, refer to
page78.
Page 132 of 247
Starting navigation system
130
Starting navigation system
Your navigation system can use satellites to
ascertain the precise position of your vehicle
and guide you reliably to any destination you
enter.
Navigation CD/DVD
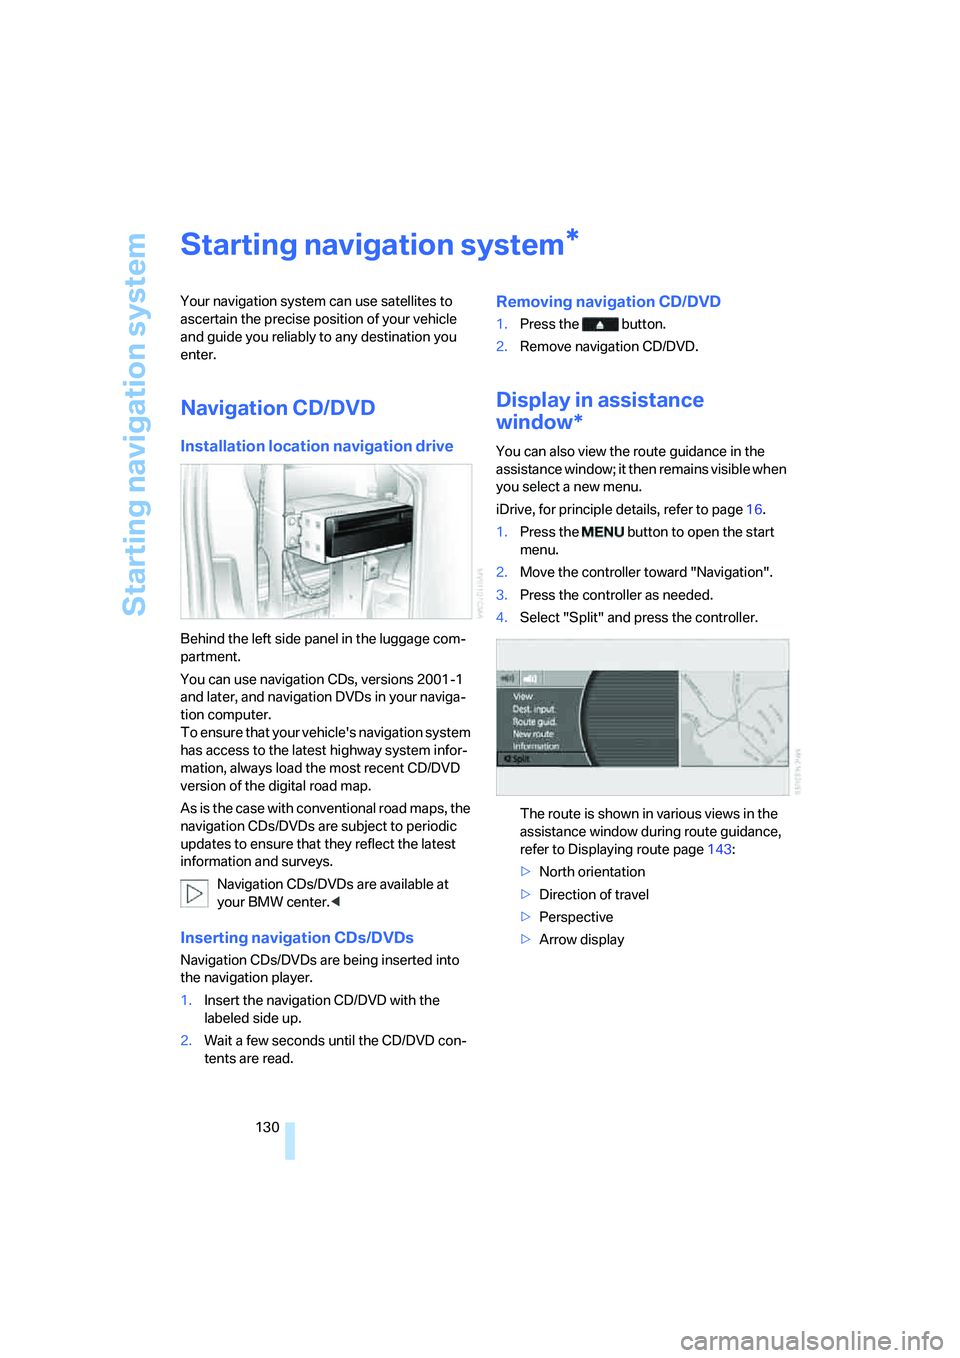
Installation location navigation drive
Behind the left side panel in the luggage com-
partment.
You can use navigation CDs, versions 2001-1
and later, and navigation DVDs in your naviga-
tion computer.
To ensure that your vehicle's navigation system
has access to the latest highway system infor-
mation, always load the most recent CD/DVD
version of the digital road map.
As is the case with conventional road maps, the
navigation CDs/DVDs are subject to periodic
updates to ensure that they reflect the latest
information and surveys.
Navigation CDs/DVDs are available at
your BMW center.<
Inserting navigation CDs/DVDs
Navigation CDs/DVDs are being inserted into
the navigation player.
1.Insert the navigation CD/DVD with the
labeled side up.
2.Wait a few seconds until the CD/DVD con-
tents are read.
Removing navigation CD/DVD
1.Press the button.
2.Remove navigation CD/DVD.
Display in assistance
window*
You can also view the route guidance in the
assistance window; it then remains visible when
you select a new menu.
iDrive, for principle details, refer to page16.
1.Press the button to open the start
menu.
2.Move the controller toward "Navigation".
3.Press the controller as needed.
4.Select "Split" and press the controller.
The route is shown in various views in the
assistance window during route guidance,
refer to Displaying route page143:
>North orientation
>Direction of travel
>Perspective
>Arrow display
*
Page 134 of 247
Destination input
132 >You can skip the entry of country and city if
the existing entries should be retained for
your new destination.
Using the voice command system:
Entering name
You do not absolutely have to enter a name to
use route guidance or to store an address in the
list, but assigning each address a name can
make it easier for you to recognize the
addresses in a list.
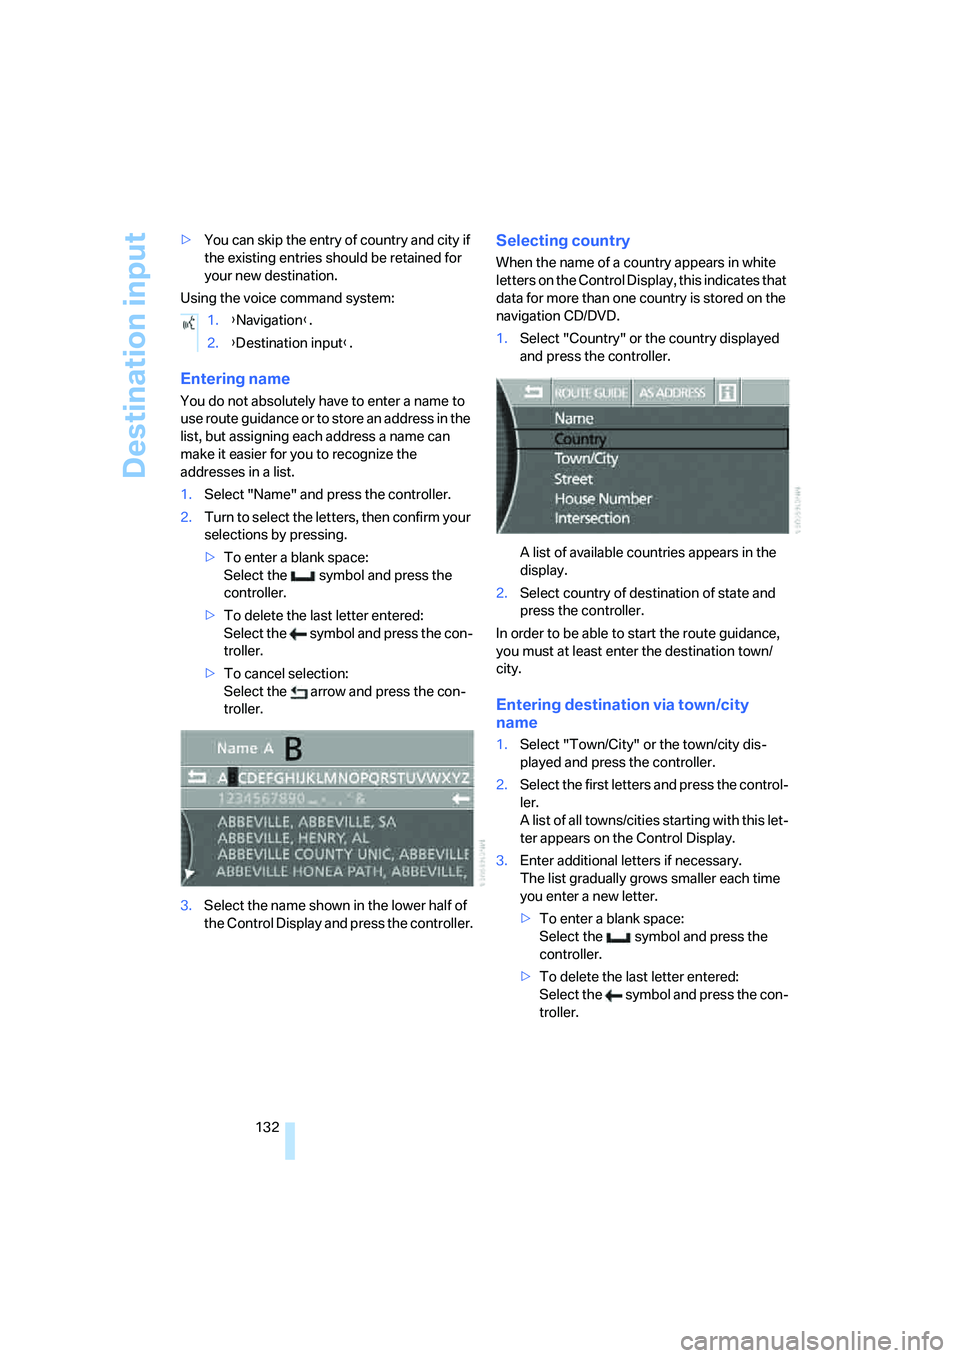
1.Select "Name" and press the controller.
2.Turn to select the letters, then confirm your
selections by pressing.
>To enter a blank space:
Select the symbol and press the
controller.
>To delete the last letter entered:
Select the symbol and press the con-
troller.
>To cancel selection:
Select the arrow and press the con-
troller.
3.Select the name shown in the lower half of
the Control Display and press the controller.
Selecting country
When the name of a country appears in white
letters on the Control Display, this indicates that
data for more than one country is stored on the
navigation CD/DVD.
1.Select "Country" or the country displayed
and press the controller.
A list of available countries appears in the
display.
2.Select country of destination of state and
press the controller.
In order to be able to start the route guidance,
you must at least enter the destination town/
city.
Entering destination via town/city
name
1.Select "Town/City" or the town/city dis-
played and press the controller.
2.Select the first letters and press the control-
ler.
A list of all towns/cities starting with this let-
ter appears on the Control Display.
3.Enter additional letters if necessary.
The list gradually grows smaller each time
you enter a new letter.
>To enter a blank space:
Select the symbol and press the
controller.
>To delete the last letter entered:
Select the symbol and press the con-
troller. 1.{Navigation}.
2.{Destination input}.
Page 135 of 247
Navigation
Driving tips
133Reference
At a glance
Controls
Communications
Entertainment
Mobility
>To cancel selection:
Select the arrow and press the con-
troller.
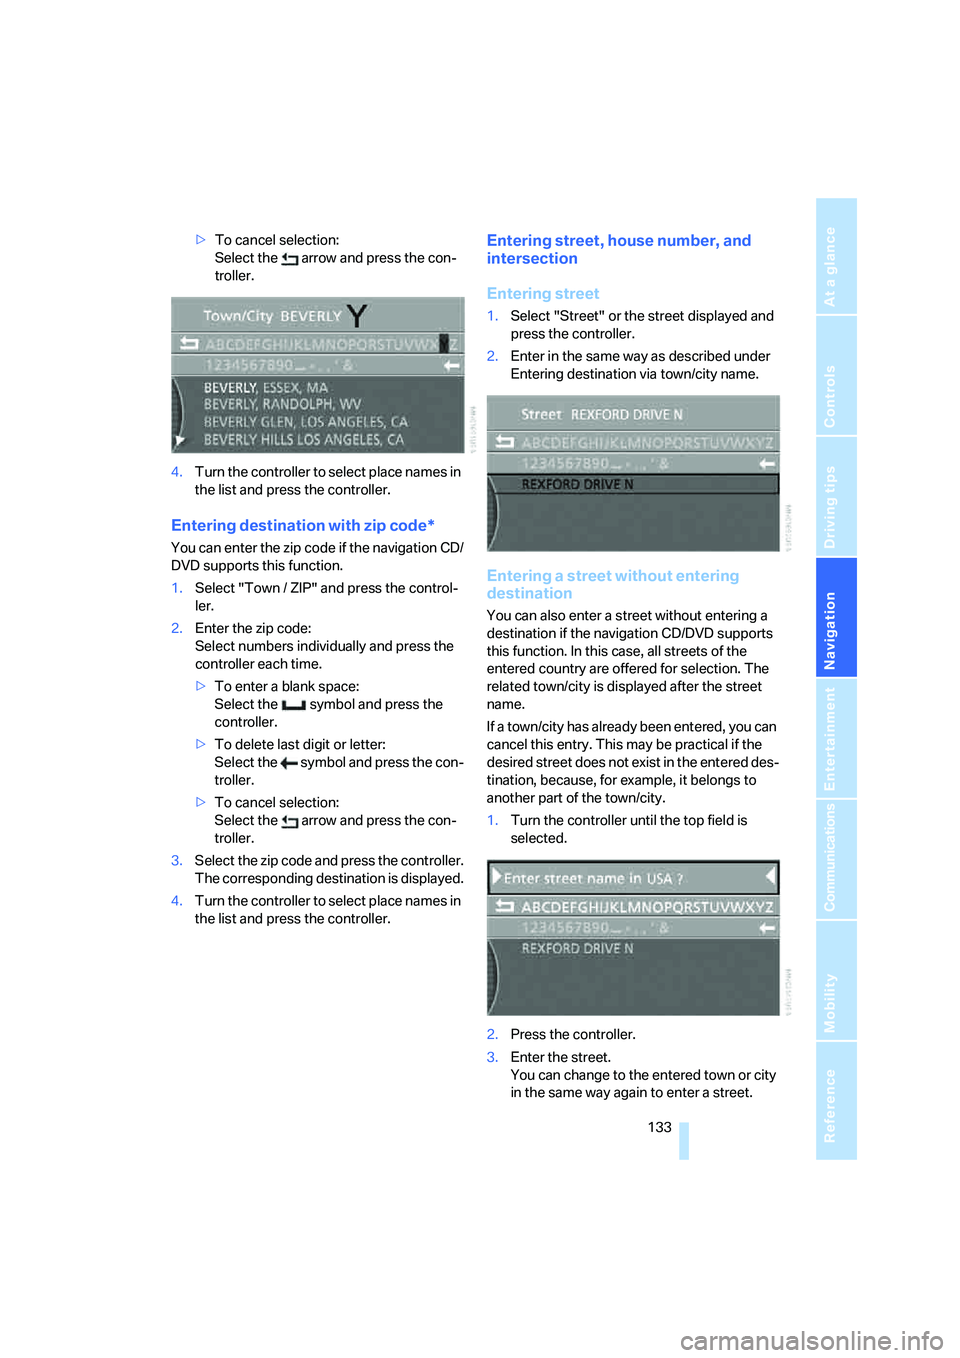
4.Turn the controller to select place names in
the list and press the controller.
Entering destination with zip code*
You can enter the zip code if the navigation CD/
DVD supports this function.
1.Select "Town / ZIP" and press the control-
ler.
2.Enter the zip code:
Select numbers individually and press the
controller each time.
>To enter a blank space:
Select the symbol and press the
controller.
>To delete last digit or letter:
Select the symbol and press the con-
troller.
>To cancel selection:
Select the arrow and press the con-
troller.
3.Select the zip code and press the controller.
The corresponding destination is displayed.
4.Turn the controller to select place names in
the list and press the controller.
Entering street, house number, and
intersection
Entering street
1.Select "Street" or the street displayed and
press the controller.
2.Enter in the same way as described under
Entering destination via town/city name.
Entering a street without entering
destination
You can also enter a street without entering a
destination if the navigation CD/DVD supports
this function. In this case, all streets of the
entered country are offered for selection. The
related town/city is displayed after the street
name.
If a town/city has already been entered, you can
cancel this entry. This may be practical if the
desired street does not exist in the entered des-
tination, because, for example, it belongs to
another part of the town/city.
1.Turn the controller until the top field is
selected.
2.Press the controller.
3.Enter the street.
You can change to the entered town or city
in the same way again to enter a street.