2006 BMW 650I COUPE ECU
[x] Cancel search: ECUPage 2 of 236
650iOwner's Manual for Vehicle
Congratulations, and thank you for choosing a BMW.
Thorough familiarity with your vehicle will provide you with
enhanced control and security when you drive it. We therefore
have this request:
Please take the time to read this Owner's Manual and familiarize
yourself with the information that we have compiled for you
before starting off in your new vehicle. It contains important data
and instructions intended to assist you in gaining maximum use
and satisfaction from your BMW's unique range of technical fea-
tures. The manual also contains information on maintenance
designed to enhance operating safety and contribute to main-
taining the value of your BMW throughout an extended service
life.
This manual is supplemented by a Service and Warranty Infor-
mation Booklet for US models or a Warranty and Service Guide
Booklet for Canadian models.
We wish you an enjoyable driving experience.
BMW AG
Page 36 of 236
Controls
35Reference
At a glance
Driving tips
Communications
Navigation
Entertainment
Mobility
The handle recesses on the interior trim of the
luggage compartment lid make it easier to pull
down.
If special circumstances should make it abso-
lutely necessary to operate the vehicle with the
luggage compartment lid open:
1.Coupe: close both windows and the glass
sunroof
*.
Convertible: with the convertible top
closed, close all windows, including the rear
window.
2.Increase the air volume of the automatic
climate control to a high level, refer to
page102.
Luggage compartment
There are four lashing eyes on the inner corners
of the luggage compartment for securing lug-
gage nets
* or securing straps to fix luggage in
position.
Also refer to Securing cargo, page117.
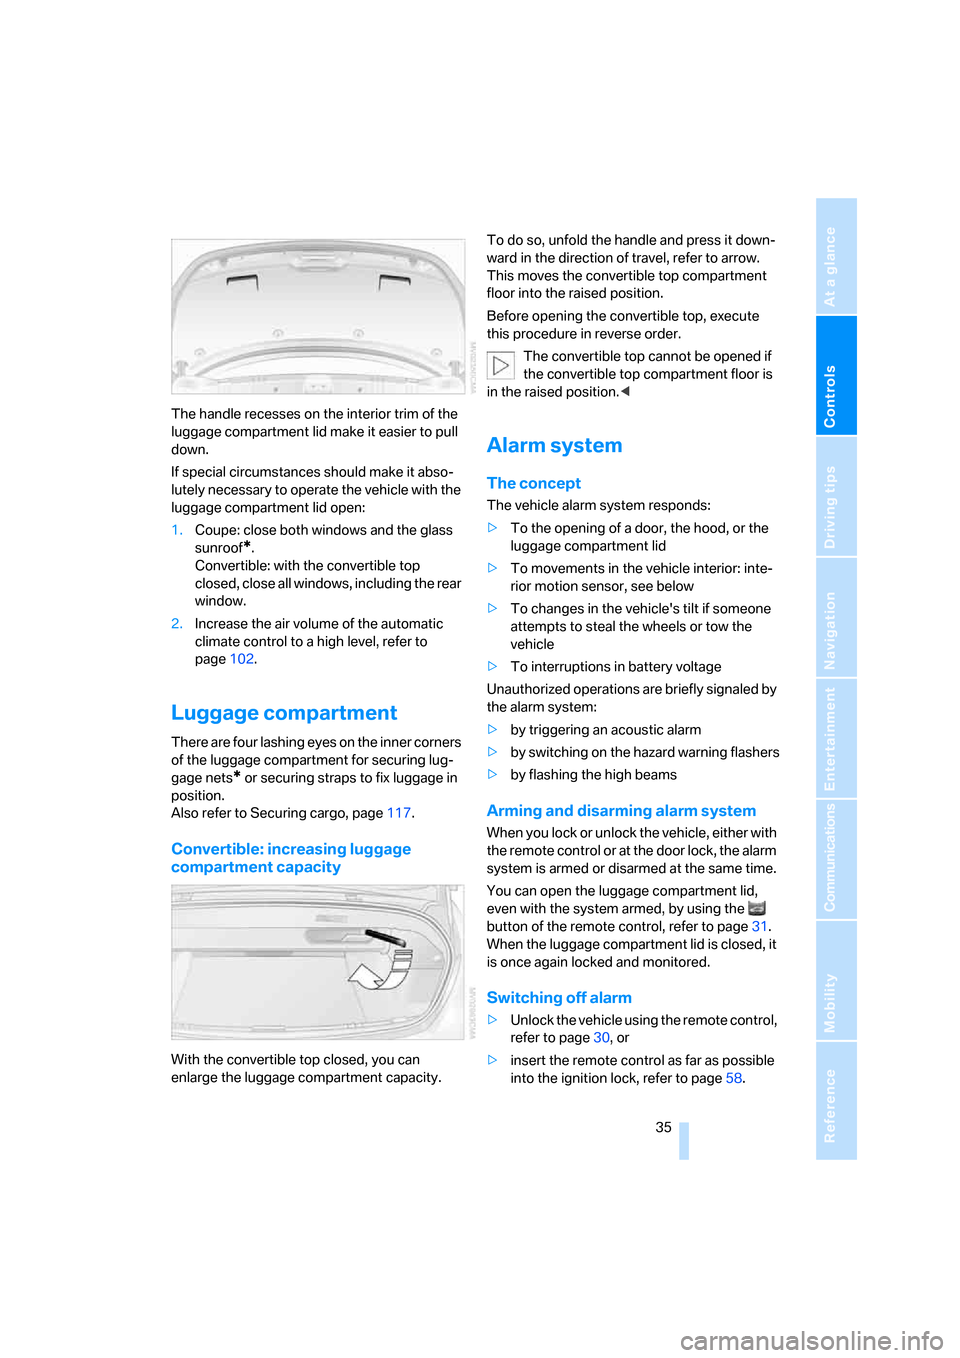
Convertible: increasing luggage
compartment capacity
With the convertible top closed, you can
enlarge the luggage compartment capacity.To do so, unfold the handle and press it down-
ward in the direction of travel, refer to arrow.
This moves the convertible top compartment
floor into the raised position.
Before opening the convertible top, execute
this procedure in reverse order.
The convertible top cannot be opened if
the convertible top compartment floor is
in the raised position.<
Alarm system
The concept
The vehicle alarm system responds:
>To the opening of a door, the hood, or the
luggage compartment lid
>To movements in the vehicle interior: inte-
rior motion sensor, see below
>To changes in the vehicle's tilt if someone
attempts to steal the wheels or tow the
vehicle
>To interruptions in battery voltage
Unauthorized operations are briefly signaled by
the alarm system:
>by triggering an acoustic alarm
>by switching on
the hazard warning flashers
>by flashing the high beams
Arming and disarming alarm system
When you lock or unlock the vehicle, either with
the remote control or at the door lock, the alarm
system is armed or disarmed at the same time.
You can open the luggage compartment lid,
even with the system armed, by using the
button of the remote control, refer to page31.
When the luggage compartment lid is closed, it
is once again locked and monitored.
Switching off alarm
>Unlock the vehicle using the remote control,
refer to page30, or
>insert the remote control as far as possible
into the ignition lock, refer to page58.
Page 42 of 236
Controls
41Reference
At a glance
Driving tips
Communications
Navigation
Entertainment
Mobility
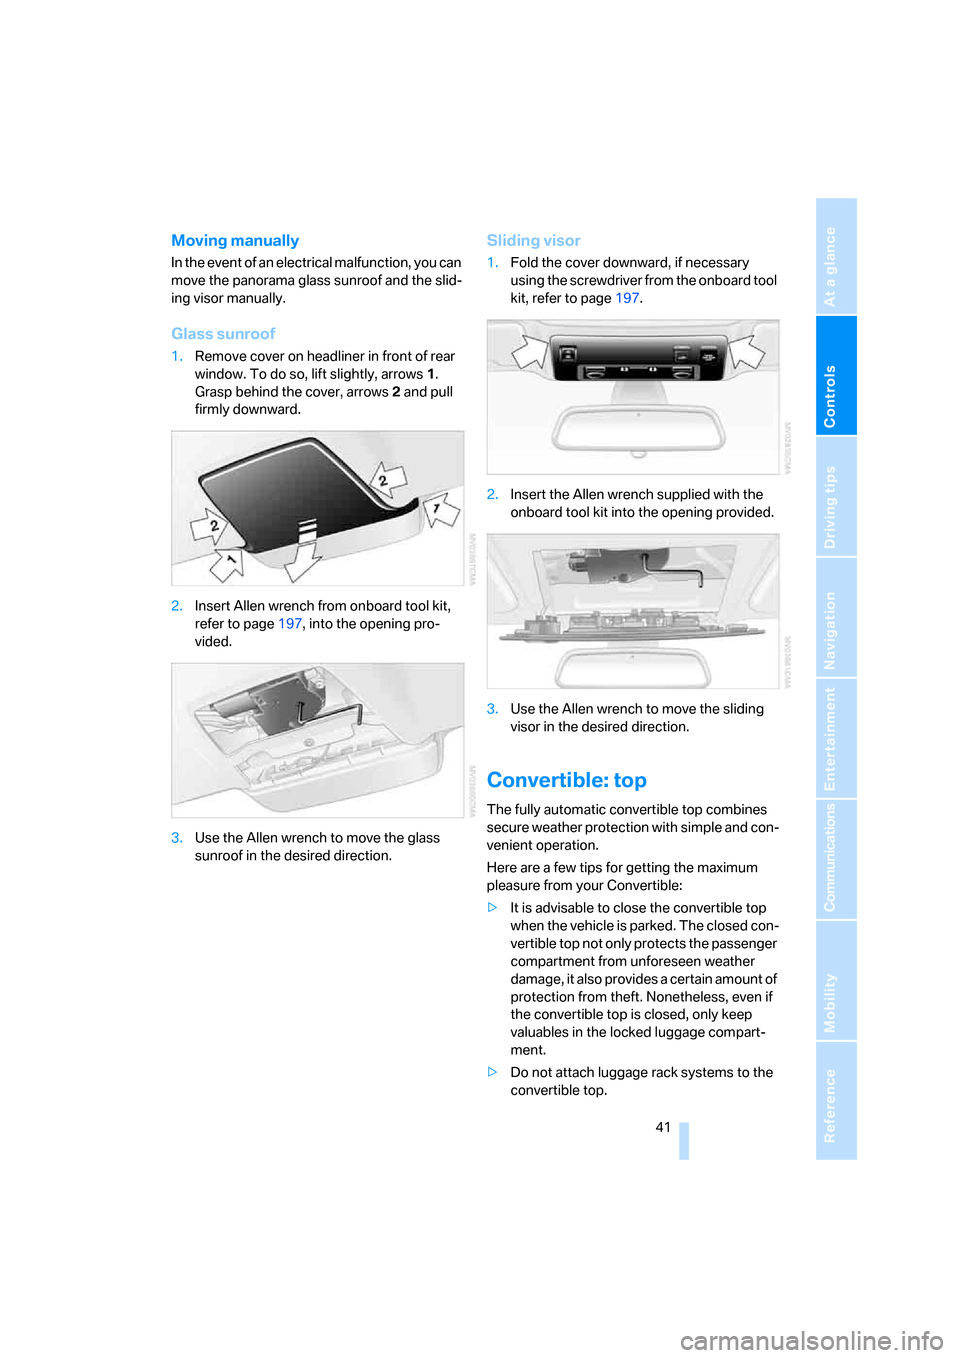
Moving manually
In the event of an electrical malfunction, you can
move the panorama glass sunroof and the slid-
ing visor manually.
Glass sunroof
1.Remove cover on headliner in front of rear
window. To do so, lift slightly, arrows1.
Grasp behind the cover, arrows2 and pull
firmly downward.
2.Insert Allen wrench from onboard tool kit,
refer to page197, into the opening pro-
vided.
3.Use the Allen wrench to move the glass
sunroof in the desired direction.
Sliding visor
1.Fold the cover downward, if necessary
using the screwdriver from the onboard tool
kit, refer to page197.
2.Insert the Allen wrench supplied with the
onboard tool kit into the opening provided.
3.Use the Allen wrench to move the sliding
visor in the desired direction.
Convertible: top
The fully automatic convertible top combines
secure weather protection with simple and con-
venient operation.
Here are a few tips for getting the maximum
pleasure from your Convertible:
>It is advisable to close the convertible top
when the vehicle is parked. The closed con-
vertible top not only protects the passenger
compartment from unforeseen weather
damage, it also provides a certain amount of
protection from theft. Nonetheless, even if
the convertible top is closed, only keep
valuables in the locked luggage compart-
ment.
>Do not attach luggage rack systems to the
convertible top.
Page 46 of 236
Controls
45Reference
At a glance
Driving tips
Communications
Navigation
Entertainment
Mobility
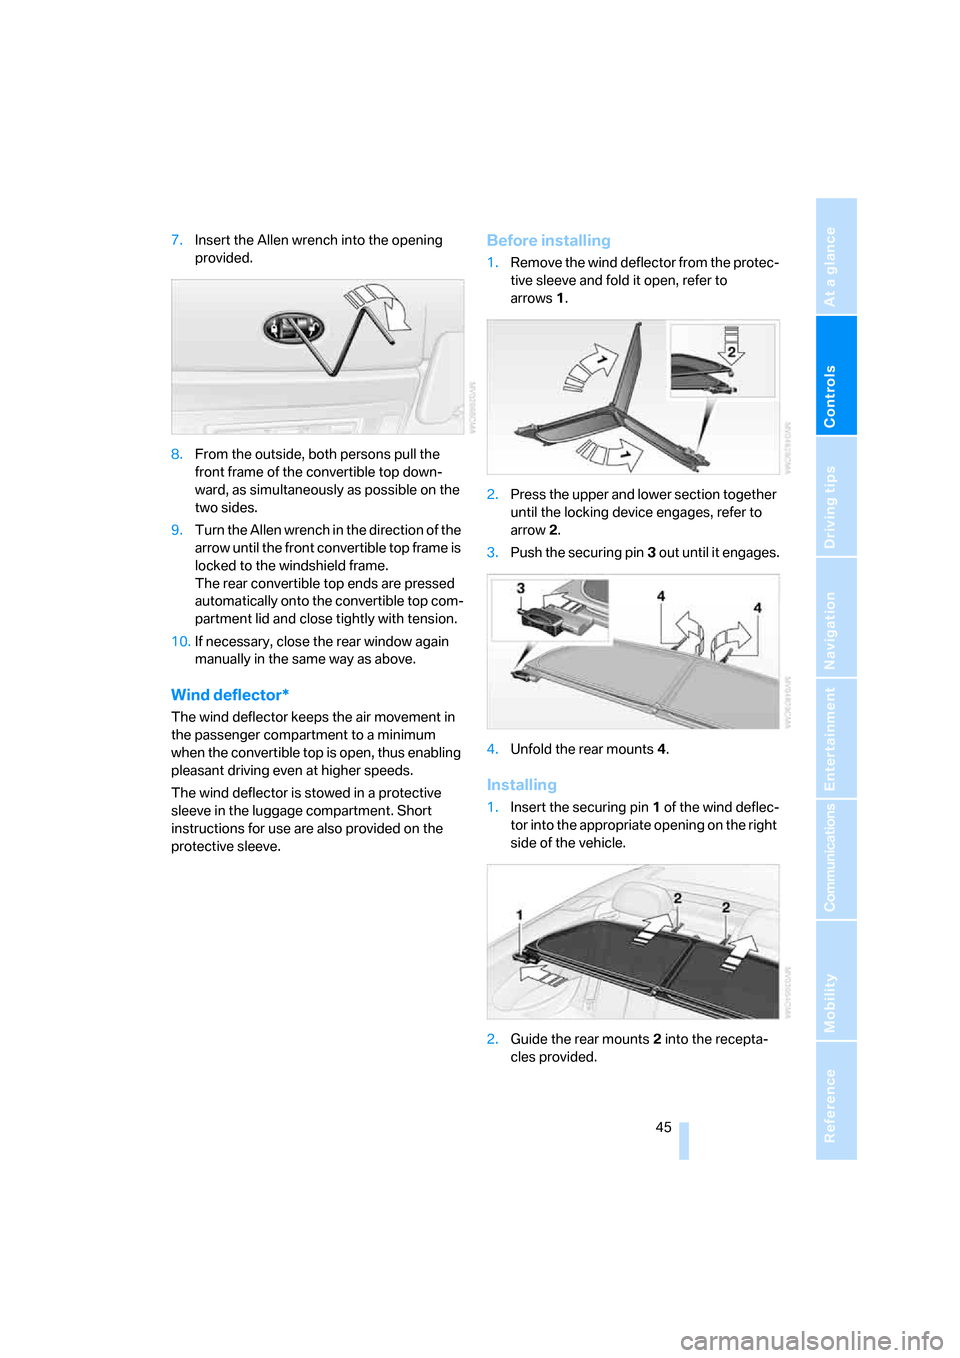
7.Insert the Allen wrench into the opening
provided.
8.From the outside, both persons pull the
front frame of the convertible top down-
ward, as simultaneously as possible on the
two sides.
9.Turn the Allen wrench in the direction of the
arrow until the front convertible top frame is
locked to the windshield frame.
The rear convertible top ends are pressed
automatically onto the convertible top com-
partment lid and close tightly with tension.
10.If necessary, close the rear window again
manually in the same way as above.
Wind deflector*
The wind deflector keeps the air movement in
the passenger compartment to a minimum
when the convertible top is open, thus enabling
pleasant driving even at higher speeds.
The wind deflector is stowed in a protective
sleeve in the luggage compartment. Short
instructions for use are also provided on the
protective sleeve.
Before installing
1.Remove the wind deflector from the protec-
tive sleeve and fold it open, refer to
arrows1.
2.Press the upper and lower section together
until the locking device engages, refer to
arrow2.
3.Push the securing pin3 out until it engages.
4.Unfold the rear mounts4.
Installing
1.Insert the securing pin 1 of the wind deflec-
tor into the appropriate opening on the right
side of the vehicle.
2.Guide the rear mounts2 into the recepta-
cles provided.
Page 47 of 236
Opening and closing
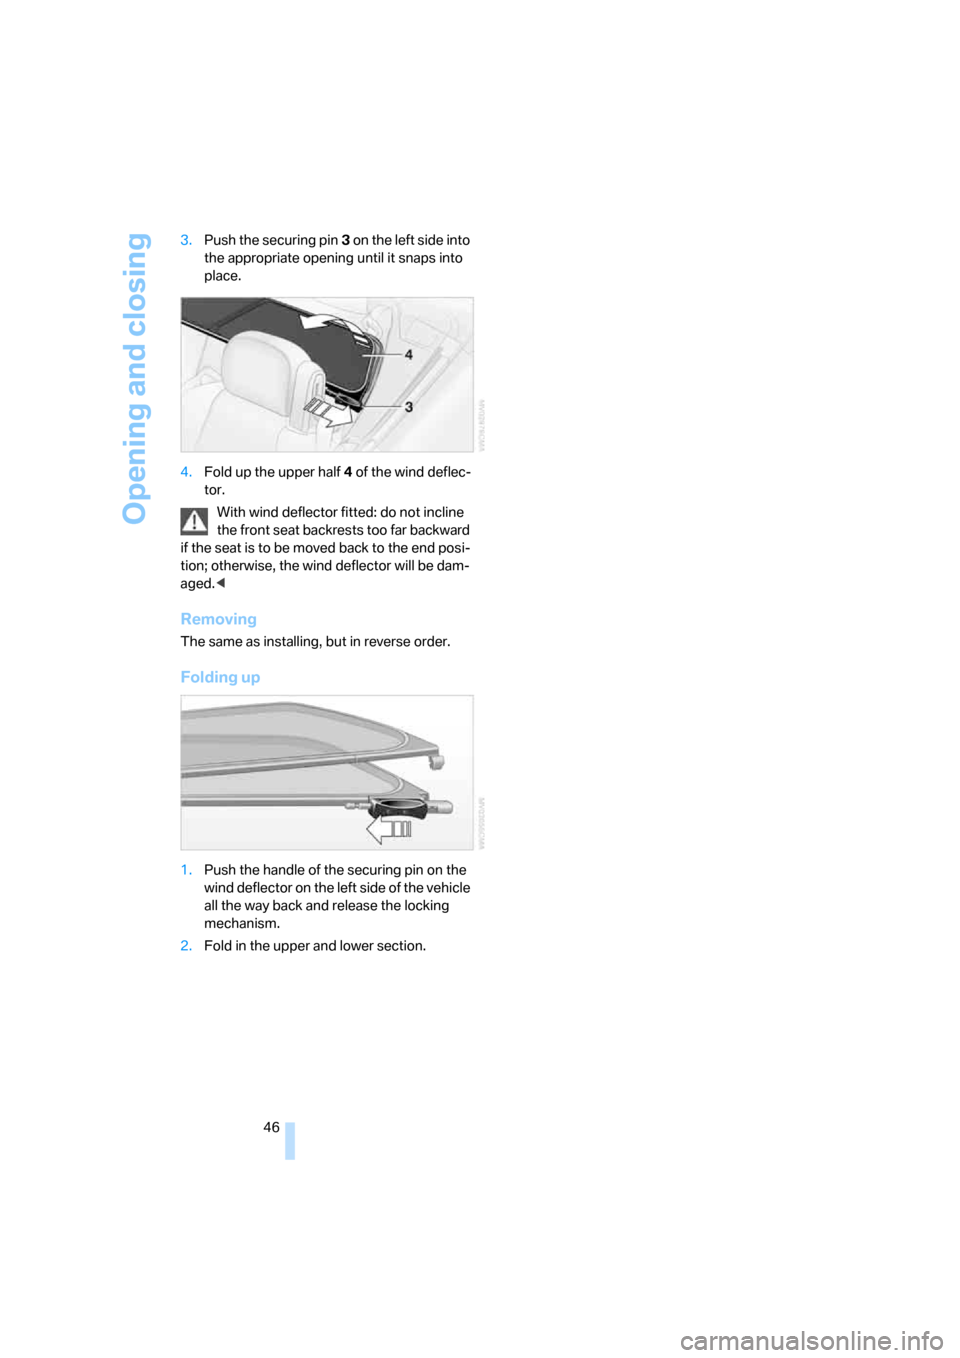
46 3.Push the securing pin3 on the left side into
the appropriate opening until it snaps into
place.
4.Fold up the upper half4 of the wind deflec-
tor.
With wind deflector fitted: do not incline
the front seat backrests too far backward
if the seat is to be moved back to the end posi-
tion; otherwise, the wind deflector will be dam-
aged.<
Removing
The same as installing, but in reverse order.
Folding up
1.Push the handle of the securing pin on the
wind deflector on the left side of the vehicle
all the way back and release the locking
mechanism.
2.Fold in the upper and lower section.
Page 48 of 236
Controls
47Reference
At a glance
Driving tips
Communications
Navigation
Entertainment
Mobility
Adjustments
Sitting safely
The ideal sitting position can make a vital con-
tribution to relaxed, fatigue-free driving. In the
interaction with the safety belts, the head
restraints and the airbags, the seat position
plays an important role in an accident. To
ensure that the safety systems operate with
optimum efficiency, we strongly urge you to fol-
low the instructions contained in the following
section.
For additional information on transporting chil-
dren safely, refer to page56.
Airbags
Always maintain an adequate distance
between yourself and the airbags. Always
hold the steering wheel by its rim with hands at
the 9 o'clock and 3 o'clock positions to mini-
mize the risk of injuries to your hands and arms
in the event of airbag deployment.
No one and nothing is to come between the air-
bags and the seat occupant.
Do not use the cover of the front airbag on the
front passenger side as a storage area. Make
sure that the front passenger is sitting correctly
and does not rest feet or legs on the instrument
panel, otherwise leg injuries can occur if the
knee and front airbags are triggered.
Make sure that occupants do not rest their head
on the side or head airbag; otherwise, injuries
can occur if the airbags are triggered.<
Even if you adhere to all the instructions, the
occurrence of injuries resulting from contact
with airbags cannot be entirely ruled out,
depending on the circumstances. The ignition
and inflation noise may provoke a mild hearing
loss in extremely sensitive individuals. This
effect is usually only temporary.
For airbag locations and additional information
on airbags, refer to page90.
Head restraints
A correctly adjusted head restraint reduces the
risk of injury to cervical vertebrae in an accident.
Adjust the head restraint so that its center
is approx. at ear level. Otherwise there is
increased danger of injury in the event of an
accident.<
Head restraints, refer to page50.
Safety belt
Before every drive, make sure that safety belts
are being worn at all of the occupied seats.
Airbags complement the safety belt as an addi-
tional safety device, but they do not represent a
substitute.
Your vehicle has four seats that are each
equipped with a safety belt.
Never allow more than one person to
wear a single safety belt. Never allow
infants or small children to ride in a passenger's
lap.
Expectant mothers should always wear their
safety belts, taking care to position the lap belt
against the lower hips, where it will not exert
pressure against the abdominal area.
Do not route the belt across your neck, or run it
across sharp edges. Be sure that the belt does
not become caught or jammed. Make sure that
the safety belt is securely fastened across the
lap and shoulders, as close to the body as pos-
sible without it being twisted or tangled. Be sure
not to route it over solid or breakable objects;
otherwise, the belt can slip over the hips in the
lap area in a frontal impact and injure the abdo-
men. Avoid wearing clothing that prevents the
belt from fitting properly and pull the shoulder
belt upward periodically to readjust the tension
across your lap in order to avoid a reduction in
the retention effect of the safety belt.<
For instructions on operating safety belts, refer
to page51.
Page 57 of 236
Transporting children safely
56
Transporting children safely
The right place for children
Do not leave children unattended in the
vehicle; otherwise, they could endanger
themselves and other persons, e.g. by opening
the doors.<
In principle, all seats in your BMW are suitable,
with the exception of the driver's seat, for
mounting universal child restraint systems for
all age classes approved for the respective age
group.
Children always in back
Accident research shows that the safest place
for children is in the back.
Children younger than 13 years of age or
under 5 ft/150 cm in height must be trans-
ported in back, seated in child restraint systems
which correspond to the age, weight and height
of the child. Otherwise there is an increased
danger of injury in an accident.<
Children 13 years of age or older must wear a
safety belt as soon as a suitable child restraint
system can no longer be used due to their age,
size and weight.
All rear seat positions in your vehicle comply
with the recommendations of the standard
SAE J1819 for the safe securing of child
restraint systems in motor vehicles.
Exception for front passenger seat
Should it be necessary to use a child-
restraint system on the front passenger
seat, the front, knee and side airbag on the pas-
senger side must be deactivated. Otherwise,
there is an increased risk of injury for the child
if the airbags are triggered, even with a child-
restraint system. Your BMW center will be glad
to advise you.<
For more information on automatic deactivation
of the front passenger airbags, refer to page91.
Installing child-restraint
systems
Follow child-restraint system manufac-
turer's instructions for the selection,
installation and use of child restraint systems.
Otherwise the degree of protection they offer
may be reduced.<
Commercially available child restraint systems
are designed to be secured with a lap belt or
with the lap belt section of a three-point belt.
Incorrectly or improperly installed child restraint
systems can increase the risk of injury for chil-
dren. Always follow the instructions for install-
ing the system exactly.
On front passenger seat
Before installing a child restraint system
in the front passenger seat, make sure
that the front, knee and side airbag on the front
passenger side are deactivated. Otherwise
there is an increased risk of injury if the airbags
are triggered.<
Seat height
Before mounting a universal child-restraint sys-
tem, move the front passenger seat into the
highest position to achieve the best possible
belt routing. Do not change this seat height.
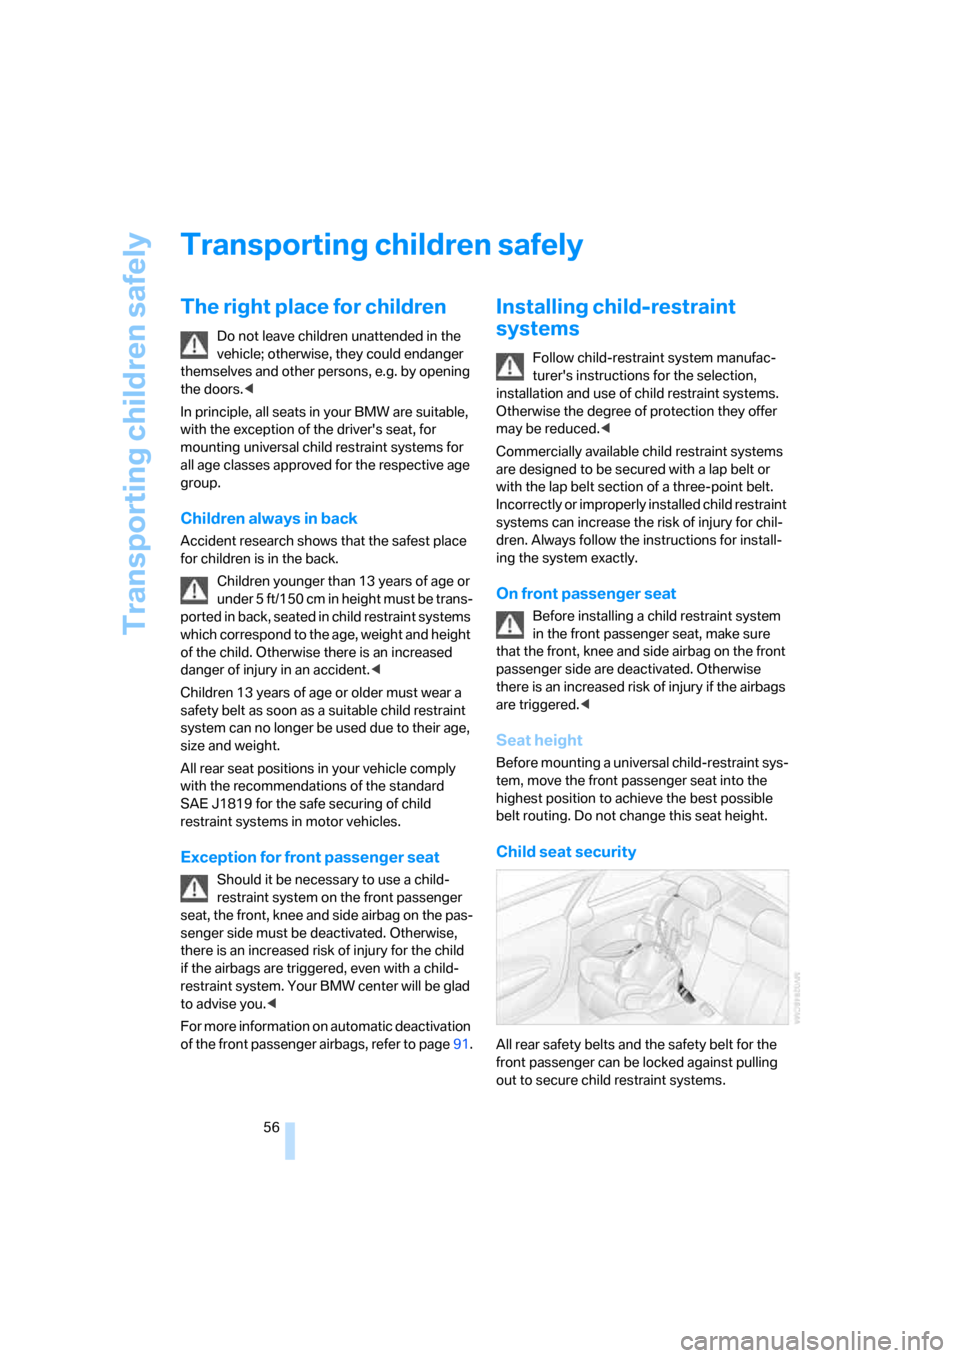
Child seat security
All rear safety belts and the safety belt for the
front passenger can be locked against pulling
out to secure child restraint systems.
Page 58 of 236
Controls
57Reference
At a glance
Driving tips
Communications
Navigation
Entertainment
Mobility
Locking safety belt
1.Secure the child restraint system with the
belt.
2.Pull out the belt webbing completely.
3.Allow the belt webbing to be pulled in and
pull taut against the child restraint system.
The safety belt is locked.
Unlocking safety belt
1.Open the belt buckle.
2.Remove the child restraint system.
3.Allow the belt webbing to be pulled in com-
pletely.
Coupe: child restraint system with
tether strap
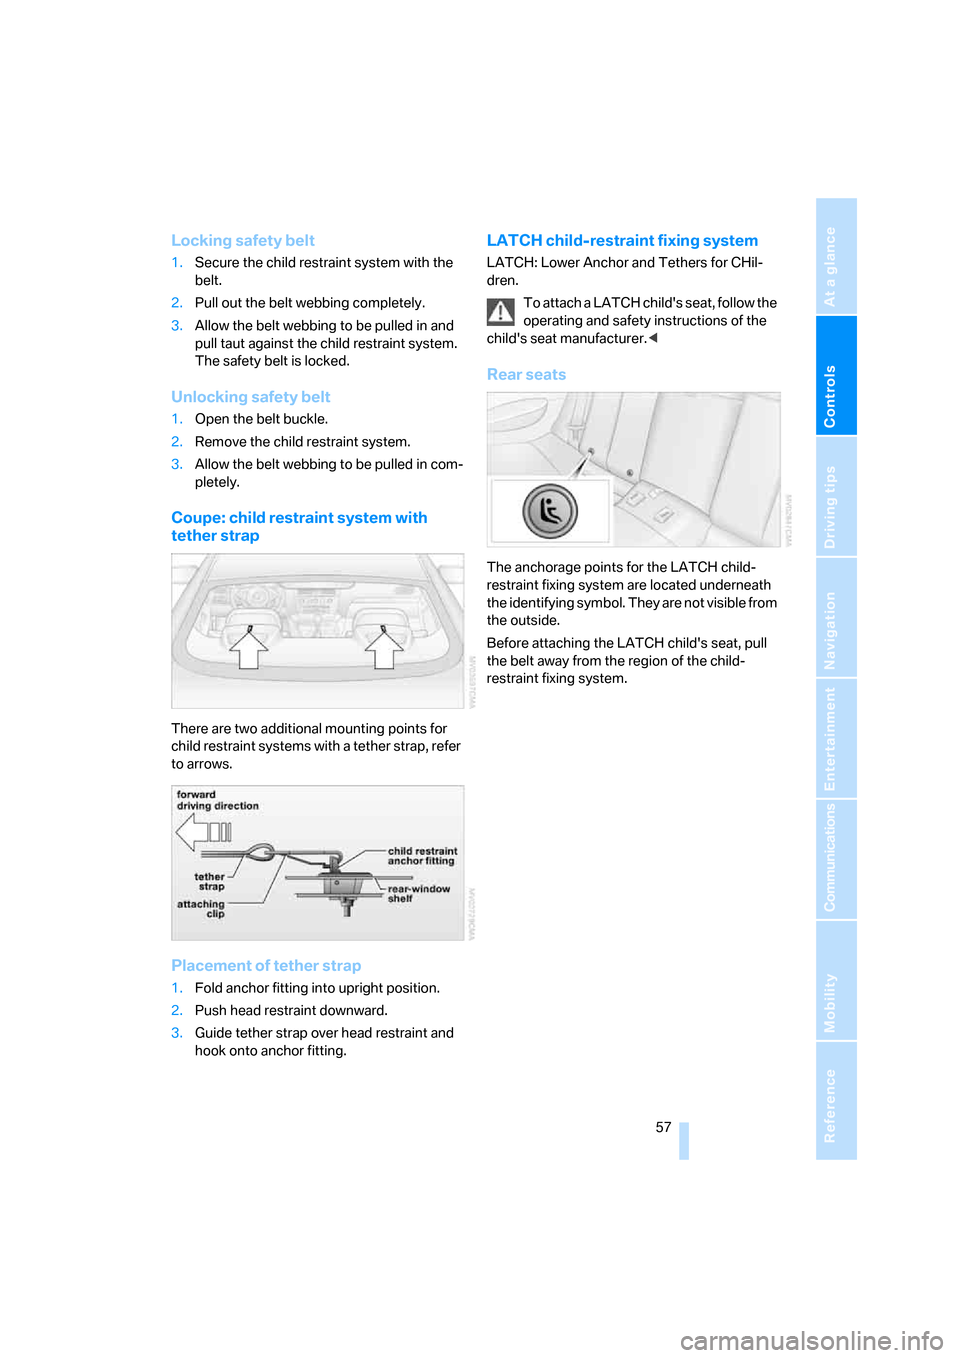
There are two additional mounting points for
child restraint systems with a tether strap, refer
to arrows.
Placement of tether strap
1.Fold anchor fitting into upright position.
2.Push head restraint downward.
3.Guide tether strap over head restraint and
hook onto anchor fitting.
LATCH child-restraint fixing system
LATCH: Lower Anchor and Tethers for CHil-
dren.
To attach a LATCH child's seat, follow the
operating and safety instructions of the
child's seat manufacturer.<
Rear seats
The anchorage points for the LATCH child-
restraint fixing system are located underneath
the identifying symbol. They are not visible from
the outside.
Before attaching the LATCH child's seat, pull
the belt away from the region of the child-
restraint fixing system.