2006 BMW 650I CONVERTIBLE rear entertainment
[x] Cancel search: rear entertainmentPage 16 of 236

At a glance
15Reference
Controls
Driving tips
Communications
Navigation
Entertainment
Mobility
1Coupe: glass sunroof, electric with raise
function
*40
2Microphone for handsfree mode for
telephone
*
and voice command system*22
Convertible: microphone on steering
column
3Reading lamps99
4Interior lamps99
5Coupe: initiating emergency call
*202
6Indicator/warning lamp for front passenger
airbag
*92
7Convertible: initiating emergency
call
*202
8Control Display16
9Hazard warning flashers
10Central locking system32
11Automatic climate control100
12Changing
>radio station145
>track14013Ejecting
>navigation DVD
*120
>audio CD140
14Player for navigation DVD in Professional
*
navigation system120
15Drive for audio CDs140
16Switching audio sources on/off and
adjusting volume141
18Bracket for cup holder109
19Controller16
Turn, press or move horizontally in four
directions
20Activating voice command system
*22
21Opening start menu on Control Display17
22Dynamic Driving Control64 Temperature setting,
left/right100
Automatic air distribution and
volume101
Cooling function102
AUC Automatic recirculated-air
control103
Maximum cooling103
Residual heat mode103
Switching off automatic climate
control103
Air volume102
Defrosting windows and removing
condensation102
Rear window defroster100
17
Heated seats52
PDC Park Distance Control
*85
DTC Dynamic Traction Control87
Convertible: opening the convert-
ible top42
Convertible: closing the convertible
top42
Page 36 of 236

Controls
35Reference
At a glance
Driving tips
Communications
Navigation
Entertainment
Mobility
The handle recesses on the interior trim of the
luggage compartment lid make it easier to pull
down.
If special circumstances should make it abso-
lutely necessary to operate the vehicle with the
luggage compartment lid open:
1.Coupe: close both windows and the glass
sunroof
*.
Convertible: with the convertible top
closed, close all windows, including the rear
window.
2.Increase the air volume of the automatic
climate control to a high level, refer to
page102.
Luggage compartment
There are four lashing eyes on the inner corners
of the luggage compartment for securing lug-
gage nets
* or securing straps to fix luggage in
position.
Also refer to Securing cargo, page117.
Convertible: increasing luggage
compartment capacity
With the convertible top closed, you can
enlarge the luggage compartment capacity.To do so, unfold the handle and press it down-
ward in the direction of travel, refer to arrow.
This moves the convertible top compartment
floor into the raised position.
Before opening the convertible top, execute
this procedure in reverse order.
The convertible top cannot be opened if
the convertible top compartment floor is
in the raised position.<
Alarm system
The concept
The vehicle alarm system responds:
>To the opening of a door, the hood, or the
luggage compartment lid
>To movements in the vehicle interior: inte-
rior motion sensor, see below
>To changes in the vehicle's tilt if someone
attempts to steal the wheels or tow the
vehicle
>To interruptions in battery voltage
Unauthorized operations are briefly signaled by
the alarm system:
>by triggering an acoustic alarm
>by switching on
the hazard warning flashers
>by flashing the high beams
Arming and disarming alarm system
When you lock or unlock the vehicle, either with
the remote control or at the door lock, the alarm
system is armed or disarmed at the same time.
You can open the luggage compartment lid,
even with the system armed, by using the
button of the remote control, refer to page31.
When the luggage compartment lid is closed, it
is once again locked and monitored.
Switching off alarm
>Unlock the vehicle using the remote control,
refer to page30, or
>insert the remote control as far as possible
into the ignition lock, refer to page58.
Page 40 of 236

Controls
39Reference
At a glance
Driving tips
Communications
Navigation
Entertainment
Mobility
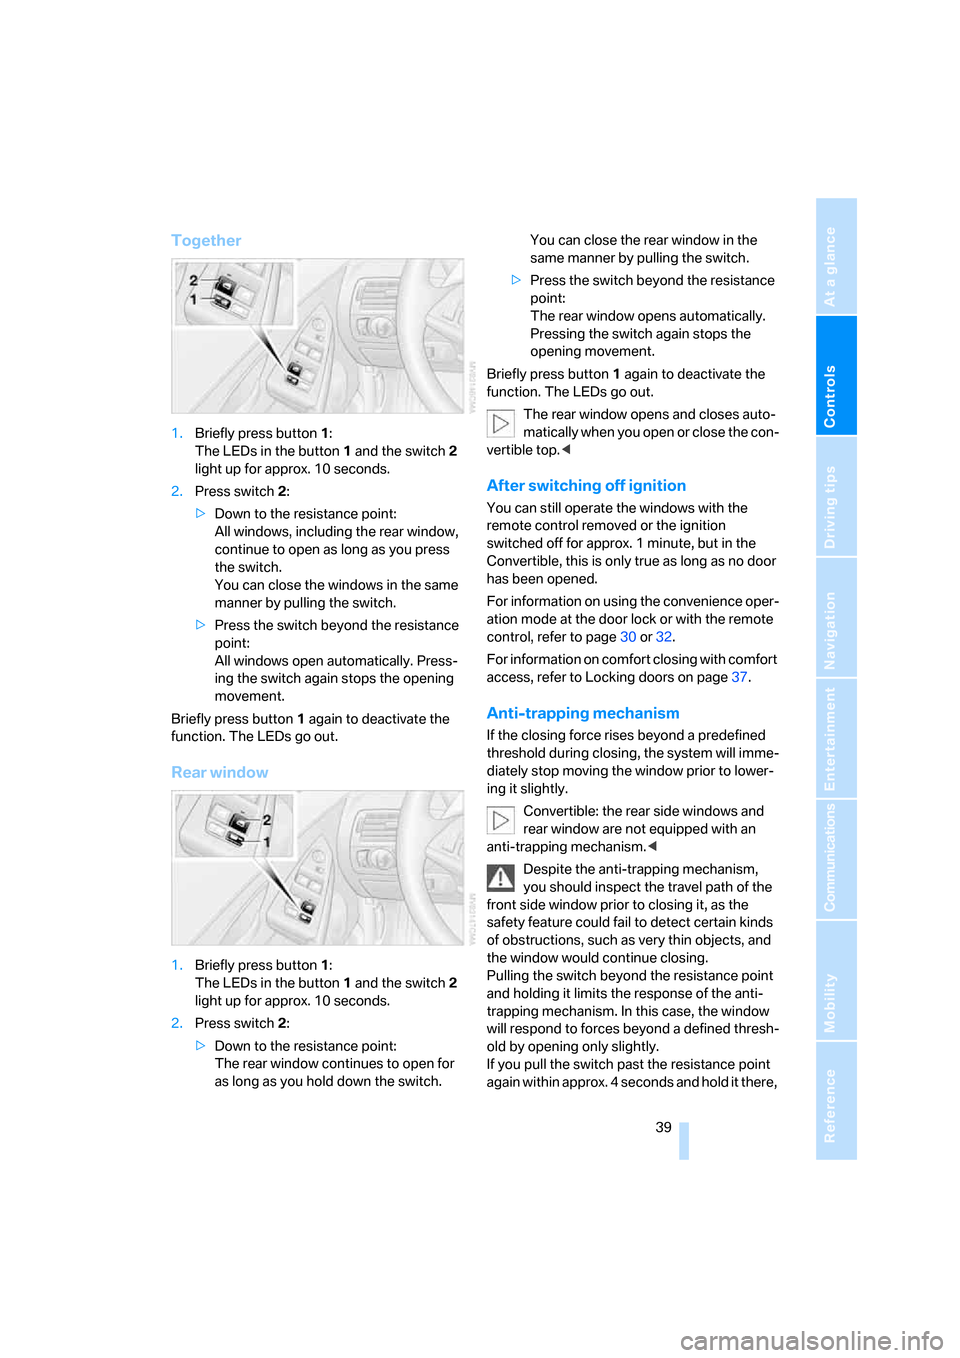
Together
1.Briefly press button1:
The LEDs in the button1 and the switch2
light up for approx. 10 seconds.
2.Press switch 2:
>Down to the resistance point:
All windows, including the rear window,
continue to open as long as you press
the switch.
You can close the windows in the same
manner by pulling the switch.
>Press the switch beyond the resistance
point:
All windows open automatically. Press-
ing the switch again stops the opening
movement.
Briefly press button 1 again to deactivate the
function. The LEDs go out.
Rear window
1.Briefly press button1:
The LEDs in the button1 and the switch2
light up for approx. 10 seconds.
2.Press switch 2:
>Down to the resistance point:
The rear window continues to open for
as long as you hold down the switch.You can close the rear window in the
same manner by pulling the switch.
>Press the switch beyond the resistance
point:
The rear window opens automatically.
Pressing the switch again stops the
opening movement.
Briefly press button 1 again to deactivate the
function. The LEDs go out.
The rear window opens and closes auto-
matically when you open or close the con-
vertible top.<
After switching off ignition
You can still operate the windows with the
remote control removed or the ignition
switched off for approx. 1 minute, but in the
Convertible, this is only true as long as no door
has been opened.
For information on using the convenience oper-
ation mode at the door lock or with the remote
control, refer to page30 or32.
For information on comfort closing with comfort
access, refer to Locking doors on page37.
Anti-trapping mechanism
If the closing force rises beyond a predefined
threshold during closing, the system will imme-
diately stop moving the window prior to lower-
ing it slightly.
Convertible: the rear side windows and
rear window are not equipped with an
anti-trapping mechanism.<
Despite the anti-trapping mechanism,
you should inspect the travel path of the
front side window prior to closing it, as the
safety feature could fail to detect certain kinds
of obstructions, such as very thin objects, and
the window would continue closing.
Pulling the switch beyond the resistance point
and holding it limits the response of the anti-
trapping mechanism. In this case, the window
will respond to forces beyond a defined thresh-
old by opening only slightly.
If you pull the switch past the resistance point
again within approx. 4 seconds and hold it there,
Page 42 of 236

Controls
41Reference
At a glance
Driving tips
Communications
Navigation
Entertainment
Mobility
Moving manually
In the event of an electrical malfunction, you can
move the panorama glass sunroof and the slid-
ing visor manually.
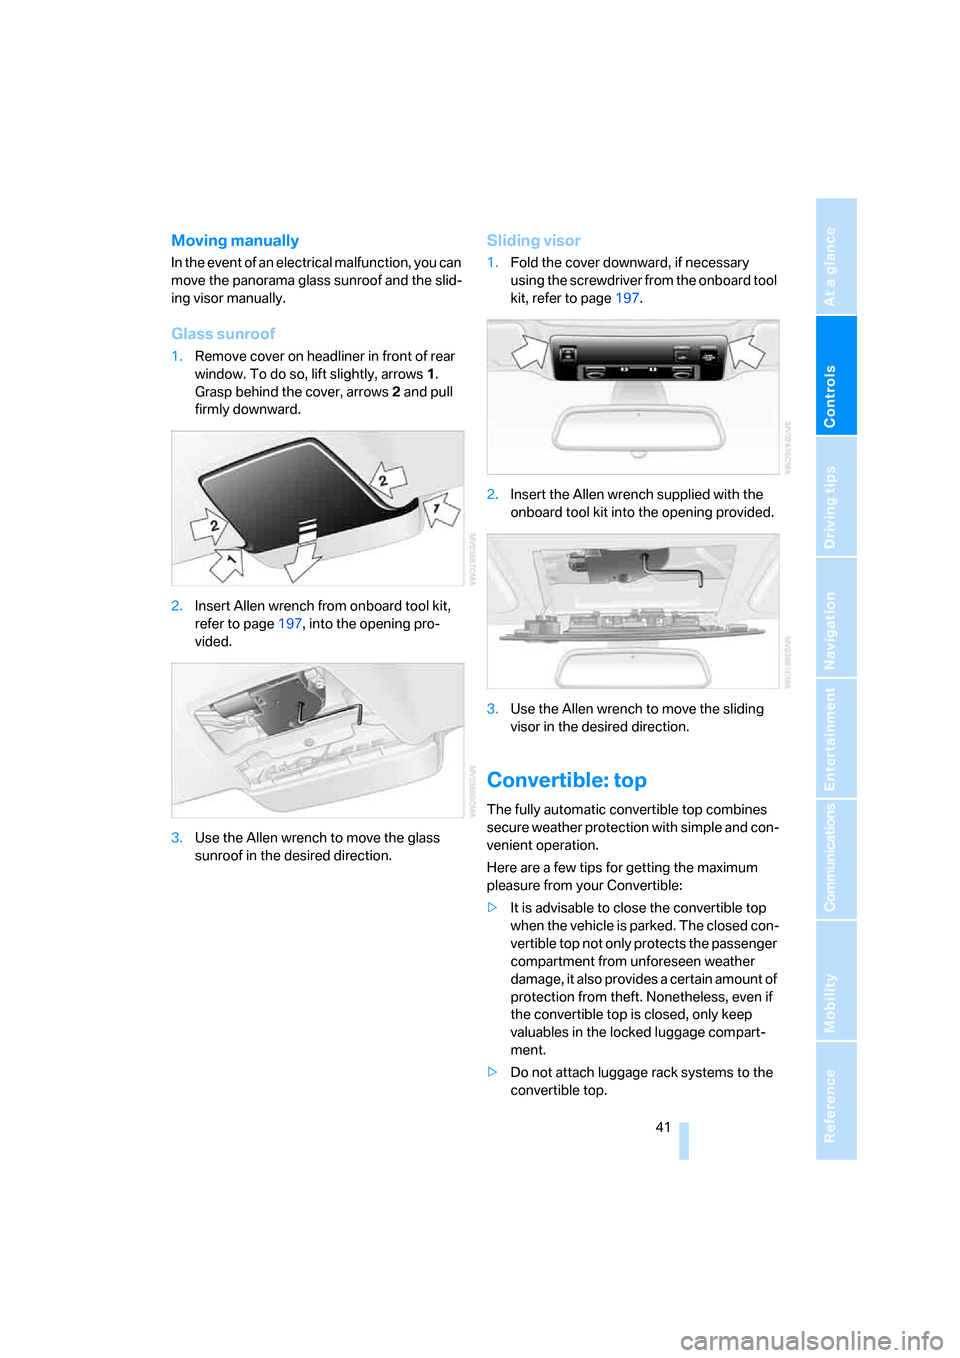
Glass sunroof
1.Remove cover on headliner in front of rear
window. To do so, lift slightly, arrows1.
Grasp behind the cover, arrows2 and pull
firmly downward.
2.Insert Allen wrench from onboard tool kit,
refer to page197, into the opening pro-
vided.
3.Use the Allen wrench to move the glass
sunroof in the desired direction.
Sliding visor
1.Fold the cover downward, if necessary
using the screwdriver from the onboard tool
kit, refer to page197.
2.Insert the Allen wrench supplied with the
onboard tool kit into the opening provided.
3.Use the Allen wrench to move the sliding
visor in the desired direction.
Convertible: top
The fully automatic convertible top combines
secure weather protection with simple and con-
venient operation.
Here are a few tips for getting the maximum
pleasure from your Convertible:
>It is advisable to close the convertible top
when the vehicle is parked. The closed con-
vertible top not only protects the passenger
compartment from unforeseen weather
damage, it also provides a certain amount of
protection from theft. Nonetheless, even if
the convertible top is closed, only keep
valuables in the locked luggage compart-
ment.
>Do not attach luggage rack systems to the
convertible top.
Page 44 of 236

Controls
43Reference
At a glance
Driving tips
Communications
Navigation
Entertainment
Mobility
>If the LED lights up red when the button is
pressed, either the floor of the convertible
top storage compartment in the luggage
compartment is in the raised position or a
malfunction has occurred. The convertible
top cannot be moved.
Interruption
The automatic sequence of movements is
interrupted immediately if the button for top
operation is released. The sequence can be
continued in the desired direction by pressing
the appropriate button.
If the opening or closing action is interrupted for
a longer period, the convertible top remains in
that position for approx. 15 minutes before it
slowly moves to a stable position.
A convertible top which is not completely
opened or closed presents a danger.
Do not interrupt and continue the closing action
several times in succession; otherwise, the top
mechanism can be damaged.<
If the convertible top is not completely
open or closed, then the luggage com-
partment lid cannot be opened.<
Convenience operation with the
remote control and via the door lock
Refer to pages30 and32.
Manual closing
Only close the convertible top manually if
absolutely necessary; never open it man-
ually. The convertible top compartment lid can-
not be locked in the event of an electrical mal-
function and would open while the vehicle is
being driven.
Improper handling can lead to damage.<
Before closing
1.Open luggage compartment lid.
2.Take the Allen wrench and the screwdriver
from the onboard tool kit, refer to page197.
3.Pry out the two buttons in the luggage com-
partment with the screwdriver and then pull
firmly. This unlocks the convertible top
compartment lid.
4.Close luggage compartment lid.
During manual convertible top opera-
tion, the luggage compartment lid
cannot be opened.<
5.Completely open the side windows and the
rear window.
If the rear window cannot be opened using
the switch, it must be lowered manually.
Opening rear window manually
1.Pry out the cover between the rear head
restraints. To do so, place the screwdriver
as close as possible to the locking ele-
ments, as shown in the illustration.
2.Insert the Allen wrench as far as possible
into the opening and turn firmly in the direc-
Page 46 of 236

Controls
45Reference
At a glance
Driving tips
Communications
Navigation
Entertainment
Mobility
7.Insert the Allen wrench into the opening
provided.
8.From the outside, both persons pull the
front frame of the convertible top down-
ward, as simultaneously as possible on the
two sides.
9.Turn the Allen wrench in the direction of the
arrow until the front convertible top frame is
locked to the windshield frame.
The rear convertible top ends are pressed
automatically onto the convertible top com-
partment lid and close tightly with tension.
10.If necessary, close the rear window again
manually in the same way as above.
Wind deflector*
The wind deflector keeps the air movement in
the passenger compartment to a minimum
when the convertible top is open, thus enabling
pleasant driving even at higher speeds.
The wind deflector is stowed in a protective
sleeve in the luggage compartment. Short
instructions for use are also provided on the
protective sleeve.
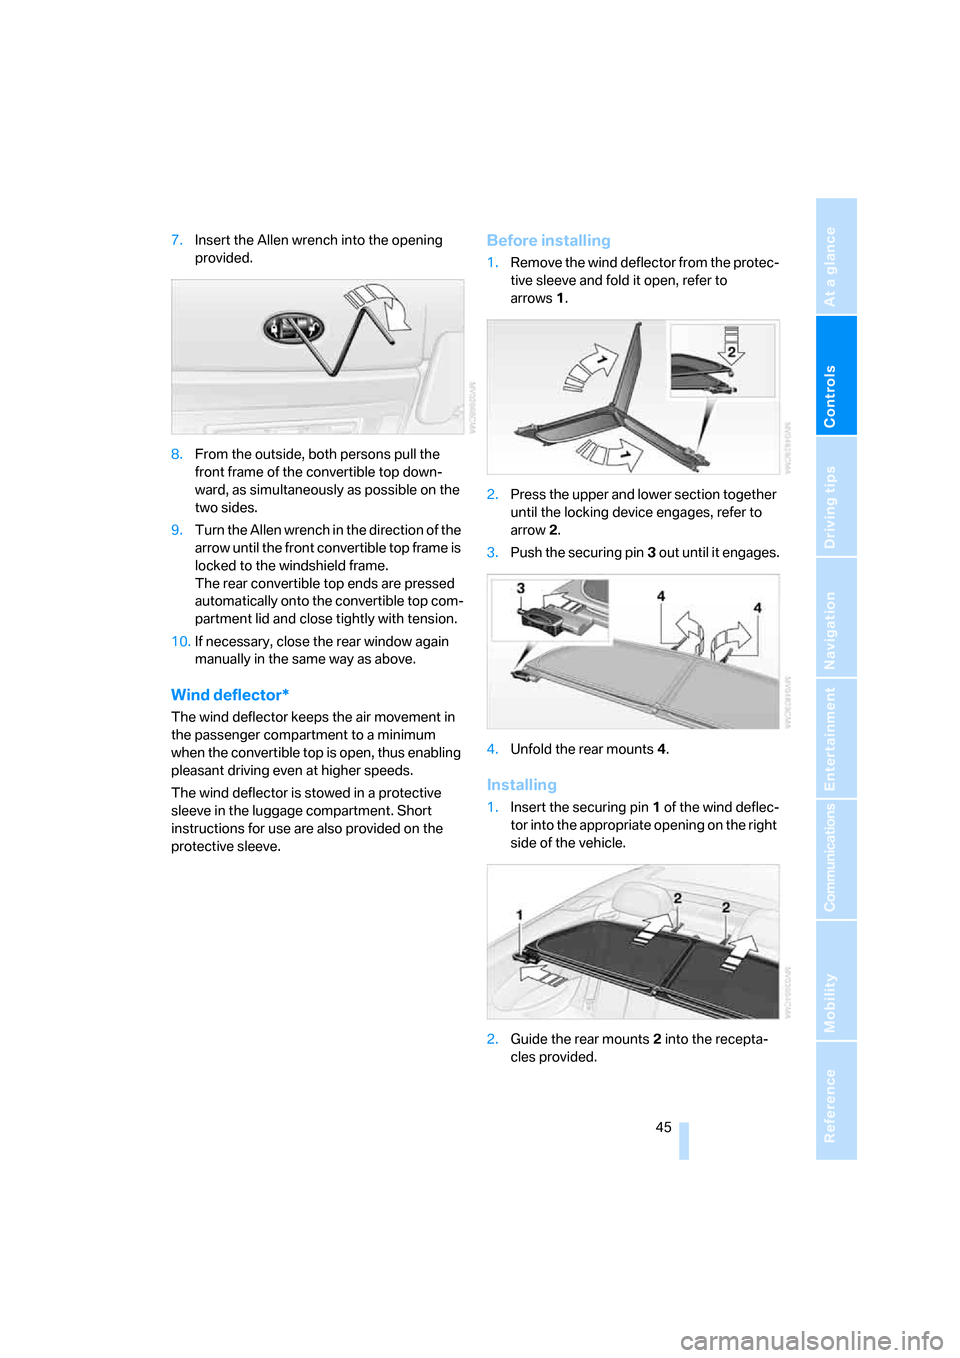
Before installing
1.Remove the wind deflector from the protec-
tive sleeve and fold it open, refer to
arrows1.
2.Press the upper and lower section together
until the locking device engages, refer to
arrow2.
3.Push the securing pin3 out until it engages.
4.Unfold the rear mounts4.
Installing
1.Insert the securing pin 1 of the wind deflec-
tor into the appropriate opening on the right
side of the vehicle.
2.Guide the rear mounts2 into the recepta-
cles provided.
Page 50 of 236

Controls
49Reference
At a glance
Driving tips
Communications
Navigation
Entertainment
Mobility
Seat, mirror and steering
wheel memory
You can store and select three different adjust-
ment settings for the driver's seat, exterior mir-
rors and steering wheel.
The adjustment of the lumbar support is not
stored in the memory.
Storing
1.Switch on radio readiness or ignition, refer
to page58.
2.Adjust the desired seat, exterior mirror and
steering-wheel positions.
3.Press the button:
The LED in the button lights up.
4.Press the desired memory button 1, 2 or3:
The LED goes out.
Requesting
Do not request a position from the mem-
ory while the vehicle is moving. There is a
risk of accident from unexpected movement of
the seat or steering wheel.<
Convenience mode
1.Open the driver's door after unlocking or
switch on radio readiness, refer to page58.
2.Briefly press the desired memory button1,
2 or3.
The system immediately cancels the adjust-
ment procedure when you briefly press one of
the seat adjustment switches or one of the
memory buttons.The adjusting procedure for the steering wheel
is immediately interrupted if you operate the
switch for the steering wheel adjustment in any
direction, refer to page53.
Safety feature
1.Close the driver's door and switch ignition
on or off, refer to page58.
2.Press the desired memory button 1, 2 or3
and maintain pressure until the adjustment
process has been completed.
If the button was pressed inadvertently:
press the button again; the LED goes out.
Activating with remote control
The last positions of the driver's seat, external
rearview mirrors, and steering wheel are stored
for the remote key currently in use.
You can choose when the position is requested:
>Request when unlocking vehicle
>Request when opening driver's door
iDrive, for principle details, refer to page16.
1.Open the start menu.
2.Press the controller to open the menu.
3.Select "Vehicle settings" and press the
controller.
4.Select "Door locks" and press the control-
ler.
5.Select "Central locking" and press the con-
troller.
6.Select "Last seat pos." and press the con-
troller.
Page 54 of 236

Controls
53Reference
At a glance
Driving tips
Communications
Navigation
Entertainment
Mobility
Automatic functions
>Both exterior mirrors are automatically
heated when the engine is running or the
ignition is switched on.
>When the vehicle is moving forward, the
interior and exterior mirrors dim as a func-
tion of the incoming light.
The interior mirror is provided with two photo-
cells to control its automatic dimming function.
One is integrated into the mirror glass, refer to
arrow, while the other is located at a position
slightly offset from this on the back of the mirror
housing.
For trouble-free operation, keep the photocells
clean and do not cover the area between the
interior rearview mirror and the windshield. Also
do not attach stickers to the windshield in front
of the mirror.
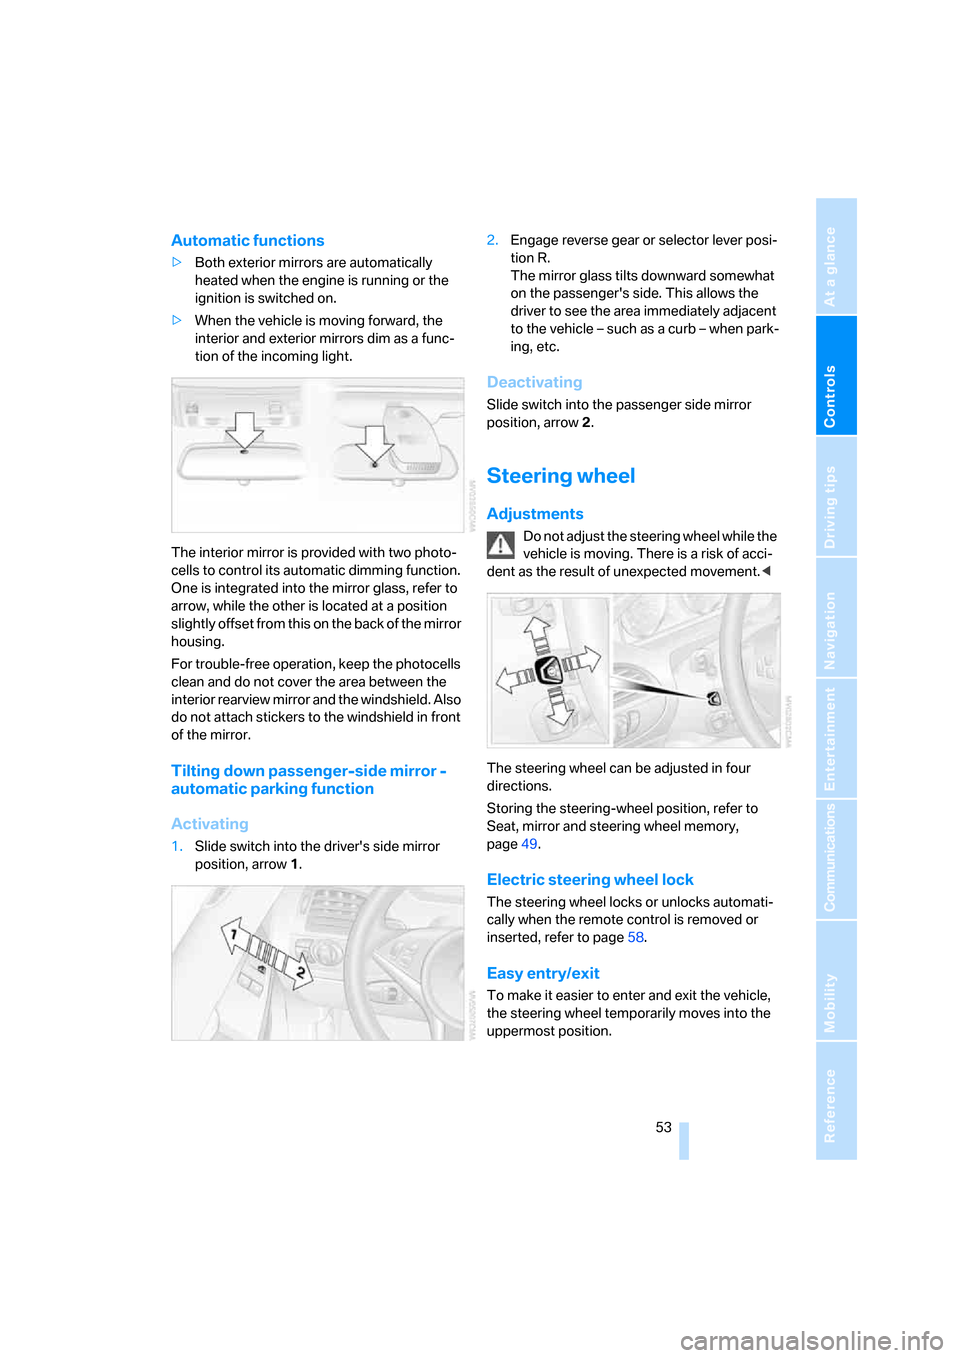
Tilting down passenger-side mirror -
automatic parking function
Activating
1.Slide switch into the driver's side mirror
position, arrow 1.2.Engage reverse gear or selector lever posi-
tion R.
The mirror glass tilts downward somewhat
on the passenger's side. This allows the
driver to see the area immediately adjacent
to the vehicle – such as a curb – when park-
ing, etc.
Deactivating
Slide switch into the passenger side mirror
position, arrow 2.
Steering wheel
Adjustments
Do not adjust the steering wheel while the
vehicle is moving. There is a risk of acci-
dent as the result of unexpected movement.<
The steering wheel can be adjusted in four
directions.
Storing the steering-wheel position, refer to
Seat, mirror and steering wheel memory,
page49.
Electric steering wheel lock
The steering wheel locks or unlocks automati-
cally when the remote control is removed or
inserted, refer to page58.
Easy entry/exit
To make it easier to enter and exit the vehicle,
the steering wheel temporarily moves into the
uppermost position.