2006 BMW 650I CONVERTIBLE rear entertainment
[x] Cancel search: rear entertainmentPage 118 of 236
Driving tips
117Reference
At a glance
Controls
Communications
Navigation
Entertainment
Mobility
5.Determine the combined weight of luggage
and cargo being loaded on the vehicle. That
weight may not safely exceed the available
cargo and luggage load capacity calculated
in step 4.
6.If your vehicle will be towing a trailer, part of
the load from your trailer will be transferred
to your vehicle. Consult the manual for
transporting a trailer to determine how this
may reduce the available cargo and luggage
load capacity of your vehicle.
Load
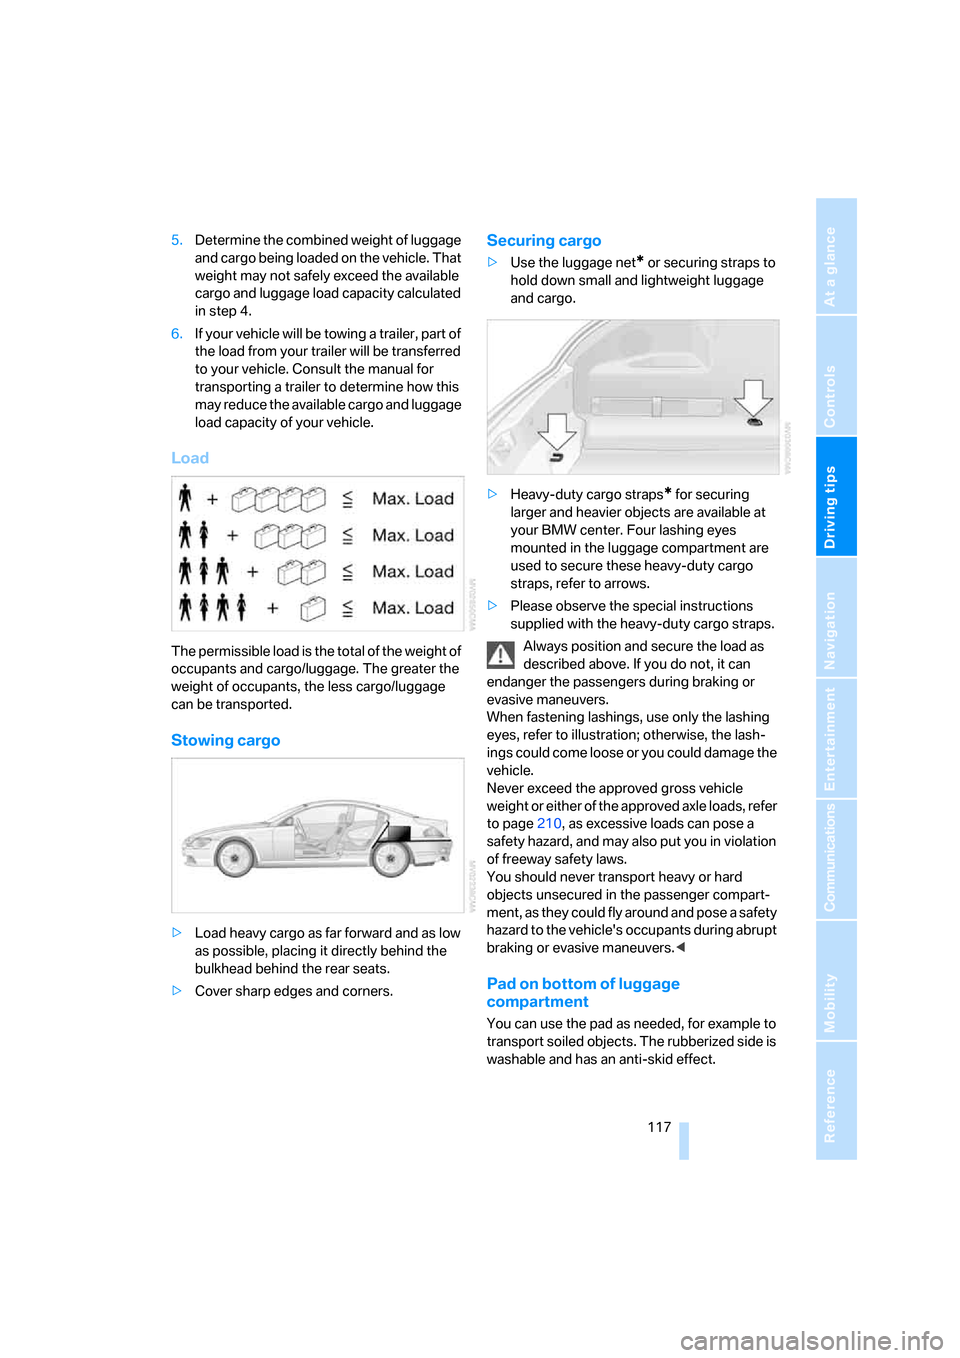
The permissible load is the total of the weight of
occupants and cargo/luggage. The greater the
weight of occupants, the less cargo/luggage
can be transported.
Stowing cargo
>Load heavy cargo as far forward and as low
as possible, placing it directly behind the
bulkhead behind the rear seats.
>Cover sharp edges and corners.
Securing cargo
>Use the luggage net* or securing straps to
hold down small and lightweight luggage
and cargo.
>Heavy-duty cargo straps
* for securing
larger and heavier objects are available at
your BMW center. Four lashing eyes
mounted in the luggage compartment are
used to secure these heavy-duty cargo
straps, refer to arrows.
>Please observe the special instructions
supplied with the heavy-duty cargo straps.
Always position and secure the load as
described above. If you do not, it can
endanger the passengers during braking or
evasive maneuvers.
When fastening lashings, use only the lashing
eyes, refer to illustration; otherwise, the lash-
ings could come loose or you could damage the
vehicle.
Never exceed the approved gross vehicle
weight or either of the approved axle loads, refer
to page210, as excessive loads can pose a
safety hazard, and may also put you in violation
of freeway safety laws.
You should never transport heavy or hard
objects unsecured in the passenger compart-
ment, as they could fly around and pose a safety
hazard to the vehicle's occupants during abrupt
braking or evasive maneuvers.<
Pad on bottom of luggage
compartment
You can use the pad as needed, for example to
transport soiled objects. The rubberized side is
washable and has an anti-skid effect.
Page 186 of 236
Mobility
185Reference
At a glance
Controls
Driving tips
Communications
Navigation
Entertainment
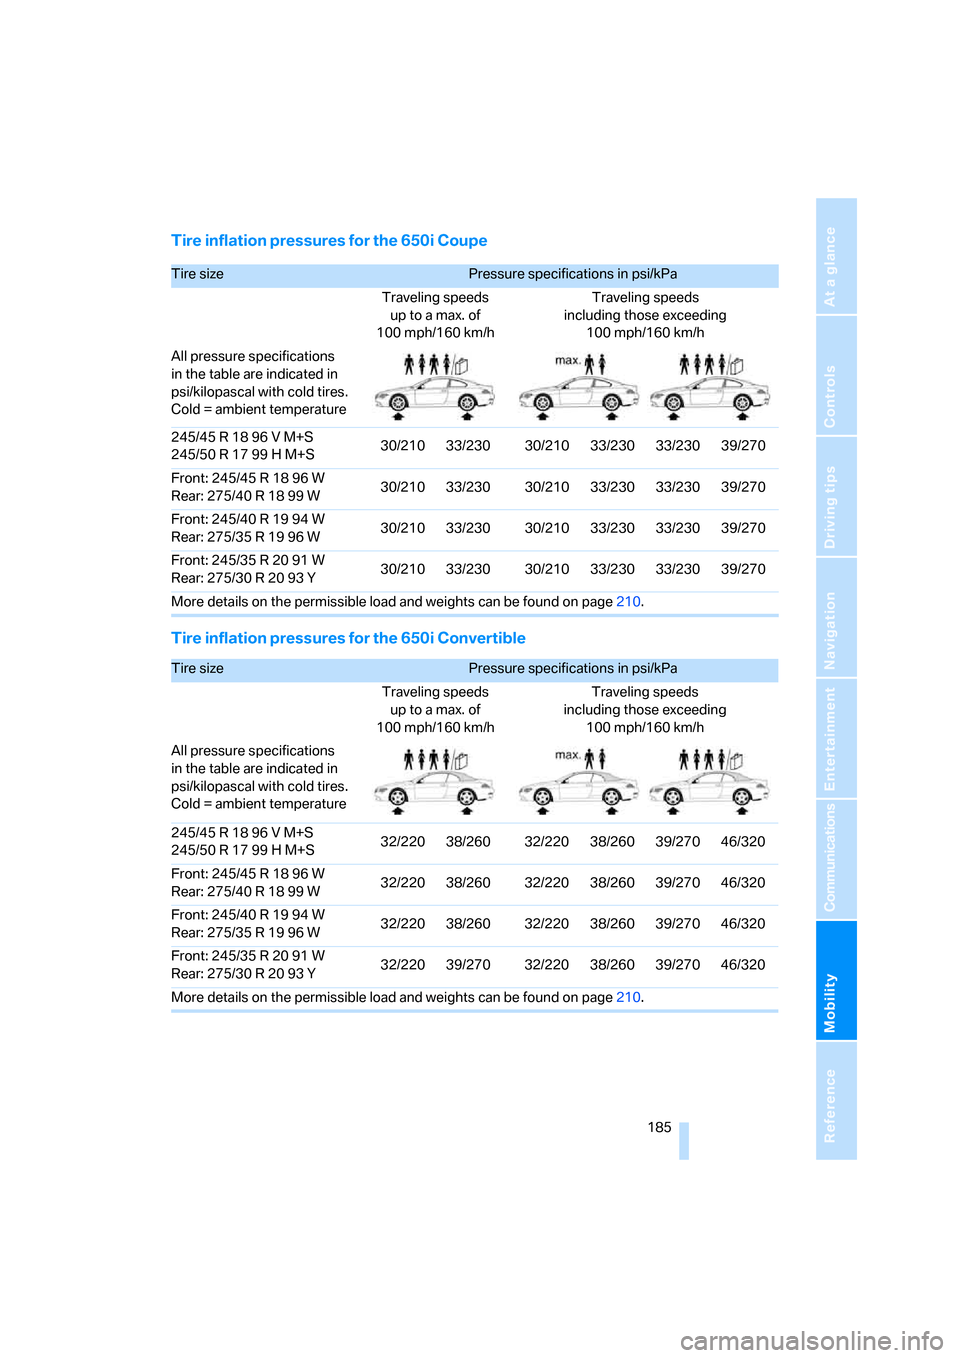
Tire inflation pressures for the 650i Coupe
Tire inflation pressures for the 650i Convertible
Tire sizePressure specifications in psi/kPa
Traveling speeds
up to a max. of
100 mph/160 km/hTraveling speeds
including those exceeding
100 mph/160 km/h
All pressure specifications
in the table are indicated in
psi/kilopascal with cold tires.
Cold = ambient temperature
245/45 R 18 96 V M+S
245/50 R 17 99 H M+S30/210 33/230 30/210 33/230 33/230 39/270
Front: 245/45 R 18 96 W
Rear: 275/40R1899W30/210 33/230 30/210 33/230 33/230 39/270
Front: 245/40 R 19 94 W
Rear: 275/35R1996W30/210 33/230 30/210 33/230 33/230 39/270
Front: 245/35 R 20 91 W
Rear: 275/30R2093Y30/210 33/230 30/210 33/230 33/230 39/270
More details on the permissible load and weights can be found on page210.
Tire sizePressure specifications in psi/kPa
Traveling speeds
up to a max. of
100 mph/160 km/hTraveling speeds
including those exceeding
100 mph/160 km/h
All pressure specifications
in the table are indicated in
psi/kilopascal with cold tires.
Cold = ambient temperature
245/45 R 18 96 V M+S
245/50 R 17 99 H M+S32/220 38/260 32/220 38/260 39/270 46/320
Front: 245/45 R 18 96 W
Rear: 275/40R1899W32/220 38/260 32/220 38/260 39/270 46/320
Front: 245/40 R 19 94 W
Rear: 275/35R1996W32/220 38/260 32/220 38/260 39/270 46/320
Front: 245/35 R 20 91 W
Rear: 275/30R2093Y32/220 39/270 32/220 38/260 39/270 46/320
More details on the permissible load and weights can be found on page210.
Page 190 of 236
Mobility
189Reference
At a glance
Controls
Driving tips
Communications
Navigation
Entertainment
Special characteristics of winter tires
BMW recommends winter tires for use in cold
winter driving conditions. Although all-season
M+S tires provide better winter traction than
summer tires, they generally fail to provide the
same levels of cold-weather performance as
winter tires.
Watch speed
Always observe the maximum permissi-
ble speed for the winter tires, otherwise
tire damage may occur, which can result in acci-
dents.<
Storage
Always store wheels and tires in a cool, dry
place with as little exposure to light as possible.
Always protect tires against all contact with oil,
grease and fuels. Do not exceed the maximum
tire inflation pressure indicated on the side wall
of the tire.
Snow chains*
BMW only tests certain fine-link snow chains,
classifies them as road-safe and recommends
them. Consult your BMW center for more infor-
mation.
These snow chains are approved exclusively for
use in pairs on the rear wheels with the tire size:
>245/50 R 17 Y
>245/45 R 18 Y
Follow the chain manufacturer's instructions
when installing snow chains. Do not exceed a
vehicle speed of 30 mph/50 km/h with the
chains installed.
Do not initialize the Flat Tire Monitor after
installing snow chains as this could cause
the Flat Tire Monitor to malfunction.
When you are driving with snow chains, it can
be beneficial to switch off DTC briefly, refer to
page87.<
Page 196 of 236

Mobility
195Reference
At a glance
Controls
Driving tips
Communications
Navigation
Entertainment
Maintenance
The BMW Maintenance
System
The BMW Maintenance System supports the
preservation of the traffic and operating safety
of your BMW. The service schedule also
includes operations related to the vehicle's
comfort and convenience features, such as
replacement of the filters for the inside air.
The ultimate objective is to ensure economical
maintenance by providing the ideal service for
your vehicle.
Should the day come when you decide to sell
your BMW, you will find that a complete dealer
service history is an asset of inestimable value.
CBS Condition Based Service
Sensors and special algorithms take the differ-
ent driving conditions of your BMW into
account. Condition Based Service uses this to
determine the current and future service
requirements. By letting you define a service
and maintenance regimen that reflects your
own individual requirements, the system builds
the basis for trouble-free driving.
You can set the Control Display to show
remaining distances and times of selected
maintenance intervals and legally mandated
deadlines, refer to page77:
>Engine oil
>Brakes, front and rear separately
>Microfilter/activated-charcoal filter
>Brake fluid>Spark plugs
>Vehicle check
>Legally required tests depending on local
regulations
Service data in remote control
Your vehicle stores this information continu-
ously in the remote control while the vehicle is
being driven. After accessing the data stored in
the remote control, your BMW Service Advisor
can suggest precisely the right array of service
procedures for your own individual vehicle.
For this reason, when you take your vehicle in
for service, you should give the BMW Service
Advisor the remote control last used to drive it.
Make sure the date in the iDrive is always
set correctly, refer to page83; otherwise,
the effectiveness of CBS Condition Based Ser-
vice is not ensured.<
Service and Warranty Information
Booklet for US models and
Warranty and Service Guide Booklet
for Canadian models
Please consult your Service and Warranty Infor-
mation Booklet for US models and Warranty
and Service Guide Booklet for Canadian models
for additional information on service require-
ments.
Have service and repair operations per-
formed at your BMW center.
Take the time to ensure that these service pro-
cedures are confirmed by entries in your vehi-
cle's Service and Warranty Information Booklet
for US models and Warranty and Service Guide
Booklet for Canadian models. These entries
verify that your vehicle has received the speci-
fied regular maintenance, and may also be
required when submitting warranty claims.<
Page 200 of 236
Mobility
199Reference
At a glance
Controls
Driving tips
Communications
Navigation
Entertainment
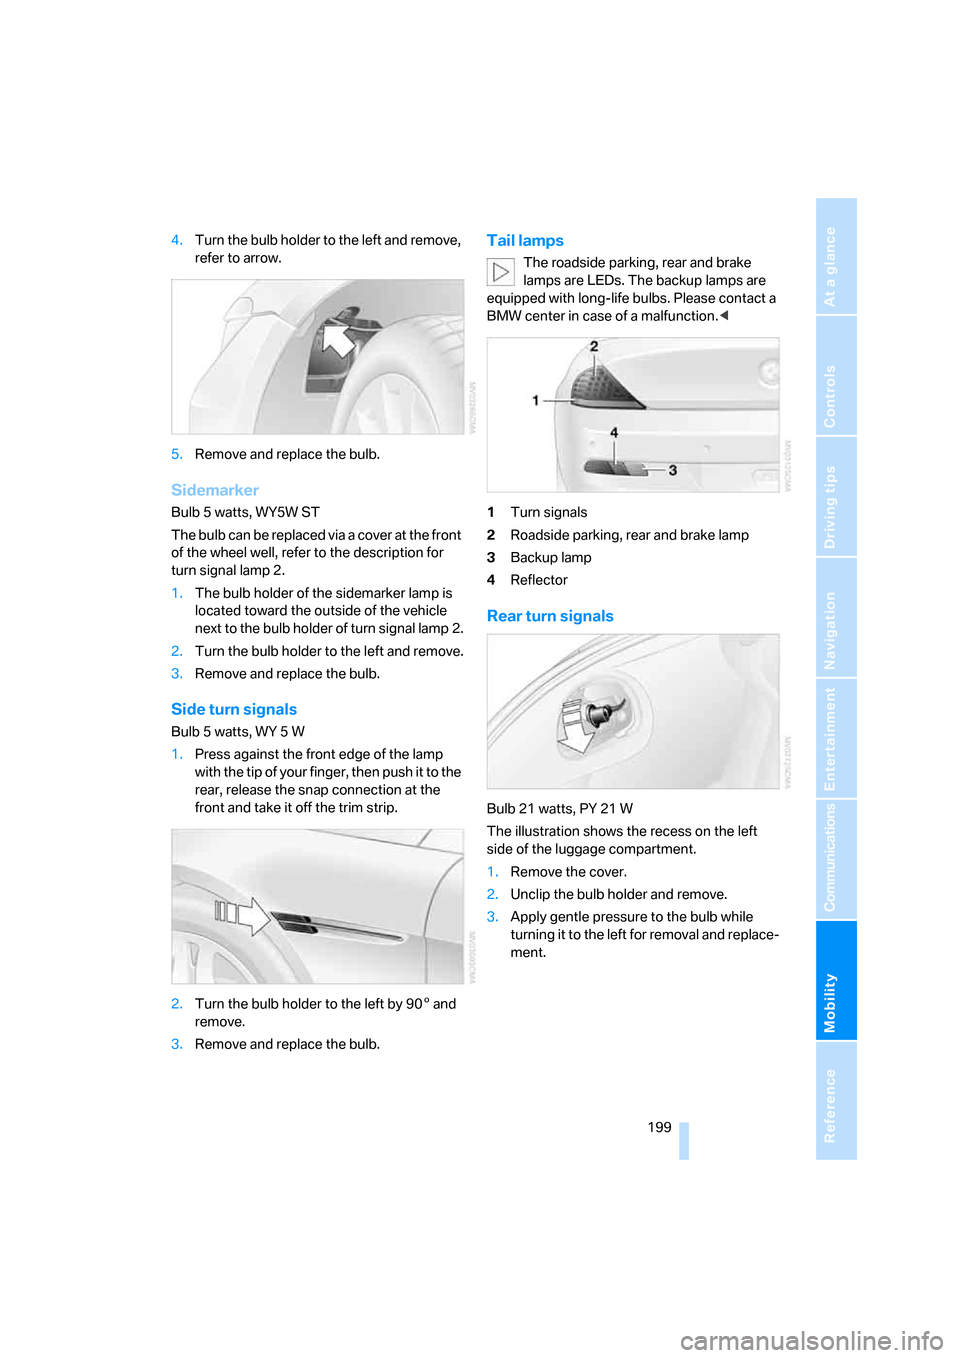
4.Turn the bulb holder to the left and remove,
refer to arrow.
5.Remove and replace the bulb.
Sidemarker
Bulb 5 watts, WY5W ST
The bulb can be replaced via a cover at the front
of the wheel well, refer to the description for
turn signal lamp 2.
1.The bulb holder of the sidemarker lamp is
located toward the outside of the vehicle
next to the bulb holder of turn signal lamp 2.
2.Turn the bulb holder to the left and remove.
3.Remove and replace the bulb.
Side turn signals
Bulb 5 watts, WY 5 W
1.Press against the front edge of the lamp
with the tip of your finger, then push it to the
rear, release the snap connection at the
front and take it off the trim strip.
2.Turn the bulb holder to the left by 905 and
remove.
3.Remove and replace the bulb.
Tail lamps
The roadside parking, rear and brake
lamps are LEDs. The backup lamps are
equipped with long-life bulbs. Please contact a
BMW center in case of a malfunction.<
1Turn signals
2Roadside parking, rear and brake lamp
3Backup lamp
4Reflector
Rear turn signals
Bulb 21 watts, PY 21 W
The illustration shows the recess on the left
side of the luggage compartment.
1.Remove the cover.
2.Unclip the bulb holder and remove.
3.Apply gentle pressure to the bulb while
turning it to the left for removal and replace-
ment.
Page 204 of 236
Mobility
203Reference
At a glance
Controls
Driving tips
Communications
Navigation
Entertainment
First-aid kit*
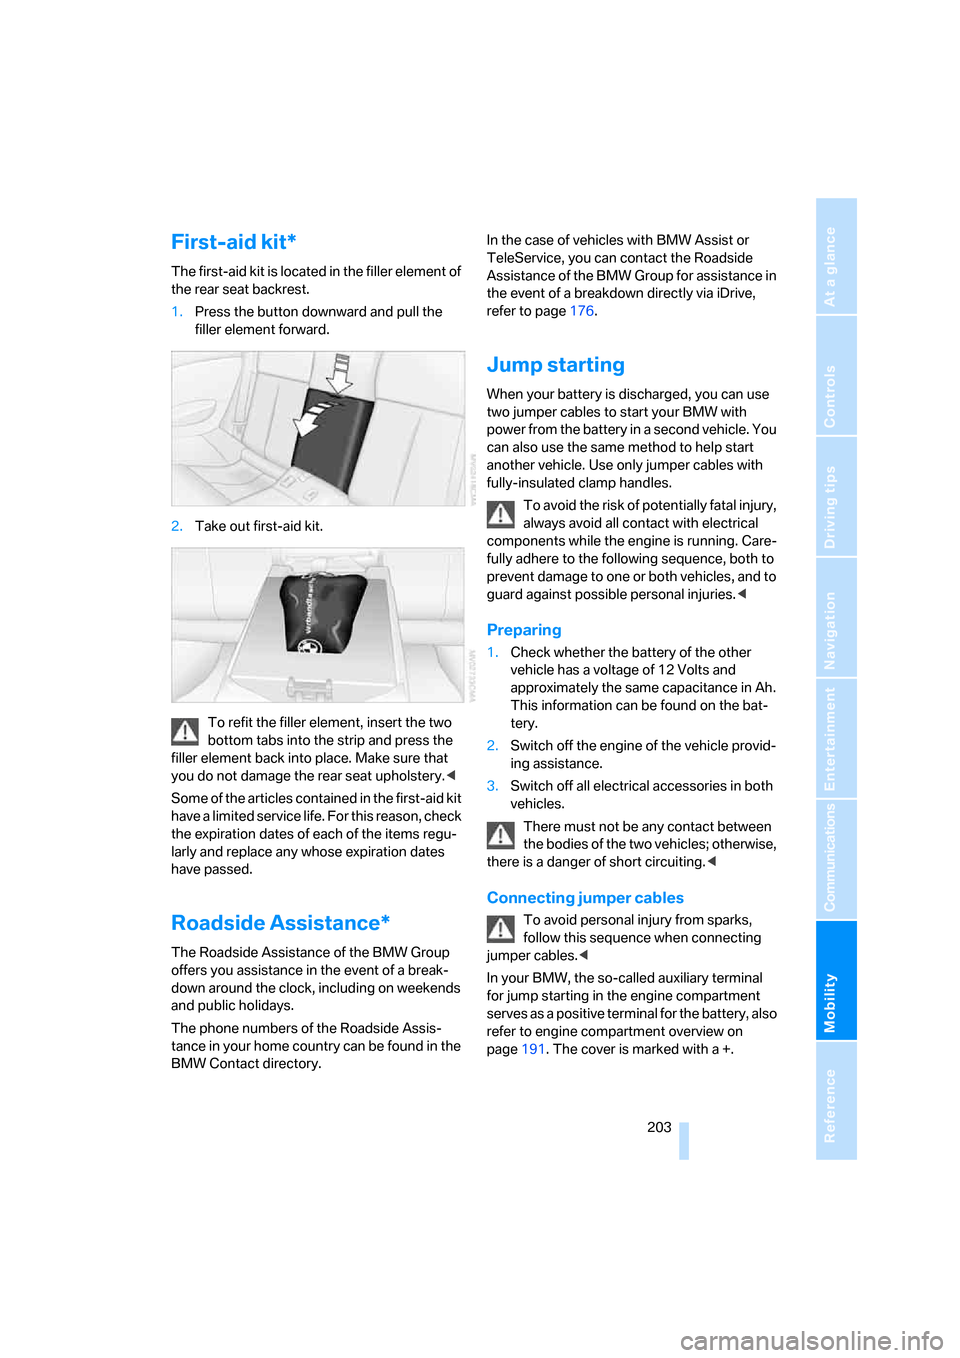
The first-aid kit is located in the filler element of
the rear seat backrest.
1.Press the button downward and pull the
filler element forward.
2.Take out first-aid kit.
To refit the filler element, insert the two
bottom tabs into the strip and press the
filler element back into place. Make sure that
you do not damage the rear seat upholstery.<
Some of the articles contained in the first-aid kit
have a limited service life. For this reason, check
the expiration dates of each of the items regu-
larly and replace any whose expiration dates
have passed.
Roadside Assistance*
The Roadside Assistance of the BMW Group
offers you assistance in the event of a break-
down around the clock, including on weekends
and public holidays.
The phone numbers of the Roadside Assis-
tance in your home country can be found in the
BMW Contact directory.In the case of vehicles with BMW Assist or
TeleService, you can contact the Roadside
Assistance of the BMW Group for assistance in
the event of a breakdown directly via iDrive,
refer to page176.
Jump starting
When your battery is discharged, you can use
two jumper cables to start your BMW with
power from the battery in a second vehicle. You
can also use the same method to help start
another vehicle. Use only jumper cables with
fully-insulated clamp handles.
To avoid the risk of potentially fatal injury,
always avoid all contact with electrical
components while the engine is running. Care-
fully adhere to the following sequence, both to
prevent damage to one or both vehicles, and to
guard against possible personal injuries.<
Preparing
1.Check whether the battery of the other
vehicle has a voltage of 12 Volts and
approximately the same capacitance in Ah.
This information can be found on the bat-
tery.
2.Switch off the engine of the vehicle provid-
ing assistance.
3.Switch off all electrical accessories in both
vehicles.
There must not be any contact between
the bodies of the two vehicles; otherwise,
there is a danger of short circuiting.<
Connecting jumper cables
To avoid personal injury from sparks,
follow this sequence when connecting
jumper cables.<
In your BMW, the so-called auxiliary terminal
for jump starting in the engine compartment
serves as a positive terminal for the battery, also
refer to engine compartment overview on
page191. The cover is marked with a +.
Page 206 of 236

Mobility
205Reference
At a glance
Controls
Driving tips
Communications
Navigation
Entertainment
Access to screw thread
Rectangular cover in bumper:
Press the arrow symbol on the cover.
Front
Rear
Being towed
Make sure that the ignition is switched on,
refer to page58; otherwise, the low-beam
headlights, tail lights, turn signals and wind-
shield wipers would not be available. If the vehi-
cle electrical system fails, do not tow-start or
tow the vehicle. The electric steering-wheel
lock cannot be unlocked and the vehicle cannot
be steered. For information on jump starting,
refer to page203. There is no power assistance
with the engine stopped. This then requires
increased effort for braking and steering. Active
steering is deactivated and larger steering
wheel movements are required.<
Switch on the hazard warning flashers depend-
ing on the local regulations. If the electrical sys-
tem fails, mark the vehicle to be towed, e.g. with
a sign or warning triangle in the rear window.
Manual transmission
Gearshift lever in neutral position.
Automatic transmission
Selector lever in position N.
Do not exceed a towing speed of
45 mph/70 km/h and a towing distance of
90 miles/150 km; otherwise, the automatic
transmission may be damaged.<
SMG Sequential Manual Gearbox
Engage selector lever position N with the igni-
tion switched on.
Towing methods
In some countries, towing with tow bars or
ropes in public traffic is not permitted.
Familiarize yourself with the regulations on tow-
ing in the respective country.
With tow bar
The towing vehicle may not be lighter
than the vehicle to be towed; otherwise, it
will not be possible to reliably control vehicle
response.<
The tow fittings used should be on the same
side on both vehicles. Should it prove impossi-
ble to avoid mounting the tow bar at an offset
angle, please note the following:
>Clearance and maneuvering capability will
be strictly limited during cornering.
>When mounted at an angle, the tow bar will
exert lateral forces, tending to push the
vehicle sideways.
Attach the tow bar to the tow fittings only,
as attachment to other vehicle parts can
lead to damage.<
With tow rope
When starting off in the towing vehicle, make
sure that the tow rope is taut.
To avoid jerking and the associated
stresses on vehicle components when
towing, always use nylon ropes or nylon straps.
Attach tow ropes to the tow fittings only, as
attachment to other vehicle parts can lead to
damage.<
Page 226 of 236

Reference 225
At a glance
Controls
Driving tips
Communications
Navigation
Entertainment
Mobility
Instrument panel, refer to
Instrument cluster12
Integrated key28
Integrated universal remote
control106
Interesting destination for
navigation126
"Interim time"82
Interior lamps99
– switching on with remote
control31
Interior motion sensor36
– switching off36
Interior rearview mirror53
– automatically dimming, refer
to Automatic functions53
Interlock on automatic
transmission62
Intermittent wiper mode65
J
Jacking points200
Joystick, refer to iDrive16
Jump starting203
K
Keyless-Go, refer to Comfort
access36
Keyless opening and closing,
refer to Comfort access36
Key Memory, refer to Personal
Profile29
"Keypad"169
Keys28
– key-related settings, refer to
Personal Profile29
Kick-down
– automatic transmission with
Steptronic63
– SMG Sequential Manual
Gearbox62
Knock control183
L
Lamps, refer to Parking lamps/
low beams96
Lamps and bulbs197
"Languages"84
"Languages" for
navigation135
Lashing eyes, refer to
Securing cargo117
Last destinations, refer to
Destination list127
"Last seat pos."49
LATCH child-restraint fixing
system57
Length, refer to
Dimensions211
License plate lamps, replacing
bulbs200
Light-emitting diodes
LEDs200
Lighter110
"Lighting"65,96
Lighting
– instruments99
– of the vehicle, refer to
Lamps96
– refer to High-beam
assistant97
Light switch96
"Limit"81
Loading, refer to Cargo
loading116
"Lock after driving"32
Lock buttons in the doors,
refer to Locking33
Locking
– from inside33
– from outside31
– without key, refer to Comfort
access36
Locking and unlocking doors
– from inside32
– from outside30
Locking out, refer to
Unlocking36
Locking without key, refer to
Comfort access36"LOGIC7", refer to Tone
control142
Low beams96
– automatic96
– replacing bulbs197
Lower back support, refer to
Lumbar support48
Luggage compartment
– capacity210
– emergency release34
– hotel function33
– increasing capacity,
Convertible35
– opening/closing, refer to
Luggage compartment
lid34
– opening from inside34
– opening from outside34
– opening with remote
control31
Luggage compartment lid34
– emergency operation34
– emergency release34
– opening from inside34
– opening from outside34
– opening with remote
control31,34
– unlocking manually34
Lumbar support48
LW, waveband144
M
M+S tires, refer to Winter
tires189
Maintenance
– refer to Service
requirements77
– refer to the Service and
Warranty Information
Booklet for US models195
– refer to Warranty and
Service Guide Booklet for
Canadian models195
Maintenance system195