2006 BMW 650I CONVERTIBLE display
[x] Cancel search: displayPage 75 of 236
Everything under control
74
Everything under control
Odometer, outside
temperature display, clock
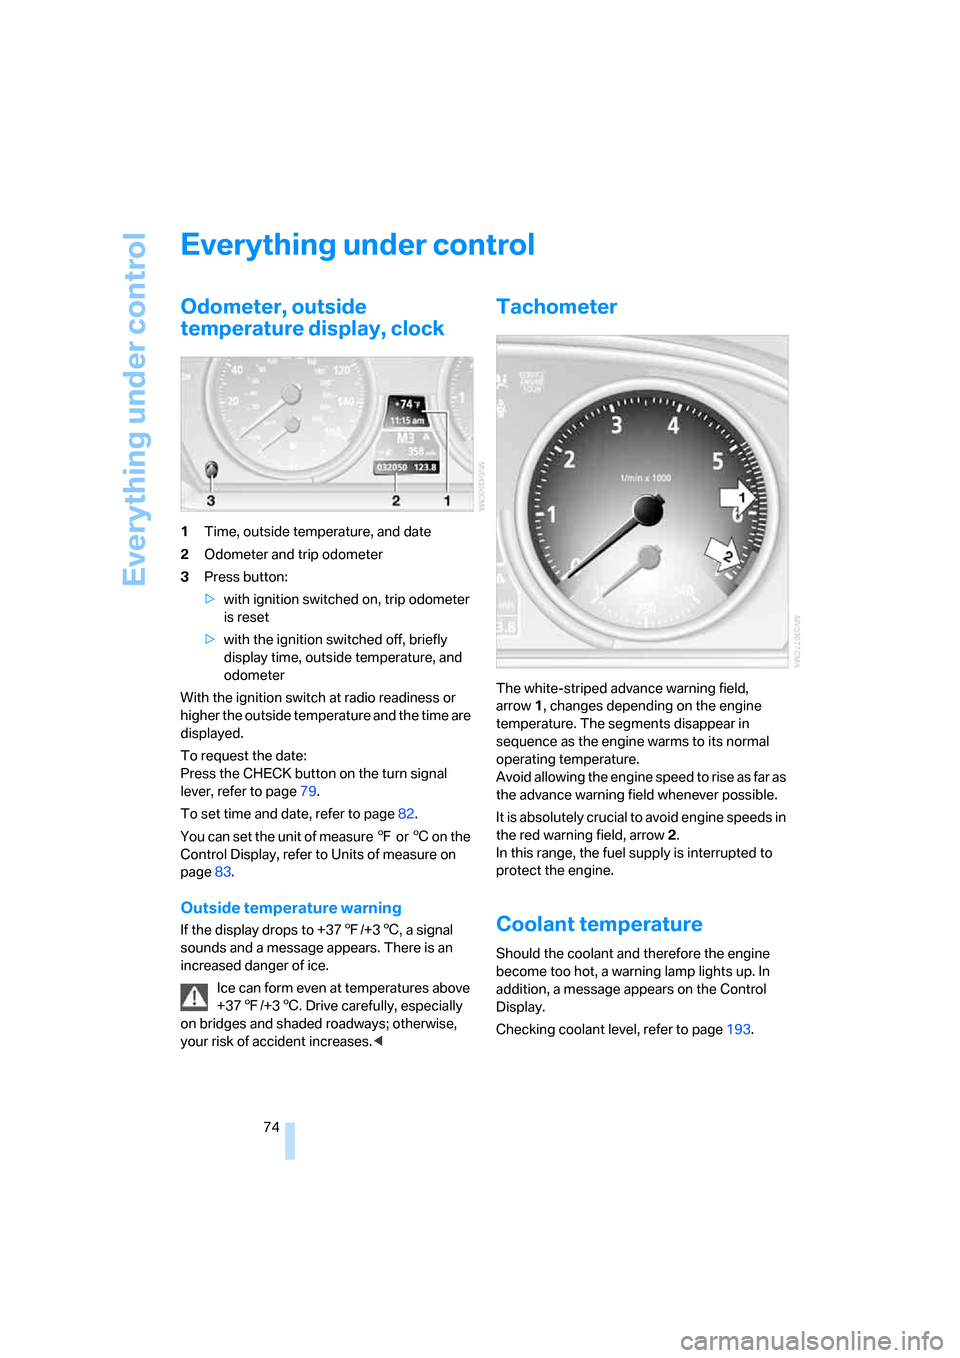
1Time, outside temperature, and date
2Odometer and trip odometer
3Press button:
>with ignition switched on, trip odometer
is reset
>with the ignition switched off, briefly
display time, outside temperature, and
odometer
With the ignition switch at radio readiness or
higher the outside temperature and the time are
displayed.
To request the date:
Press the CHECK button on the turn signal
lever, refer to page79.
To set time and date, refer to page82.
You can set the unit of measure 7 or 6 on the
Control Display, refer to Units of measure on
page83.
Outside temperature warning
If the display drops to +377/+36, a signal
sounds and a message appears. There is an
increased danger of ice.
Ice can form even at temperatures above
+377/+36. Drive carefully, especially
on bridges and shaded roadways; otherwise,
your risk of accident increases.<
Tachometer
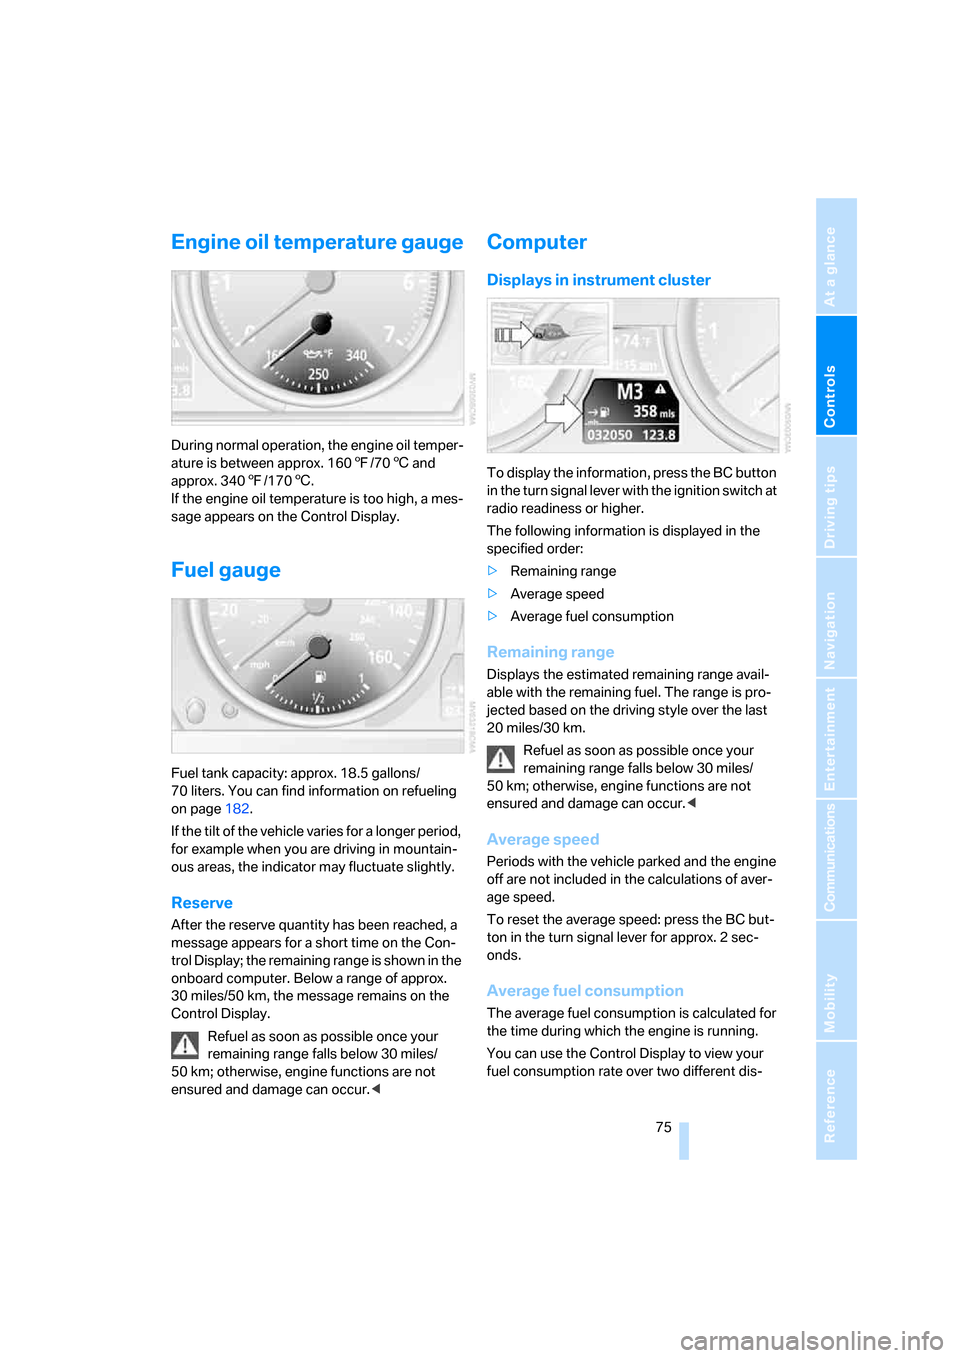
The white-striped advance warning field,
arrow1, changes depending on the engine
temperature. The segments disappear in
sequence as the engine warms to its normal
operating temperature.
Avoid allowing the engine speed to rise as far as
the advance warning field whenever possible.
It is absolutely crucial to avoid engine speeds in
the red warning field, arrow2.
In this range, the fuel supply is interrupted to
protect the engine.
Coolant temperature
Should the coolant and therefore the engine
become too hot, a warning lamp lights up. In
addition, a message appears on the Control
Display.
Checking coolant level, refer to page193.
Page 76 of 236
Controls
75Reference
At a glance
Driving tips
Communications
Navigation
Entertainment
Mobility
Engine oil temperature gauge
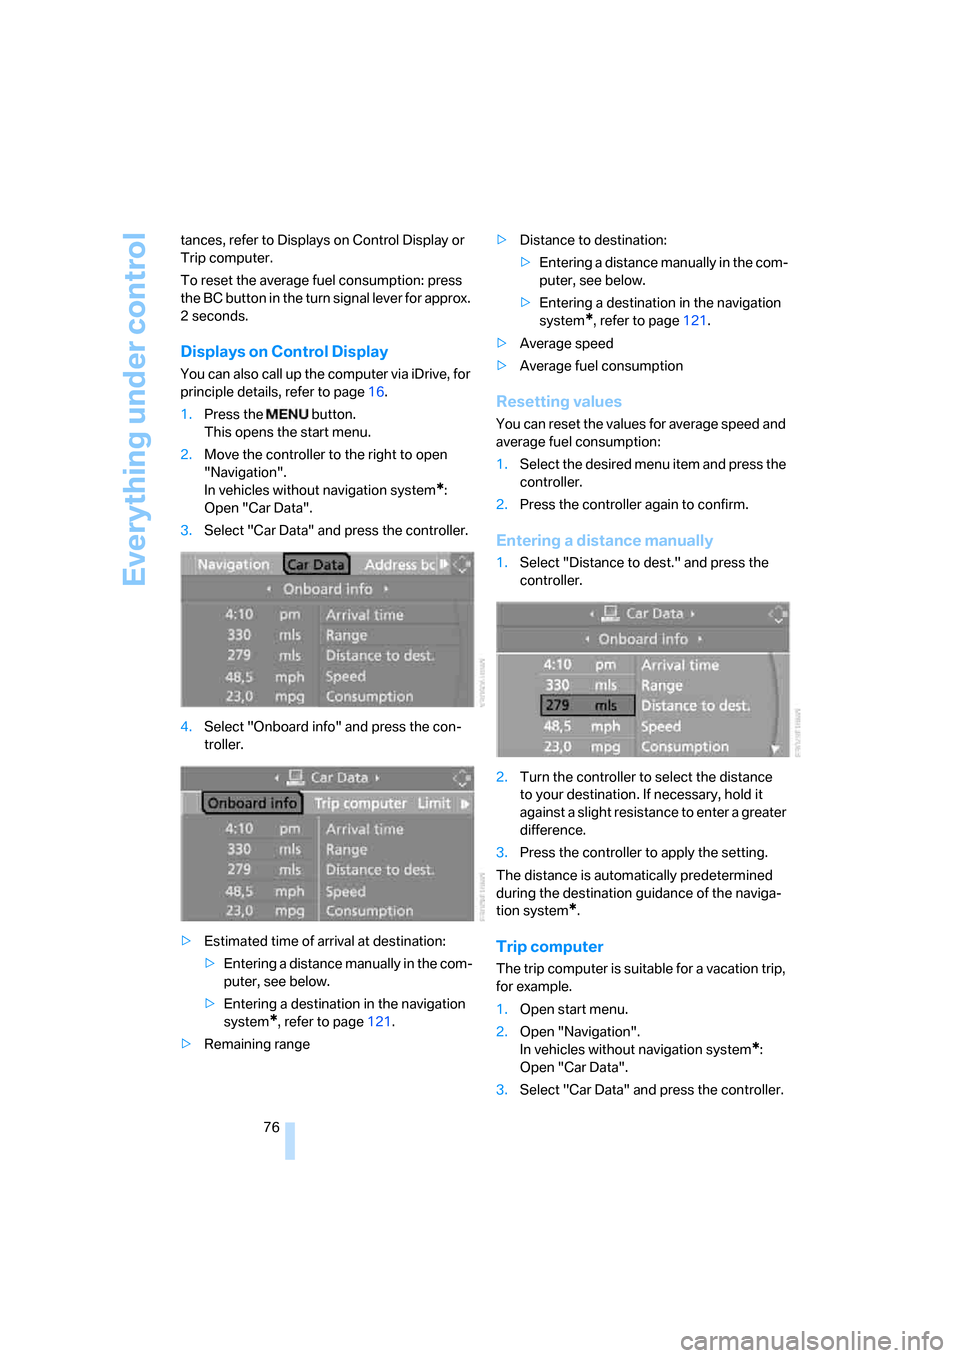
During normal operation, the engine oil temper-
ature is between approx. 1607/706 and
approx. 3407/1706.
If the engine oil temperature is too high, a mes-
sage appears on the Control Display.
Fuel gauge
Fuel tank capacity: approx. 18.5 gallons/
70 liters. You can find information on refueling
on page182.
If the tilt of the vehicle varies for a longer period,
for example when you are driving in mountain-
ous areas, the indicator may fluctuate slightly.
Reserve
After the reserve quantity has been reached, a
message appears for a short time on the Con-
trol Display; the remaining range is shown in the
onboard computer. Below a range of approx.
30 miles/50 km, the message remains on the
Control Display.
Refuel as soon as possible once your
remaining range falls below 30 miles/
50 km; otherwise, engine functions are not
ensured and damage can occur.<
Computer
Displays in instrument cluster
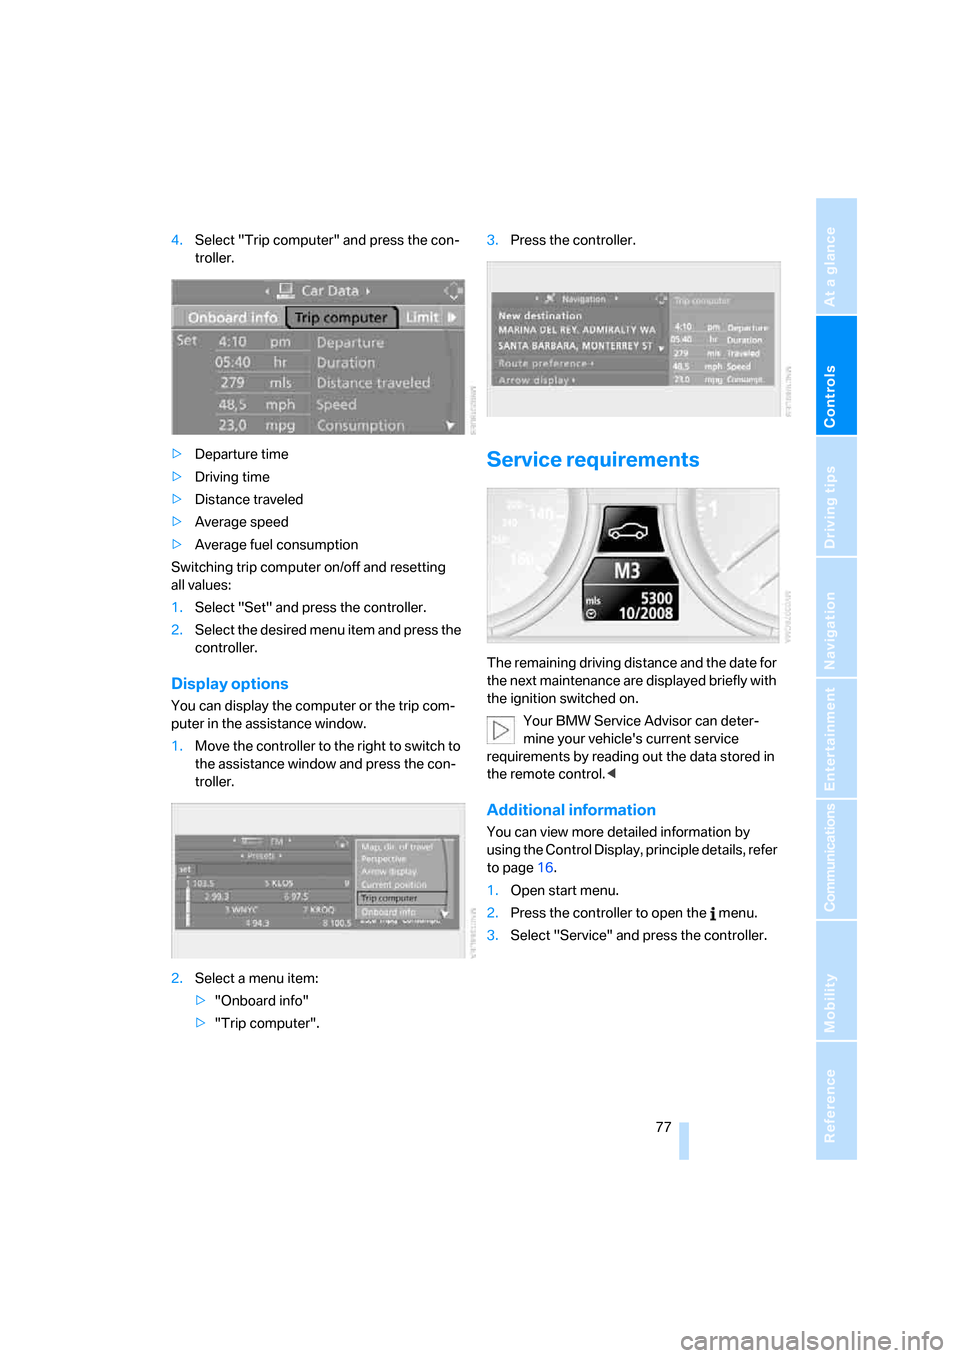
To display the information, press the BC button
in the turn signal lever with the ignition switch at
radio readiness or higher.
The following information is displayed in the
specified order:
>Remaining range
>Average speed
>Average fuel consumption
Remaining range
Displays the estimated remaining range avail-
able with the remaining fuel. The range is pro-
jected based on the driving style over the last
20 miles/30 km.
Refuel as soon as possible once your
remaining range falls below 30 miles/
50 km; otherwise, engine functions are not
ensured and damage can occur.<
Average speed
Periods with the vehicle parked and the engine
off are not included in the calculations of aver-
age speed.
To reset the average speed: press the BC but-
ton in the turn signal lever for approx. 2 sec-
onds.
Average fuel consumption
The average fuel consumption is calculated for
the time during which the engine is running.
You can use the Control Display to view your
fuel consumption rate over two different dis-
Page 77 of 236
Everything under control
76 tances, refer to Displays on Control Display or
Trip computer.
To reset the average fuel consumption: press
the BC button in the turn signal lever for approx.
2seconds.
Displays on Control Display
You can also call up the computer via iDrive, for
principle details, refer to page16.
1.Press the button.
This opens the start menu.
2.Move the controller to the right to open
"Navigation".
In vehicles without navigation system
*:
Open "Car Data".
3.Select "Car Data" and press the controller.
4.Select "Onboard info" and press the con-
troller.
>Estimated time of arrival at destination:
>Entering a distance manually in the com-
puter, see below.
>Entering a destination in the navigation
system
*, refer to page121.
>Remaining range>Distance to destination:
>Entering a distance manually in the com-
puter, see below.
>Entering a destination in the navigation
system
*, refer to page121.
>Average speed
>Average fuel consumption
Resetting values
You can reset the values for average speed and
average fuel consumption:
1.Select the desired menu item and press the
controller.
2.Press the controller again to confirm.
Entering a distance manually
1.Select "Distance to dest." and press the
controller.
2.Turn the controller to select the distance
to your destination. If necessary, hold it
against a slight resistance to enter a greater
difference.
3.Press the controller to apply the setting.
The distance is automatically predetermined
during the destination guidance of the naviga-
tion system
*.
Trip computer
The trip computer is suitable for a vacation trip,
for example.
1.Open start menu.
2.Open "Navigation".
In vehicles without navigation system
*:
Open "Car Data".
3.Select "Car Data" and press the controller.
Page 78 of 236
Controls
77Reference
At a glance
Driving tips
Communications
Navigation
Entertainment
Mobility
4.Select "Trip computer" and press the con-
troller.
>Departure time
>Driving time
>Distance traveled
>Average speed
>Average fuel consumption
Switching trip computer on/off and resetting
all values:
1.Select "Set" and press the controller.
2.Select the desired menu item and press the
controller.
Display options
You can display the computer or the trip com-
puter in the assistance window.
1.Move the controller to the right to switch to
the assistance window and press the con-
troller.
2.Select a menu item:
>"Onboard info"
>"Trip computer".3.Press the controller.
Service requirements
The remaining driving distance and the date for
the next maintenance are displayed briefly with
the ignition switched on.
Your BMW Service Advisor can deter-
mine your vehicle's current service
requirements by reading out the data stored in
the remote control.<
Additional information
You can view more detailed information by
using the Control Display, principle details, refer
to page16.
1.Open start menu.
2.Press the controller to open the menu.
3.Select "Service" and press the controller.
Page 79 of 236
Everything under control
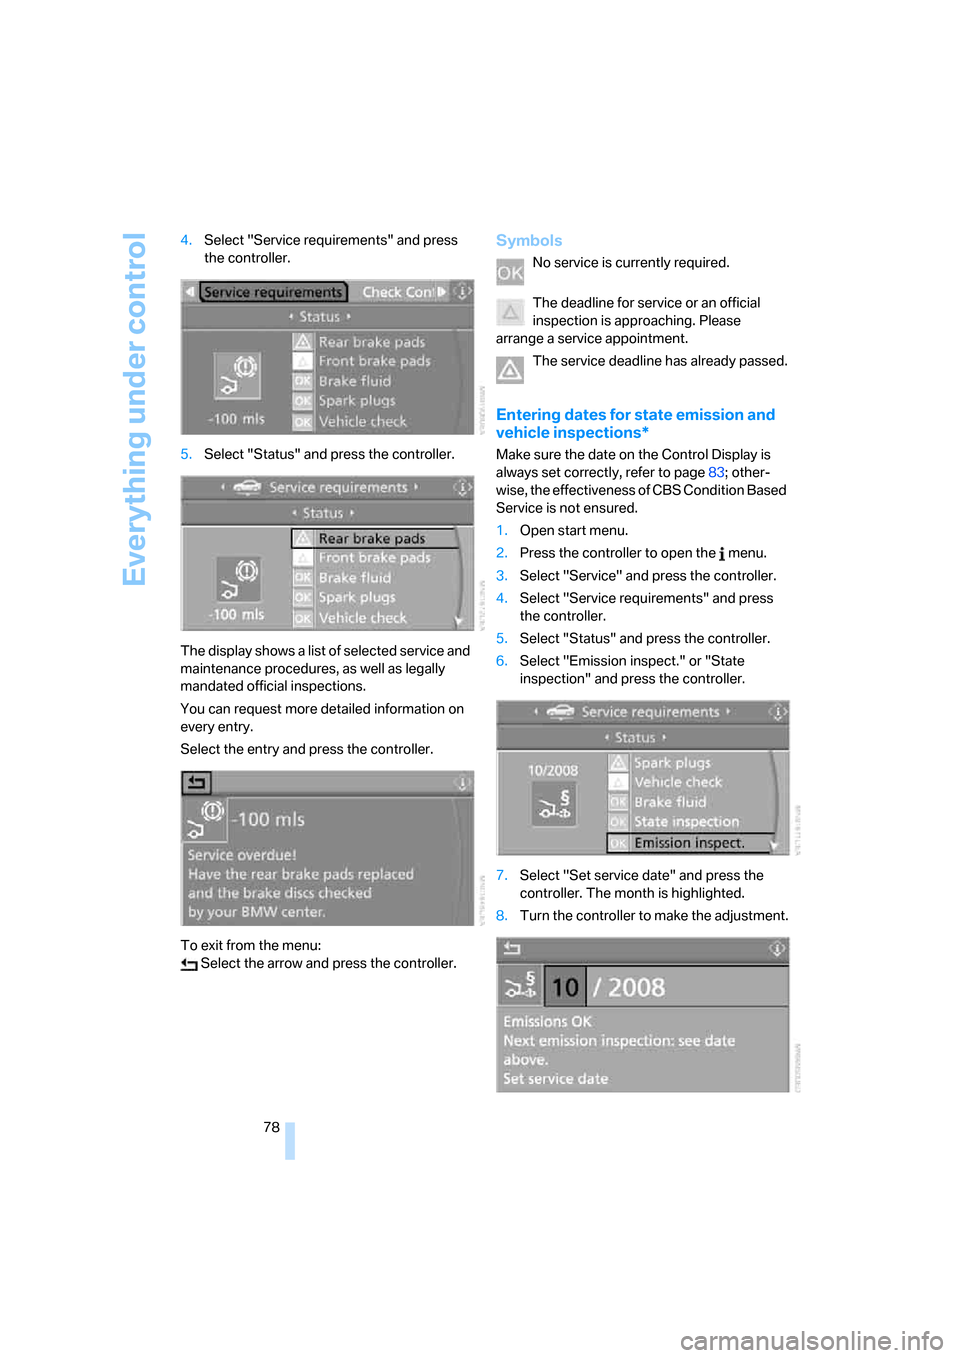
78 4.Select "Service requirements" and press
the controller.
5.Select "Status" and press the controller.
The display shows a list of selected service and
maintenance procedures, as well as legally
mandated official inspections.
You can request more detailed information on
every entry.
Select the entry and press the controller.
To exit from the menu:
Select the arrow and press the controller.
Symbols
No service is currently required.
The deadline for service or an official
inspection is approaching. Please
arrange a service appointment.
The service deadline has already passed.
Entering dates for state emission and
vehicle inspections*
Make sure the date on the Control Display is
always set correctly, refer to page83; other-
wise, the effectiveness of CBS Condition Based
Service is not ensured.
1.Open start menu.
2.Press the controller to open the menu.
3.Select "Service" and press the controller.
4.Select "Service requirements" and press
the controller.
5.Select "Status" and press the controller.
6.Select "Emission inspect." or "State
inspection" and press the controller.
7.Select "Set service date" and press the
controller. The month is highlighted.
8.Turn the controller to make the adjustment.
Page 80 of 236
Controls
79Reference
At a glance
Driving tips
Communications
Navigation
Entertainment
Mobility
9.Press the controller to apply the setting.
The year is highlighted.
10.Turn the controller to make the adjustment.
11.Press the controller to apply the setting.
The date entry is stored.
To exit from the menu:
Select the arrow and press the controller.
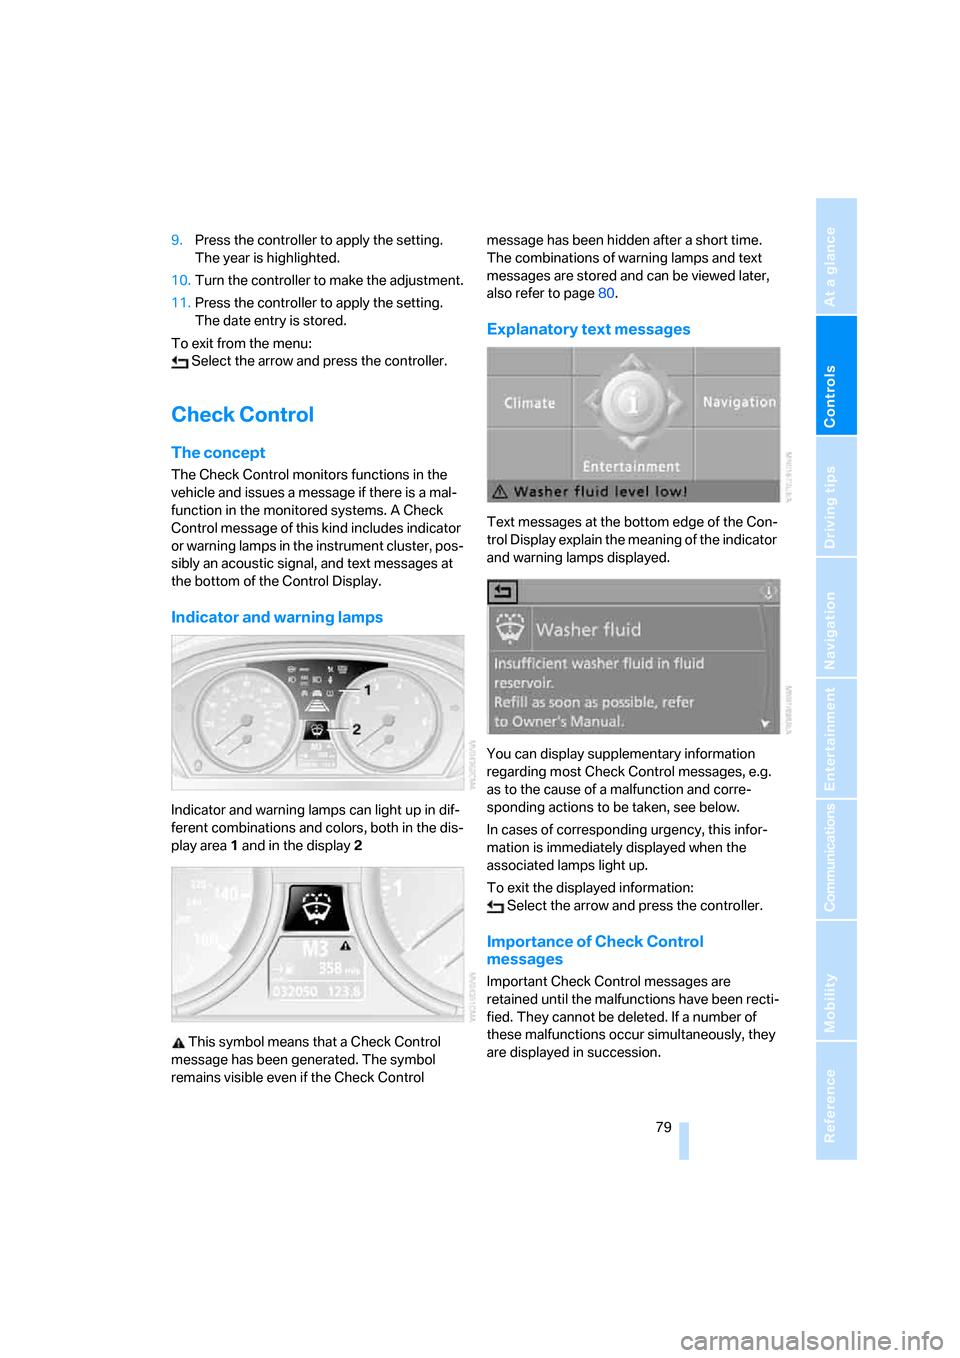
Check Control
The concept
The Check Control monitors functions in the
vehicle and issues a message if there is a mal-
function in the monitored systems. A Check
Control message of this kind includes indicator
or warning lamps in the instrument cluster, pos-
sibly an acoustic signal, and text messages at
the bottom of the Control Display.
Indicator and warning lamps
Indicator and warning lamps can light up in dif-
ferent combinations and colors, both in the dis-
play area1 and in the display2
This symbol means that a Check Control
message has been generated. The symbol
remains visible even if the Check Control message has been hidden after a short time.
The combinations of warning lamps and text
messages are stored and can be viewed later,
also refer to page80.
Explanatory text messages
Text messages at the bottom edge of the Con-
trol Display explain the meaning of the indicator
and warning lamps displayed.
You can display supplementary information
regarding most Check Control messages, e.g.
as to the cause of a malfunction and corre-
sponding actions to be taken, see below.
In cases of corresponding urgency, this infor-
mation is immediately displayed when the
associated lamps light up.
To exit the displayed information:
Select the arrow and press the controller.
Importance of Check Control
messages
Important Check Control messages are
retained until the malfunctions have been recti-
fied. They cannot be deleted. If a number of
these malfunctions occur simultaneously, they
are displayed in succession.
Page 81 of 236
Everything under control
80 Less important messages disappear after
approx. 20 seconds, but remain in memory.
To hide these Check Control messages:
Press the CHECK button on the turn signal
lever.
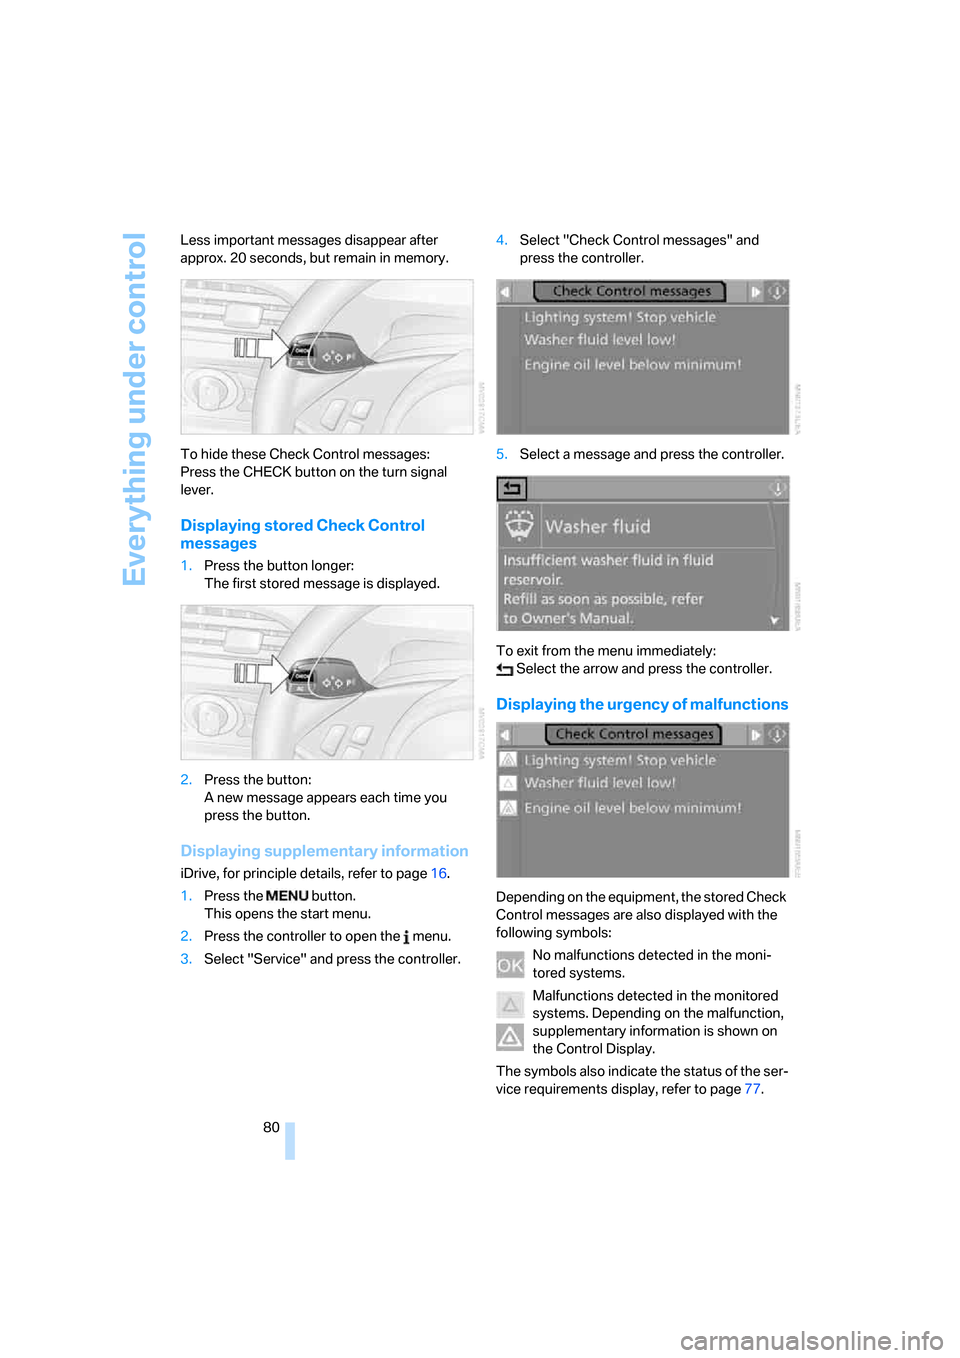
Displaying stored Check Control
messages
1.Press the button longer:
The first stored message is displayed.
2.Press the button:
A new message appears each time you
press the button.
Displaying supplementary information
iDrive, for principle details, refer to page16.
1.Press the button.
This opens the start menu.
2.Press the controller to open the menu.
3.Select "Service" and press the controller.4.Select "Check Control messages" and
press the controller.
5.Select a message and press the controller.
To exit from the menu immediately:
Select the arrow and press the controller.
Displaying the urgency of malfunctions
Depending on the equipment, the stored Check
Control messages are also displayed with the
following symbols:
No malfunctions detected in the moni-
tored systems.
Malfunctions detected in the monitored
systems. Depending on the malfunction,
supplementary information is shown on
the Control Display.
The symbols also indicate the status of the ser-
vice requirements display, refer to page77.
Page 82 of 236
Controls
81Reference
At a glance
Driving tips
Communications
Navigation
Entertainment
Mobility
Displays after completion of trip
Malfunction reports generated during the trip
are shown consecutively when you switch off
the ignition.
Before the display disappears, you can display
the messages once again. Press the CHECK
button for approx. 2 seconds. If several mes-
sages are present, you can press the CHECK
button repeatedly.
The display:
>turns off automatically after a brief period
>can be turned off at any time by pressing
the CHECK button again for approx. 2 sec-
onds
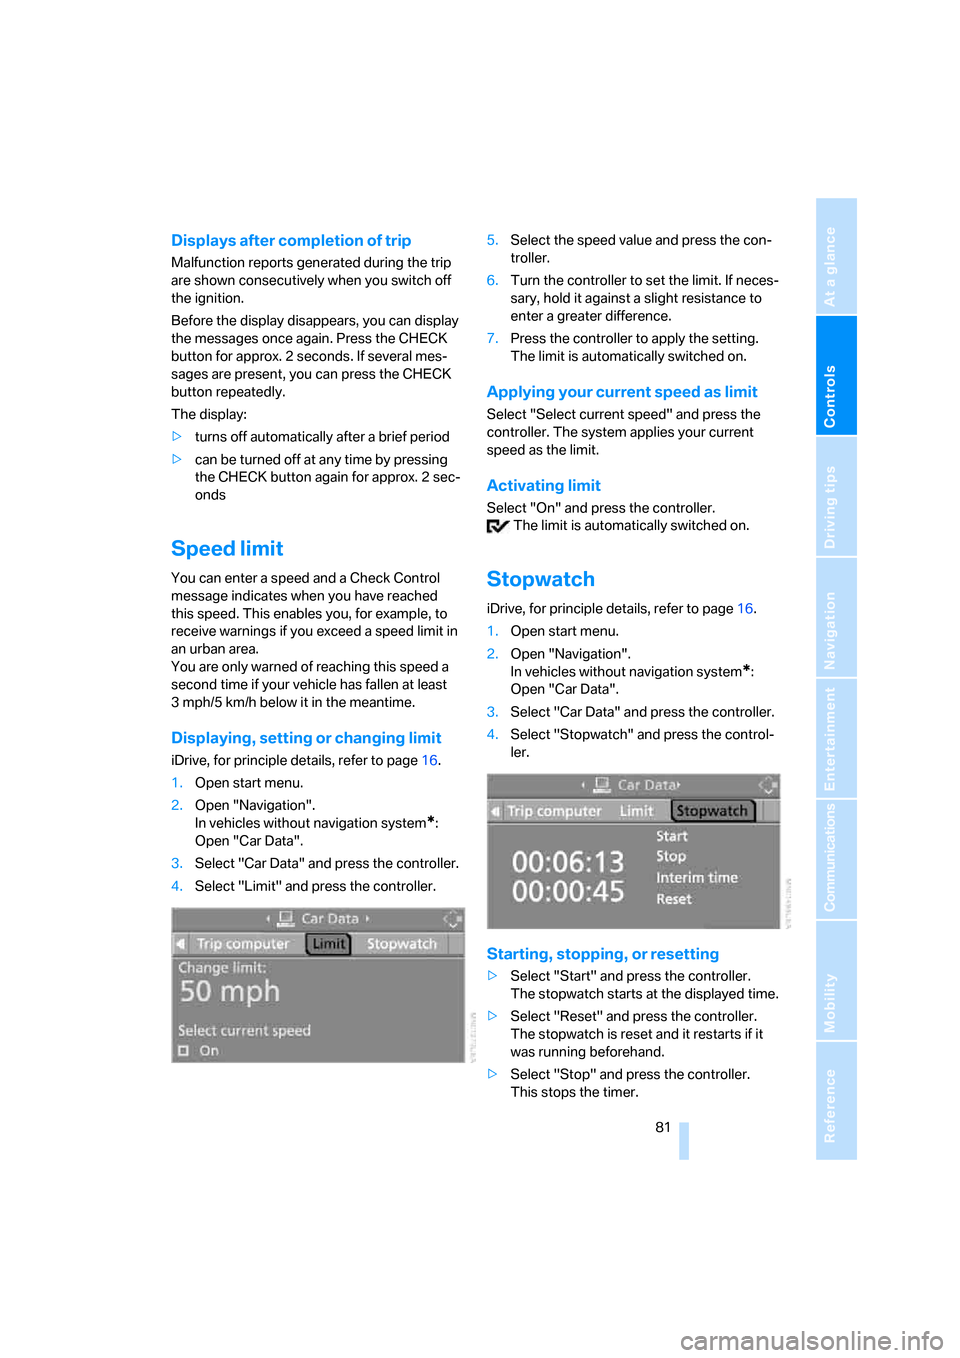
Speed limit
You can enter a speed and a Check Control
message indicates when you have reached
this speed. This enables you, for example, to
receive warnings if you exceed a speed limit in
an urban area.
You are only warned of reaching this speed a
second time if your vehicle has fallen at least
3 mph/5 km/h below it in the meantime.
Displaying, setting or changing limit
iDrive, for principle details, refer to page16.
1.Open start menu.
2.Open "Navigation".
In vehicles without navigation system
*:
Open "Car Data".
3.Select "Car Data" and press the controller.
4.Select "Limit" and press the controller.5.Select the speed value and press the con-
troller.
6.Turn the controller to set the limit. If neces-
sary, hold it against a slight resistance to
enter a greater difference.
7.Press the controller to apply the setting.
The limit is automatically switched on.
Applying your current speed as limit
Select "Select current speed" and press the
controller. The system applies your current
speed as the limit.
Activating limit
Select "On" and press the controller.
The limit is automatically switched on.
Stopwatch
iDrive, for principle details, refer to page16.
1.Open start menu.
2.Open "Navigation".
In vehicles without navigation system
*:
Open "Car Data".
3.Select "Car Data" and press the controller.
4.Select "Stopwatch" and press the control-
ler.
Starting, stopping, or resetting
>Select "Start" and press the controller.
The stopwatch starts at the displayed time.
>Select "Reset" and press the controller.
The stopwatch is reset and it restarts if it
was running beforehand.
>Select "Stop" and press the controller.
This stops the timer.