2006 BMW 525XI brake light
[x] Cancel search: brake lightPage 14 of 248

At a glance
13Reference
Controls
Driving tips
Communications
Navigation
Entertainment
Mobility
Indicator and warning lamps
The concept
Indicator and warning lamps can light up both in
the display area1 and in the display2 in various
combinations and colors.
Some lights are tested for proper function by
briefly lighting up during starting of the engine
or when the ignition is switched on.
Explanatory text messages
Text message at the bottom edge of the Con-
trol Display explain the meaning of the dis-
played indicator and warning lamps.
Additional information, e.g. on the cause of a
malfunction and on the corresponding need to
take action can be displayed via the Check Con-
trol, refer to page77.In the case of corresponding urgency, this infor-
mation is displayed immediately when the
related lamp lights up.
Indicator lamps without text messages
The following indicator lamps in the display
area1 indicate that the associated functions
are activated:
Handbrake engaged58
Handbrake engaged for Canadian
models
Fog lamps
*97
DTC Dynamic Traction Control85
High beams/headlamp flasher95
Lamp flashes:
DSC or DTC controls the drive and
braking forces for maintaining vehicle
stability85
Page 39 of 248

Opening and closing
38 remote control with you, e.g. in your jacket
pocket. The vehicle automatically detects the
related remote control in the immediate vicinity
or in the interior.
Comfort access supports the following func-
tions:
>Unlocking/locking vehicle
>Starting engine
>Comfort locking
Functional requirement
>The vehicle can only be unlocked if the
vehicle detects that the remote control car-
ried is located outside the vehicle.
>The next unlocking and locking cycle is not
possible until after approx. 2 seconds.
>The engine can only be started if the vehicle
detects that the remote control carried is
located in the vehicle.
Special features in contrast to ordinary
remote control
It is basically irrelevant whether you operate the
functions mentioned previously with the com-
fort access feature or by pressing the buttons
on the remote control. Therefore, please famil-
iarize yourself with the information on opening
and closing beginning on page28 beforehand.
The special features when using comfort
access are described in the following.
Releasing
Completely grasp a door handle, arrow1.
This corresponds to pressing the button.If a remote control is detected in the interior
after unlocking, the electric steering-wheel lock
unlocks, refer to page56.
Locking
Touch the surface, arrow2 on the driver's door
or3 on the other doors with a finger for approx.
1 second. This corresponds to pressing the
button.
For comfort closing, hold a finger on the sur-
face, arrow2 or 3.
If a remote control accidentally left in the
luggage compartment/cargo area is
detected in the locked vehicle after closing the
luggage compartment lid/tailgate, the lid/tail-
gate opens again. The hazard warning flashers
flash and an acoustic signal
* sounds.<
Switching on radio readiness
By briefly pressing the Start/Stop button, you
switch on the radio readiness, refer to page56.
When doing so, do not depress the brake
pedal, otherwise the engine will start
immediately.<
Starting engine
You can start the engine or switch on the switch
on ignition if a remote control is located in the
interior of the vehicle. It need not be inserted in
the ignition lock, refer to page56.
If you take the remote control with you when
leaving the vehicle with the engine running, a
warning lamp lights up. In addition, a message
appears on the Control Display. As long as no
remote control is detected in the vehicle, it is
only possible to restart the engine within
approx. 10 seconds after it is switched off.
Switching off engine with automatic
transmission
The engine can only be switched off in the
selector lever position P, refer to page58.
To switch off the engine in the selector lever
position N, the remote control must be inserted
in the ignition lock.
Page 40 of 248

Controls
39Reference
At a glance
Driving tips
Communications
Navigation
Entertainment
Mobility
Before driving into a car wash with
automatic transmission
1.Insert the remote control into the ignition
lock.
2.Depress brake pedal.
3.Place selector lever in position N.
4.Switch off the engine.
The vehicle can roll.
Malfunction
The comfort access function may malfunction
due to local radio waves. Then open or close the
vehicle with the buttons on the remote control
or with a key. To start the engine following this,
insert the remote control in the ignition lock.
Replacing battery
The remote control for comfort access contains
a battery which must be replaced if necessary.
1.Remove integrated key from remote con-
trol, refer to page28.
2.Remove cover.
3.Lay in new battery with positive side facing
upward.
4.Press cover closed.
Return used battery to a recycling collec-
tion point or to your BMW center.<
Windows
To prevent injuries, exercise care when
closing the windows and keep them in
your field of vision until they are shut.
Always take along the remote control when you
leave the vehicle, otherwise children could, for example, operate the windows and injure them-
selves.<
Opening, closing
>Press switch to resistance point:
The window continues to open as long as
you keep the switch pressed.
>Press switch beyond resistance point:
The window opens automatically. Pressing
the switch again stops the opening move-
ment.
You can close the windows in the same manner
by pulling the switch.
For information on using the convenience oper-
ation at the door lock or with the remote control,
refer to page30 or32.
For information on comfort closing with comfort
access, refer to Locking on page38.
After switching off ignition
You can still operate the windows with the
remote control removed or the ignition
switched off for approx. 1 minute, as long as
neither of the front doors has been opened.
Anti-trapping mechanism
If the closing force rises beyond a predefined
threshold during closing, the system will imme-
diately stop moving the window prior to lower-
ing it slightly.
Despite the anti-trapping mechanism,
inspect the window's travel path prior to
closing it, as the safety system might fail to
detect certain kinds of obstructions, such as
thin objects, and the window would continue
closing.
Pulling the switch beyond the resistance point
Page 57 of 248

Driving
56
Driving
Ignition lock
Insert the remote control as far as possible into
the ignition lock.
>Radio readiness switches on.
Some current consumers are ready for
operation.
>The electric steering-wheel lock audibly
unlocks.
Before moving the vehicle, insert the
remote control into the ignition lock,
otherwise the electric steering-wheel lock will
not be unlocked and the vehicle cannot be
steered.<
Removing remote control from ignition
lock
Briefly press in the remote control; it is pushed
out somewhat.
At the same time:
>The ignition is switched off if it was still
switched on.
>The electric steering-wheel lock audibly
locks.
Automatic transmission
The remote control can only be removed when
the selector lever position P is selected: inter-
lock.
Start/Stop button
Briefly pressing the Start/Stop button several
times switches the radio readiness or the igni-
tion on and off.
Briefly pressing the Start/Stop button
with the brake or clutch pedal depressed
starts the engine.<
Radio readiness
Some current consumers are ready for opera-
tion. The time and outside temperature are dis-
played in the instrument cluster.
Radio readiness is automatically switched off:
>immediately when the remote control is
removed from the ignition lock
>with comfort access
* by touching the sen-
sitive surface on the door handle, refer to
Locking on page38
Ignition on
Most indicator and warning lamps in the display
area1 of the instrument cluster, refer to
page13, light up for different periods.
Radio readiness and ignition off
All indicator and warning lamps in the instru-
ment cluster go out.
Page 59 of 248

Driving
58
Manual transmission
1.Briefly press the Start/Stop button with the
vehicle stopped.
2.Shift into first gear or reverse.
3.Apply the handbrake.
SMG Sequential Manual Gearbox*
1.Apply the handbrake.
2.Engage a driving position.
3.Briefly press Start/Stop button.
If the position N is engaged when the
engine is switched off, this is pointed out
visually and acoustically.
Automatic transmission*
1.Select the selector lever position P with the
vehicle stopped.
2.Briefly press Start/Stop button.
Handbrake
The handbrake is primarily intended to prevent
the vehicle from rolling while parked; it brakes
the rear wheels.
Indicator lamp
The indicator lamp lights up, and a sig-
nal also sounds when starting off. The
handbrake is applied.
Indicator lamp for Canadian models.
Applying
The lever locks in position automatically.
Releasing
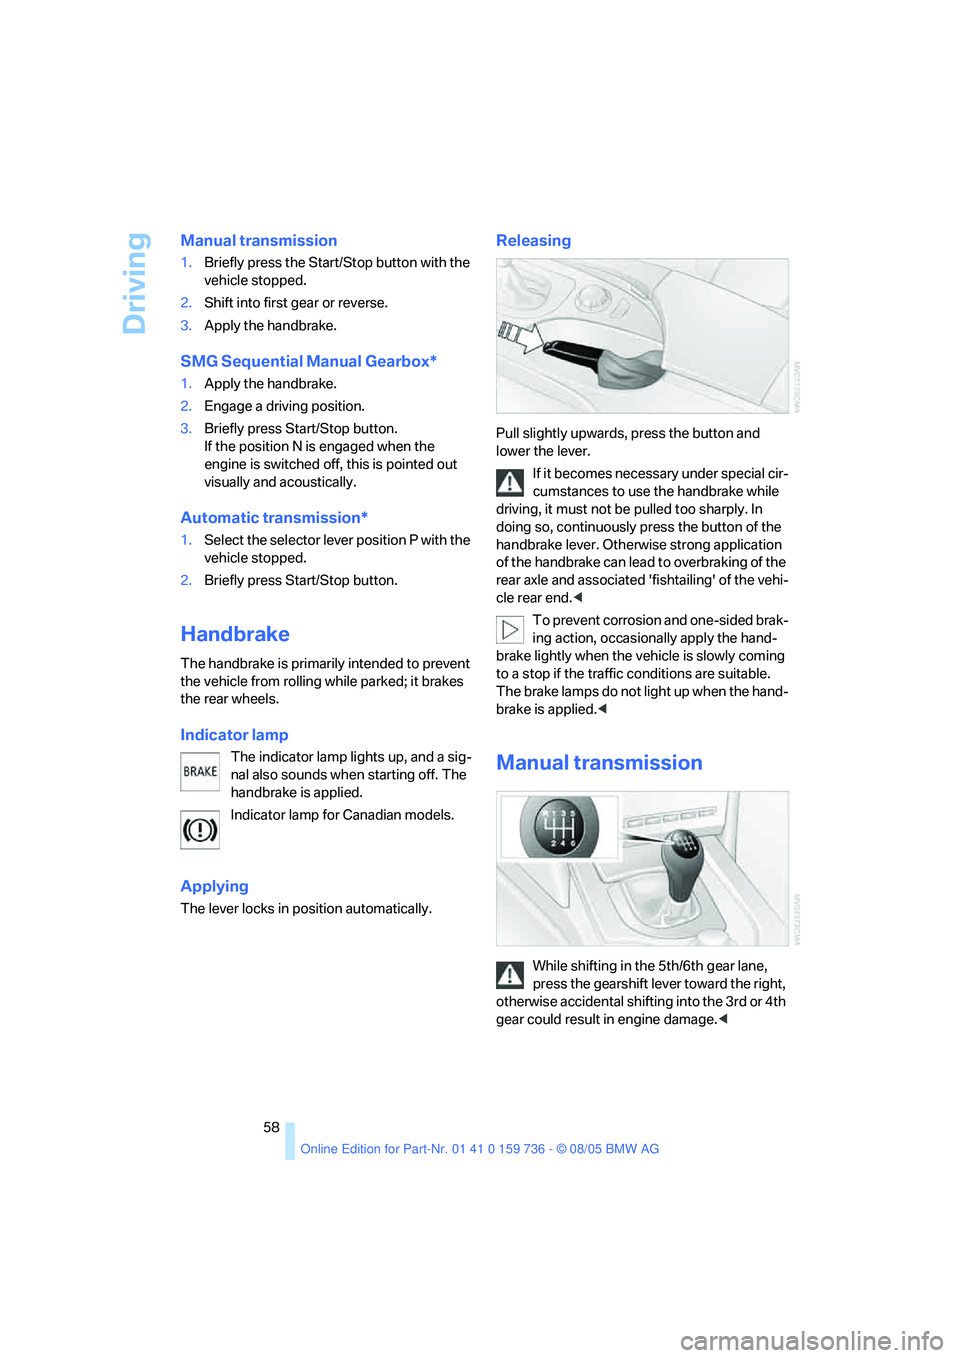
Pull slightly upwards, press the button and
lower the lever.
If it becomes necessary under special cir-
cumstances to use the handbrake while
driving, it must not be pulled too sharply. In
doing so, continuously press the button of the
handbrake lever. Otherwise strong application
of the handbrake can lead to overbraking of the
rear axle and associated 'fishtailing' of the vehi-
cle rear end.<
To prevent corrosion and one-sided brak-
ing action, occasionally apply the hand-
brake lightly when the vehicle is slowly coming
to a stop if the traffic conditions are suitable.
The brake lamps do not light up when the hand-
brake is applied.<
Manual transmission
While shifting in the 5th/6th gear lane,
press the gearshift lever toward the right,
otherwise accidental shifting into the 3rd or 4th
gear could result in engine damage.<
Page 61 of 248

Driving
60 It is also possible to start off in second gear, e. g.
in slippery conditions.
In the following situations, SMG thinks for you:
>Upshifts and downshifts are executed only
when they will result in a plausible combina-
tion of engine and vehicle speed; thus, for
example, a downshift that would cause the
engine to overrev will not be executed by
the system.
>When the vehicle is stationary, the trans-
mission automatically downshifts into first
gear.
>Shortly before dropping below a gear-
dependent minimum speed, the transmis-
sion downshifts automatically even without
your intervention.
D Drive mode
In the Drive mode, all forward gears are shifted
automatically.
Shifting from Sequential mode to Drive mode:
press selector lever to the right toward D.
Kick-down: for rapid acceleration, e. g. when
passing, press the accelerator pedal as far
down as it will go. You achieve maximum accel-
eration.
To switch back into the Sequential mode: press
selector lever to the right again toward D or shift
using the shifting paddles or the selector lever.
Start off quickly on slopes. Do not hold
the vehicle on a hill by pressing the accel-
erator, but apply the handbrake instead. Other-
wise overheating can occur in the transmission
region.<
Gear changes
Using selector lever
>To upshift, pull the selector lever back.
>To downshift, push the selector lever for-
ward.
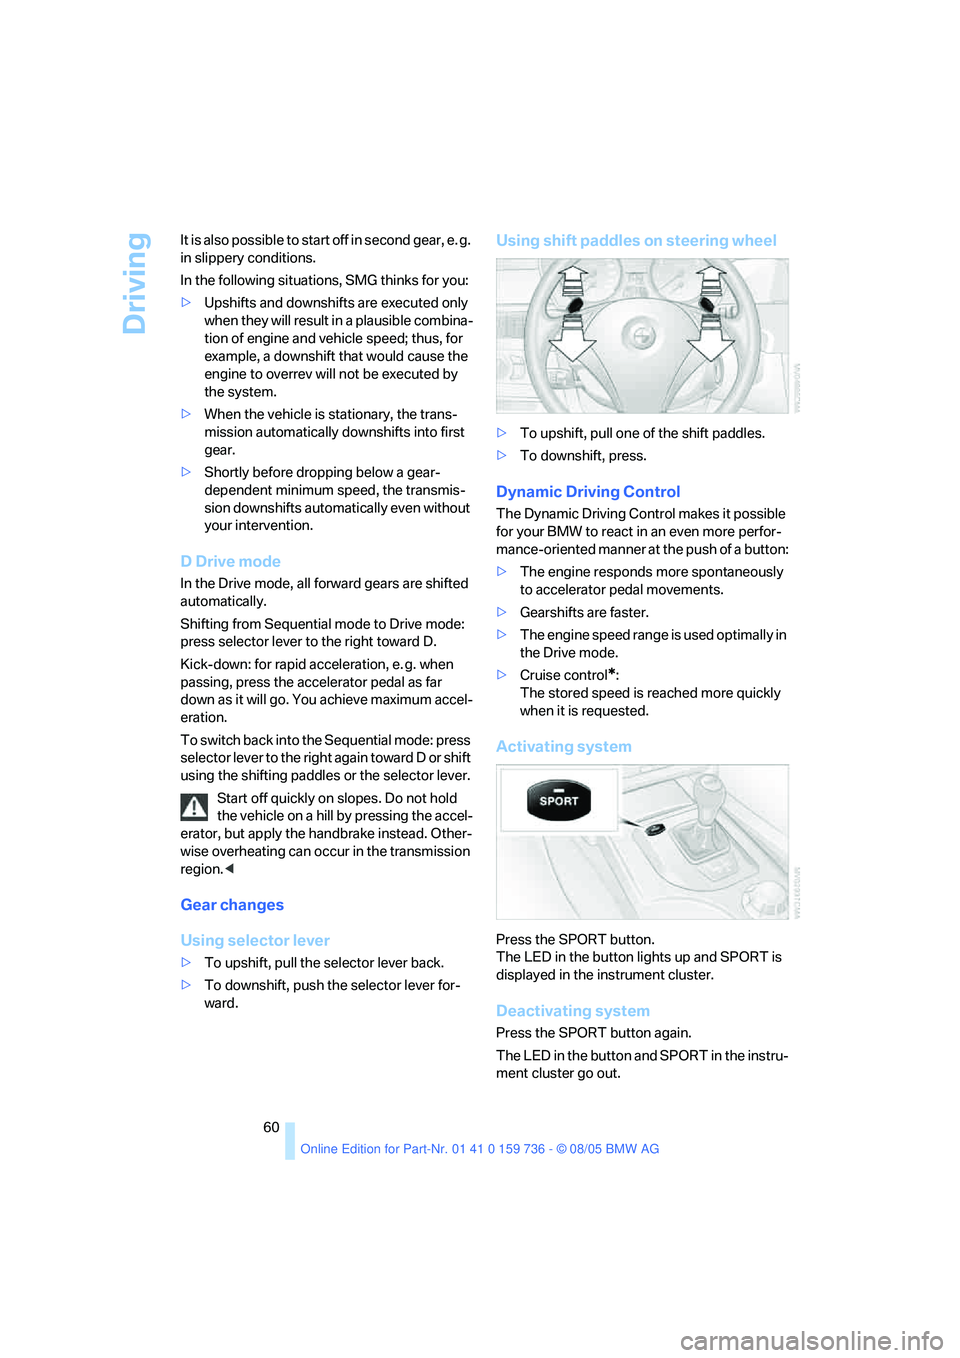
Using shift paddles on steering wheel
>To upshift, pull one of the shift paddles.
>To downshift, press.
Dynamic Driving Control
The Dynamic Driving Control makes it possible
for your BMW to react in an even more perfor-
mance-oriented manner at the push of a button:
>The engine responds more spontaneously
to accelerator pedal movements.
>Gearshifts are faster.
>The engine speed range is used optimally in
the Drive mode.
>Cruise control
*:
The stored speed is reached more quickly
when it is requested.
Activating system
Press the SPORT button.
The LED in the button lights up and SPORT is
displayed in the instrument cluster.
Deactivating system
Press the SPORT button again.
The LED in the button and SPORT in the instru-
ment cluster go out.
Page 67 of 248

Driving
66 fares. Especially on longer trips, the system can
reduce fatigue and tension, while increasing
your enjoyment of driving. Please use it safely
and responsibly.
In addition to holding a steady cruising speed,
if you encounter slower vehicles ahead, active
cruise control will, within the scope of given
possibilities, adjust your vehicle's speed auto-
matically so that you can flow with the traffic
without having to make constant adjustments.
If, for example, while cruising at the selected
speed, you begin to approach a slower vehicle
ahead of you in the same lane, the system will
reduce your vehicle's speed to the same as that
of the vehicle ahead to maintain your selected
distance setting between your vehicle and the
vehicle ahead. You can vary the distance, which
is additionally speed-dependent. Based on
your selected distance setting, the system
automatically decreases the throttle setting and
lightly applies the brakes if necessary. The vehi-
cle brake lamps will automatically illuminate to
signal a following driver to take action. In addi-
tion, it may be necessary for the vehicle or the
driver to downshift, depending on the kind of
transmission your vehicle is equipped with, to
maintain the distance setting selected. If the
vehicle ahead speeds up or when the lane
ahead becomes clear, your vehicle will acceler-
ate to the speed you have selected by increas-
ing the throttle setting and shifting gears auto-
matically or by the driver as needed. Your
selected speed will be held when driving down-
hill, too.
Active cruise control is not and must not
be used as a collision avoidance/warning
system.<
Since this active cruise control system is
a new technology and operates differ-
ently from conventional cruise control systems
which you may be accustomed to, you are
strongly urged to read all of the pages relating
to this system before use. Pay special attention
to the information contained in the Things to
know about active cruise control section begin-
ning on page69.<
Navigation system Professional*
If a navigation DVD is in the drive, refer to
page124, the system adjusts the accelerating
and braking behavior of the vehicle to the road
you are driving on.
When the vehicle position is unknown, e.g.
when you leave the map area, this influence of
the navigation system is not available.
Manual transmission
You can shift with the cruise control activated.
Shifting information is provided or the system
deactivates itself if you drive at very high or very
low engine speeds for a longer period.
SMG
In the Sequential mode, shifting information is
provided or the system deactivates itself if you
drive at very high engine speeds for a longer
period.
In the Drive mode the SMG acts similarly to an
automatic transmission in the D position.
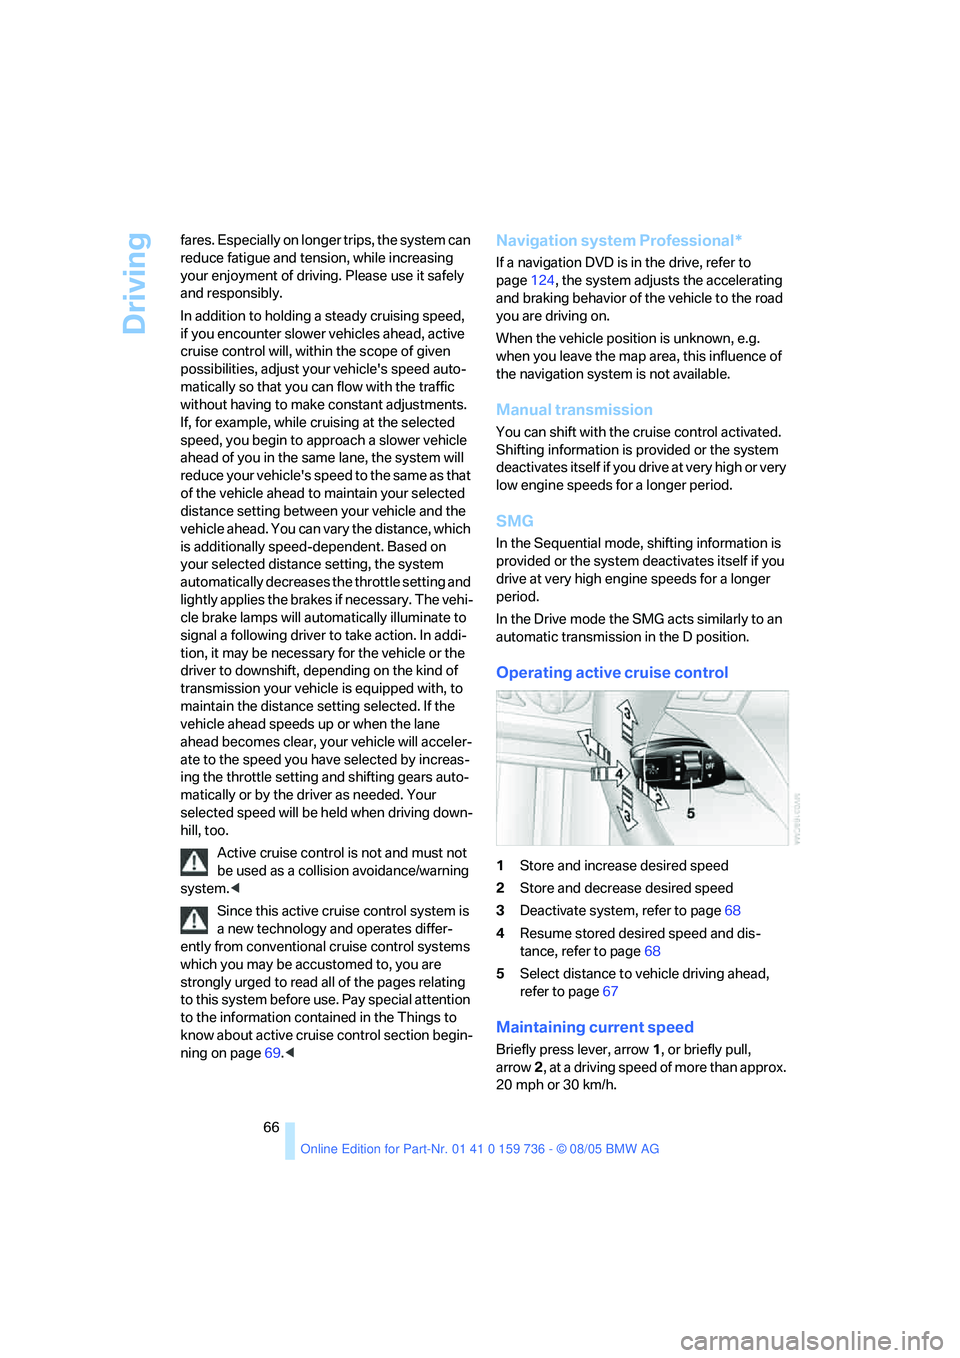
Operating active cruise control
1Store and increase desired speed
2Store and decrease desired speed
3Deactivate system, refer to page68
4Resume stored desired speed and dis-
tance, refer to page68
5Select distance to vehicle driving ahead,
refer to page67
Maintaining current speed
Briefly press lever, arrow1, or briefly pull,
arrow2, at a driving speed of more than approx.
20 mph or 30 km/h.
Page 68 of 248

Controls
67Reference
At a glance
Driving tips
Communications
Navigation
Entertainment
Mobility
The speed currently being driven is stored and
maintained. It is indicated on the speedometer
and briefly in the instrument cluster.
The controlled speed can drop on uphill grades
if the engine output is insufficient. If the engine
braking effect is not sufficient on a downhill
grade, the system lightly brakes the vehicle.
Setting desired speed
Adjust your desired speed to the traffic
conditions and remain ready to brake at
all times, otherwise accidents can occur. Great
differences in speed to the vehicle ahead, e. g.
when quickly approaching a truck or when
another vehicle swerves into your lane, cannot
be compensated for by the system.<
Increasing in steps
Briefly press the lever repeatedly up to the
pressure point or past the pressure point,
arrow1, until the desired speed is displayed.
>Each time the lever is briefly pressed up to
the pressure point, the desired speed
increases by approx. 1 mph or 1 km/h.
>Each time the lever is briefly pressed
beyond the pressure point, the desired
speed is increased by a maximum of 5 mph
or 10 km/h until the maximum speed of
110mph or 180km/h is reached.
The speed then displayed is stored and
reached on clear roads.
Increasing steplessly
Press the lever up to the pressure point or past
the pressure point, arrow1, until the desired
speed is reached.
The speed then displayed is stored and
reached on clear roads.
Decreasing steplessly
Pull the lever up to the pressure point or past
the pressure point, arrow2, until the desired
speed is displayed.
>Each time the lever is pulled up to the pres-
sure point, the desired speed decreases by
approx. 1 mph or 1 km/h.
>Each time the lever is pulled beyond the
pressure point, the desired speed is
decreased by a maximum of 5 mph or
10 km/h until the minimum speed of
20 mph or 30 km/h is reached.
The speed then displayed is stored and
reached on clear roads.
Select distance
>Rotary switch downward:
Increase distance.
>Rotary switch upward:
Decrease distance.