2006 BMW 525XI navigation update
[x] Cancel search: navigation updatePage 125 of 248

Starting navigation system
124
Starting navigation system
Your navigation system can use satellites to
ascertain the precise position of your vehicle
and guide you reliably to any destination you
enter.
Navigation DVD
The navigation system requires a special navi-
gation DVD. You can obtain the latest version at
your BMW center.
Inserting navigation DVD
1.Insert the navigation DVD with the labeled
side up.
2.Allow several seconds for the system to
scan the data from the DVD.
Removing navigation DVD
1.Press button 1.
The DVD emerges slightly from the drive.
2.Remove the DVD.
If the DVD is not ejected from the drive, it is pos-
sible that it is blocked. A message appears on
the Control Display.
Display in assistance window
You can display the route or the current position
in the assistance window. This display remains
visible even if you change to another applica-
tion.
1.Move the controller to the right to enter the
assistance window.
2.Press the controller.
Other menu items are displayed.
3.Select the desired route view or "Current
position".
4.Press the controller.
The contents of the assistance window are con-
tinually updated as you drive.
*
Page 145 of 248

On/off and tone
144
On/off and tone
The following audio sources have shared
controls and setting options:
>Professional radio
* or
Business radio
>CD player
>CD changer
*
Controls
The audio sources can be operated using:
>Buttons in the area of the CD player
>iDrive
>Buttons on steering wheel, refer to page11
Buttons in area of CD player
The layout of the buttons can vary depending
on your vehicle's equipment.
Equipment with a single drive:
Equipment with two drives:1Entertainment sound output on/off, volume
>Press: switch on/off.
When you switch on, the last set radio
station or CD track is played.
>Turn: adjust volume.
2Drive for audio CDs
3 Eject CD
4 Station scan/track search
>Change radio station.
>Select track for CD player and
CD changer.
5Drive for navigation DVDs
Operation via iDrive
iDrive, for principle details, refer to page16.
1.Press the button.
This opens the start menu.
2.Move the controller backwards to open
"Entertainment".
You have the following choices:
>"FM" and "AM": radio reception
>"WB": Weather Band station
>"SAT": satellite radio
>"CD": CD player or CD changer
>"Set": depending on the audio source,
other adjustments can be made, e.g. with
the radio: update station with strongest
reception, save station, tone control,
sample stations.
Page 150 of 248
Navigation
Entertainment
Driving tips
149Reference
At a glance
Controls
Communications
Mobility
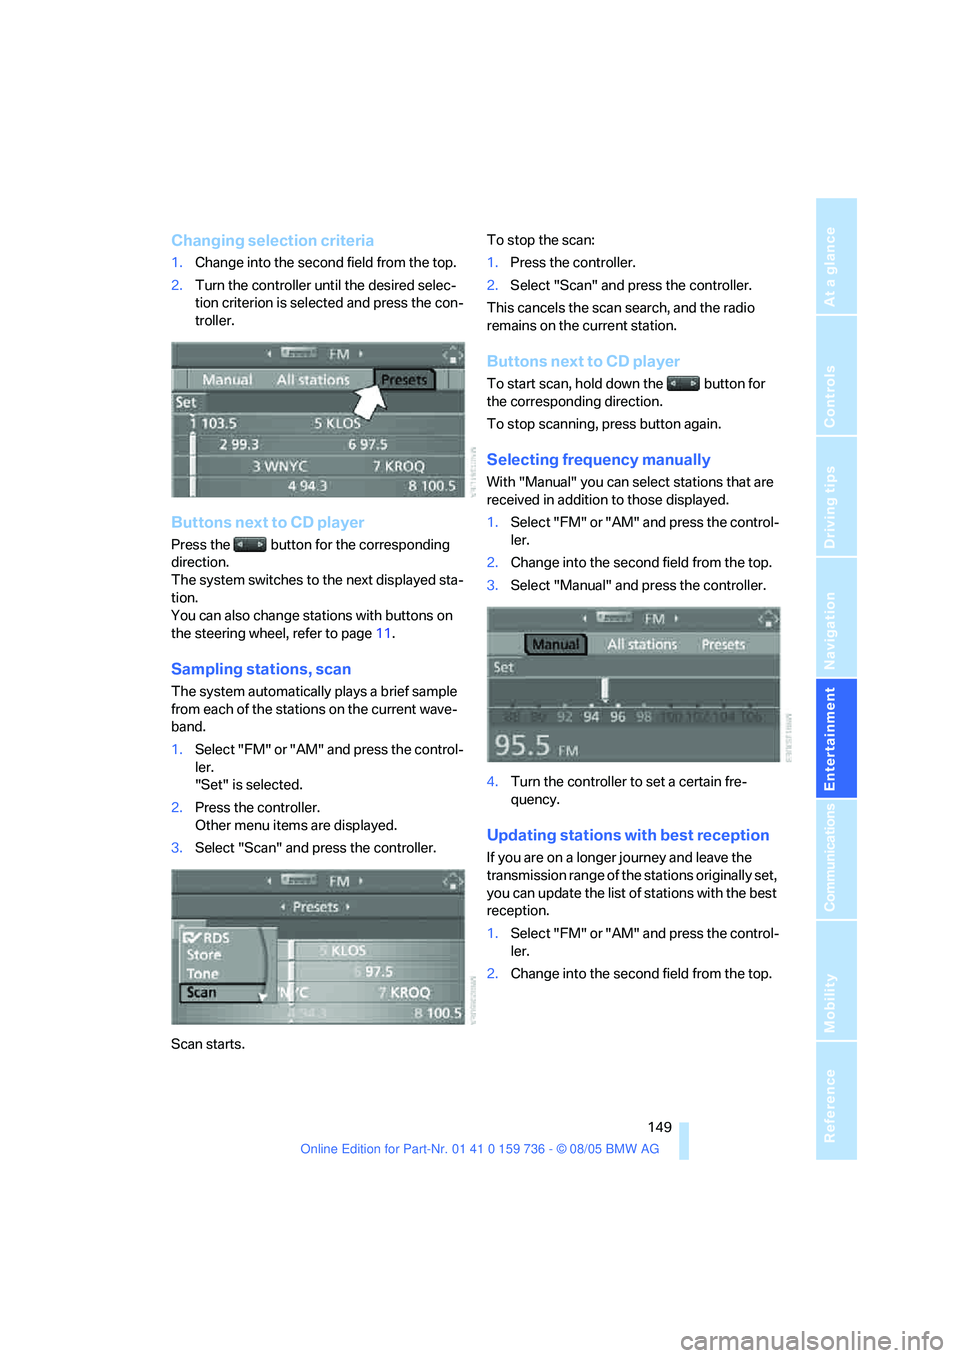
Changing selection criteria
1.Change into the second field from the top.
2.Turn the controller until the desired selec-
tion criterion is selected and press the con-
troller.
Buttons next to CD player
Press the button for the corresponding
direction.
The system switches to the next displayed sta-
tion.
You can also change stations with buttons on
the steering wheel, refer to page11.
Sampling stations, scan
The system automatically plays a brief sample
from each of the stations on the current wave-
band.
1.Select "FM" or "AM" and press the control-
ler.
"Set" is selected.
2.Press the controller.
Other menu items are displayed.
3.Select "Scan" and press the controller.
Scan starts.To stop the scan:
1.Press the controller.
2.Select "Scan" and press the controller.
This cancels the scan search, and the radio
remains on the current station.
Buttons next to CD player
To start scan, hold down the button for
the corresponding direction.
To stop scanning, press button again.
Selecting frequency manually
With "Manual" you can select stations that are
received in addition to those displayed.
1.Select "FM" or "AM" and press the control-
ler.
2.Change into the second field from the top.
3.Select "Manual" and press the controller.
4.Turn the controller to set a certain fre-
quency.
Updating stations with best reception
If you are on a longer journey and leave the
transmission range of the stations originally set,
you can update the list of stations with the best
reception.
1.Select "FM" or "AM" and press the control-
ler.
2.Change into the second field from the top.
Page 152 of 248
Navigation
Entertainment
Driving tips
151Reference
At a glance
Controls
Communications
Mobility
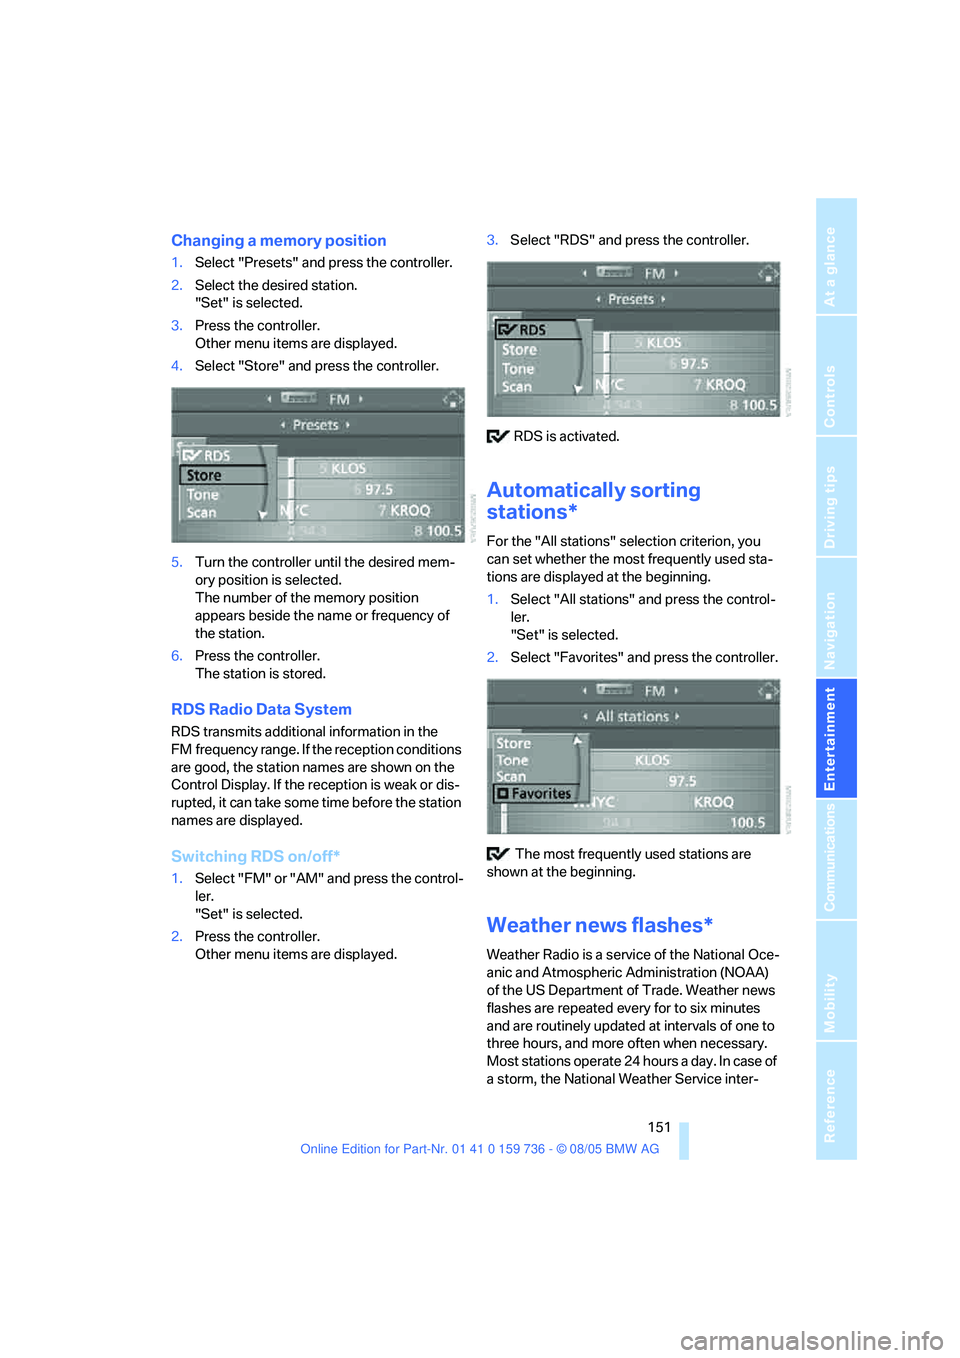
Changing a memory position
1.Select "Presets" and press the controller.
2.Select the desired station.
"Set" is selected.
3.Press the controller.
Other menu items are displayed.
4.Select "Store" and press the controller.
5.Turn the controller until the desired mem-
ory position is selected.
The number of the memory position
appears beside the name or frequency of
the station.
6.Press the controller.
The station is stored.
RDS Radio Data System
RDS transmits additional information in the
FM frequency range. If the reception conditions
are good, the station names are shown on the
Control Display. If the reception is weak or dis-
rupted, it can take some time before the station
names are displayed.
Switching RDS on/off*
1.Select "FM" or "AM" and press the control-
ler.
"Set" is selected.
2.Press the controller.
Other menu items are displayed.3.Select "RDS" and press the controller.
RDS is activated.
Automatically sorting
stations*
For the "All stations" selection criterion, you
can set whether the most frequently used sta-
tions are displayed at the beginning.
1.Select "All stations" and press the control-
ler.
"Set" is selected.
2.Select "Favorites" and press the controller.
The most frequently used stations are
shown at the beginning.
Weather news flashes*
Weather Radio is a service of the National Oce-
anic and Atmospheric Administration (NOAA)
of the US Department of Trade. Weather news
flashes are repeated every for to six minutes
and are routinely updated at intervals of one to
three hours, and more often when necessary.
Most stations operate 24 hours a day. In case of
a storm, the National Weather Service inter-
Page 154 of 248

Navigation
Entertainment
Driving tips
153Reference
At a glance
Controls
Communications
Mobility
1.Select "FM" or "AM" and press the control-
ler.
2.Change into the second field from the top.
3.Select "Autostore" and press the controller.
4.Press the controller.
Other menu items are displayed.
5.Select "Autostore " and press the con-
troller.
The display of the stations offering digital
reception is updated. This can take up to 2 min-
utes.
Displaying additional information
With the digital stations, additional information
on the current track is displayed, e.g. the name
of the artist.1.Select station and press controller.
2.Select "Details" and press the controller.
The information is displayed.
If a digital station is received again when the
station is changed, the additional information
will be displayed again following a brief interrup-
tion.
Satellite radio*
You can receive over 100 different channels
with high sound quality.
The channels are offered to you in predefined
packages. To receive the channels of your
choice, you must have this package enabled.
With this new technology the signal may
fail, causing interruptions in reception.<
Enabling or disabling channels
iDrive, for principle details, refer to page16.
1.Press the button.
This opens the start menu.
2.Move the controller backwards to open
"Entertainment".
Page 180 of 248
179
Entertainment
Reference
At a glance
Controls
Driving tips Communications
Navigation
Mobility
TeleService , BMW Assist
TeleService
TeleService supports you when communicat-
ing with a BMW center. The built-in car phone
can be used to transmit data regarding the ser-
vice status of your vehicle or regarding legally
mandated inspections directly to your BMW
center. This is the same data that is also stored
for CBS Condition Based Service in the remove
control. Your BMW center can then contact
you, and you can make an appointment that
suits you while you are still on the road. Your
advantage here is that your BMW center can
prepare in advance for the required mainte-
nance work. The TeleService functions are
country-specific: the data regarding the service
status of your vehicle or regarding legally man-
dated inspections is transmitted on a country-
specific basis either automatically before they
fall due or during your calls to the BMW center.
Your BMW center will be glad to provide more
detailed information.
BMW Assist
BMW Assist provides you with other services in
addition to TeleService. For example, the posi-
tion data of your vehicle can be transferred to
the BMW Assist response center if an emer-
gency call
* has been initiated.
Many functions of BMW Assist depend on the
individually agreed contract. Data transmission,
e. g. of the CBS Condition Based Service, dif-
fers from country to country.
The contract of participation with BMW Assist
and the activation must be completed before
you can use BMW Assist.
When the contract expires, the car phone can
be deactivated by a BMW center without having
to visit a BMW center. Following deactivation of
the car phone, no emergency calls can be
made. The car phone can be reactivated after
signing a new contract with a BMW center.You can also use the services of BMW Assist via
the Internet. The range of services is continually
being expanded.
Requirements
You can use TeleService or BMW Assist when
the following requirements are met:
>The installed car phone is logged on to a
cellular telephone network. This network
must be capable of transmitting the ser-
vices.
>To transmit position data, the vehicle must
be able to determine the current position.
This can be displayed on the Control Dis-
play.
>For TeleService or BMW Assist to be acti-
vated and updated, the GPS signal must be
available.
>For BMW Assist: you have applied to your
BMW center or BMW Customer Support for
BMW Assist.
Enabling TeleService or BMW Assist
For you to be able to use the services of
TeleService or BMW Assist, these must be
enabled.
Requirements
>Make sure that the vehicle can determine its
current location. Reception is best when
you have an unobstructed view to the sky.
>Leave radio readiness switched on while
connecting to the system.
Enabling
iDrive, for principle details, refer to page16.
1.Press the button.
This opens the start menu.
2.Press the controller to open the menu.
**
Page 210 of 248
Mobility
209Reference
At a glance
Controls
Driving tips
Communications
Navigation
Entertainment
When you mount wheels other than Genu-
ine BMW light-alloy wheels, different lug
bolts may also be required.
4.Screw in the remaining lug bolts. Tighten all
the bolts securely in a diagonal pattern.
5.Lower the vehicle and remove the jack from
beneath the vehicle.
After mounting
1.Tighten the lug bolts in a diagonal pattern.
To ensure safety, always have the
lug bolts checked with a calibrated
torque wrench as soon as possible to
ensure that they are tightened to the speci-
fied torque. The tightening torque is
88.5 lb ft/120 Nm.<
2.When stowing the wheel and tools in the
vehicle, execute these steps in the reverse
order.
3.Check and correct the tire inflation pressure
at the earliest opportunity.
Protect valve stems and valve stem
seal caps against dirt and contamina-
tion. Dirt in valve stems is a frequent source
of gradual air loss.<
4.Initialize the Flat Tire Monitor, refer to
page88.
5.Replace the damaged tire as soon as possi-
ble and have the new wheel/tire balanced.
Driving with compact wheel
Drive reservedly and do not exceed a speed of
50 mph/80 km/h.
The driving characteristics change, for example
reduced track stability on braking, extended
braking distance, and altered self-steering
characteristics in the limit range. In conjunction
with winter tires, these characteristics are more
pronounced.
Only one compact wheel may be
mounted. You should re-equip with
wheels and tires of the original size as quickly as
possible.<
Vehicle battery
Battery care
The battery is 100 % maintenance-free, i.e., the
electrolyte will last for the life of the battery
when the vehicle is operated in a temperate cli-
mate. Your BMW center will be glad to advise in
all matters concerning the battery.
Charging battery
Only charge the battery in the vehicle via the
terminals in the engine compartment with the
engine off. Connections, refer to Jump starting
on page212.
Disposal
Have old batteries disposed of by your
BMW center or hand them in to a recy-
cling center. Maintain the battery in an upright
position for transport and storage. Always
restrain the battery to prevent it from tipping
over during transport.<
Power failure
After a temporary power loss, the functioning of
some equipment may be limited and require
reinitialization. Individual settings are also lost
and must be updated:
>Seat, mirror and steering wheel memory
The positions must be stored again, refer to
page45.
>Time and Date
The values must be updated, refer to
page80.
>Radio
Stations must be stored again if necessary,
refer to page150.
>Navigation system
Wait until the system starts, refer to
page141.
Page 244 of 248
Reference 243
At a glance
Controls
Driving tips
Communications
Navigation
Entertainment
Mobility
Tires
– age192
– air loss88
– breaking-in116
– changing194
– condition193
– damage193
– flat tire, refer to Changing
wheels207
– inflation pressure188
– new wheels and tires194
– pressure monitoring87
– replacing207
– retreaded tires194
– run-flat tires194
– size192
– tread193
– wear indicators193
– wheel/tire combination194
– winter tires195
"Tone"145
Tone in audio mode
– adjusting145
– middle setting147
Tone on locking/unlocking31
Tools, refer to Onboard
toolkit203
"Top 8" for mobile phone172
Torque
– engine218
– lug bolts, refer to After
mounting209
Touch tone dialing173
Tow fitting213
Towing213
– tow fitting213
"Town / City" for destination
entry126
Tow-starting213,215
Tracks
– random play sequence160
– sample scan159
Track width, refer to
Dimensions219
Traction-assist feature, refer
to DSC Dynamic Stability
Control84Traction control, refer to DSC
Dynamic Stability
Control84
Traffic congestion, refer to
Bypassing route
sections140
Transmission
– automatic transmission with
Steptronic61
– deactivating selector lever
interlock on automatic
transmission with
Steptronic62
– manual transmission58
– SMG Sequential Manual
Gearbox59
– starting assistant117
Transporting children
safely52
Transport securing device,
refer to Securing cargo120
Tread depth, refer to Minimum
tire tread193
"Treble", refer to Tone
control146
Treble, refer to Tone
control145
"Trip computer"75
Trip computer74
Trip-distance counter, refer to
Trip odometer72
"Triple turn signal
activation"63
Trip odometer72
Turning circle, refer to
Dimensions219
Turn signals62
– indicator lamp10,12
– replacing bulbs205
U
Underbody protection, refer to
Caring for your vehicle
brochure
Uniform Tire Quality Grading/
UTQR192
"Units"81Units
– average fuel
consumption81
– temperature81
Universal garage-door
opener, refer to Integrated
universal remote
control104
Universal remote control104
"Unlock button"30
Unlocking
– from inside33
– from outside30
– without key, refer to Comfort
access37
Unlocking without key, refer to
Comfort access37
"Update services"182
"Use current location as
address"133,134
Used batteries
– refer to Disposal209
– refer to Replacing battery39
V
Valve screw caps, refer to
After mounting209
Vehicle
– battery209
– break-in period116
– care202
– care, refer to Caring for your
vehicle brochure
– dimensions219
– loading118
– parking57
– washing, refer to Caring for
your vehicle brochure
– weights221
Vehicle jack207
– jacking points208
Vehicle position, refer to
Displaying current
position140
"Vehicle settings", when
unlocking30