2006 BMW 525XI change wheel
[x] Cancel search: change wheelPage 159 of 248
CD player and CD changer
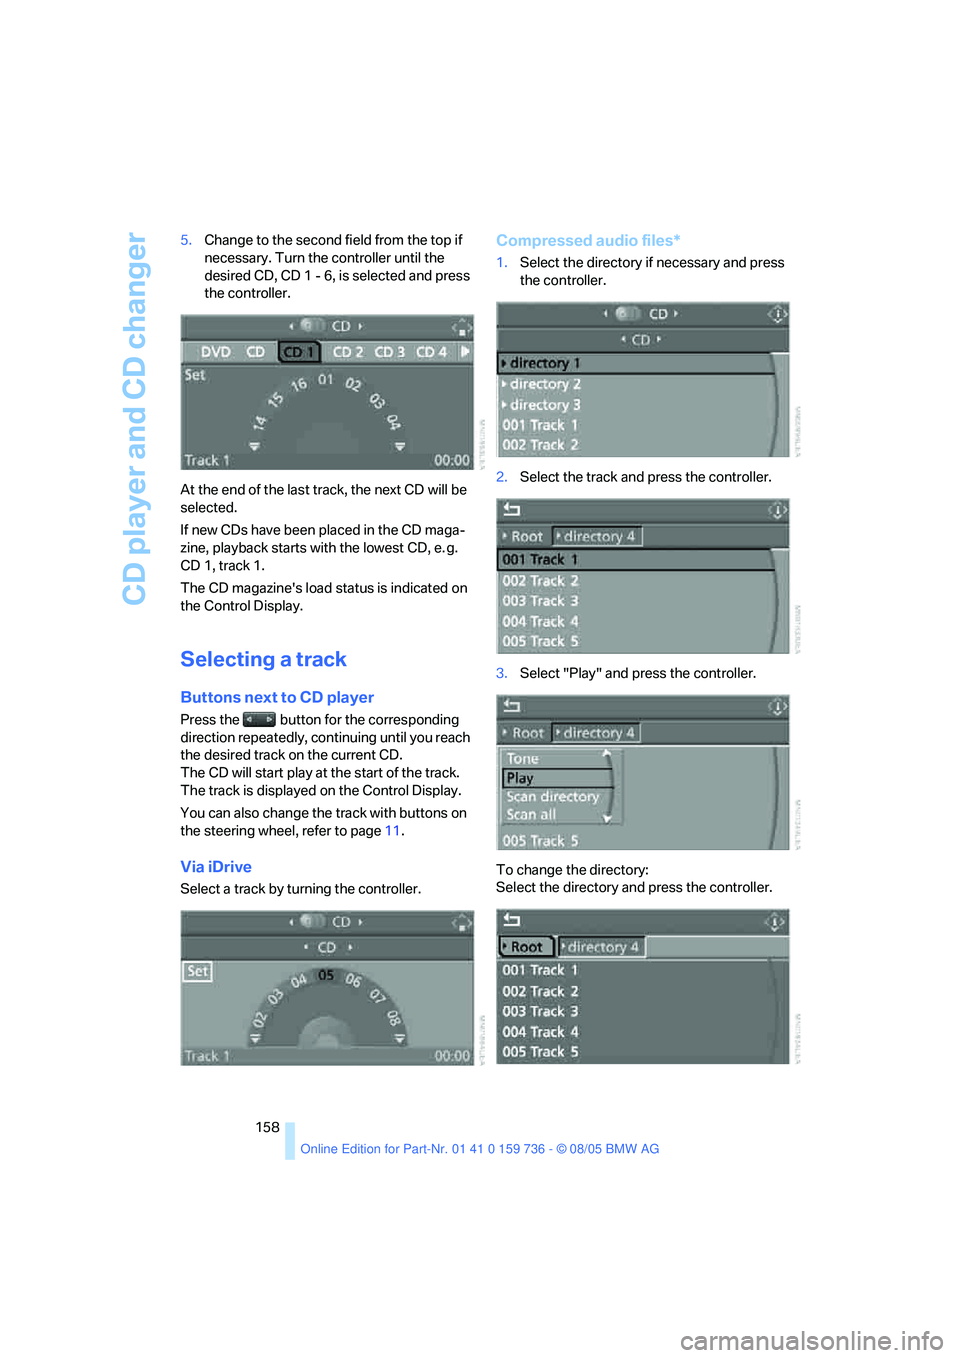
158 5.Change to the second field from the top if
necessary. Turn the controller until the
desired CD, CD 1 - 6, is selected and press
the controller.
At the end of the last track, the next CD will be
selected.
If new CDs have been placed in the CD maga-
zine, playback starts with the lowest CD, e. g.
CD 1, track 1.
The CD magazine's load status is indicated on
the Control Display.
Selecting a track
Buttons next to CD player
Press the button for the corresponding
direction repeatedly, continuing until you reach
the desired track on the current CD.
The CD will start play at the start of the track.
The track is displayed on the Control Display.
You can also change the track with buttons on
the steering wheel, refer to page11.
Via iDrive
Select a track by turning the controller.
Compressed audio files*
1.Select the directory if necessary and press
the controller.
2.Select the track and press the controller.
3.Select "Play" and press the controller.
To change the directory:
Select the directory and press the controller.
Page 194 of 248
Mobility
193Reference
At a glance
Controls
Driving tips
Communications
Navigation
Entertainment
heat when tested under controlled conditions
on a specified indoor laboratory test wheel.
Sustained high temperature can cause the
material of the tire to degenerate and reduce
tire life, and excessive temperature can lead to
sudden tire failure. The grade C corresponds to
a level of performance which all passenger car
tires must meet under the Federal Motor Vehi-
cle Safety Standard No. 109. Grades B and A
represent higher levels of performance on the
laboratory test wheel than the minimum
required by law.
The temperature grade for this tire is
established for a tire that is properly
inflated and not overloaded. Excessive speed,
underinflation, or excessive loading, either sep-
arately or in combination, can cause heat
buildup and possible tire failure.<
RSC – run-flat tires
You will recognize run-flat tires by a circular
symbol containing the letters RSC on the side
of the tire, refer to page194.
M+S
Winter and all-season tires.
These have better winter properties than sum-
mer tires.
XL
Indicates specially reinforced tires.
Tire condition
Inspect your tires frequently for tread wear,
signs of damage and for foreign objects lodged
in the tread. Check the tread depth.
Minimum tread depth
The tread depth should not drop below 0.12 in/
3 mm, although, for example, European legisla-
tion only specifies a minimum tread depth of
0.063 in/1.6 mm. At tread depths below 0.12 in/
3 mm there is an increased risk of high-speed
hydroplaning, even when only small amounts of
water are present on the road surface.When winter tires wear down past a tread depth
of 0.16 in/4 mm, they become perceptibly less
suitable for winter conditions. For the sake of
safety, new tires should be installed.
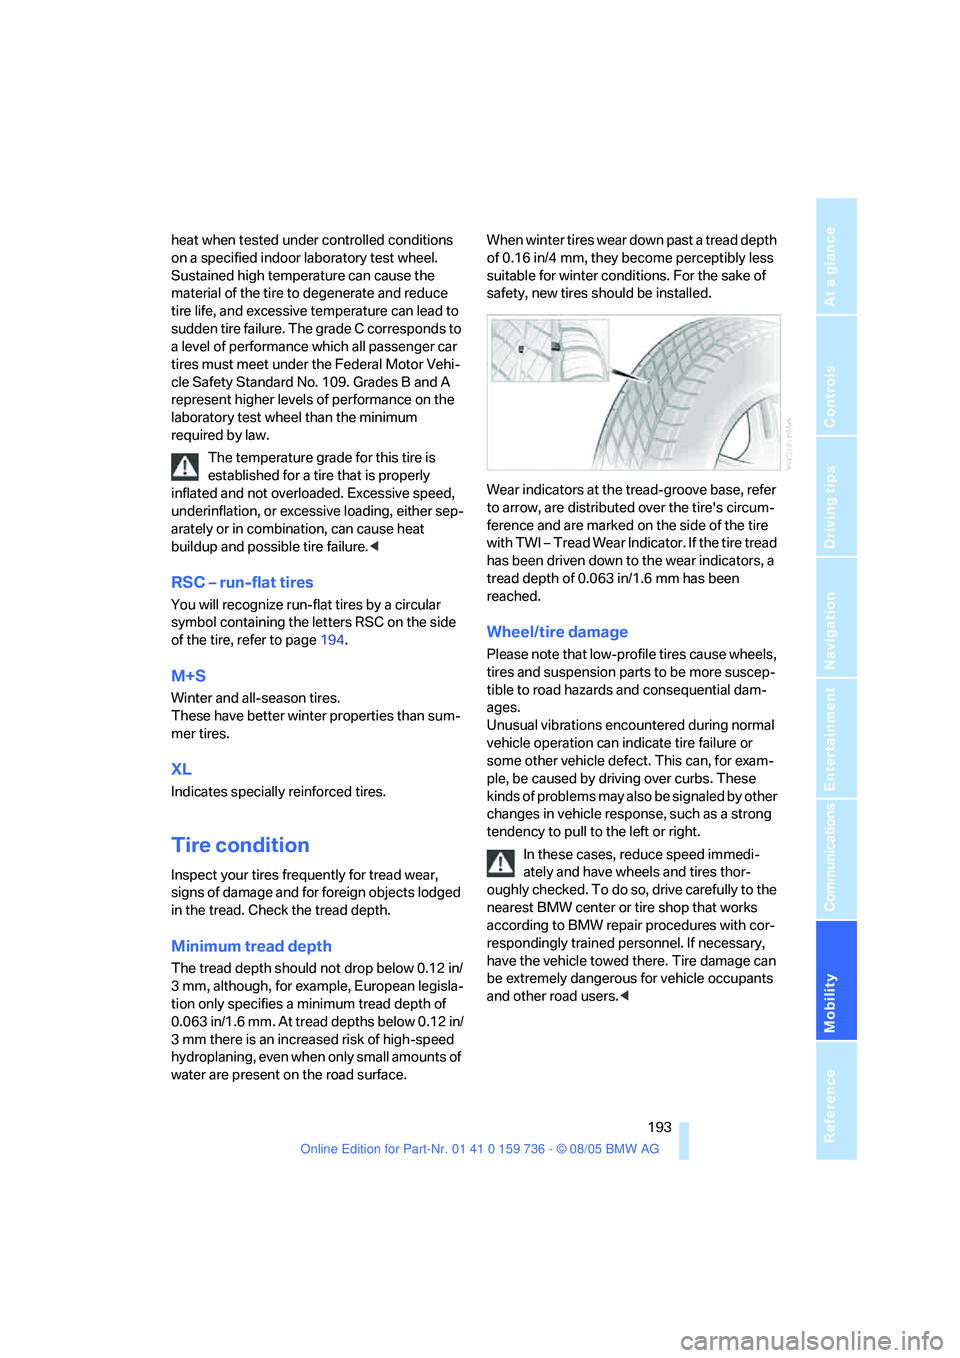
Wear indicators at the tread-groove base, refer
to arrow, are distributed over the tire's circum-
ference and are marked on the side of the tire
with TWI – Tread Wear Indicator. If the tire tread
has been driven down to the wear indicators, a
tread depth of 0.063 in/1.6 mm has been
reached.
Wheel/tire damage
Please note that low-profile tires cause wheels,
tires and suspension parts to be more suscep-
tible to road hazards and consequential dam-
ages.
Unusual vibrations encountered during normal
vehicle operation can indicate tire failure or
some other vehicle defect. This can, for exam-
ple, be caused by driving over curbs. These
kinds of problems may also be signaled by other
changes in vehicle response, such as a strong
tendency to pull to the left or right.
In these cases, reduce speed immedi-
ately and have wheels and tires thor-
oughly checked. To do so, drive carefully to the
nearest BMW center or tire shop that works
according to BMW repair procedures with cor-
respondingly trained personnel. If necessary,
have the vehicle towed there. Tire damage can
be extremely dangerous for vehicle occupants
and other road users.<
Page 208 of 248
Mobility
207Reference
At a glance
Controls
Driving tips
Communications
Navigation
Entertainment
Changing wheels
Safety precautions in the event of a flat
tire or wheel change: park the vehicle as
far as possible from passing traffic and on solid
ground. Switch on the hazard warning flashers.
Lock the steering wheel in straight-ahead set-
ting of the wheels. Apply the handbrake and
engage first gear, reverse gear or selector lever
position P.
Have all vehicle occupants get out of the vehicle
and ensure that they remain outside the imme-
diate area in a safe place, such as behind a
guardrail.
If a warning triangle
* or portable hazard warning
lamp is required, set it up on the roadside at an
appropriate distance from the rear of the vehi-
cle. Comply with all safety guidelines and regu-
lations.
Change the wheel only on a level, firm surface
which is not slippery. The vehicle or the jack
could slip to the side if you attempt to raise the
vehicle on a soft or slippery surface such as
snow, ice, tiles, etc.
Position the jack on a firm support surface.
Do not use a wooden block or similar object as a
support base for the jack, as this would prevent
it from extending to its full support height and
reduce its load-carrying capacity.
To avoid serious or fatal injury: never lie under
the vehicle, and never start the engine while it is
supported by the jack.<
What you will need
To avoid rattling noises later on, note the posi-
tions of the tools before removing them, then
return them to their initial positions after com-
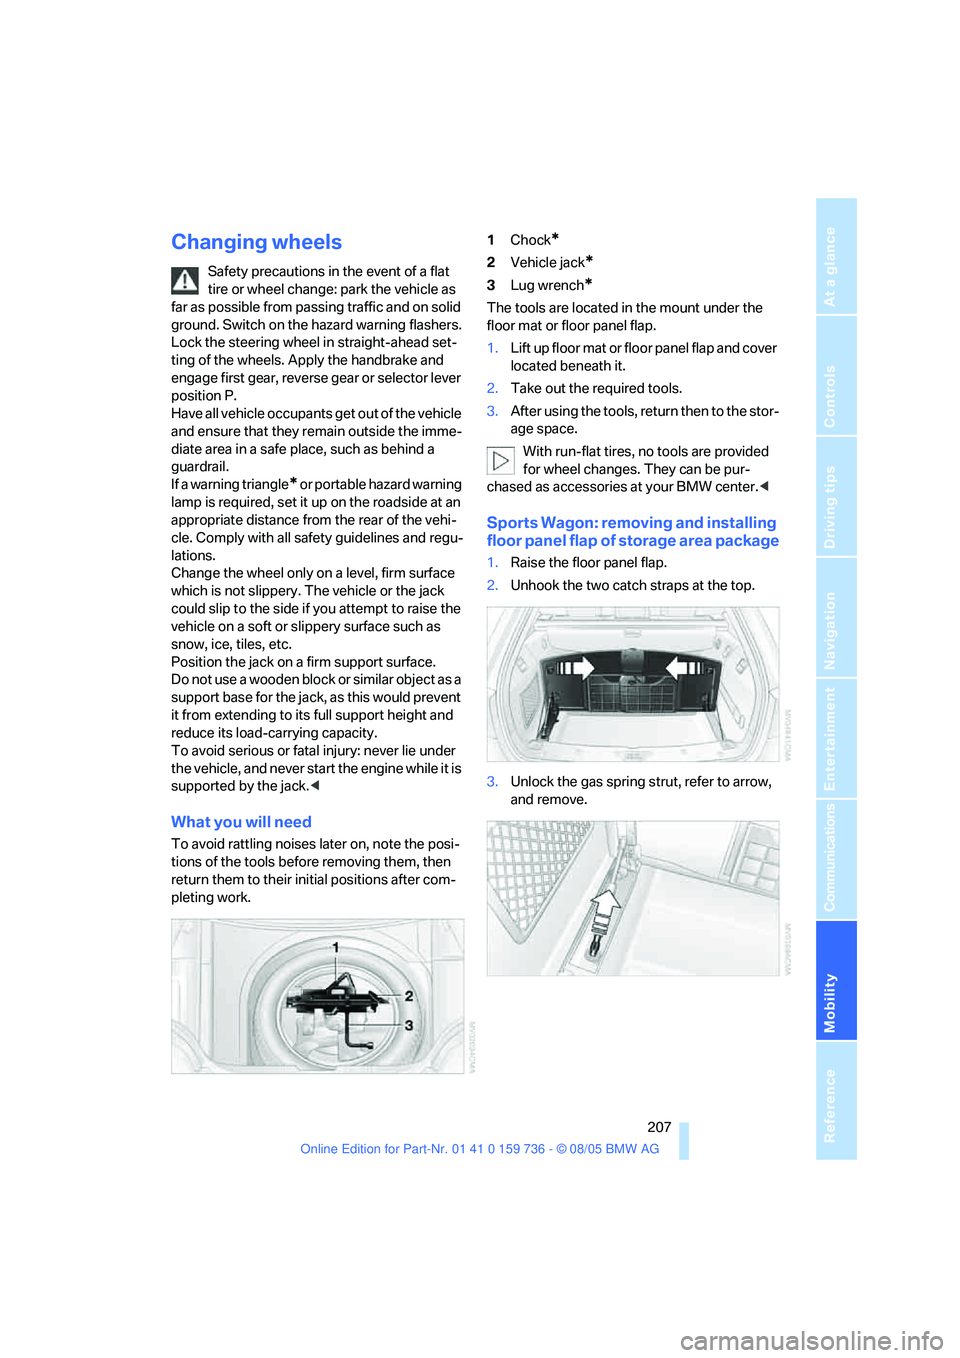
pleting work.1Chock
*
2Vehicle jack*
3Lug wrench*
The tools are located in the mount under the
floor mat or floor panel flap.
1.Lift up floor mat or floor panel flap and cover
located beneath it.
2.Take out the required tools.
3.After using the tools, return then to the stor-
age space.
With run-flat tires, no tools are provided
for wheel changes. They can be pur-
chased as accessories at your BMW center.<
Sports Wagon: removing and installing
floor panel flap of storage area package
1.Raise the floor panel flap.
2.Unhook the two catch straps at the top.
3.Unlock the gas spring strut, refer to arrow,
and remove.
Page 209 of 248
Replacing components
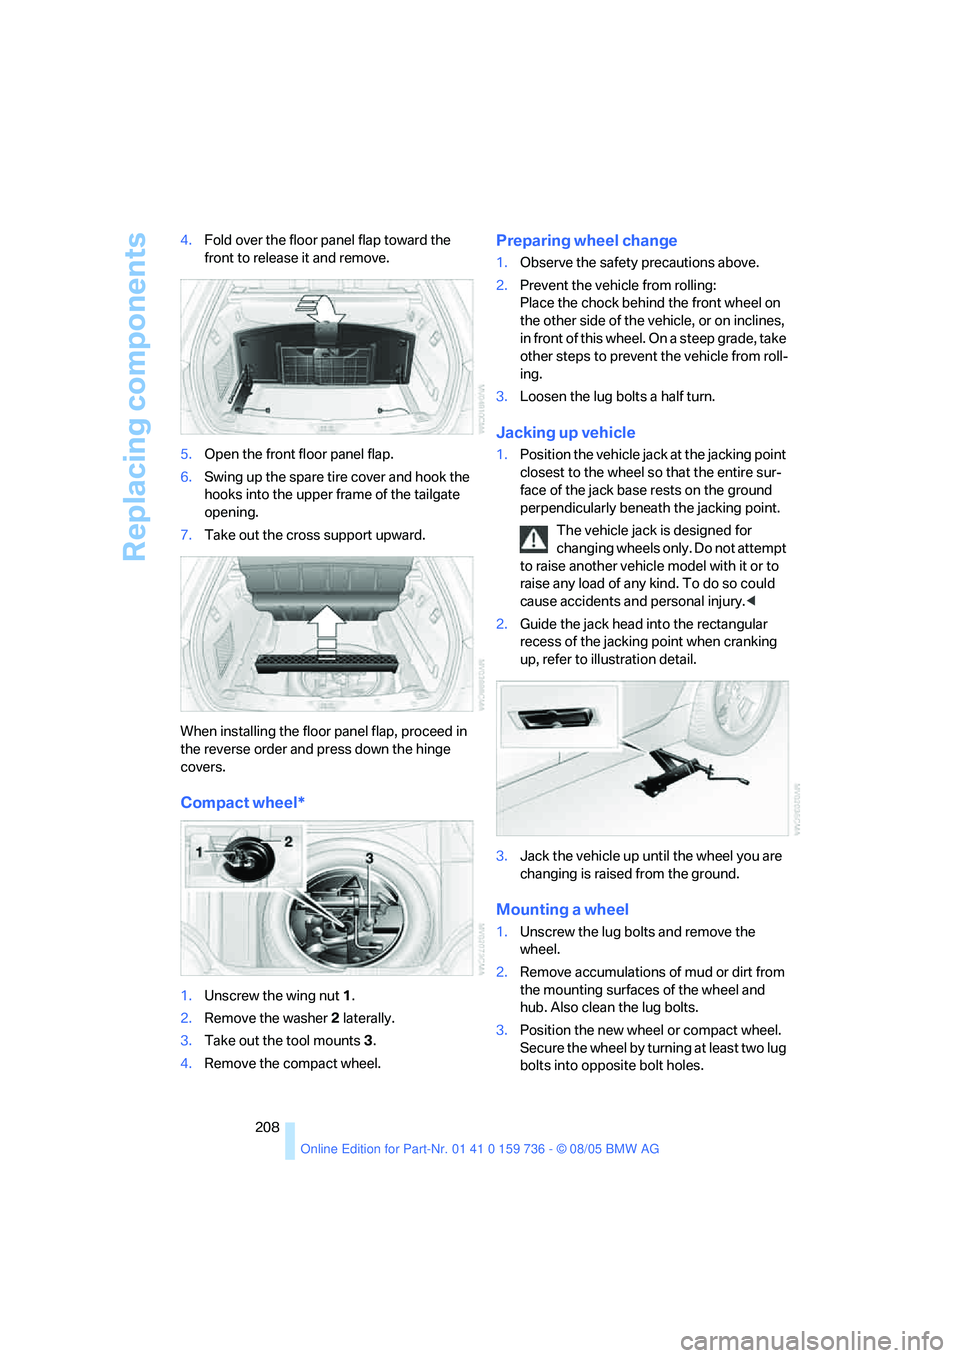
208 4.Fold over the floor panel flap toward the
front to release it and remove.
5.Open the front floor panel flap.
6.Swing up the spare tire cover and hook the
hooks into the upper frame of the tailgate
opening.
7.Take out the cross support upward.
When installing the floor panel flap, proceed in
the reverse order and press down the hinge
covers.
Compact wheel*
1.Unscrew the wing nut 1.
2.Remove the washer 2 laterally.
3.Take out the tool mounts 3.
4.Remove the compact wheel.
Preparing wheel change
1.Observe the safety precautions above.
2.Prevent the vehicle from rolling:
Place the chock behind the front wheel on
the other side of the vehicle, or on inclines,
in front of this wheel. On a steep grade, take
other steps to prevent the vehicle from roll-
ing.
3.Loosen the lug bolts a half turn.
Jacking up vehicle
1.Position the vehicle jack at the jacking point
closest to the wheel so that the entire sur-
face of the jack base rests on the ground
perpendicularly beneath the jacking point.
The vehicle jack is designed for
changing wheels only. Do not attempt
to raise another vehicle model with it or to
raise any load of any kind. To do so could
cause accidents and personal injury.<
2.Guide the jack head into the rectangular
recess of the jacking point when cranking
up, refer to illustration detail.
3.Jack the vehicle up until the wheel you are
changing is raised from the ground.
Mounting a wheel
1.Unscrew the lug bolts and remove the
wheel.
2.Remove accumulations of mud or dirt from
the mounting surfaces of the wheel and
hub. Also clean the lug bolts.
3.Position the new wheel or compact wheel.
Secure the wheel by turning at least two lug
bolts into opposite bolt holes.
Page 210 of 248
Mobility
209Reference
At a glance
Controls
Driving tips
Communications
Navigation
Entertainment
When you mount wheels other than Genu-
ine BMW light-alloy wheels, different lug
bolts may also be required.
4.Screw in the remaining lug bolts. Tighten all
the bolts securely in a diagonal pattern.
5.Lower the vehicle and remove the jack from
beneath the vehicle.
After mounting
1.Tighten the lug bolts in a diagonal pattern.
To ensure safety, always have the
lug bolts checked with a calibrated
torque wrench as soon as possible to
ensure that they are tightened to the speci-
fied torque. The tightening torque is
88.5 lb ft/120 Nm.<
2.When stowing the wheel and tools in the
vehicle, execute these steps in the reverse
order.
3.Check and correct the tire inflation pressure
at the earliest opportunity.
Protect valve stems and valve stem
seal caps against dirt and contamina-
tion. Dirt in valve stems is a frequent source
of gradual air loss.<
4.Initialize the Flat Tire Monitor, refer to
page88.
5.Replace the damaged tire as soon as possi-
ble and have the new wheel/tire balanced.
Driving with compact wheel
Drive reservedly and do not exceed a speed of
50 mph/80 km/h.
The driving characteristics change, for example
reduced track stability on braking, extended
braking distance, and altered self-steering
characteristics in the limit range. In conjunction
with winter tires, these characteristics are more
pronounced.
Only one compact wheel may be
mounted. You should re-equip with
wheels and tires of the original size as quickly as
possible.<
Vehicle battery
Battery care
The battery is 100 % maintenance-free, i.e., the
electrolyte will last for the life of the battery
when the vehicle is operated in a temperate cli-
mate. Your BMW center will be glad to advise in
all matters concerning the battery.
Charging battery
Only charge the battery in the vehicle via the
terminals in the engine compartment with the
engine off. Connections, refer to Jump starting
on page212.
Disposal
Have old batteries disposed of by your
BMW center or hand them in to a recy-
cling center. Maintain the battery in an upright
position for transport and storage. Always
restrain the battery to prevent it from tipping
over during transport.<
Power failure
After a temporary power loss, the functioning of
some equipment may be limited and require
reinitialization. Individual settings are also lost
and must be updated:
>Seat, mirror and steering wheel memory
The positions must be stored again, refer to
page45.
>Time and Date
The values must be updated, refer to
page80.
>Radio
Stations must be stored again if necessary,
refer to page150.
>Navigation system
Wait until the system starts, refer to
page141.
Page 231 of 248

Everything from A to Z
230 CBS Condition Based
Service201
"CD"144,157
CD changer157
– controls144
– fast forward/reverse161
– installation location161
– playing a track159
– random order160
– repeating a track160
– selecting a CD157
– selecting a track158
– switching on/off144
– tone control145
– volume145
CD player157
– controls144
– fast forward/reverse161
– playing a track159
– random order160
– repeating a track160
– selecting a track158
– switching on/off144
– tone control145
– volume145
Center armrest
– front106
– rear109
Center brake lamp206
Center console14
"Central locking"30
Central locking system29
– comfort access37
– from inside vehicle32
Changes, technical
– refer to For your own
safety5
– refer to Parts and
accessories6
Changing settings on Control
Display80
Changing the language on the
Control Display82
Changing units of measure on
Control Display81
Changing wheels194,207
CHECK button78
Check Control77"Check Control
messages"78
Check Gas Cap187
Checking the air pressure,
refer to Tire inflation
pressure188
Child-restraint fixing system
LATCH
54
Child restraints52
Child-restraint systems52
Child-safety lock55
Child seats52
Chime, refer to Check
Control77
Chock207
Chrome parts, care, refer to
Caring for your vehicle
brochure
Cigarette lighter108
Cleaning, refer to Caring for
your vehicle brochure
"Climate"48,99
Clock72
– 12h/24h mode81
– setting time and date80
Closing
– from inside32
– from outside30
Closing fuel filler cap187
Clothes hooks107
Cockpit10
Cold start, refer to Starting
engine57
"Comfort", active backrest
width adjustment45
Comfort access37
– observe in car wash39
– replacing battery39
Comfort area, refer to All
about the center console14
Comfort operation
– windows with comfort
access38
– with comfort access38
Comfort seat44
"Communication"170,181
"Communication
settings"180Compact Disc
– refer to CD changer157
– refer to CD player157
Compact wheel
– inflation pressure189
– wheel change208
Compartment for remote
control, refer to Ignition
lock56
Compartments, refer to
Storage compartments107
Compressed audio files157
Computer73
– displays on Control
Display74
– hour signal81
"Concert hall", refer to Tone
control146
Condition Based Service
CBS201
"Confirmation"
31
Connecting car vacuum
cleaner, refer to Connecting
electrical devices108
Consumption, refer to
Average consumption73
Consumption indicator,
Energy Control73
Consumption statistics, refer
to Average fuel
consumption73
"Continue guidance to
destination?"137
Control Center, refer to
iDrive16
Control Display, refer to
iDrive16
– setting brightness81
Controller, refer to iDrive16
Controls, refer to Cockpit10
Convenience operation
– glass sunroof30
– windows30
Convenience start, refer to
Starting engine57
Coolant199
– checking level199
– temperature72
Cooling, maximum100
Page 234 of 248

Reference 233
At a glance
Controls
Driving tips
Communications
Navigation
Entertainment
Mobility
ESP Electronic Stability
Program, refer to DSC
Dynamic Stability
Control84
Event Data Recorders202
Exhaust system, refer to Hot
exhaust system116
Exterior mirrors49
– automatic dimming
feature117
– automatic heating49
– folding in and out49
– tilting down passenger-side
exterior mirror50
Eye for tow-starting and
towing, refer to Tow
fitting213
F
"Fader", refer to Tone
control146
Fader, refer to Tone
control146
Failure messages, refer to
Check Control77
False alarm, refer to Avoiding
unintentional alarms37
Fastening safety belts, refer to
Safety belts47
– warning lamp47
Fastest route for
navigation134
"Fast route" for
navigation135
"Favorites" calling up with
radio151
First aid, refer to First-aid
kit212
First-aid kit212
Flashing during locking/
unlocking, refer to Setting
confirmation signals31
Flashlight, refer to
Rechargeable flashlight106Flat tire
– changing wheels207
– compact wheel208
– Flat Tire Monitor87,88
– run-flat tires88,194
Flat Tire Monitor87
– false alarms88
– initializing system88
– limits of system88
– show chains195
– warning lamp88
Flat tires, refer to Tire
condition193
"FM", reception
range144,148
FM, waveband148
Fog lamps97
– indicator lamp13,97
Folding rear seat
back109,111
Footbrake, refer to Braking
safely117
Footwell lamps97
For specified oil grades, refer
to Approved engine oils198
Forward, fast
– CD changer161
– CD player161
For your own safety5
4-wheel drive system, refer to
xDrive85
Freeway, refer to Route
criteria135
Front airbags90
Front armrest, refer to Center
armrest, front106
Front passenger airbags,
deactivating90
Front seat adjustment44
"FTM"88
FTM, refer to Flat Tire
Monitor87
Fuel187
– capacity222
– display73
– high-quality brands187
– quality187
– specifications187Fuel clock, refer to Fuel
gauge73
Fuel consumption display,
computer, average fuel
consumption73
Fuel display, refer to Fuel
gauge73
Fuel filler door186
– releasing in the event of
electrical malfunction186
Fuses210
G
Garage door opener, refer to
Integrated universal remote
control104
Gasoline, refer to Required
fuel187
Gasoline display, refer to Fuel
gauge73
Gear changes
– automatic transmission with
Steptronic61
– SMG Sequential Manual
Gearbox60
Gear display
– automatic transmission with
Steptronic61
– SMG Sequential Manual
Gearbox59
Gearshift lever, manual
transmission58
Gearshift lever positions,
manual transmission58
General driving notes116
Glass sunroof, electric40
– auto-remote operation from
outside32
– comfort operation with
comfort access38
– moving manually41
– remote control30
Glove compartment105
– lighting105
– rechargeable flashlight106
GPS navigation, refer to
Navigation system124
Page 236 of 248
Reference 235
At a glance
Controls
Driving tips
Communications
Navigation
Entertainment
Mobility
Indicator/warning lamps
– active steering89
– airbags91
– brake fluid199
– brake pads200
– DSC13,85
– DTC13,85
– Flat Tire Monitor88
– fog lamps13
– safety belt warning47
Indicator and warning
lamps13
Individual air distribution100
Individually programmable
buttons on steering
wheel51
Individual settings, refer to
Personal Profile29
Inflation pressure, refer to Tire
inflation pressure188
Inflation pressure monitoring,
refer to Flat Tire Monitor87
Information
– on another location130
– on country130
– on current position130
– on destination location130
"Information" for
navigation131
"Information on
destination"132
"Initializing..."88
Initializing
– Flat Tire Monitor88
– radio, refer to Storing
stations150
– refer to Power failure209
– refer to Setting time and
date80
– seat, mirror and steering
wheel memory45
"Input map"130
Installation location
– CD changer161
– mobile phone106
– navigation drive124
Instructions for navigation
system, refer to Voice
instructions139Instrument cluster12
Instrument illumination, refer
to Instrument lighting97
Instrument lighting97
Instrument panel, refer to
Cockpit10
Instrument panel, refer to
Instrument cluster12
Integrated key28
Integrated universal remote
control
104
Interesting destination for
navigation130
"Interim time"80
Interior lamps97
– switching on with remote
control31
Interior motion sensor37
– switching off37
Interior rearview mirror50
– automatic dimming
feature117
Interlock on automatic
transmission61
Intermittent mode of the
wipers63
J
Jacking points208
Joystick, refer to iDrive16
Jumpering, refer to Jump
starting212
Jump starting212
K
Keyless-Go, refer to Comfort
access37
Keyless opening and closing,
refer to Comfort access37
Key Memory, refer to Personal
Profile29
"Keypad"174
Keys28
– key-related settings, refer to
Personal Profile29Kick-down
– automatic transmission with
Steptronic61
– SMG Sequential Manual
Gearbox60
Knock control187
L
Lamps, refer to Parking lamps/
low beams94
Lamps and bulbs203
"Languages"82
"Languages" for
navigation139
Lashing eyes, refer to
Securing cargo120
Last destinations, refer to
Destination list131
"Last seat pos."46
LATCH child-restraint fixing
system54
Length, refer to
Dimensions219
License plate lamp, replacing
bulbs206
Light-emitting diodes
LEDs206
Lighter108
Lighter socket108
"Lighting"63,94
Lighting
– instruments97
– of the vehicle, refer to
Lamps94
– refer to High-beam
assistant95
Light switch94
"Limit"79
Loading
– securing cargo120
– stowing cargo119
– vehicle118
"Lock after driving off"33
Lock buttons in the doors,
refer to Locking33