2006 BMW 525XI change wheel
[x] Cancel search: change wheelPage 90 of 248
Controls
89Reference
At a glance
Driving tips
Communications
Navigation
Entertainment
Mobility
may not have been initialized. The system
must then be initialized.<
3.In the event of complete tire pressure loss,
0 psi/0 kPa, you can estimate the possible
distance for continued driving on the basis
of the following guide values:
>With a light load:
1 to 2 persons without luggage:
approx. 155 miles/250 km
>With a medium load:
2 persons, luggage compartment or
cargo area full, or 4 persons without
luggage:
approx. 94 miles/150 km
>With a full load:
from 4 persons, luggage compartment
or cargo area full:
approx. 30 miles/50 km
Drive reservedly and do not exceed a
speed of 50 mph/80 km/h. In the event of
pressure loss, vehicle handling changes. This
includes reduced tracking stability in braking,
extended braking distance and altered natural
steering characteristics.
If unusual vibrations or loud noises occur while
the vehicle is being driven, this can indicate final
failure of the damaged tire. Reduce speed and
stop at a suitable location as soon as possible,
otherwise pieces of the tire could become
detached and cause an accident. Do not con-
tinue driving, but instead contact your BMW
center.<
Active steering*
The concept
The active steering is a system that actively var-
ies the steering angle of the front wheels in rela-
tion to the steering wheel movements.
When you are driving in the low road speed
range, e. g. in a town or when parking, the steer-
ing angle increases, i.e. the steering becomes
very direct. In the higher speed range, on the
other hand, the steering angle is reduced more
and more. This improves the handling capability
of your BMW over the entire speed range.In critical situations, the system can make tar-
geted corrections to the steering angle pro-
vided by the driver and thus stabilize the vehicle
before the driver intervenes. This stabilizing
intervention is simultaneously deactivated
when DSC is switched off, refer to page85.
Malfunction
The warning lamp lights up and a mes-
sage appears on the Control Display.
The active steering is no longer opera-
tional. At low speeds, greater steering wheel
movements are required, whereas at higher
speeds, the vehicle reacts more sensitively to
steering wheel movements. The stability-
promoting intervention can also be deactivated.
Proceed cautiously and drive defensively. Have
the system checked.
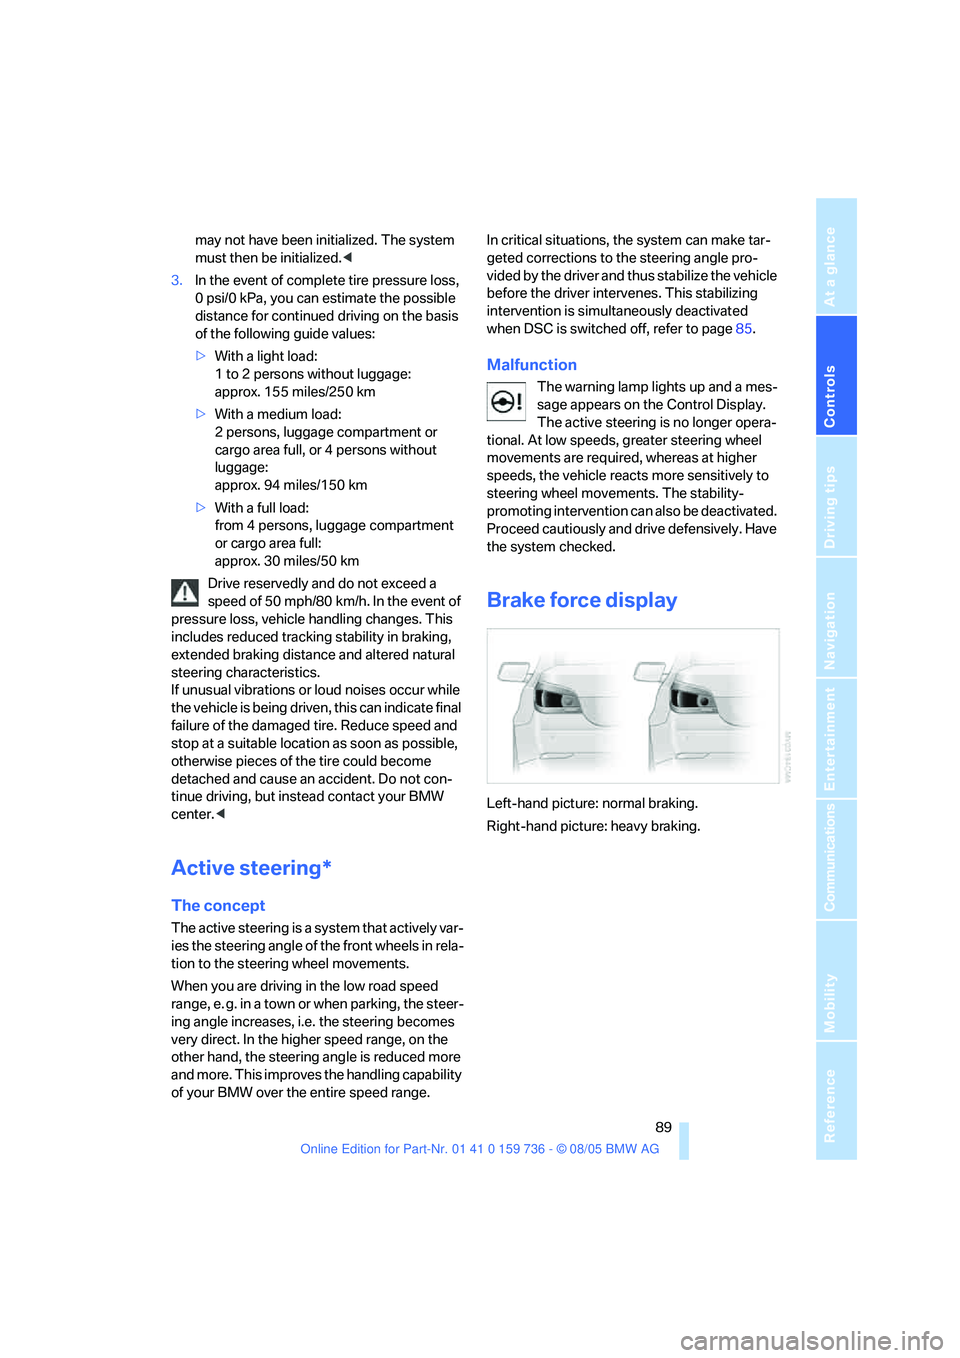
Brake force display
Left-hand picture: normal braking.
Right-hand picture: heavy braking.
Page 94 of 248
Controls
93Reference
At a glance
Driving tips
Communications
Navigation
Entertainment
Mobility
Setting brightness
The brightness of the display is automatically
adapted to the ambient lighting conditions.
However, you can change the base setting.
With the low beams switched on, the brightness
can also be adjusted with the knurled wheel of
the instrument lighting.
iDrive, for principle details, refer to page16.
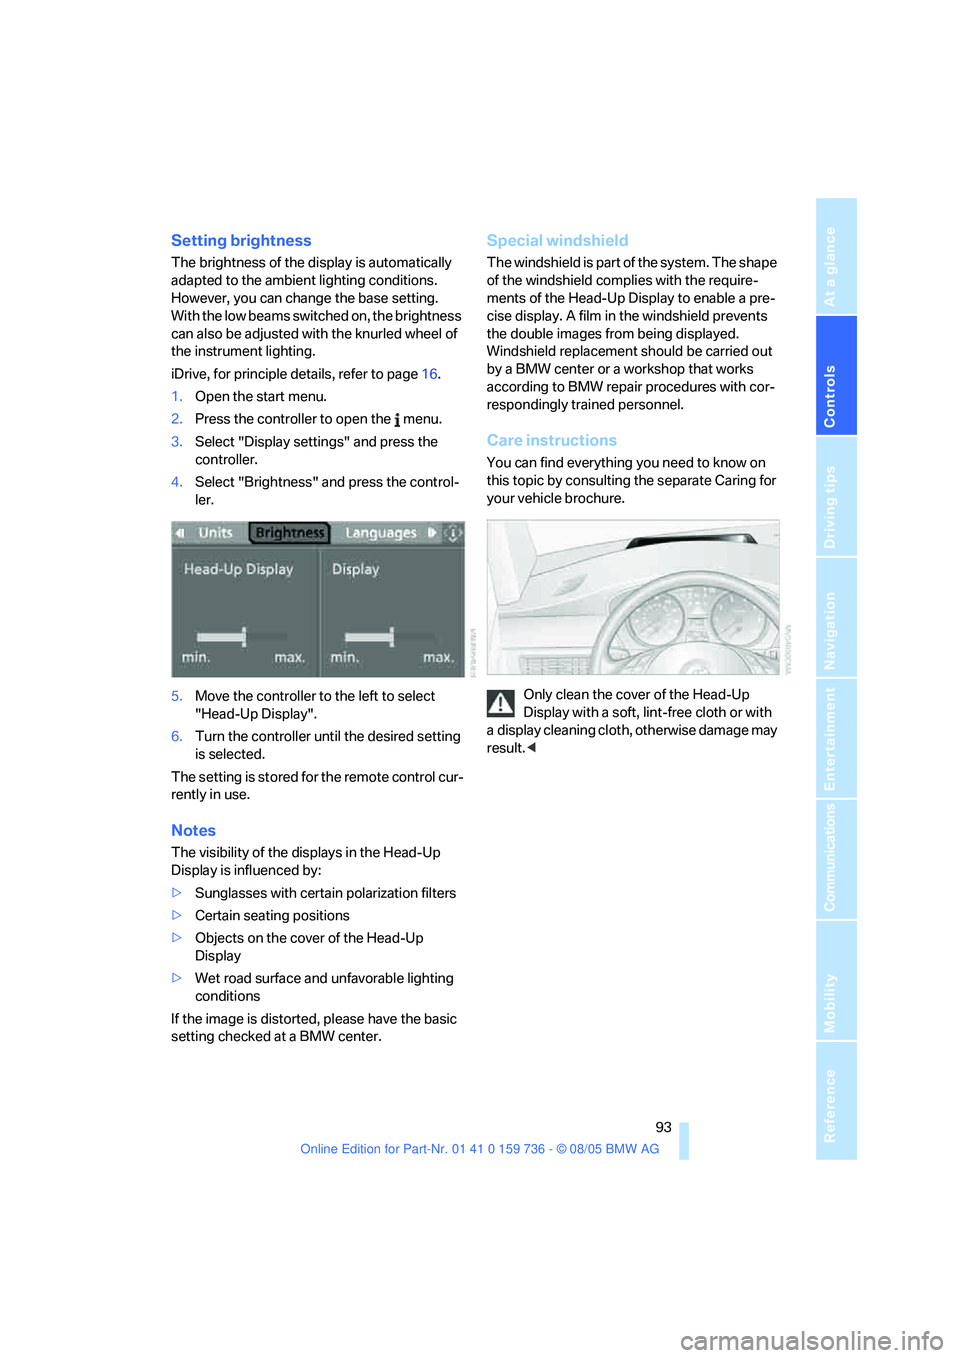
1.Open the start menu.
2.Press the controller to open the menu.
3.Select "Display settings" and press the
controller.
4.Select "Brightness" and press the control-
ler.
5.Move the controller to the left to select
"Head-Up Display".
6.Turn the controller until the desired setting
is selected.
The setting is stored for the remote control cur-
rently in use.
Notes
The visibility of the displays in the Head-Up
Display is influenced by:
>Sunglasses with certain polarization filters
>Certain seating positions
>Objects on the cover of the Head-Up
Display
>Wet road surface and unfavorable lighting
conditions
If the image is distorted, please have the basic
setting checked at a BMW center.
Special windshield
The windshield is part of the system. The shape
of the windshield complies with the require-
ments of the Head-Up Display to enable a pre-
cise display. A film in the windshield prevents
the double images from being displayed.
Windshield replacement should be carried out
by a BMW center or a workshop that works
according to BMW repair procedures with cor-
respondingly trained personnel.
Care instructions
You can find everything you need to know on
this topic by consulting the separate Caring for
your vehicle brochure.
Only clean the cover of the Head-Up
Display with a soft, lint-free cloth or with
a display cleaning cloth, otherwise damage may
result.<
Page 102 of 248

Controls
101Reference
At a glance
Driving tips
Communications
Navigation
Entertainment
Mobility
body. Therefore, open these vents for maxi-
mum cooling.
AUC Automatic recirculated-air
control/recirculated-air mode
You can respond to pollutants or
unpleasant odors in the immediate
environment by suspending the
supply of outside air. The system then recircu-
lates the air currently within the vehicle. During
AUC operation, a sensor detects pollutants in
the outside air and controls the shut-off auto-
matically.
By pressing the button repeatedly, you can
request three operating modes:
>LED off: outside air flows in continuously.
>Right LED on, AUC mode: the system
detects pollutants in the outside air and
shuts off the supply as needed.
>Left LED on, recirculated-air mode: the
supply of outside air is permanently shut off.
If condensation starts to form on the
inside window surfaces during operation
in the recirculated-air mode, you should switch
it off while also increasing the air volume as
required.
The recirculated-air mode should not be used
over an extended period of time, as the air qual-
ity inside the vehicle deteriorates continu-
ously.<
Residual heat
The heat stored in the engine is
used to heat the passenger com-
partment, e.g. while stopped at a
school to pick up a child.
The function can be switched on when the fol-
lowing conditions are met:
>up to 15 minutes after switching off the
engine
>with engine at operating temperature
>with sufficient battery voltage
>at an outside temperature below 777/
256The LED lights up when the function is
switched on.
From radio readiness the interior temperature,
the air volume and the air distribution can be
set.
Switching off automatic climate control
The air volume, the heater and the
cooling function are all switched
off.
You can restart the automatic
climate control by pressing any of its buttons
except the REST button.
Front ventilation
1Knurled wheels to smoothly open and close
air vents
2Levers to change the air vent direction
Do not drop any foreign objects into the
vent outlets, otherwise these could be
catapulted outwards and lead to injuries.<
Ventilation for cooling
Adjust the vent outlets to direct the flow of cool
air in your direction, for instance, if the interior
has become too warm, etc.
Draft-free ventilation
Set the vent outlets so that the air flows past
you and is not directed straight at you.
Page 103 of 248
Climate
102
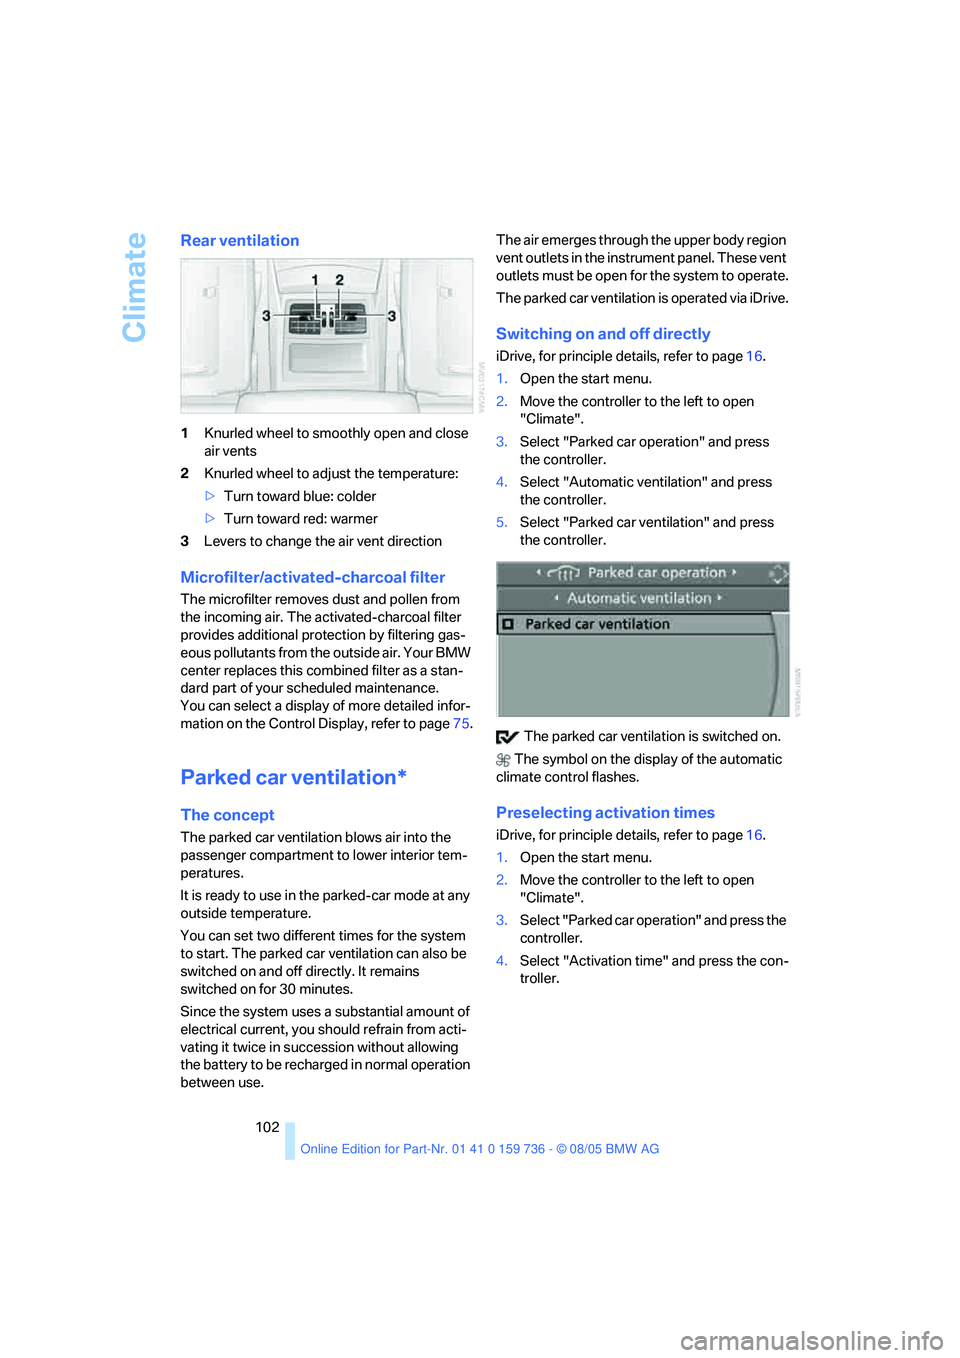
Rear ventilation
1Knurled wheel to smoothly open and close
air vents
2Knurled wheel to adjust the temperature:
>Turn toward blue: colder
>Turn toward red: warmer
3Levers to change the air vent direction
Microfilter/activated-charcoal filter
The microfilter removes dust and pollen from
the incoming air. The activated-charcoal filter
provides additional protection by filtering gas-
eous pollutants from the outside air. Your BMW
center replaces this combined filter as a stan-
dard part of your scheduled maintenance.
You can select a display of more detailed infor-
mation on the Control Display, refer to page75.
Parked car ventilation*
The concept
The parked car ventilation blows air into the
passenger compartment to lower interior tem-
peratures.
It is ready to use in the parked-car mode at any
outside temperature.
You can set two different times for the system
to start. The parked car ventilation can also be
switched on and off directly. It remains
switched on for 30 minutes.
Since the system uses a substantial amount of
electrical current, you should refrain from acti-
vating it twice in succession without allowing
the battery to be recharged in normal operation
between use.The air emerges through the upper body region
vent outlets in the instrument panel. These vent
outlets must be open for the system to operate.
The parked car ventilation is operated via iDrive.
Switching on and off directly
iDrive, for principle details, refer to page16.
1.Open the start menu.
2.Move the controller to the left to open
"Climate".
3.Select "Parked car operation" and press
the controller.
4.Select "Automatic ventilation" and press
the controller.
5.Select "Parked car ventilation" and press
the controller.
The parked car ventilation is switched on.
The symbol on the display of the automatic
climate control flashes.
Preselecting activation times
iDrive, for principle details, refer to page16.
1.Open the start menu.
2.Move the controller to the left to open
"Climate".
3.Select "Parked car operation" and press the
controller.
4.Select "Activation time" and press the con-
troller.
Page 129 of 248
Destination entry
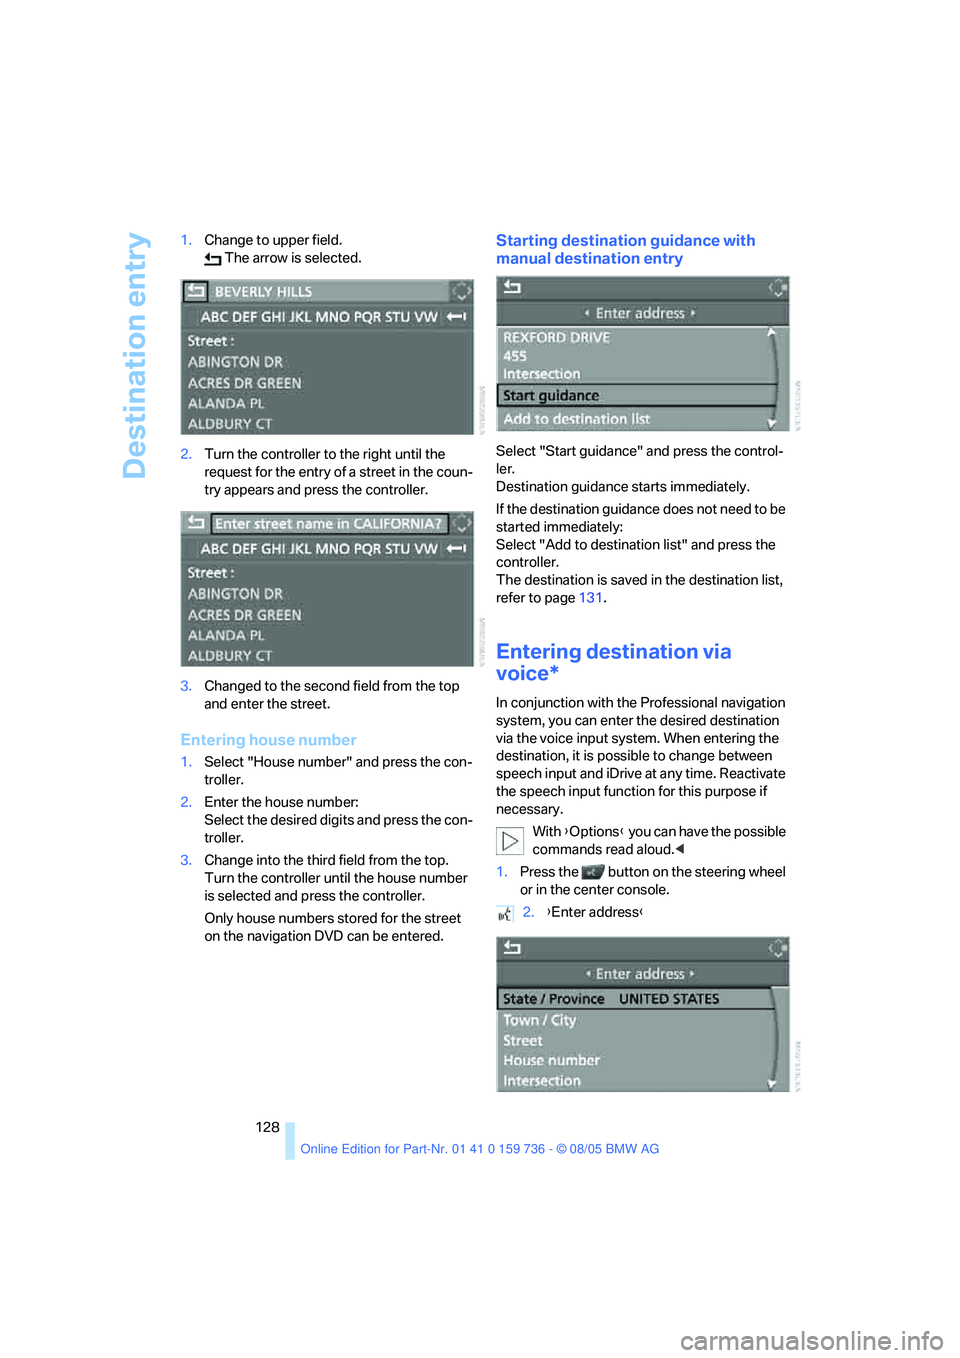
128 1.Change to upper field.
The arrow is selected.
2.Turn the controller to the right until the
request for the entry of a street in the coun-
try appears and press the controller.
3.Changed to the second field from the top
and enter the street.
Entering house number
1.Select "House number" and press the con-
troller.
2.Enter the house number:
Select the desired digits and press the con-
troller.
3.Change into the third field from the top.
Turn the controller until the house number
is selected and press the controller.
Only house numbers stored for the street
on the navigation DVD can be entered.
Starting destination guidance with
manual destination entry
Select "Start guidance" and press the control-
ler.
Destination guidance starts immediately.
If the destination guidance does not need to be
started immediately:
Select "Add to destination list" and press the
controller.
The destination is saved in the destination list,
refer to page131.
Entering destination via
voice*
In conjunction with the Professional navigation
system, you can enter the desired destination
via the voice input system. When entering the
destination, it is possible to change between
speech input and iDrive at any time. Reactivate
the speech input function for this purpose if
necessary.
With {Options} you can have the possible
commands read aloud.<
1.Press the button on the steering wheel
or in the center console.
2.{Enter address}
Page 140 of 248
Navigation
Driving tips
139Reference
At a glance
Controls
Communications
Entertainment
Mobility
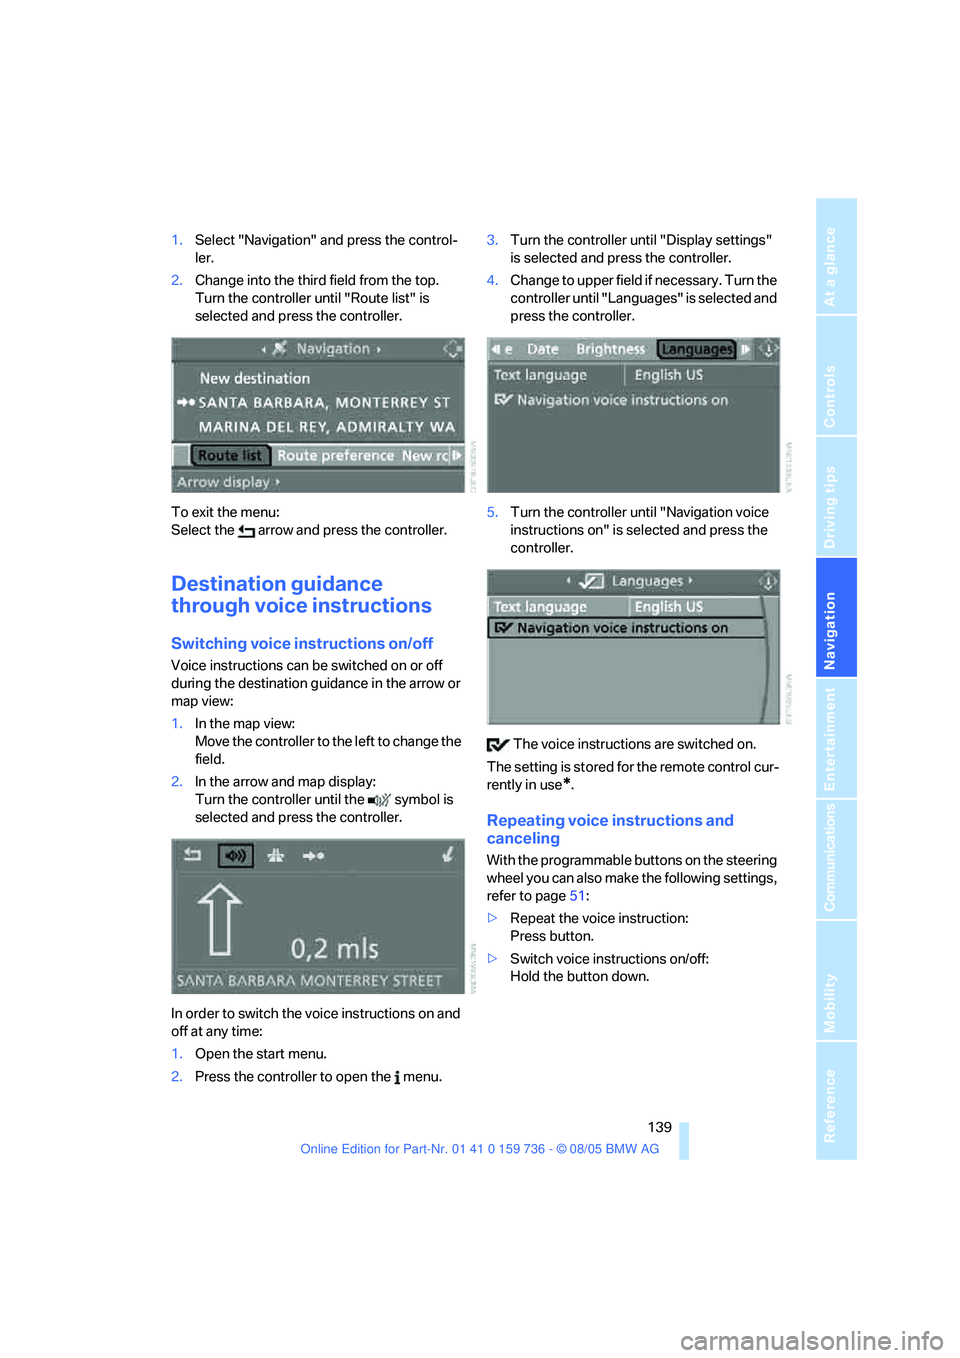
1.Select "Navigation" and press the control-
ler.
2.Change into the third field from the top.
Turn the controller until "Route list" is
selected and press the controller.
To exit the menu:
Select the arrow and press the controller.
Destination guidance
through voice instructions
Switching voice instructions on/off
Voice instructions can be switched on or off
during the destination guidance in the arrow or
map view:
1.In the map view:
Move the controller to the left to change the
field.
2.In the arrow and map display:
Turn the controller until the symbol is
selected and press the controller.
In order to switch the voice instructions on and
off at any time:
1.Open the start menu.
2.Press the controller to open the menu.3.Turn the controller until "Display settings"
is selected and press the controller.
4.Change to upper field if necessary. Turn the
controller until "Languages" is selected and
press the controller.
5.Turn the controller until "Navigation voice
instructions on" is selected and press the
controller.
The voice instructions are switched on.
The setting is stored for the remote control cur-
rently in use
*.
Repeating voice instructions and
canceling
With the programmable buttons on the steering
wheel you can also make the following settings,
refer to page51:
>Repeat the voice instruction:
Press button.
>Switch voice instructions on/off:
Hold the button down.
Page 145 of 248

On/off and tone
144
On/off and tone
The following audio sources have shared
controls and setting options:
>Professional radio
* or
Business radio
>CD player
>CD changer
*
Controls
The audio sources can be operated using:
>Buttons in the area of the CD player
>iDrive
>Buttons on steering wheel, refer to page11
Buttons in area of CD player
The layout of the buttons can vary depending
on your vehicle's equipment.
Equipment with a single drive:
Equipment with two drives:1Entertainment sound output on/off, volume
>Press: switch on/off.
When you switch on, the last set radio
station or CD track is played.
>Turn: adjust volume.
2Drive for audio CDs
3 Eject CD
4 Station scan/track search
>Change radio station.
>Select track for CD player and
CD changer.
5Drive for navigation DVDs
Operation via iDrive
iDrive, for principle details, refer to page16.
1.Press the button.
This opens the start menu.
2.Move the controller backwards to open
"Entertainment".
You have the following choices:
>"FM" and "AM": radio reception
>"WB": Weather Band station
>"SAT": satellite radio
>"CD": CD player or CD changer
>"Set": depending on the audio source,
other adjustments can be made, e.g. with
the radio: update station with strongest
reception, save station, tone control,
sample stations.
Page 150 of 248
Navigation
Entertainment
Driving tips
149Reference
At a glance
Controls
Communications
Mobility
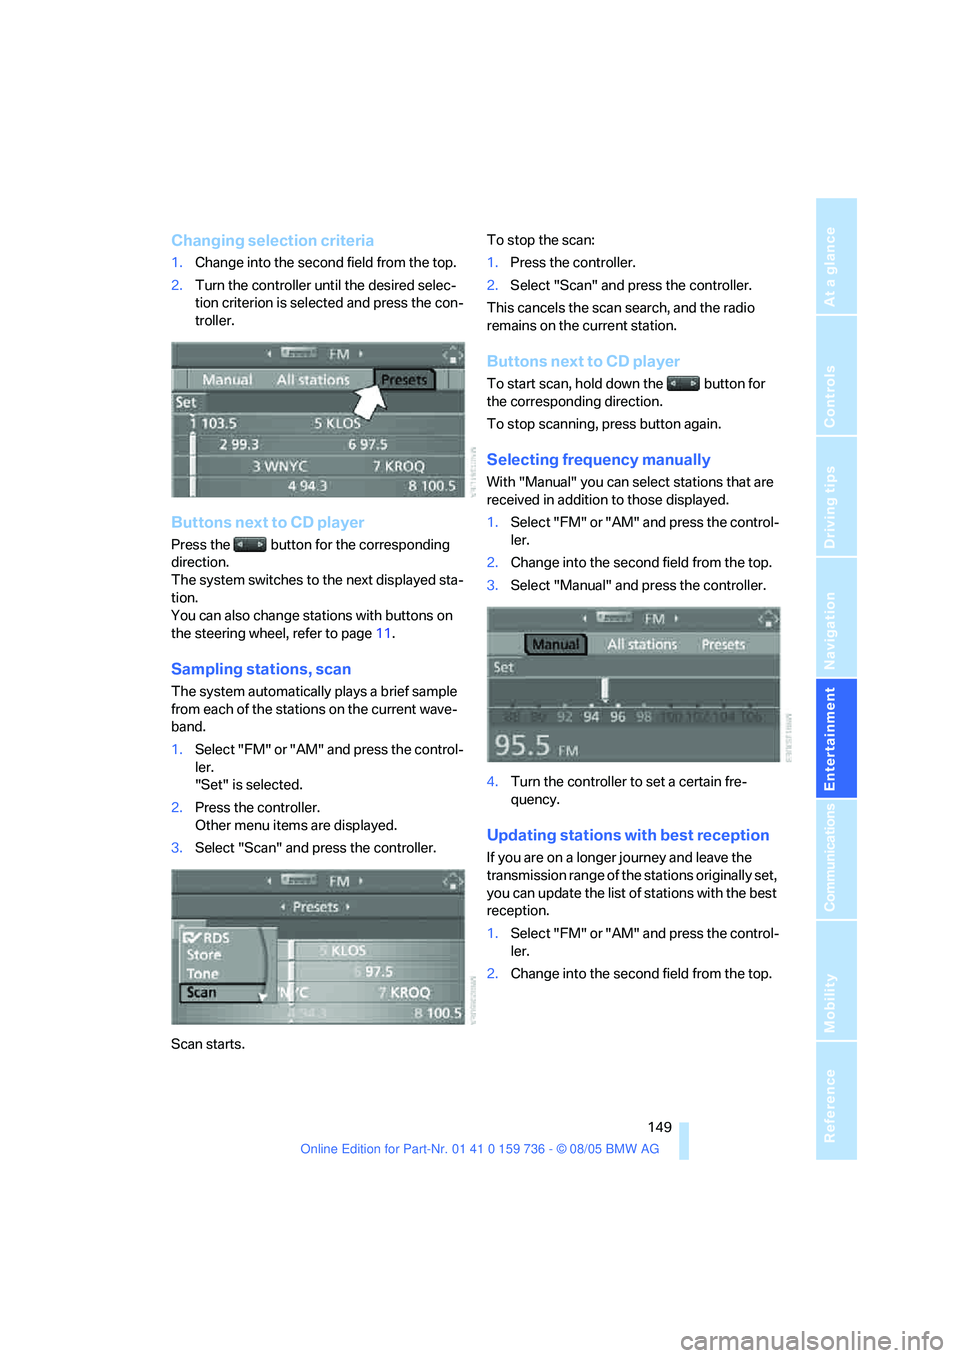
Changing selection criteria
1.Change into the second field from the top.
2.Turn the controller until the desired selec-
tion criterion is selected and press the con-
troller.
Buttons next to CD player
Press the button for the corresponding
direction.
The system switches to the next displayed sta-
tion.
You can also change stations with buttons on
the steering wheel, refer to page11.
Sampling stations, scan
The system automatically plays a brief sample
from each of the stations on the current wave-
band.
1.Select "FM" or "AM" and press the control-
ler.
"Set" is selected.
2.Press the controller.
Other menu items are displayed.
3.Select "Scan" and press the controller.
Scan starts.To stop the scan:
1.Press the controller.
2.Select "Scan" and press the controller.
This cancels the scan search, and the radio
remains on the current station.
Buttons next to CD player
To start scan, hold down the button for
the corresponding direction.
To stop scanning, press button again.
Selecting frequency manually
With "Manual" you can select stations that are
received in addition to those displayed.
1.Select "FM" or "AM" and press the control-
ler.
2.Change into the second field from the top.
3.Select "Manual" and press the controller.
4.Turn the controller to set a certain fre-
quency.
Updating stations with best reception
If you are on a longer journey and leave the
transmission range of the stations originally set,
you can update the list of stations with the best
reception.
1.Select "FM" or "AM" and press the control-
ler.
2.Change into the second field from the top.