2006 BMW 525I SEDAN phone
[x] Cancel search: phonePage 31 of 259

Controls
29Reference
At a glance
Driving tips
Communications
Navigation
Entertainment
Mobility
Remove the adapter from the holder in the
glove compartment and slide the spare key into
the adapter before use.
Personal Profile
The concept
You can set a number of functions of your BMW
individually according to your preferences. Per-
sonal Profile ensures that most of these set-
tings are stored for the remote control currently
in use without you having to do anything. When
the vehicle is unlocked, the corresponding
remote control is detected and the settings
stored for it are called up and carried out.
This means that you will always find your BMW
set to your own personal settings even if
another person with his/her own remote control
and settings has used the vehicle since the last
time you drove it. The individual settings are
stored for a maximum of four remote controls.
Personal Profile settings
Details on the settings are provided on the
specified pages.
>When unlocking with the remote control,
either unlock only the driver's door or the
entire vehicle, refer to page30
>Locking the vehicle after a short time or
after starting off, refer to page32
>Assigning the programmable buttons
* on
the steering wheel, refer to page53>Settings for the display on the Control Dis-
play:
>Brightness of the Control Display, refer
to page83
>Measuring units for consumption, route/
distances, temperature, and pressure,
refer to page84
>Language on Control Display, refer to
page84
>12h/24h mode of the clock, refer to
page83
>Date format, refer to page83
>Showing optical warning for PDC Park Dis-
tance Control
*, refer to page85
>Selection and brightness of display in
Head-Up Display
*, refer to page97
>Display settings of BMW Night Vision
*,
refer to page99
>Air distribution, temperature in the upper
body area and intensity of the automatic air
conditioning system, refer to page106
>Setting voice instructions for destination
guidance in the navigation system
*, refer to
page147
In addition, the following, most recently
selected settings are recalled during unlocking:
>Positions of driver's seat, outside mirrors,
and steering wheel
*, refer to page47
>Audio sources, volume and tone settings,
refer to page153
>Radio, displaying stored stations, refer to
page156
>Telephone, setting volume, refer to
pages178,184
Central locking system
The concept
The central locking system is ready for opera-
tion whenever the driver's door is closed.
The system simultaneously engages and
releases the locks on the following:
>Doors
Page 55 of 259
Controls
53Reference
At a glance
Driving tips
Communications
Navigation
Entertainment
Mobility
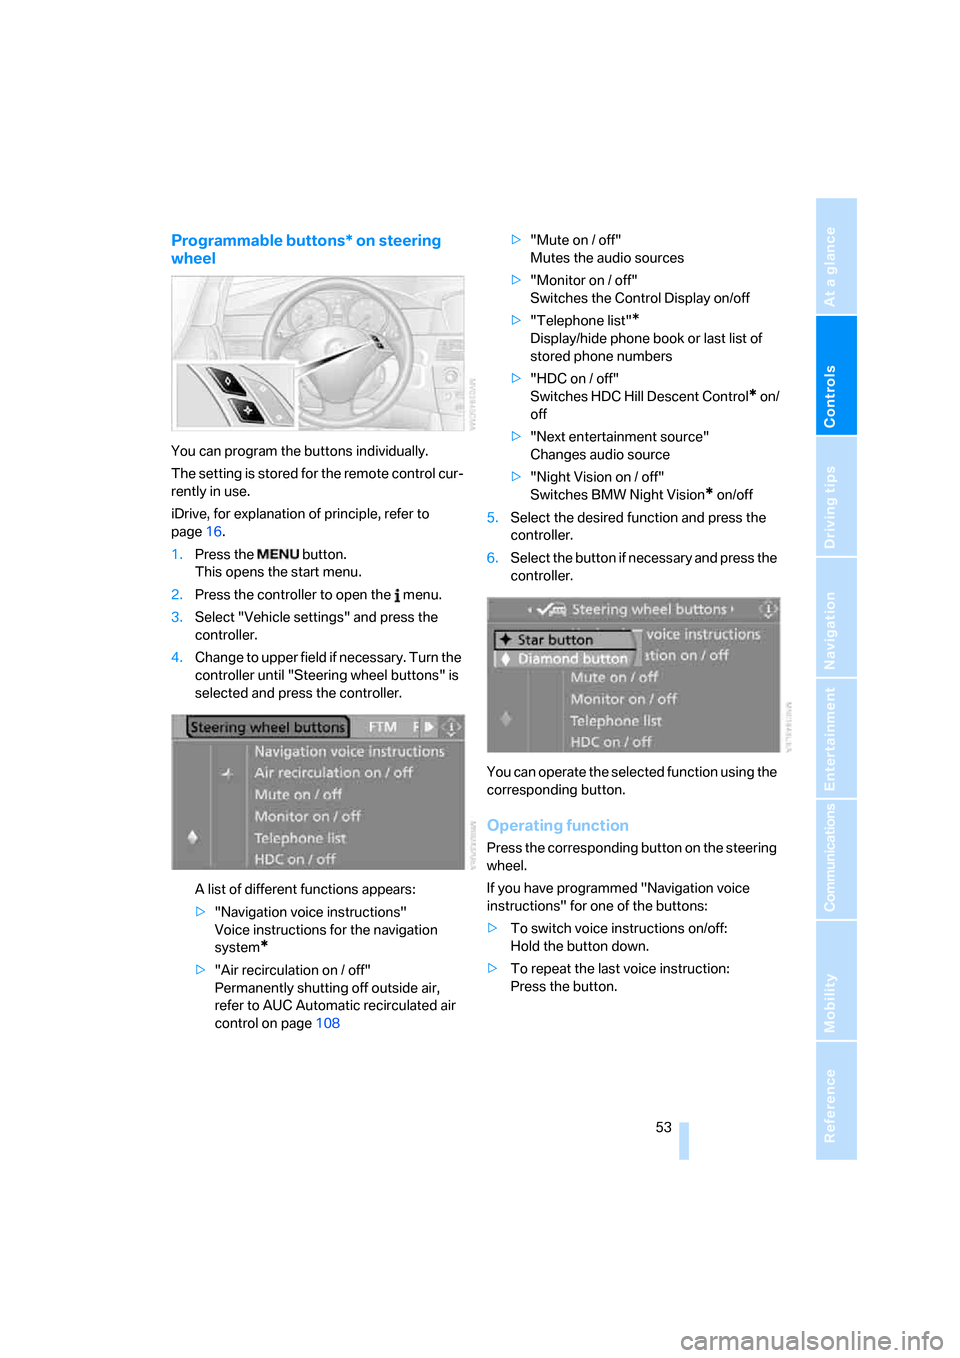
Programmable buttons* on steering
wheel
You can program the buttons individually.
The setting is stored for the remote control cur-
rently in use.
iDrive, for explanation of principle, refer to
page16.
1.Press the button.
This opens the start menu.
2.Press the controller to open the menu.
3.Select "Vehicle settings" and press the
controller.
4.Change to upper field if necessary. Turn the
controller until "Steering wheel buttons" is
selected and press the controller.
A list of different functions appears:
>"Navigation voice instructions"
Voice instructions for the navigation
system
*
>"Air recirculation on / off"
Permanently shutting off outside air,
refer to AUC Automatic recirculated air
control on page108>"Mute on / off"
Mutes the audio sources
>"Monitor on / off"
Switches the Control Display on/off
>"Telephone list"
*
Display/hide phone book or last list of
stored phone numbers
>"HDC on / off"
Switches HDC Hill Descent Control
* on/
off
>"Next entertainment source"
Changes audio source
>"Night Vision on / off"
Switches BMW Night Vision
* on/off
5.Select the desired function and press the
controller.
6.Select the button if necessary and press the
controller.
You can operate the selected function using the
corresponding button.
Operating function
Press the corresponding button on the steering
wheel.
If you have programmed "Navigation voice
instructions" for one of the buttons:
>To switch voice instructions on/off:
Hold the button down.
>To repeat the last voice instruction:
Press the button.
Page 115 of 259
Controls
113Reference
At a glance
Driving tips
Communications
Navigation
Entertainment
Mobility
Glove compartment
Opening
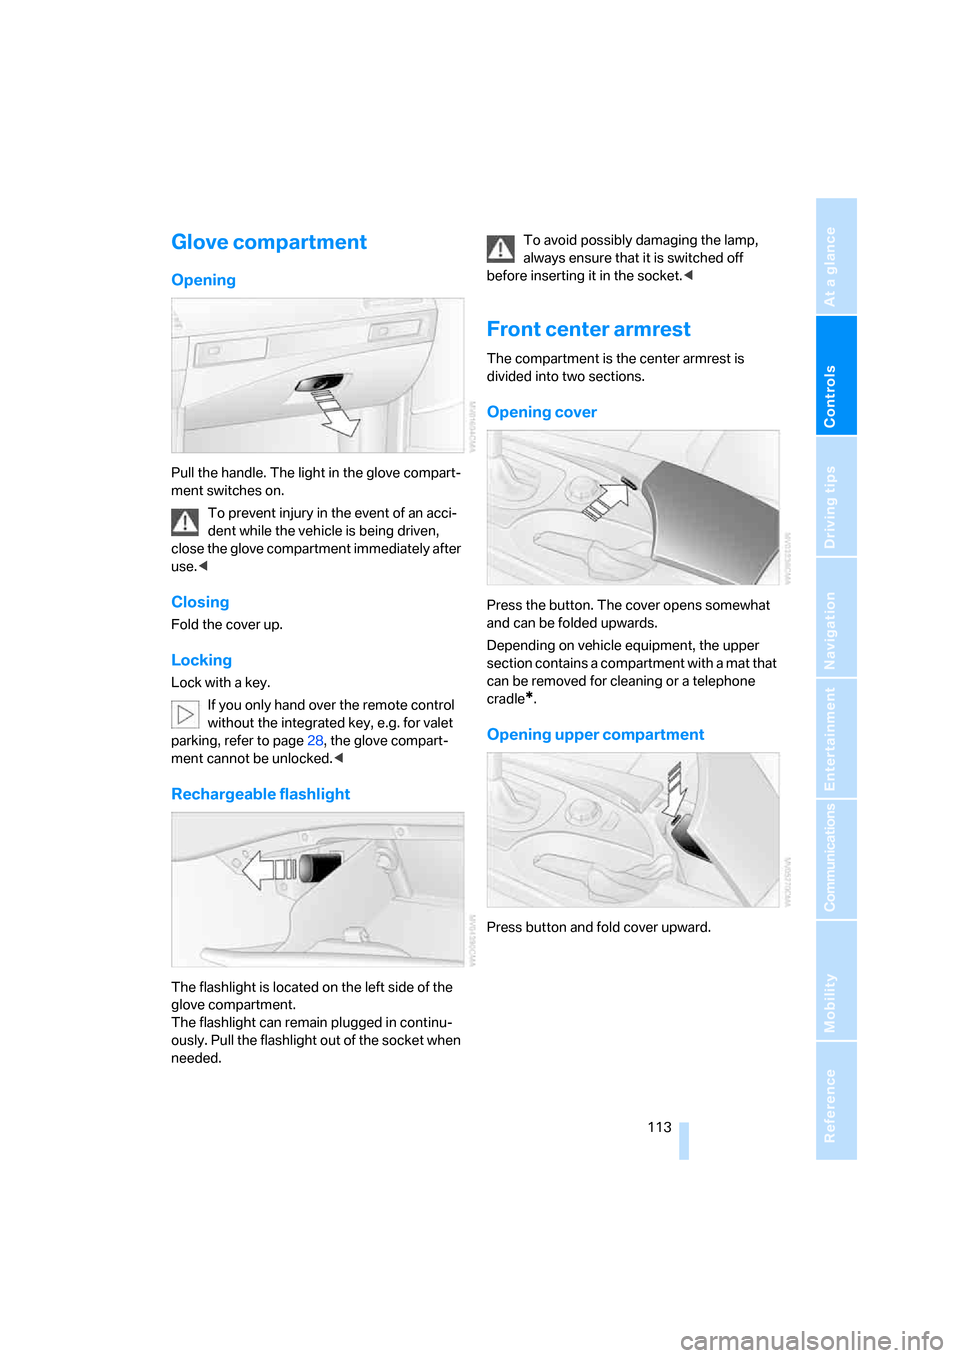
Pull the handle. The light in the glove compart-
ment switches on.
To prevent injury in the event of an acci-
dent while the vehicle is being driven,
close the glove compartment immediately after
use.<
Closing
Fold the cover up.
Locking
Lock with a key.
If you only hand over the remote control
without the integrated key, e.g. for valet
parking, refer to page28, the glove compart-
ment cannot be unlocked.<
Rechargeable flashlight
The flashlight is located on the left side of the
glove compartment.
The flashlight can remain plugged in continu-
ously. Pull the flashlight out of the socket when
needed.To avoid possibly damaging the lamp,
always ensure that it is switched off
before inserting it in the socket.<
Front center armrest
The compartment is the center armrest is
divided into two sections.
Opening cover
Press the button. The cover opens somewhat
and can be folded upwards.
Depending on vehicle equipment, the upper
section contains a compartment with a mat that
can be removed for cleaning or a telephone
cradle
*.
Opening upper compartment
Press button and fold cover upward.
Page 116 of 259
Practical interior accessories
114
Accessing lower compartment
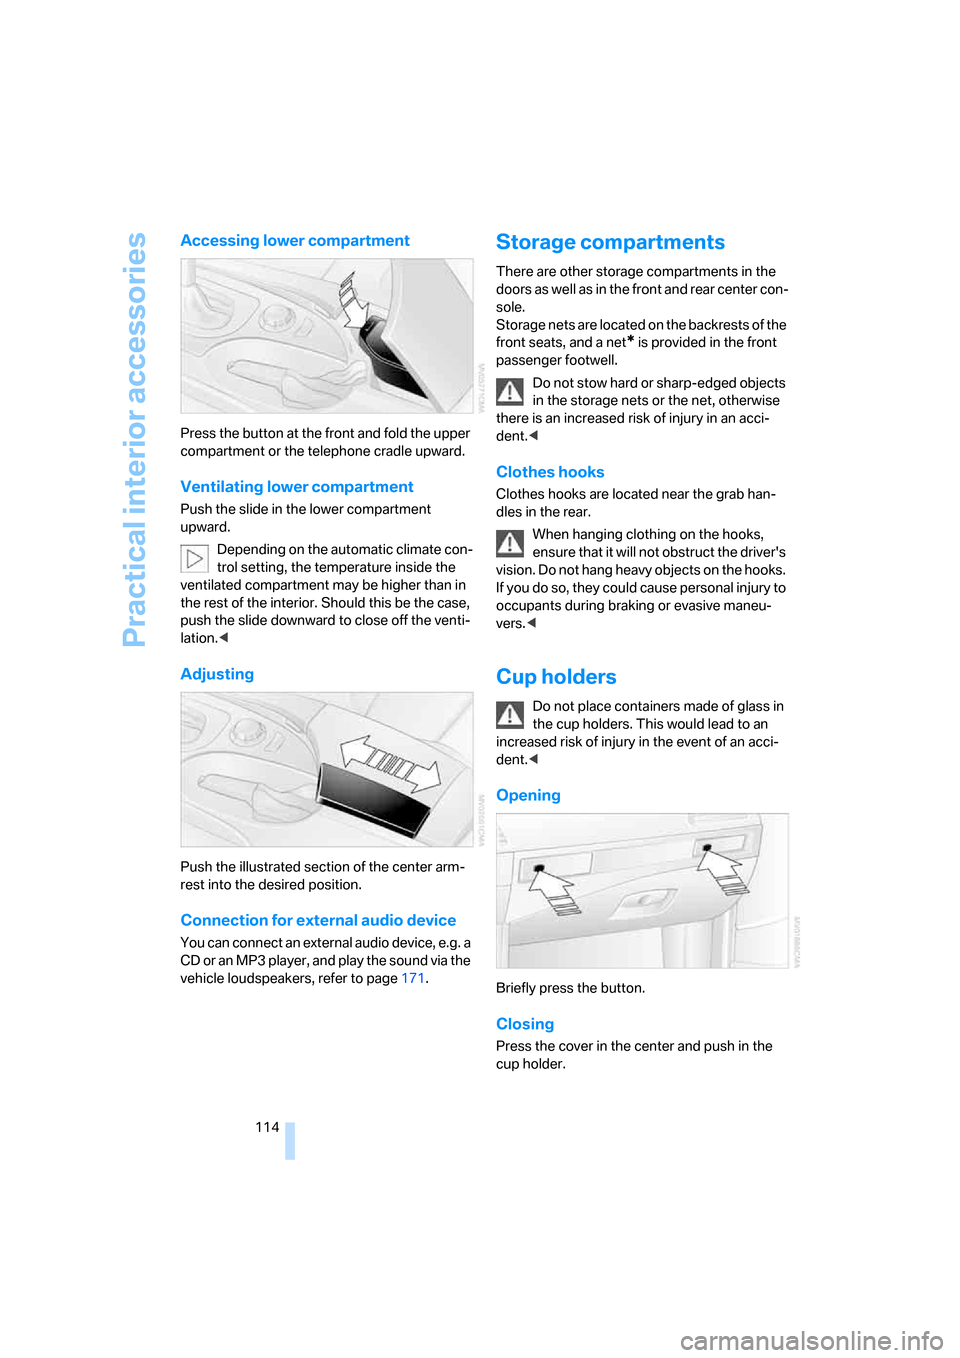
Press the button at the front and fold the upper
compartment or the telephone cradle upward.
Ventilating lower compartment
Push the slide in the lower compartment
upward.
Depending on the automatic climate con-
trol setting, the temperature inside the
ventilated compartment may be higher than in
the rest of the interior. Should this be the case,
push the slide downward to close off the venti-
lation.<
Adjusting
Push the illustrated section of the center arm-
rest into the desired position.
Connection for external audio device
You can connect an external audio device, e.g. a
CD or an MP3 player, and play the sound via the
vehicle loudspeakers, refer to page171.
Storage compartments
There are other storage compartments in the
doors as well as in the front and rear center con-
sole.
Storage nets are located on the backrests of the
front seats, and a net
* is provided in the front
passenger footwell.
Do not stow hard or sharp-edged objects
in the storage nets or the net, otherwise
there is an increased risk of injury in an acci-
dent.<
Clothes hooks
Clothes hooks are located near the grab han-
dles in the rear.
When hanging clothing on the hooks,
ensure that it will not obstruct the driver's
vision. Do not hang heavy objects on the hooks.
If you do so, they could cause personal injury to
occupants during braking or evasive maneu-
vers.<
Cup holders
Do not place containers made of glass in
the cup holders. This would lead to an
increased risk of injury in the event of an acci-
dent.<
Opening
Briefly press the button.
Closing
Press the cover in the center and push in the
cup holder.
Page 127 of 259

Driving tips
125Reference
At a glance
Controls
Communications
Navigation
Entertainment
Mobility
Mobile communications devices in
vehicle
BMW discourages the use of mobile
communications devices, e. g. mobile
phones, inside the vehicle without a direct con-
nection to an outside antenna. Otherwise, the
vehicle electronics and mobile communication
device can influence one another. In addition,
there is no assurance that the radiation which
results from transmission will be dissipated
from the vehicle interior.<
Interior and exterior mirrors,
automatic dimming feature*
This feature is controlled by two photocells in
the inside rearview mirror. One is integrated into
the glass of the mirror, while the other is located
at an offset position on the rear of the mirror
housing.
For trouble-free operation, keep the photocells
clean and do not cover the area between the
interior rearview mirror and the windshield. Do
not attach stickers of any kind to the windshield
in front of the mirror, either.
Hydroplaning
When driving on wet or slushy roads,
reduce road speed. If you do not, a wedge
of water can form between tires and road sur-
face. This phenomenon is referred to as hydro-
planing, and is characterized by a partial or
complete loss of contact between the tires and
the road surface, ultimately undermining your
ability to steer and brake the vehicle.<
The risk of hydroplaning increases as the tread
depth of the tires decreases, refer also to Mini-
mum tire tread on page201.
Driving through water
Do not drive through water on the road if it
is deeper than 1 ft/30 cm, and then only at
walking speed at the most. Otherwise, the vehi-
cle's engine, the electrical systems and the
transmission may be damaged.<
Using handbrake on inclines
On inclines, do not hold the vehicle with
the clutch; use the handbrake. Otherwise
greater clutch wear will result.<
SMG Sequential Manual Transmission
Start off quickly on slopes. Do not hold
the vehicle on a hill by pressing the accel-
erator, but apply the handbrake instead. Other-
wise overheating can occur in the transmission
region.<
Starting assistant
The starting assistant enables you to start off
conveniently on slopes. The parking brake is
not required for this purpose.
1.Hold the vehicle with the footbrake.
2.Release the footbrake and immediately
drive off quickly.
The starting assistant holds the vehicle
for approx. 2 seconds after releasing the
footbrake. Depending on the load, the vehicle
may also roll back slightly during this time.
After releasing the footbrake, immediately start
quickly, otherwise the starting assistant no
longer holds the vehicle after approx. 2 seconds
and it begins to roll back.<
Braking safely
Your BMW is equipped with ABS as a standard
feature. In situations that require it, it is best to
brake with full force. Since the vehicle maintains
steering responsiveness, you can still avoid
possible obstacles with a minimum of steering
effort.
Pulsation of the brake pedal, combined with
sounds from the hydraulic circuits, indicate that
ABS is in its active mode.
Page 141 of 259
Navigation
Driving tips
139Reference
At a glance
Controls
Communications
Entertainment
Mobility
4.Select location:
>"On destination"
>"On location"
>"On a new destination"
5.Press the controller.
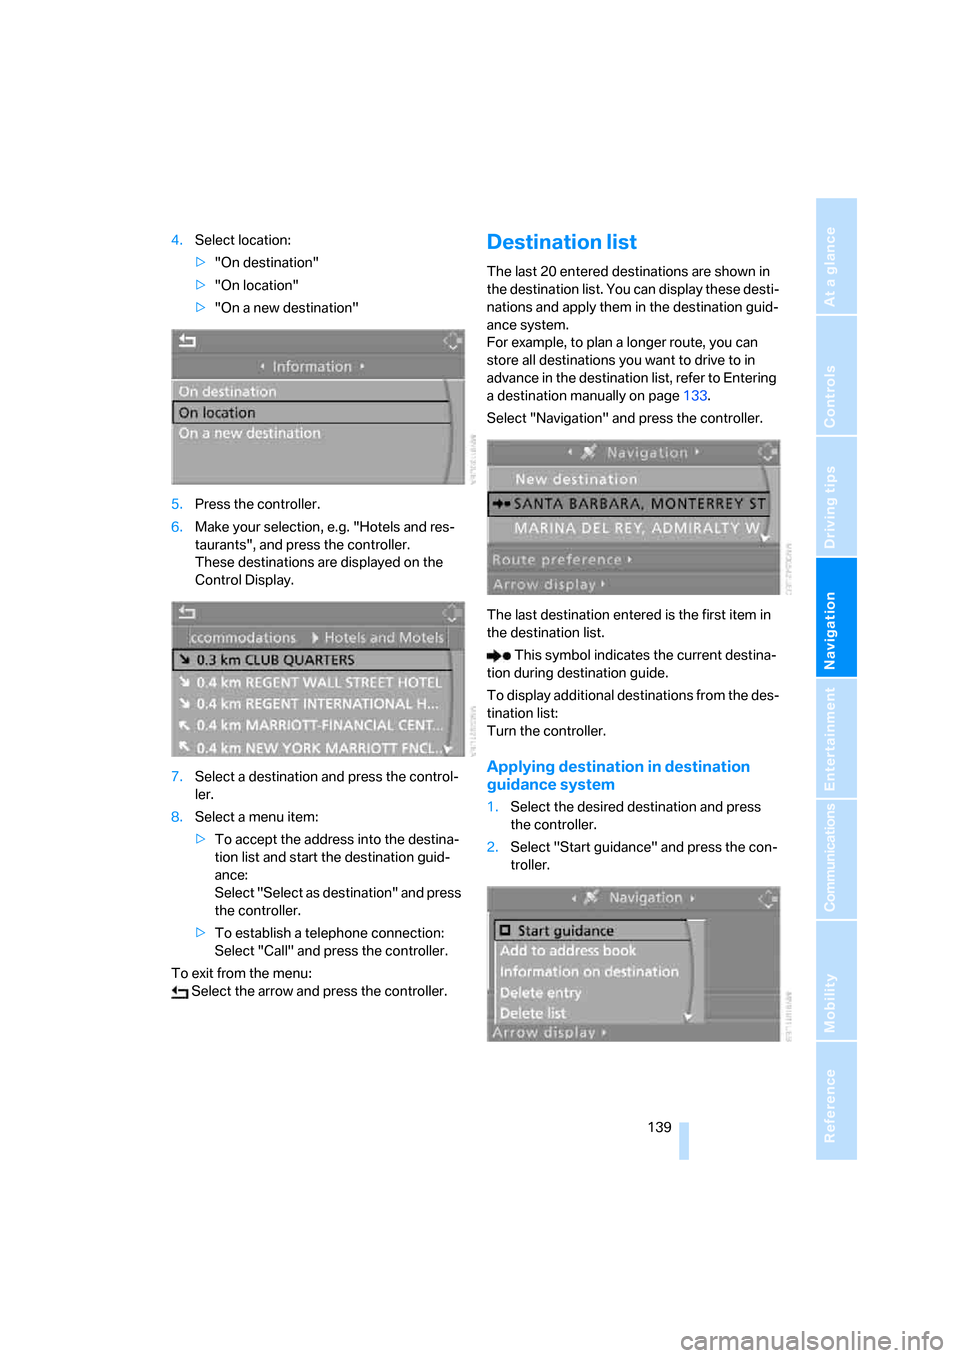
6.Make your selection, e.g. "Hotels and res-
taurants", and press the controller.
These destinations are displayed on the
Control Display.
7.Select a destination and press the control-
ler.
8.Select a menu item:
>To accept the address into the destina-
tion list and start the destination guid-
ance:
Select "Select as destination" and press
the controller.
>To establish a telephone connection:
Select "Call" and press the controller.
To exit from the menu:
Select the arrow and press the controller.Destination list
The last 20 entered destinations are shown in
the destination list. You can display these desti-
nations and apply them in the destination guid-
ance system.
For example, to plan a longer route, you can
store all destinations you want to drive to in
advance in the destination list, refer to Entering
a destination manually on page133.
Select "Navigation" and press the controller.
The last destination entered is the first item in
the destination list.
This symbol indicates the current destina-
tion during destination guide.
To display additional destinations from the des-
tination list:
Turn the controller.
Applying destination in destination
guidance system
1.Select the desired destination and press
the controller.
2.Select "Start guidance" and press the con-
troller.
Page 164 of 259
Radio
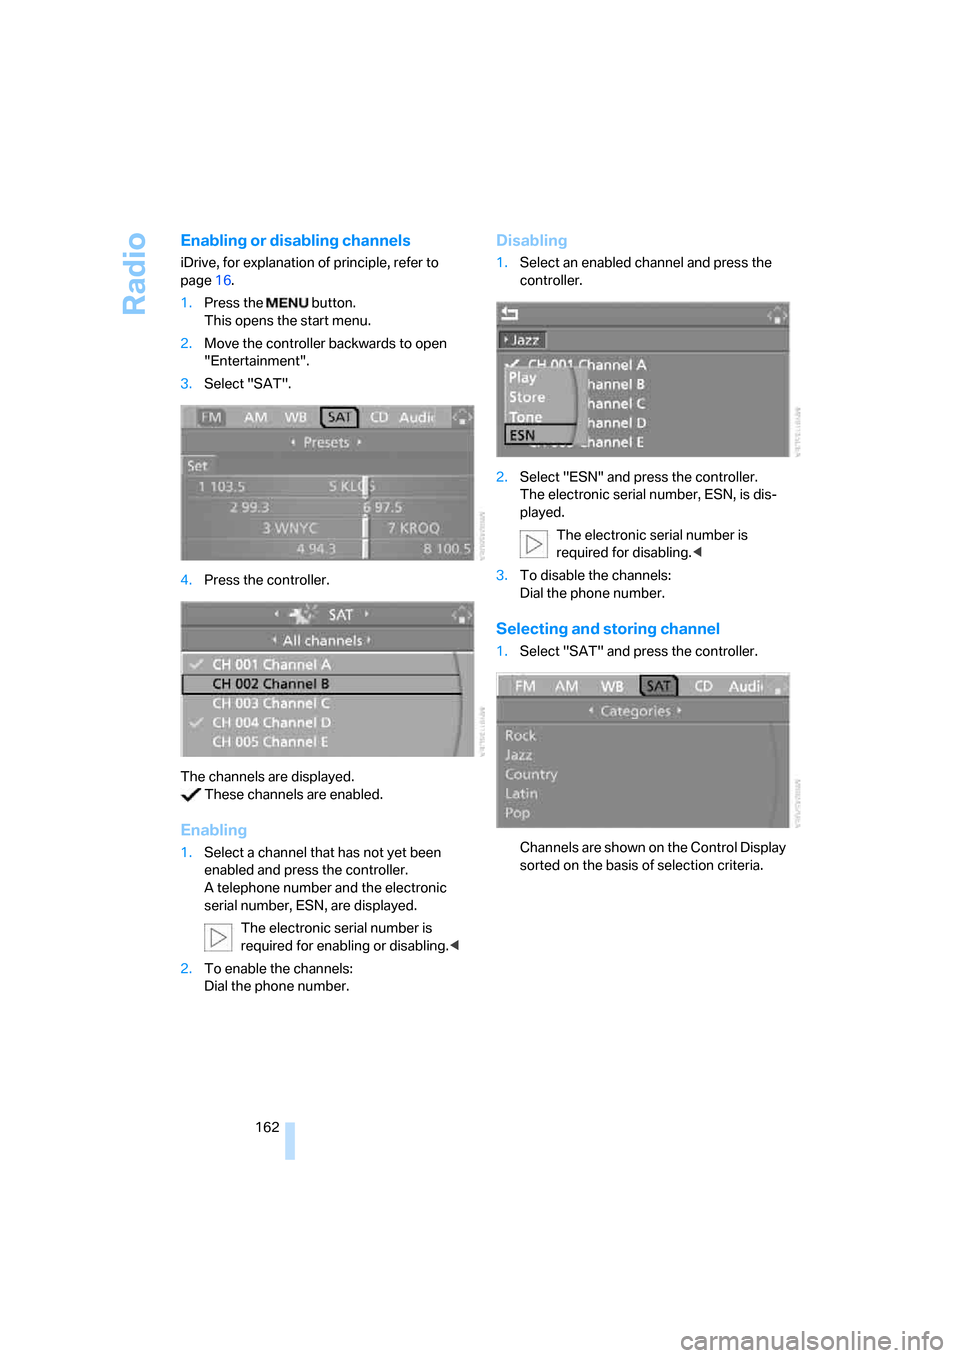
162
Enabling or disabling channels
iDrive, for explanation of principle, refer to
page16.
1.Press the button.
This opens the start menu.
2.Move the controller backwards to open
"Entertainment".
3.Select "SAT".
4.Press the controller.
The channels are displayed.
These channels are enabled.
Enabling
1.Select a channel that has not yet been
enabled and press the controller.
A telephone number and the electronic
serial number, ESN, are displayed.
The electronic serial number is
required for enabling or disabling.<
2.To enable the channels:
Dial the phone number.
Disabling
1.Select an enabled channel and press the
controller.
2.Select "ESN" and press the controller.
The electronic serial number, ESN, is dis-
played.
The electronic serial number is
required for disabling.<
3.To disable the channels:
Dial the phone number.
Selecting and storing channel
1.Select "SAT" and press the controller.
Channels are shown on the Control Display
sorted on the basis of selection criteria.
Page 173 of 259

Navigation
Entertainment
Driving tips
171Reference
At a glance
Controls
Communications
Mobility
External audio device
You can connect an external audio device, e.g.
an MP3 player, and play the sound via the vehi-
cle loudspeakers. The sound can be adjusted
with iDrive.
Connecting
1Power supply for your additional device:
Socket with removable cap
2Connection for audio playback:
Jacks εin/3.5 mm
For audio playback via the vehicle loudspeak-
ers, connect the headphone or Line-Out con-
nection of the device to the connection 2.
Starting audio playback
The audio device must be switched on.
iDrive, for explanation of principle, refer to
page16.
1.Press the button.
This opens the start menu.
2.Move the controller backwards to open
"Entertainment".3.Select "Audio Aux" and press the control-
ler.
4.Adjust volume and sound if necessary.