2006 BMW 525I SEDAN navigation update
[x] Cancel search: navigation updatePage 154 of 259

On/off and tone
152
On/off and tone
The following audio sources have shared con-
trols and setting options:
>Professional radio
* or
Business radio
>CD player
>CD changer
*
Controls
The audio sources can be operated using:
>Buttons in the area of the CD player
>iDrive
>Buttons on steering wheel, refer to page11
Buttons in area of CD player
The layout of the buttons can vary depending
on your vehicle's equipment.
Single drive:
Two drives:1Entertainment sound output on/off, volume
>Press: switch on/off.
When you switch on, the last set radio
station or CD track is played.
>Turn: adjust volume.
2Drive for audio CDs
3 Eject CD
4 Station scan/track search
>Change radio station.
>Select track for CD player and
CD changer.
5Drive for navigation DVDs
Operation via iDrive
iDrive, for explanation of principle, refer to
page16.
1.Press the button.
This opens the start menu.
2.Move the controller backwards to open
"Entertainment".
You have the following choices:
>"FM" and "AM": radio reception
>"WB": Weather Band station
>"SAT": satellite radio
>"CD": CD player or CD changer
>"Audio Aux": external audio device
>"Set": depending on the audio source,
other adjustments can be made, e.g. with
the radio: update station with strongest
reception, save station, tone control, sam-
ple stations.
Page 159 of 259

Navigation
Entertainment
Driving tips
157Reference
At a glance
Controls
Communications
Mobility
Changing selection criteria
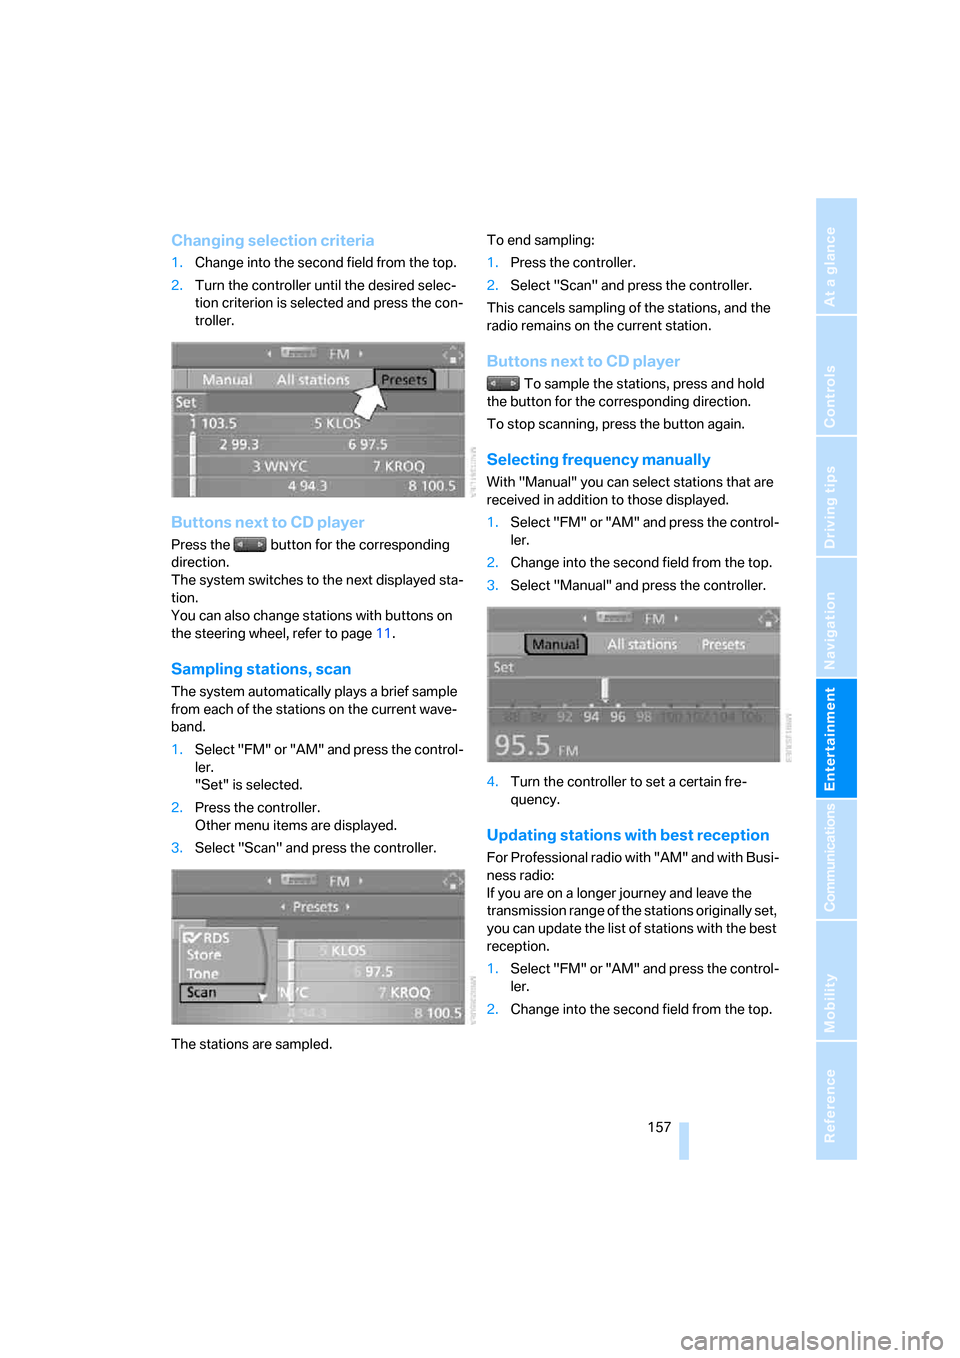
1.Change into the second field from the top.
2.Turn the controller until the desired selec-
tion criterion is selected and press the con-
troller.
Buttons next to CD player
Press the button for the corresponding
direction.
The system switches to the next displayed sta-
tion.
You can also change stations with buttons on
the steering wheel, refer to page11.
Sampling stations, scan
The system automatically plays a brief sample
from each of the stations on the current wave-
band.
1.Select "FM" or "AM" and press the control-
ler.
"Set" is selected.
2.Press the controller.
Other menu items are displayed.
3.Select "Scan" and press the controller.
The stations are sampled.To end sampling:
1.Press the controller.
2.Select "Scan" and press the controller.
This cancels sampling of the stations, and the
radio remains on the current station.
Buttons next to CD player
To sample the stations, press and hold
the button for the corresponding direction.
To stop scanning, press the button again.
Selecting frequency manually
With "Manual" you can select stations that are
received in addition to those displayed.
1.Select "FM" or "AM" and press the control-
ler.
2.Change into the second field from the top.
3.Select "Manual" and press the controller.
4.Turn the controller to set a certain fre-
quency.
Updating stations with best reception
For Professional radio with "AM" and with Busi-
ness radio:
If you are on a longer journey and leave the
transmission range of the stations originally set,
you can update the list of stations with the best
reception.
1.Select "FM" or "AM" and press the control-
ler.
2.Change into the second field from the top.
Page 161 of 259

Navigation
Entertainment
Driving tips
159Reference
At a glance
Controls
Communications
Mobility
Changing a memory position
1.Select "Presets" and press the controller.
2.Select the desired station.
"Set" is selected.
3.Press the controller.
Other menu items are displayed.
4.Select "Store" and press the controller.
5.Turn the controller until the desired mem-
ory position is selected.
The number of the memory position
appears beside the name or frequency of
the station.
6.Press the controller.
The station is stored.
RDS Radio Data System
RDS transmits additional information in the
FM frequency range. If the reception conditions
are good, the station names are shown on the
Control Display. If the reception is weak or dis-
rupted, it can take some time before the station
names are displayed.
Switching RDS on/off*
1.Select "FM" or "AM" and press the control-
ler.
"Set" is selected.
2.Press the controller.
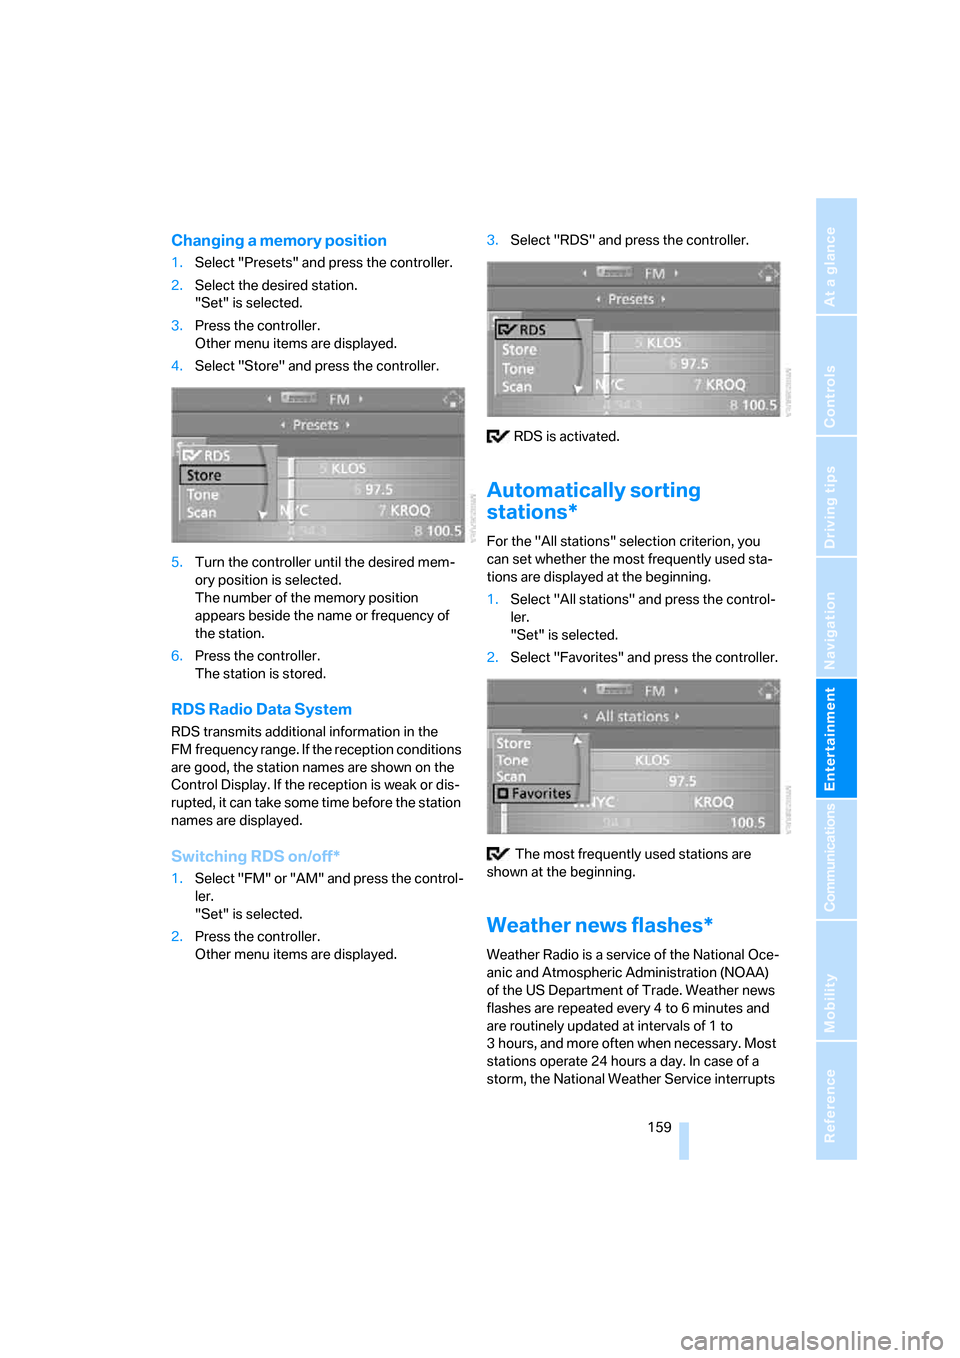
Other menu items are displayed.3.Select "RDS" and press the controller.
RDS is activated.
Automatically sorting
stations*
For the "All stations" selection criterion, you
can set whether the most frequently used sta-
tions are displayed at the beginning.
1.Select "All stations" and press the control-
ler.
"Set" is selected.
2.Select "Favorites" and press the controller.
The most frequently used stations are
shown at the beginning.
Weather news flashes*
Weather Radio is a service of the National Oce-
anic and Atmospheric Administration (NOAA)
of the US Department of Trade. Weather news
flashes are repeated every 4 to 6 minutes and
are routinely updated at intervals of 1 to
3 hours, and more often when necessary. Most
stations operate 24 hours a day. In case of a
storm, the National Weather Service interrupts
Page 163 of 259

Navigation
Entertainment
Driving tips
161Reference
At a glance
Controls
Communications
Mobility
Updating stations offering digital
reception
If you are on a longer journey and leave the
transmission range of the stations originally set,
you can update the list of stations with the best
reception.
1.Select "FM" or "AM" and press the control-
ler.
2.Change into the second field from the top.
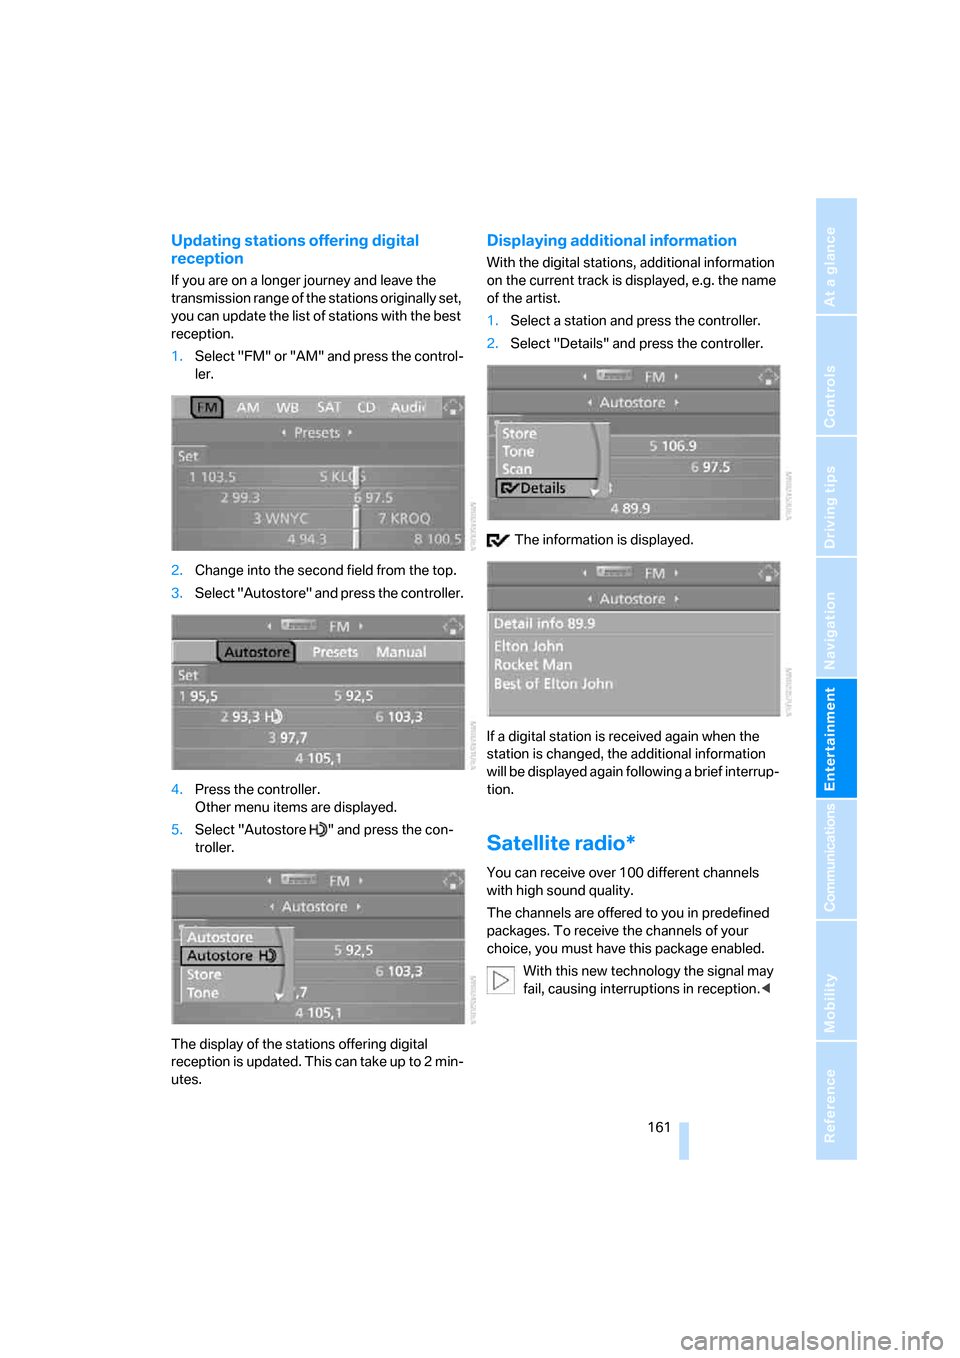
3.Select "Autostore" and press the controller.
4.Press the controller.
Other menu items are displayed.
5.Select "Autostore " and press the con-
troller.
The display of the stations offering digital
reception is updated. This can take up to 2 min-
utes.
Displaying additional information
With the digital stations, additional information
on the current track is displayed, e.g. the name
of the artist.
1.Select a station and press the controller.
2.Select "Details" and press the controller.
The information is displayed.
If a digital station is received again when the
station is changed, the additional information
will be displayed again following a brief interrup-
tion.
Satellite radio*
You can receive over 100 different channels
with high sound quality.
The channels are offered to you in predefined
packages. To receive the channels of your
choice, you must have this package enabled.
With this new technology the signal may
fail, causing interruptions in reception.<
Page 189 of 259

187
Entertainment
Reference
At a glance
Controls
Driving tips Communications
Navigation
Mobility
TeleService , BMW Assist
TeleService
TeleService supports you when communicat-
ing with a BMW center. The built-in car phone
can be used to transmit data regarding the ser-
vice status of your vehicle or regarding legally
mandated inspections directly to your BMW
center. This is the same data that is also stored
for CBS Condition Based Service in the remove
control. Your BMW center can then contact
you, and you can make an appointment that
suits you while you are still on the road. Your
advantage here is that your BMW center can
prepare in advance for the required mainte-
nance work. The TeleService functions are
country-specific: the data regarding the service
status of your vehicle or regarding legally man-
dated inspections is transmitted on a country-
specific basis either automatically before they
fall due or during your calls to the BMW center.
Your BMW center will be glad to provide more
detailed information.
BMW Assist
BMW Assist provides you with other services in
addition to TeleService. For example, the posi-
tion data of your vehicle can be transferred to
the BMW Assist response center if an emer-
gency call
* has been initiated.
Many functions of BMW Assist depend on the
individually agreed contract. Data transmission,
e. g. of the CBS Condition Based Service, dif-
fers from country to country.
The contract of participation with BMW Assist
and the activation must be completed before
you can use BMW Assist.
When the contract expires, the car phone can
be deactivated by a BMW center without having
to visit a BMW center. Following deactivation of
the car phone, no emergency calls can be
made. The car phone can be reactivated after
signing a new contract with a BMW center.You can also use the services of BMW Assist via
the Internet. The range of services is continually
being expanded.
Requirements
You can use TeleService or BMW Assist when
the following requirements are met:
>The installed car phone is logged on to a
cellular telephone network. This network
must be capable of transmitting the ser-
vices.
>To transmit position data, the vehicle must
be able to determine the current position.
This can be displayed on the Control Dis-
play.
>For TeleService or BMW Assist to be acti-
vated and updated, the GPS signal must be
available.
>For BMW Assist: you have applied to your
BMW center or BMW Customer Support for
BMW Assist.
Enabling TeleService or BMW Assist
For you to be able to use the services of
TeleService or BMW Assist, these must be
enabled.
Requirements
>Make sure that the vehicle can determine its
current position. Reception is best when
you have an unobstructed view to the sky.
>Leave radio readiness switched on while
connecting to the system.
Enabling
iDrive, for explanation of principle, refer to
page16.
1.Press the button.
This opens the start menu.
2.Press the controller to open the menu.
**
Page 220 of 259

Replacing components
218
Disposal
Have old batteries disposed of by your
BMW center or hand them in to a recy-
cling center. Maintain the battery in an upright
position for transport and storage. Always
restrain the battery to prevent it from tipping
over during transport.<
Power failure
After a temporary power loss, the functioning of
some equipment may be limited and require
reinitialization. Individual settings are also lost
and must be updated:
>Seat, mirror and steering wheel memory
The positions must be stored again, refer to
page47.
>Time and Date
The values must be updated, refer to
page82.
>Radio
Stations must be stored again if necessary,
refer to page158.
>Navigation system
Wait until the system starts, refer to
page149.
Fuses
Never attempt to repair a blown fuse and
do not replace a defective fuse with a sub-
stitute of another color or amperage rating, as
this could lead to a circuit overload, ultimately
resulting in a fire in the vehicle.<
Sedan
Spare fuses, plastic tweezers and fuse alloca-
tion diagram are located in the compartment for
the onboard tool kit, refer to page211.
Sports Wagon
Reserve fuses and a pair of plastic tweezers are
contained in the onboard tool kit, refer to
page211. A fuse allocation diagram is located
in the cargo area behind the right-hand side
panel.
In glove compartment
1.Release both quick-release fasteners.
2.Fold the cover forward or remove.
Sedan: in luggage compartment
1.Lift up floor mat.
2.Release the quick-release fastener of the
right side panel and pull out the panel.
Sports Wagon: in cargo area
1.Unhook the retaining strap*, refer to
page119.
2.Open the right-hand side panel.