2006 BMW 330I rear entertainment
[x] Cancel search: rear entertainmentPage 17 of 246
At a glance
15Reference
Controls
Driving tips
Communications
Navigation
Entertainment
Mobility
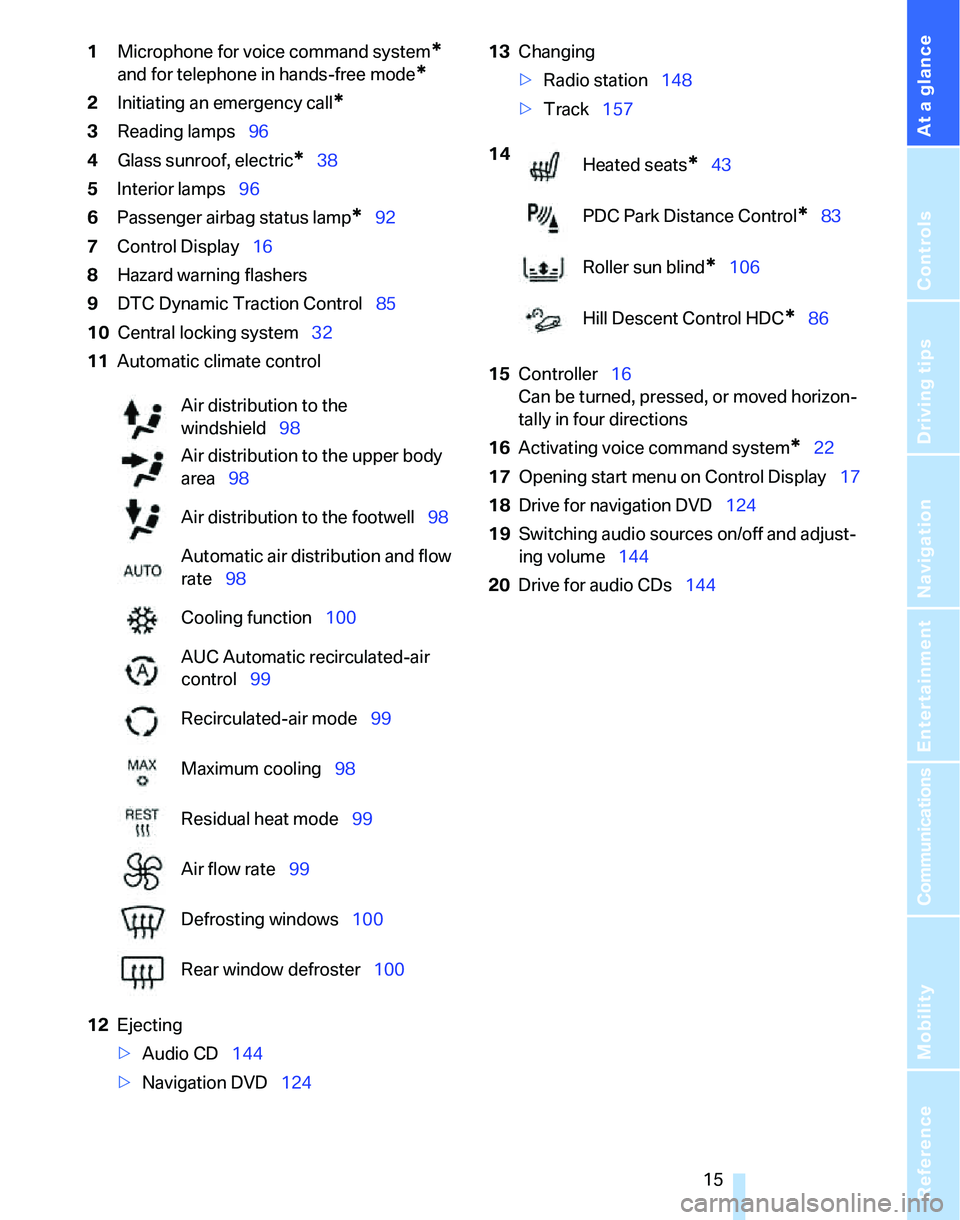
1Microphone for voice command system*
and for telephone in hands-free mode*
2Initiating an emergency call*
3Reading lamps96
4Glass sunroof, electric
*38
5Interior lamps96
6Passenger airbag status lamp
*92
7Control Display16
8Hazard warning flashers
9DTC Dynamic Traction Control85
10Central locking system32
11Automatic climate control
12Ejecting
>Audio CD144
>Navigation DVD12413Changing
>Radio station148
>Track157
15Controller16
Can be turned, pressed, or moved horizon-
tally in four directions
16Activating voice command system
*22
17Opening start menu on Control Display17
18Drive for navigation DVD124
19Switching audio sources on/off and adjust-
ing volume144
20Drive for audio CDs144 Air distribution to the
windshield98
Air distribution to the upper body
area98
Air distribution to the footwell98
Automatic air distribution and flow
rate98
Cooling function100
AUC Automatic recirculated-air
control99
Recirculated-air mode99
Maximum cooling98
Residual heat mode99
Air flow rate99
Defrosting windows100
Rear window defroster100
14
Heated seats*43
PDC Park Distance Control
*83
Roller sun blind
*106
Hill Descent Control HDC
*86
Page 39 of 246
Controls
37Reference
At a glance
Driving tips
Communications
Navigation
Entertainment
Mobility
The indicator lamp in the instrument
cluster comes on and a message
appears on the Control Display:
replace the battery in the remote control.
Replacing the battery
The remote control for convenient access con-
tains a battery that will need to be replaced from
time to time.
1.Take the integrated key out of the remote
control, refer to page28.
2.Remove the cover.
3.Insert the new battery with the plus side fac-
ing up.
4.Press the cover on to close.
Take the old battery to a battery collec-
tion point or to your BMW Center.<
Windows
To prevent injuries, exercise care when
closing the windows and keep them in
your field of vision until they are shut.
Take the remote control with you when you
leave the car, otherwise children could operate
the electric windows and possibly injure them-
selves.<
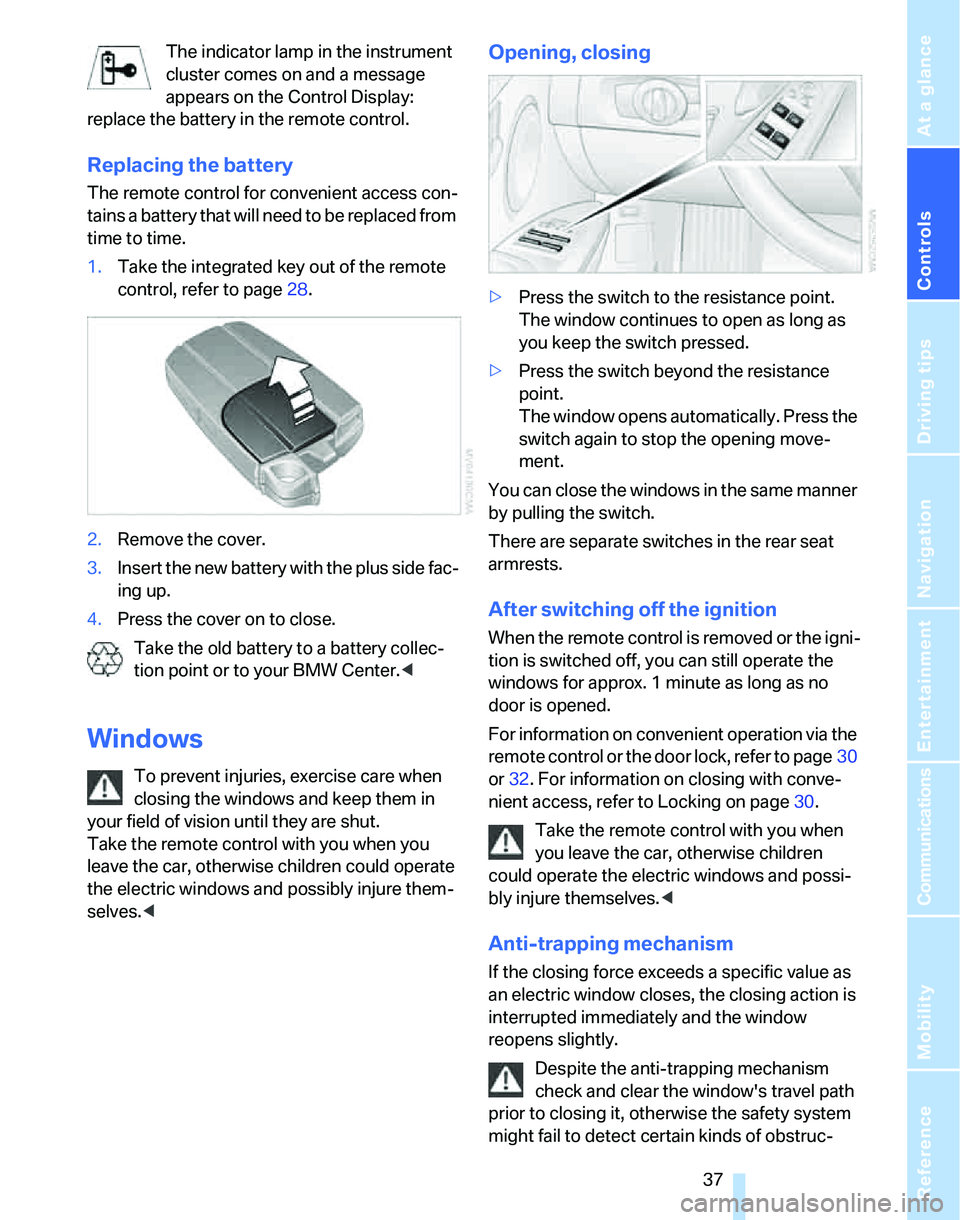
Opening, closing
>Press the switch to the resistance point.
The window continues to open as long as
you keep the switch pressed.
>Press the switch beyond the resistance
point.
The window opens automatically. Press the
switch again to stop the opening move-
ment.
You can close the windows in the same manner
by pulling the switch.
There are separate switches in the rear seat
armrests.
After switching off the ignition
When the remote control is removed or the igni-
tion is switched off, you can still operate the
windows for approx. 1 minute as long as no
door is opened.
For information on convenient operation via the
remote control or the door lock, refer to page30
or32. For information on closing with conve-
nient access, refer to Locking on page30.
Take the remote control with you when
you leave the car, otherwise children
could operate the electric windows and possi-
bly injure themselves.<
Anti-trapping mechanism
If the closing force exceeds a specific value as
an electric window closes, the closing action is
interrupted immediately and the window
reopens slightly.
Despite the anti-trapping mechanism
check and clear the window's travel path
prior to closing it, otherwise the safety system
might fail to detect certain kinds of obstruc-
Page 43 of 246
Controls
41Reference
At a glance
Driving tips
Communications
Navigation
Entertainment
Mobility
ensuing loss of vehicle control could lead to an
accident.
On the front passenger seat as well, do not
incline the backrest too far to the rear while the
vehicle is being driven, otherwise there is a dan-
ger in the event of an accident of sliding under
the safety belt, eliminating the protection nor-
mally provided by the belt.<
Comply with the instructions on head restraint
height on page42, and on damaged safety
belts on page45.
Seat adjustment
Observe the adjustment instructions on
page40 to ensure the best possible per-
sonal protection.<
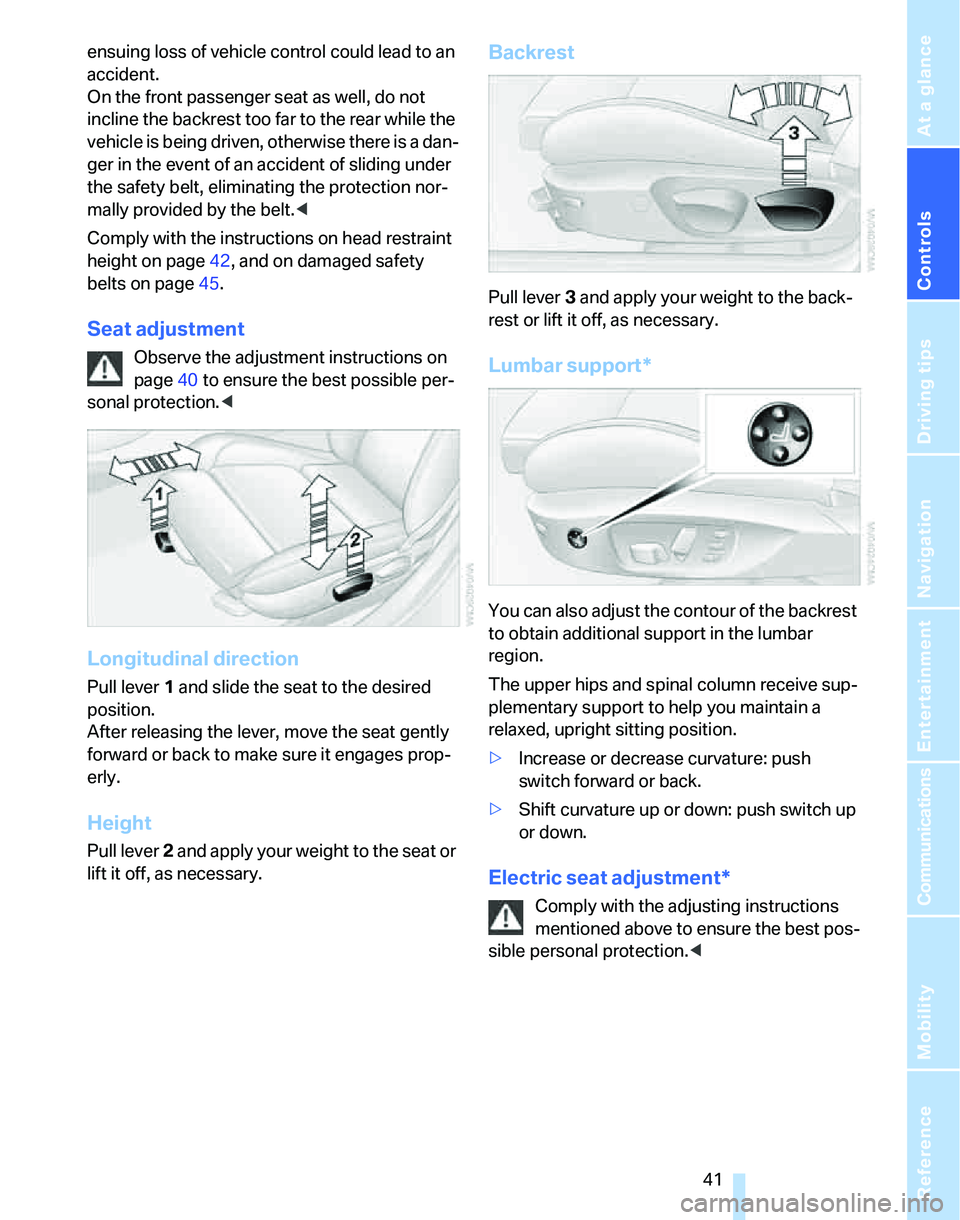
Longitudinal direction
Pull lever 1 and slide the seat to the desired
position.
After releasing the lever, move the seat gently
forward or back to make sure it engages prop-
erly.
Height
Pull lever 2 and apply your weight to the seat or
lift it off, as necessary.
Backrest
Pull lever 3 and apply your weight to the back-
rest or lift it off, as necessary.
Lumbar support*
You can also adjust the contour of the backrest
to obtain additional support in the lumbar
region.
The upper hips and spinal column receive sup-
plementary support to help you maintain a
relaxed, upright sitting position.
>Increase or decrease curvature: push
switch forward or back.
>Shift curvature up or down: push switch up
or down.
Electric seat adjustment*
Comply with the adjusting instructions
mentioned above to ensure the best pos-
sible personal protection.<
Page 45 of 246
Controls
43Reference
At a glance
Driving tips
Communications
Navigation
Entertainment
Mobility
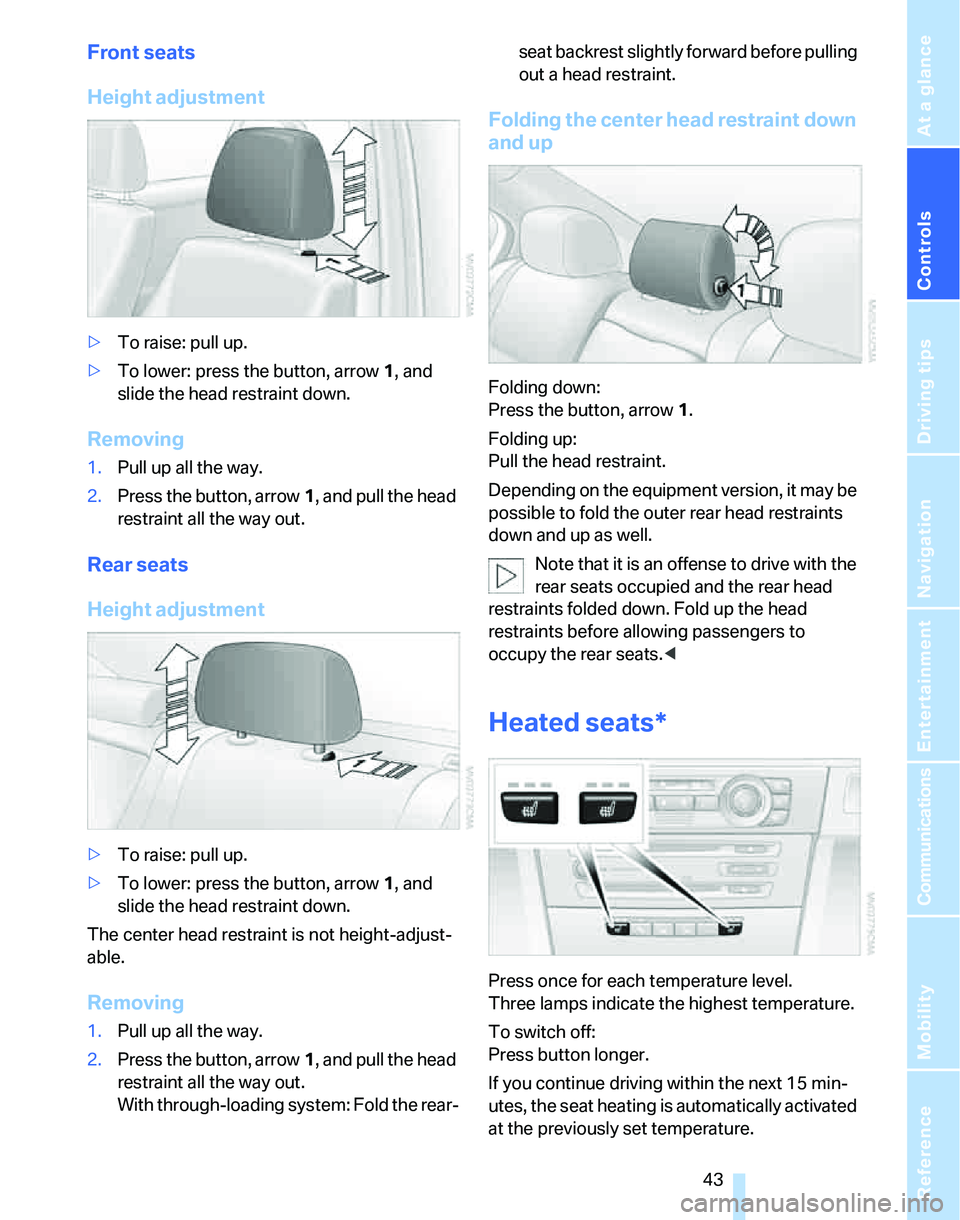
Front seats
Height adjustment
>To raise: pull up.
>To lower: press the button, arrow1, and
slide the head restraint down.
Removing
1.Pull up all the way.
2.Press the button, arrow1, and pull the head
restraint all the way out.
Rear seats
Height adjustment
>To raise: pull up.
>To lower: press the button, arrow1, and
slide the head restraint down.
The center head restraint is not height-adjust-
able.
Removing
1.Pull up all the way.
2.Press the button, arrow1, and pull the head
restraint all the way out.
With through-loading system: Fold the rear-seat backrest slightly forward before pulling
out a head restraint.
Folding the center head restraint down
and up
Folding down:
Press the button, arrow1.
Folding up:
Pull the head restraint.
Depending on the equipment version, it may be
possible to fold the outer rear head restraints
down and up as well.
Note that it is an offense to drive with the
rear seats occupied and the rear head
restraints folded down. Fold up the head
restraints before allowing passengers to
occupy the rear seats.<
Heated seats*
Press once for each temperature level.
Three lamps indicate the highest temperature.
To switch off:
Press button longer.
If you continue driving within the next 15 min-
utes, the seat heating is automatically activated
at the previously set temperature.
Page 51 of 246
Controls
49Reference
At a glance
Driving tips
Communications
Navigation
Entertainment
Mobility
Transporting children safely
The right place for children
Do not leave children unattended in the
vehicle, otherwise they could endanger
themselves and/or other persons by opening
the doors, for example.<
The rear center seat is not suitable for installing
universal child-restraint systems for all age
groups, approved for the age group in question.
Children always in the rear
Accident research has shown that the safest
place for children is on the rear seats.
Children under the age of 13 or smaller
than 5 ft/150 cm may be transported only
in the rear in suitable child-restraint systems
appropriate for their age, weight and size. Oth-
erwise there is an increased risk of injury in the
event of an accident.<
Children 13 years of age or older must be buck-
led in with a safety belt as soon as there no
longer is any child-restraint system that is
appropriate for their age, size and weight.
All rear seats in your vehicle meet the recom-
mendations of the SAE J1819 standard for
safely mounting child-restraint systems in
motor vehicles.
Exception for front passenger seat
Should it be necessary to use a child-
restraint system on the front passenger
seat, the front and side airbags must be deacti-
vated. Otherwise, a child traveling on that seat
will be at an increased risk of injury if the airbags
are triggered off, even with a child-restraint sys-
tem. Your BMW Center will be glad to advise
you.<
For more information on automatic deactivation
of the front passenger airbags refer to page91.
Installing child-restraint
systems
Observe the child-restraint system man-
ufacturer's instructions for selecting,
installing and using child-restraint systems.
Otherwise the protective effect may be dimin-
ished.<
Standard child-restraint systems are designed
to be secured with a lap belt or with the lap-belt
section of a lap-and-shoulder belt. Incorrectly
or improperly installed child-restraint systems
can increase the risk of injury to children.
Always follow the installation instructions for
the system with the greatest care.
On the front passenger's seat
Before installing a child-restraint system
on the front passenger's seat, make sure
that the front and side airbags for the front pas-
senger are deactivated, otherwise there is an
increased risk of injury if the airbags deploy.<
Seat height
Before installing a universal child-restraint sys-
tem, move the front passenger's seat up as far
as it will go to ensure that the safety belt will be
ideally positioned. Do not change the seat
height afterward.
Backrest width
The backrest width of the front passenger
seat must be adjusted to its widest set-
ting, otherwise the stability of the child seat on
the front passenger seat is limited.<
1.Adjust the backrest width to its widest set-
ting, refer to page42.
2.Install the child seat.
Page 53 of 246
Controls
51Reference
At a glance
Driving tips
Communications
Navigation
Entertainment
Mobility
Rear seats without through-loading
system
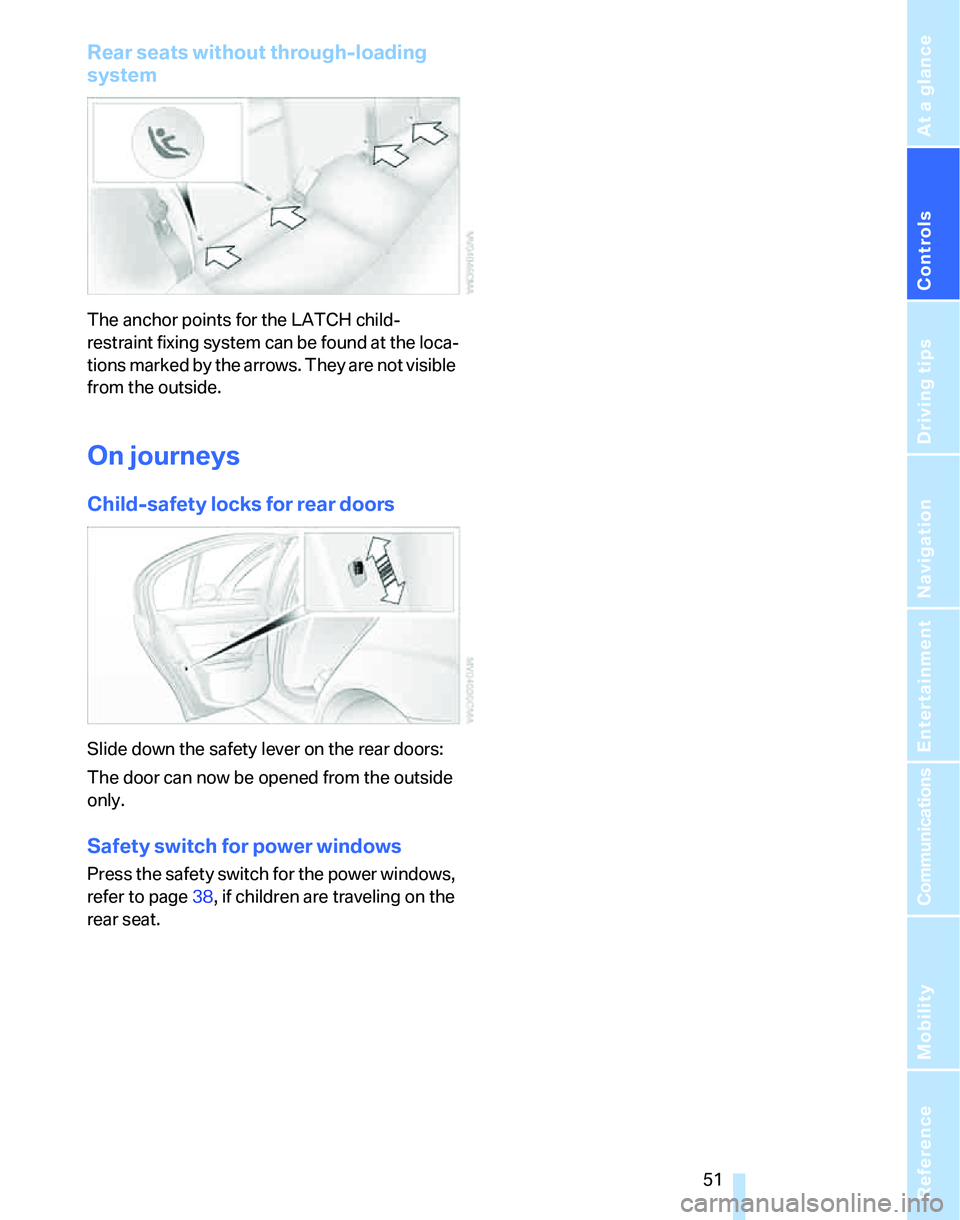
The anchor points for the LATCH child-
restraint fixing system can be found at the loca-
tions marked by the arrows. They are not visible
from the outside.
On journeys
Child-safety locks for rear doors
Slide down the safety lever on the rear doors:
The door can now be opened from the outside
only.
Safety switch for power windows
Press the safety switch for the power windows,
refer to page38, if children are traveling on the
rear seat.
Page 59 of 246
Controls
57Reference
At a glance
Driving tips
Communications
Navigation
Entertainment
Mobility
Acceleration assistant
The acceleration assistant provides for optimal,
racing-style acceleration when starting off on a
non-slippery surface.
Do not use the acceleration assistant too
frequently, otherwise components could
wear prematurely.<
1.Activate Dynamic Driving Control.
2.Deactivate DSC, refer to page85.
3.Quickly depress the accelerator pedal all
the way: kick-down. The optimal engine
speed for pulling away is achieved.
To maintain driving stability, reactivate
DSC afterward.<
Automatic transmission with
Steptronic*
In addition to fully automatic operation, you can
also manually shift with the Steptronic, refer to
page58.
Vehicle parking
To prevent the vehicle from rolling,
always select position P and apply the
handbrake before leaving the vehicle with the
engine running.<
Disengaging the remote control
In order to remove the remote control from the
ignition lock, you must first move the selector
lever to position P and switch off the engine:
interlock.
Selector lever positions
P R N D M/S + –
Displays in the instrument cluster
P R N D DS M1 to M6
The selector lever position is displayed, or the
current gear in the manual mode.
Changing selector lever positions
>With the ignition switched on or the engine
running, the selector lever can be moved
out of position P: interlock.
>Before moving the lever away from P or N
with the vehicle stationary, first depress the
brake; otherwise the selector lever will
refuse to move: shiftlock.
To prevent the vehicle from creeping
after you select a driving position,
depress the brake until you are ready to
start.<
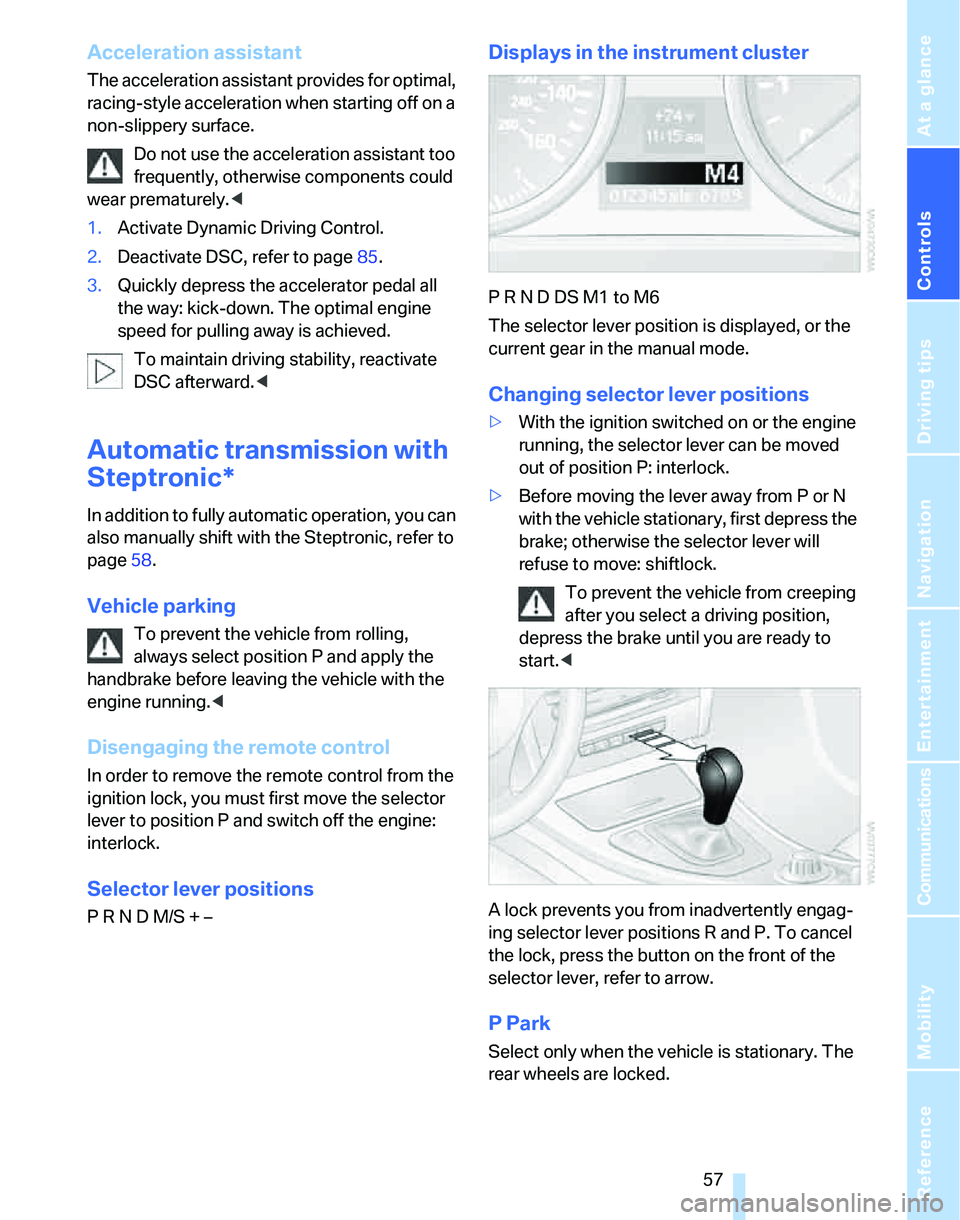
A lock prevents you from inadvertently engag-
ing selector lever positions R and P. To cancel
the lock, press the button on the front of the
selector lever, refer to arrow.
P Park
Select only when the vehicle is stationary. The
rear wheels are locked.
Page 61 of 246
Controls
59Reference
At a glance
Driving tips
Communications
Navigation
Entertainment
Mobility
Using turn signals
Press the lever beyond the resistance point.
To turn off manually, press the lever to the
resistance point.
Unusually rapid flashing of the indicator
lamp indicates that a turn signal indicator
has failed.
After switching off the ignition, make sure that
the roadside parking lamps are not switched
on.<
Indicating a turn briefly
Press the lever as far as the resistance point for
as long as you wish to indicate a turn.
Triple turn signal activation
Press the lever as far as the resistance point.
The turn signals flash three times.
You can activate or deactivate this function.
iDrive concept, refer to page16.
1.Open the start menu.
2.Press the controller to open the menu.
3.Select "Vehicle settings" and press the
controller.
4.Select "Lighting" and press the controller.
5.Select "Triple turn signal activation" and
press the controller.
Triple turn signaling is activated.
Wiper system
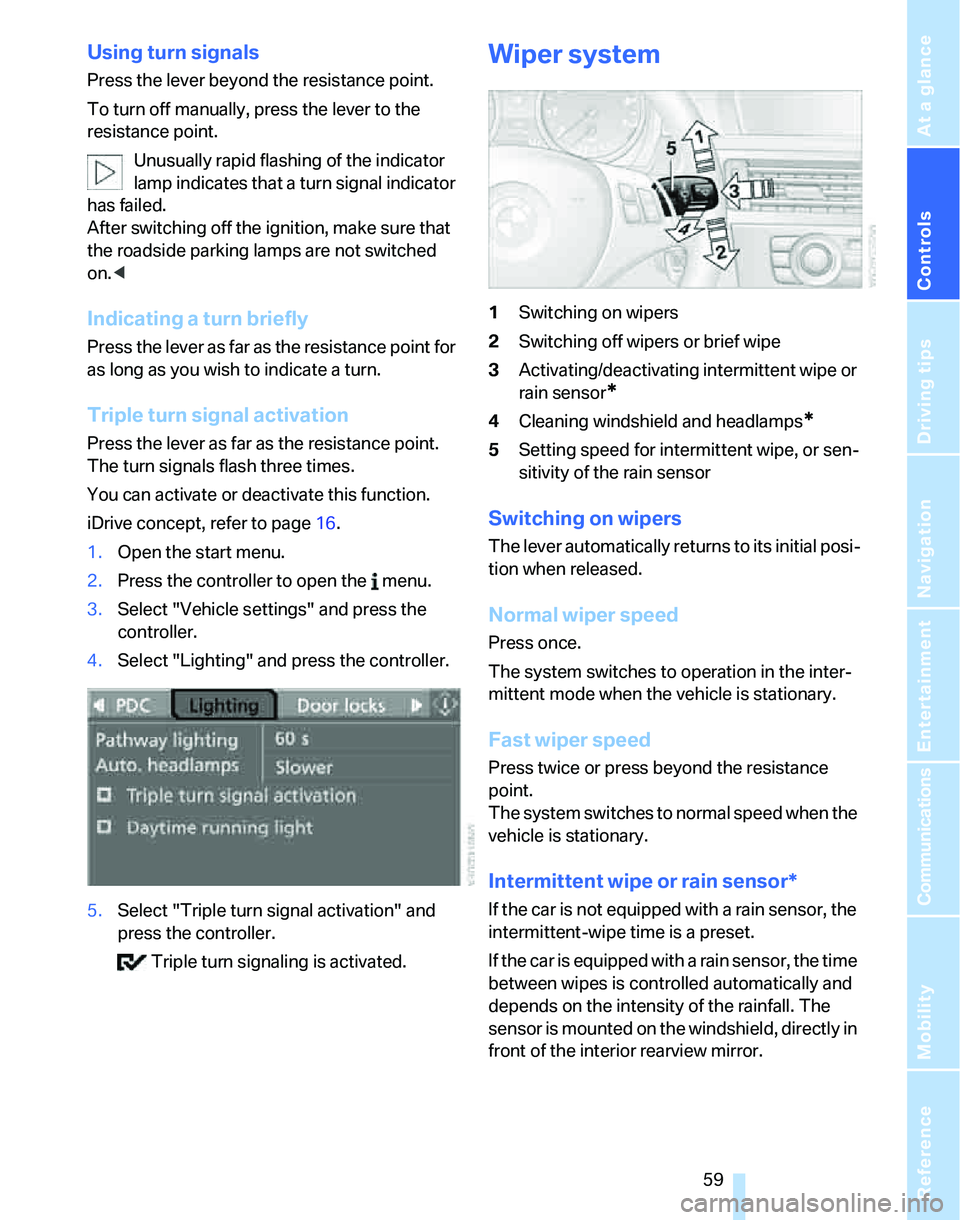
1Switching on wipers
2Switching off wipers or brief wipe
3Activating/deactivating intermittent wipe or
rain sensor
*
4Cleaning windshield and headlamps*
5Setting speed for intermittent wipe, or sen-
sitivity of the rain sensor
Switching on wipers
The lever automatically returns to its initial posi-
tion when released.
Normal wiper speed
Press once.
The system switches to operation in the inter-
mittent mode when the vehicle is stationary.
Fast wiper speed
Press twice or press beyond the resistance
point.
The system switches to normal speed when the
vehicle is stationary.
Intermittent wipe or rain sensor*
If the car is not equipped with a rain sensor, the
intermittent-wipe time is a preset.
If the car is equipped with a rain sensor, the time
between wipes is controlled automatically and
depends on the intensity of the rainfall. The
sensor is mounted on the windshield, directly in
front of the interior rearview mirror.