2006 BMW 330I clock
[x] Cancel search: clockPage 14 of 246
Cockpit
12
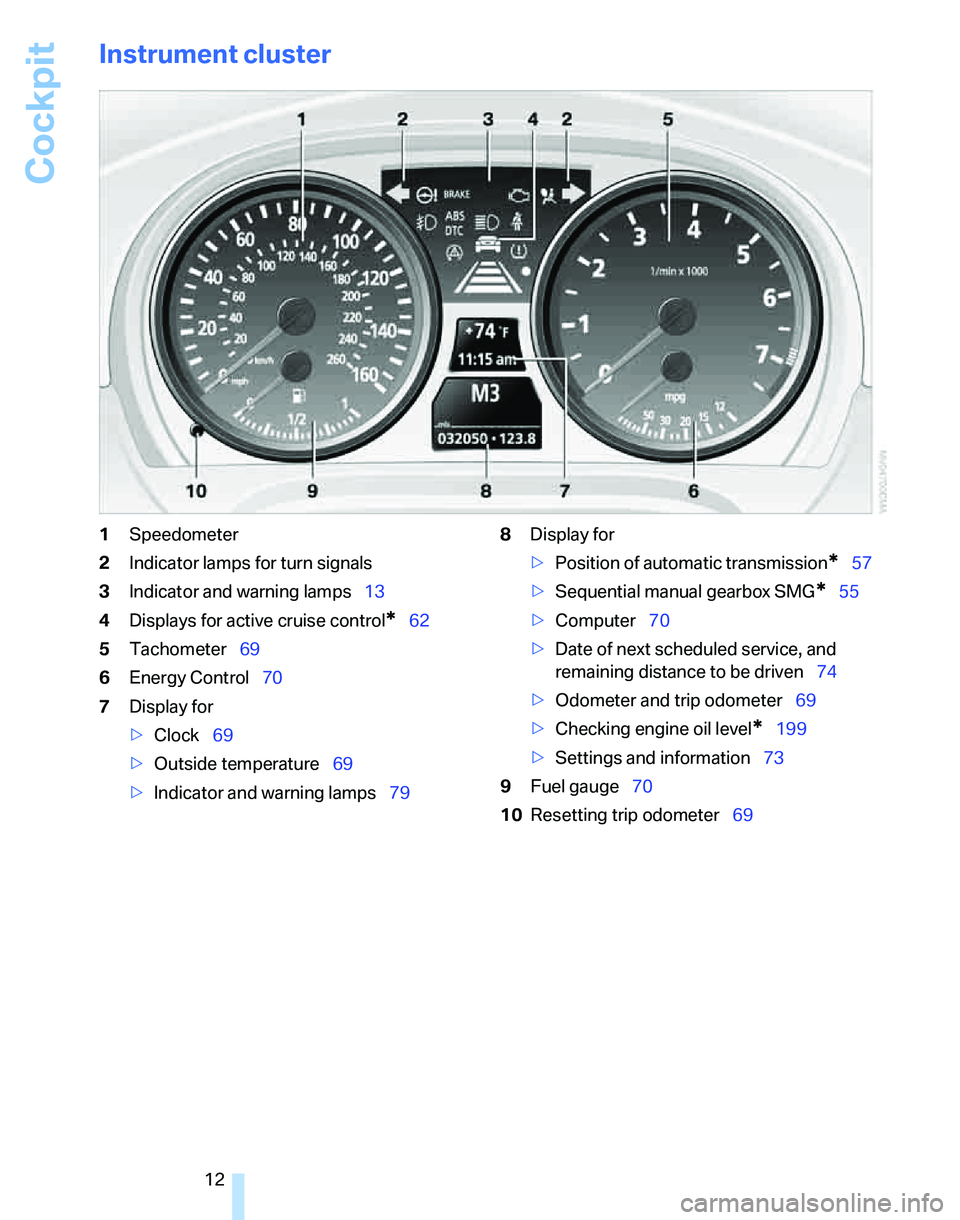
Instrument cluster
1Speedometer
2Indicator lamps for turn signals
3Indicator and warning lamps13
4Displays for active cruise control
*62
5Tachometer69
6Energy Control70
7Display for
>Clock69
>Outside temperature69
>Indicator and warning lamps798Display for
>Position of automatic transmission
*57
>Sequential manual gearbox SMG
*55
>Computer70
>Date of next scheduled service, and
remaining distance to be driven74
>Odometer and trip odometer69
>Checking engine oil level
*199
>Settings and information73
9Fuel gauge70
10Resetting trip odometer69
Page 31 of 246
Controls
29Reference
At a glance
Driving tips
Communications
Navigation
Entertainment
Mobility
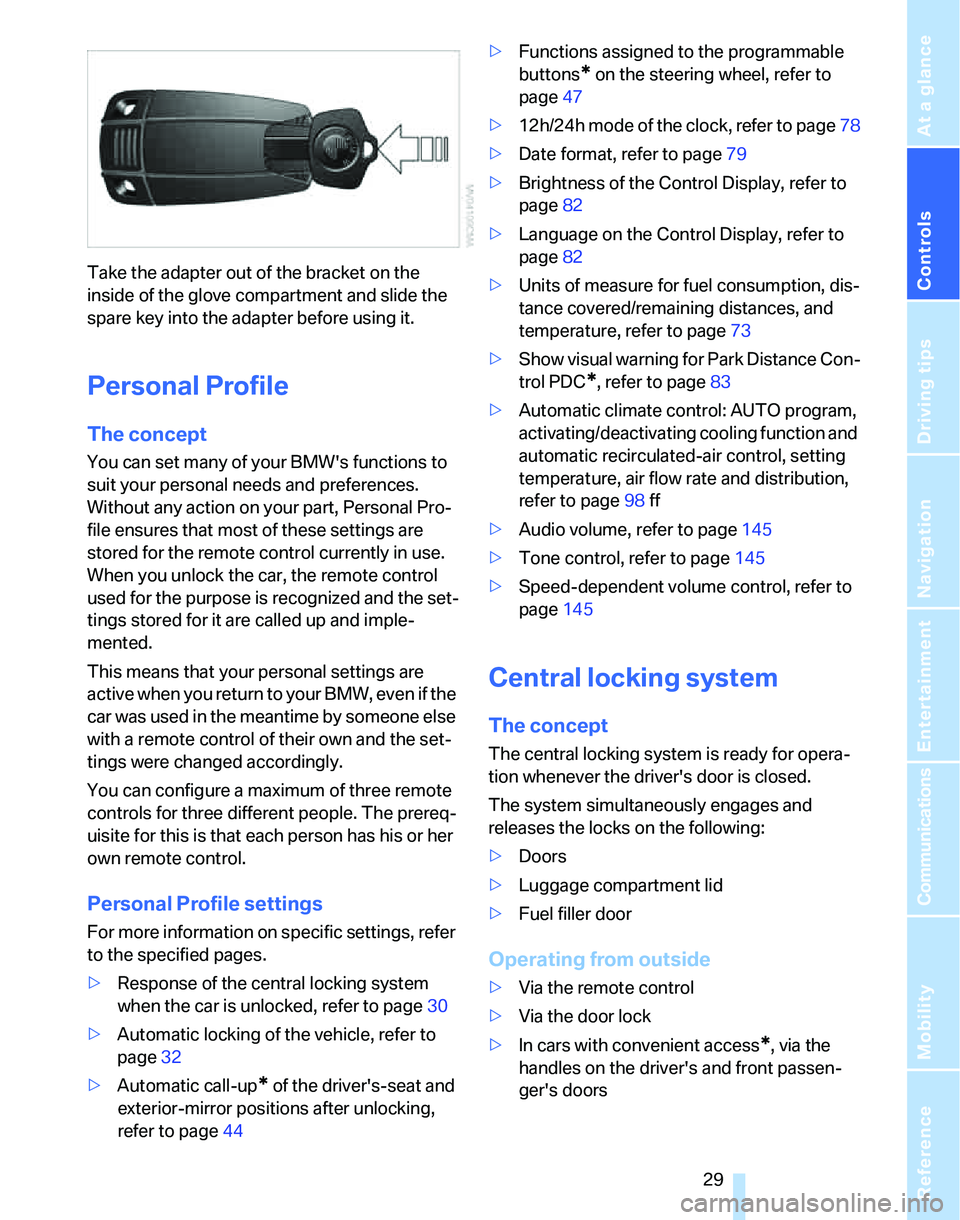
Take the adapter out of the bracket on the
inside of the glove compartment and slide the
spare key into the adapter before using it.
Personal Profile
The concept
You can set many of your BMW's functions to
suit your personal needs and preferences.
Without any action on your part, Personal Pro-
file ensures that most of these settings are
stored for the remote control currently in use.
When you unlock the car, the remote control
used for the purpose is recognized and the set-
tings stored for it are called up and imple-
mented.
This means that your personal settings are
active when you return to your BMW, even if the
car was used in the meantime by someone else
with a remote control of their own and the set-
tings were changed accordingly.
You can configure a maximum of three remote
controls for three different people. The prereq-
uisite for this is that each person has his or her
own remote control.
Personal Profile settings
For more information on specific settings, refer
to the specified pages.
>Response of the central locking system
when the car is unlocked, refer to page30
>Automatic locking of the vehicle, refer to
page32
>Automatic call-up
* of the driver's-seat and
exterior-mirror positions after unlocking,
refer to page44>Functions assigned to the programmable
buttons
* on the steering wheel, refer to
page47
>12h/24h mode of the clock, refer to page78
>Date format, refer to page79
>Brightness of the Control Display, refer to
page82
>Language on the Control Display, refer to
page82
>Units of measure for fuel consumption, dis-
tance covered/remaining distances, and
temperature, refer to page73
>Show visual warning for Park Distance Con-
trol PDC
*, refer to page83
>Automatic climate control: AUTO program,
activating/deactivating cooling function and
automatic recirculated-air control, setting
temperature, air flow rate and distribution,
refer to page98 ff
>Audio volume, refer to page145
>Tone control, refer to page145
>Speed-dependent volume control, refer to
page145
Central locking system
The concept
The central locking system is ready for opera-
tion whenever the driver's door is closed.
The system simultaneously engages and
releases the locks on the following:
>Doors
>Luggage compartment lid
>Fuel filler door
Operating from outside
>Via the remote control
>Via the door lock
>In cars with convenient access
*, via the
handles on the driver's and front passen-
ger's doors
Page 42 of 246
Adjustments
40
Adjustments
Sitting safely
The ideal sitting position can make a vital con-
tribution to relaxed, fatigue-free driving. In con-
junction with the safety belts, the head
restraints and the airbags, the seated position
has a major influence on your safety in the event
of an accident. To ensure that the safety sys-
tems operate with optimal efficiency, we
strongly urge you to observe the instructions
contained in the following section.
For additional information on transporting chil-
dren safely, refer to page49.
Airbags
Always maintain an adequate distance
between yourself and the airbags. Always
grip the steering wheel on the rim, with your
hands in the 3 o'clock and 9 o'clock positions,
to minimize the risk of injury to the hands or
arms in the event of the airbag being triggered
off.
No one and nothing is to come between the air-
bags and the seat occupant.
Do not use the cover of the front airbag on the
front passenger side as a storage area. Make
sure that the front passenger is sitting correctly,
e.g. not resting feet or legs on the instrument
panel, otherwise leg injuries can occur if the
front airbag is triggered.
Make sure that passengers do not lean their
heads against the side or head airbags, other-
wise serious injuries could result if the side air-
bags suddenly deployed.<
Even if you follow all the instructions, injuries
resulting from contact with airbags cannot be
fully excluded, depending on the circum-
stances. The ignition and inflation noise may
provoke a mild hearing loss in extremely sensi-
tive individuals. This effect is usually only tem-
porary.
For airbag locations and additional information
on airbags, refer to page90.
Head restraint
A correctly adjusted head restraint reduces the
risk of neck injury in the event of an accident.
Adjust the head restraint in such a way
that its center is at approx. ear level. Oth-
erwise, there is an increased risk of injury in the
event of an accident.<
Head restraints, refer to page42.
Safety belt
Before every drive, make sure that all occupants
wear their safety belts. Airbags complement the
safety belt as an additional safety device, but
they do not represent a substitute.
Never allow more than one person to
wear a single safety belt. Never allow
infants or small children to ride in a passenger's
lap.
Expectant mothers should also wear the safety
belt, making sure that the strap in the pelvic
area is well down on the hips and does not press
against the abdominal region of the body.
Do not route the belt across your neck, or run it
across sharp edges. Be sure that the belt does
not become caught or jammed. The safety belt
should not be twisted and must be positioned
firmly over the pelvis and shoulder, as close to
the body as possible. It should not pass over
hard or fragile objects, otherwise the belt in the
pelvic area could slide over the hips in the event
of a head-on collision and injure the lower abdo-
men. Avoid wearing bulky clothing and regularly
pull the belt in the upper-body area taut, other-
wise its restraining effect could be impaired.<
Safety belts, refer to page45.
Seats
Note before adjusting
Never attempt to adjust your seat while
the vehicle is moving. The seat could
respond with unexpected movement, and the
Page 71 of 246
Controls
69Reference
At a glance
Driving tips
Communications
Navigation
Entertainment
Mobility
Everything under control
Odometer, outside
temperature display, clock
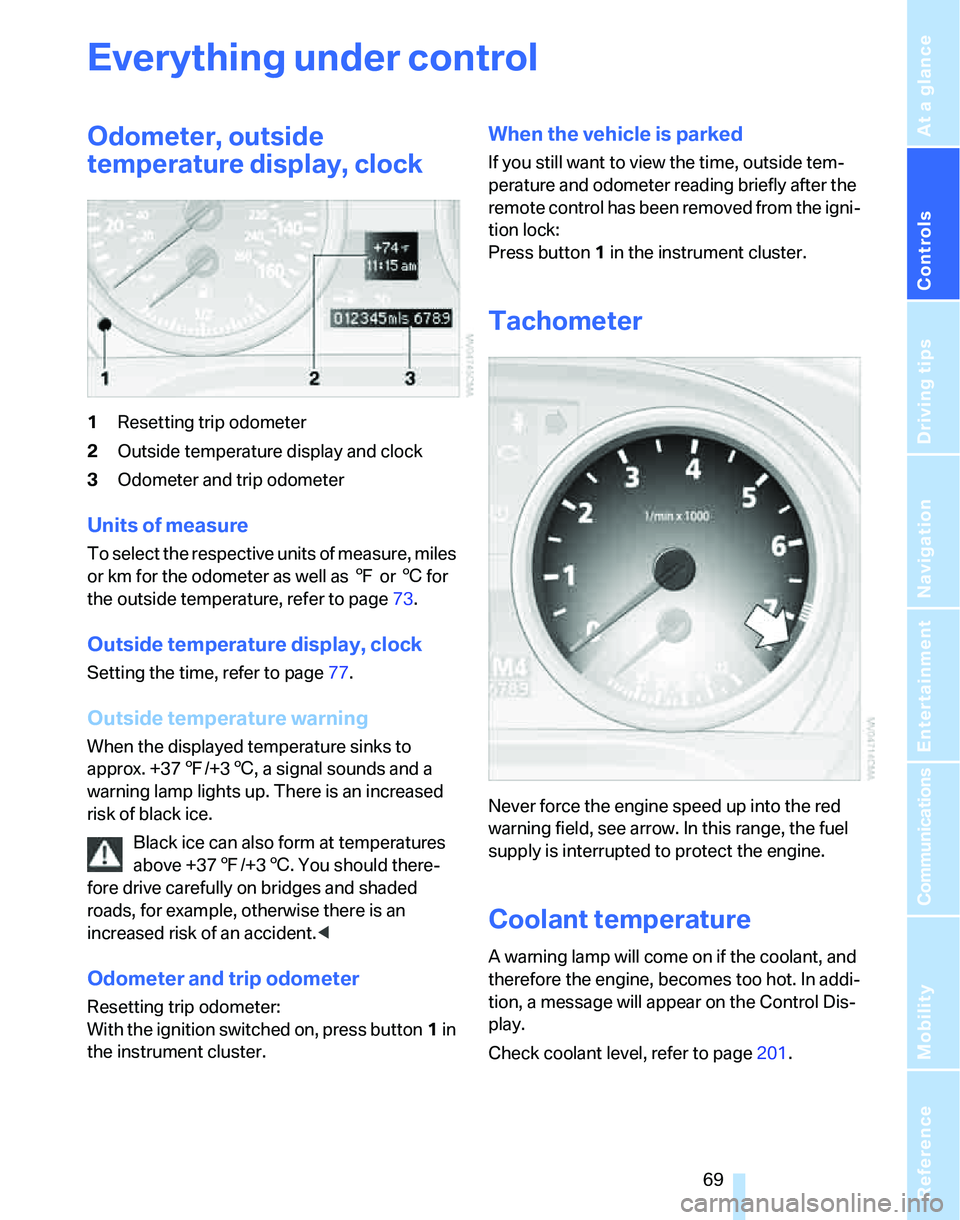
1Resetting trip odometer
2Outside temperature display and clock
3Odometer and trip odometer
Units of measure
T o s e l e c t t h e r e s p e c t i v e u n i t s o f m e a s u r e , m i l e s
or km for the odometer as well as 7 or 6 for
the outside temperature, refer to page73.
Outside temperature display, clock
Setting the time, refer to page77.
Outside temperature warning
When the displayed temperature sinks to
approx. +377/+36, a signal sounds and a
warning lamp lights up. There is an increased
risk of black ice.
Black ice can also form at temperatures
above +377/+36. You should there-
fore drive carefully on bridges and shaded
roads, for example, otherwise there is an
increased risk of an accident.<
Odometer and trip odometer
Resetting trip odometer:
With the ignition switched on, press button1 in
the instrument cluster.
When the vehicle is parked
If you still want to view the time, outside tem-
perature and odometer reading briefly after the
remote control has been removed from the igni-
tion lock:
Press button 1 in the instrument cluster.
Tachometer
Never force the engine speed up into the red
warning field, see arrow. In this range, the fuel
supply is interrupted to protect the engine.
Coolant temperature
A warning lamp will come on if the coolant, and
therefore the engine, becomes too hot. In addi-
tion, a message will appear on the Control Dis-
play.
Check coolant level, refer to page201.
Page 79 of 246
Controls
77Reference
At a glance
Driving tips
Communications
Navigation
Entertainment
Mobility
Clock
The settings are stored for the remote control
currently in use, refer also to Personal Profile on
page29.
Setting the time
In the instrument cluster
To set the 12h/24h mode, refer to Setting the
time format below.
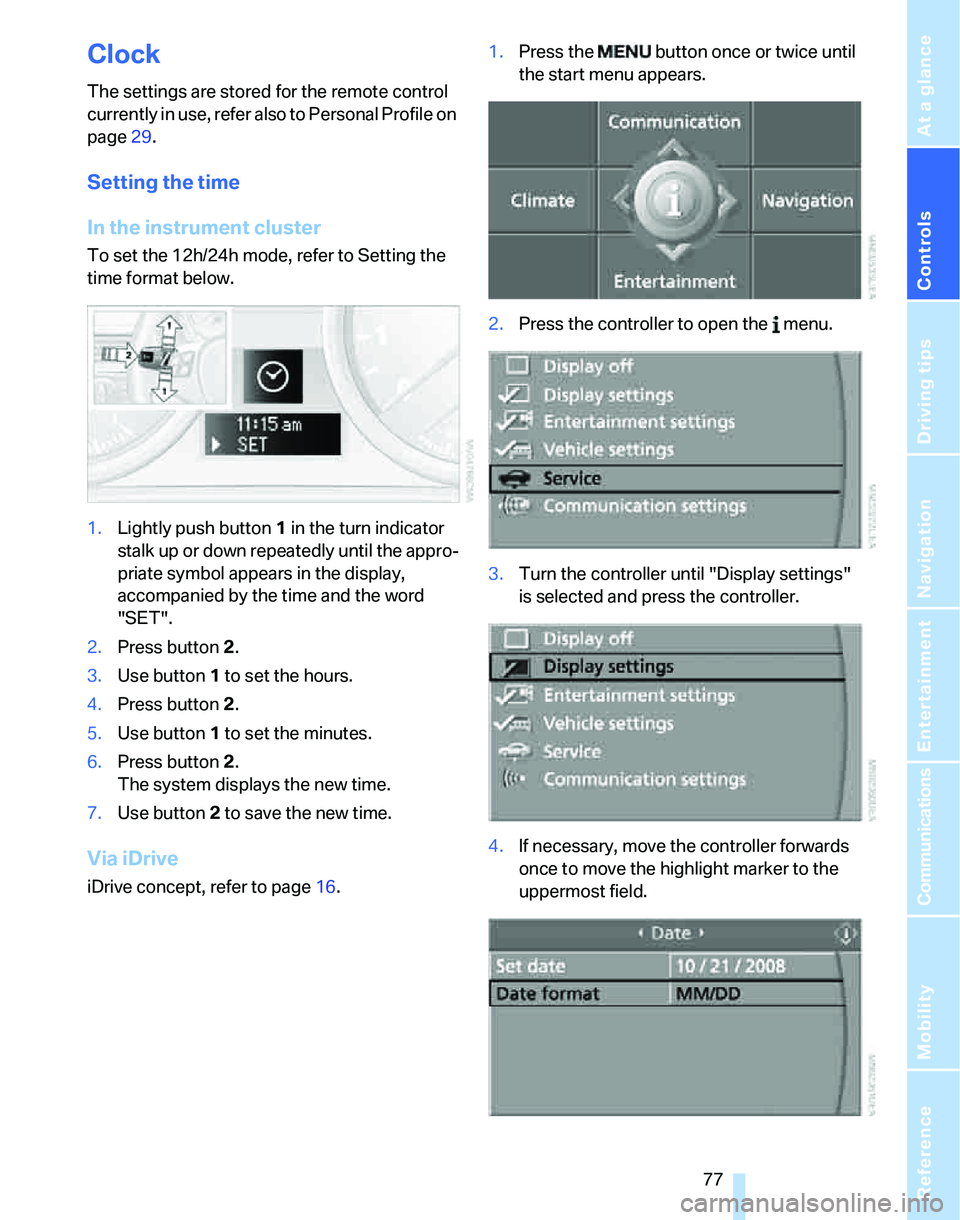
1.Lightly push button 1 in the turn indicator
stalk up or down repeatedly until the appro-
priate symbol appears in the display,
accompanied by the time and the word
"SET".
2.Press button 2.
3.Use button 1 to set the hours.
4.Press button 2.
5.Use button 1 to set the minutes.
6.Press button 2.
The system displays the new time.
7.Use button 2 to save the new time.
Via iDrive
iDrive concept, refer to page16.1.Press the button once or twice until
the start menu appears.
2.Press the controller to open the menu.
3.Turn the controller until "Display settings"
is selected and press the controller.
4.If necessary, move the controller forwards
once to move the highlight marker to the
uppermost field.
Page 188 of 246
Refueling
186
Refueling
Always switch off the engine before refu-
eling, otherwise, fuel cannot be added to
the tank and a message will be displayed.<
Take all precautionary measures and
observe all applicable regulations when
handling fuel. Do not carry any spare fuel con-
tainers in your vehicle. They can develop a leak
and cause an explosion or cause a fire in the
event of an accident.<
Gas cap
Opening
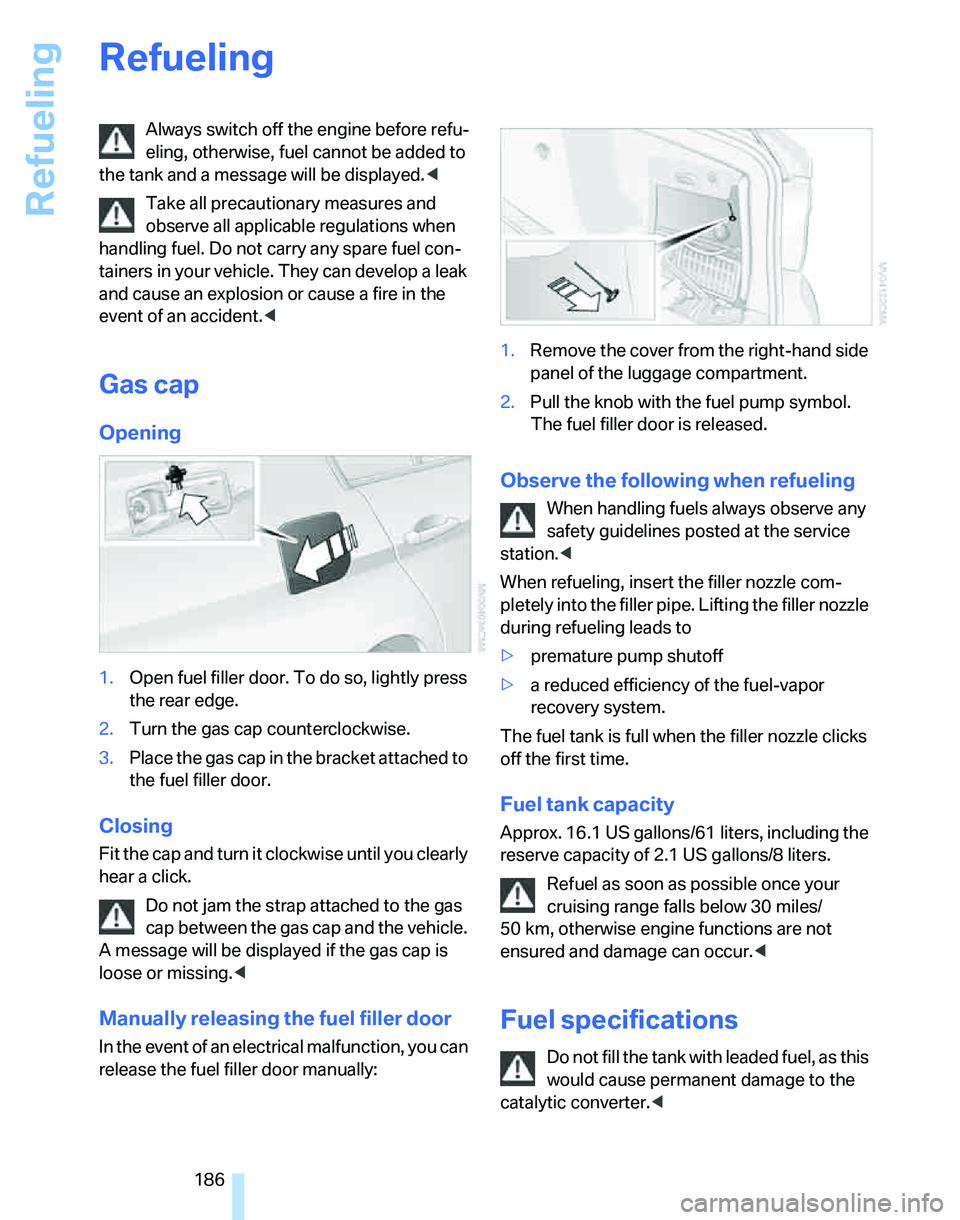
1.Open fuel filler door. To do so, lightly press
the rear edge.
2.Turn the gas cap counterclockwise.
3.Place the gas cap in the bracket attached to
the fuel filler door.
Closing
Fit the cap and turn it clockwise until you clearly
hear a click.
Do not jam the strap attached to the gas
cap between the gas cap and the vehicle.
A message will be displayed if the gas cap is
loose or missing.<
Manually releasing the fuel filler door
In the event of an electrical malfunction, you can
release the fuel filler door manually:1.Remove the cover from the right-hand side
panel of the luggage compartment.
2.Pull the knob with the fuel pump symbol.
The fuel filler door is released.
Observe the following when refueling
When handling fuels always observe any
safety guidelines posted at the service
station.<
When refueling, insert the filler nozzle com-
pletely into the filler pipe. Lifting the filler nozzle
during refueling leads to
>premature pump shutoff
>a reduced efficiency of the fuel-vapor
recovery system.
The fuel tank is full when the filler nozzle clicks
off the first time.
Fuel tank capacity
Approx. 16.1 US gallons/61 liters, including the
reserve capacity of 2.1 US gallons/8 liters.
Refuel as soon as possible once your
cruising range falls below 30 miles/
50 km, otherwise engine functions are not
ensured and damage can occur.<
Fuel specifications
Do not fill the tank with leaded fuel, as this
would cause permanent damage to the
catalytic converter.<
Page 203 of 246
Mobility
201Reference
At a glance
Controls
Driving tips
Communications
Navigation
Entertainment
Too much oil will harm the engine.
Have the vehicle checked without
delay.<
>"Please observe recalculated service inter-
val for engine oil"
Do not add engine oil. You can continue
your journey. Note the newly calculated dis-
tance remaining to the next oil service, refer
to page74. Have the system checked as
soon as possible.
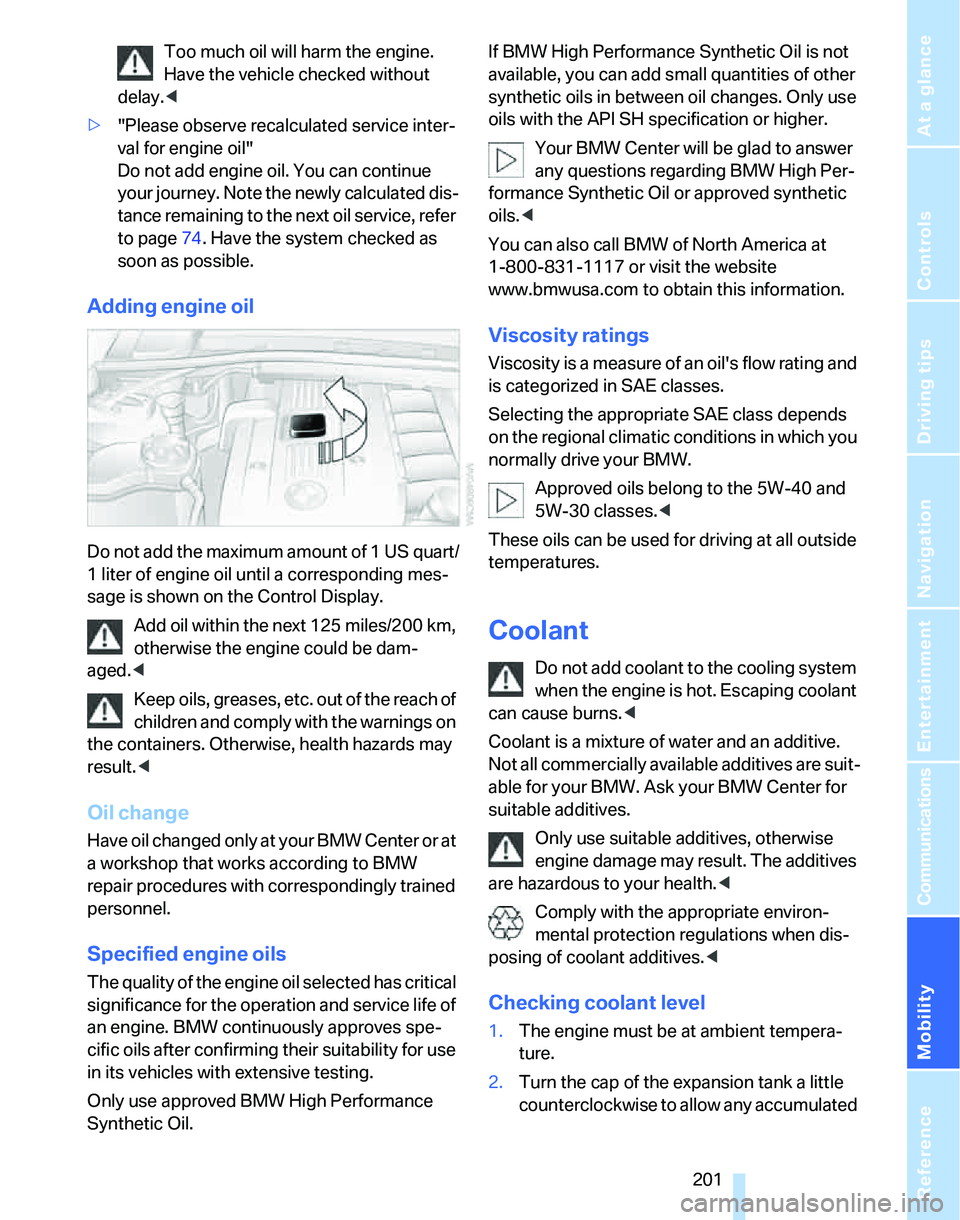
Adding engine oil
Do not add the maximum amount of 1 US quart/
1 liter of engine oil until a corresponding mes-
sage is shown on the Control Display.
Add oil within the next 125 miles/200 km,
otherwise the engine could be dam-
aged.<
Keep oils, greases, etc. out of the reach of
children and comply with the warnings on
the containers. Otherwise, health hazards may
result.<
Oil change
H a v e o i l c h a n g e d o n l y a t y o u r B M W C e n t e r o r a t
a workshop that works according to BMW
repair procedures with correspondingly trained
personnel.
Specified engine oils
The quality of the engine oil selected has critical
significance for the operation and service life of
an engine. BMW continuously approves spe-
cific oils after confirming their suitability for use
in its vehicles with extensive testing.
Only use approved BMW High Performance
Synthetic Oil.If BMW High Performance Synthetic Oil is not
available, you can add small quantities of other
synthetic oils in between oil changes. Only use
oils with the API SH specification or higher.
Your BMW Center will be glad to answer
any questions regarding BMW High Per-
formance Synthetic Oil or approved synthetic
oils.<
You can also call BMW of North America at
1-800-831-1117 or visit the website
www.bmwusa.com to obtain this information.
Viscosity ratings
Viscosity is a measure of an oil's flow rating and
is categorized in SAE classes.
Selecting the appropriate SAE class depends
on the regional climatic conditions in which you
normally drive your BMW.
Approved oils belong to the 5W-40 and
5W-30 classes.<
These oils can be used for driving at all outside
temperatures.
Coolant
Do not add coolant to the cooling system
when the engine is hot. Escaping coolant
can cause burns.<
Coolant is a mixture of water and an additive.
Not all commercially available additives are suit-
able for your BMW. Ask your BMW Center for
suitable additives.
Only use suitable additives, otherwise
engine damage may result. The additives
are hazardous to your health.<
Comply with the appropriate environ-
mental protection regulations when dis-
posing of coolant additives.<
Checking coolant level
1.The engine must be at ambient tempera-
ture.
2.Turn the cap of the expansion tank a little
counterclockwise to allow any accumulated
Page 208 of 246
Replacing components
206 lasers, are officially designated as Class 1 light-
emitting diodes.
Do not remove the covers or expose the
eyes directly to the unfiltered light source
for several hours at a time, otherwise this could
cause irritation to the retina.<
Xenon lamps*
The service life of these bulbs is very long and
the probability of a failure is very low, provided
that they are not switched on and off an unusual
number of times. If a xenon lamp fails neverthe-
less, switch on the fog lamps and continue the
journey with great care, provided that local leg-
islation does not prohibit this.
Have work on the xenon lighting system
performed only by your BMW Center or a
workshop that works according to BMW repair
procedures with correspondingly trained per-
sonnel. Due to the high electrical voltages
present, there is a risk of potentially fatal acci-
dents if work is performed inappropriate.<
Parking lamps, roadside parking lamps
In the event of a malfunction, please contact
your BMW Center or a workshop that works
according to BMW repair procedures with cor-
respondingly trained personnel.
Halogen lamps
H7 bulb, 55 watts
Always wear gloves and eye protection;
the atmosphere within the H7 bulb is
pressurized. Otherwise there is a risk of injury if
the bulb is damaged.<
There are separate headlamp covers for low-
beam headlamps and high-beam headlamps.
Be careful when installing the covers, oth-
erwise leaks could occur and cause dam-
age to the headlamp system.<
For checking and adjusting headlamp
aim, please contact your BMW Center.<
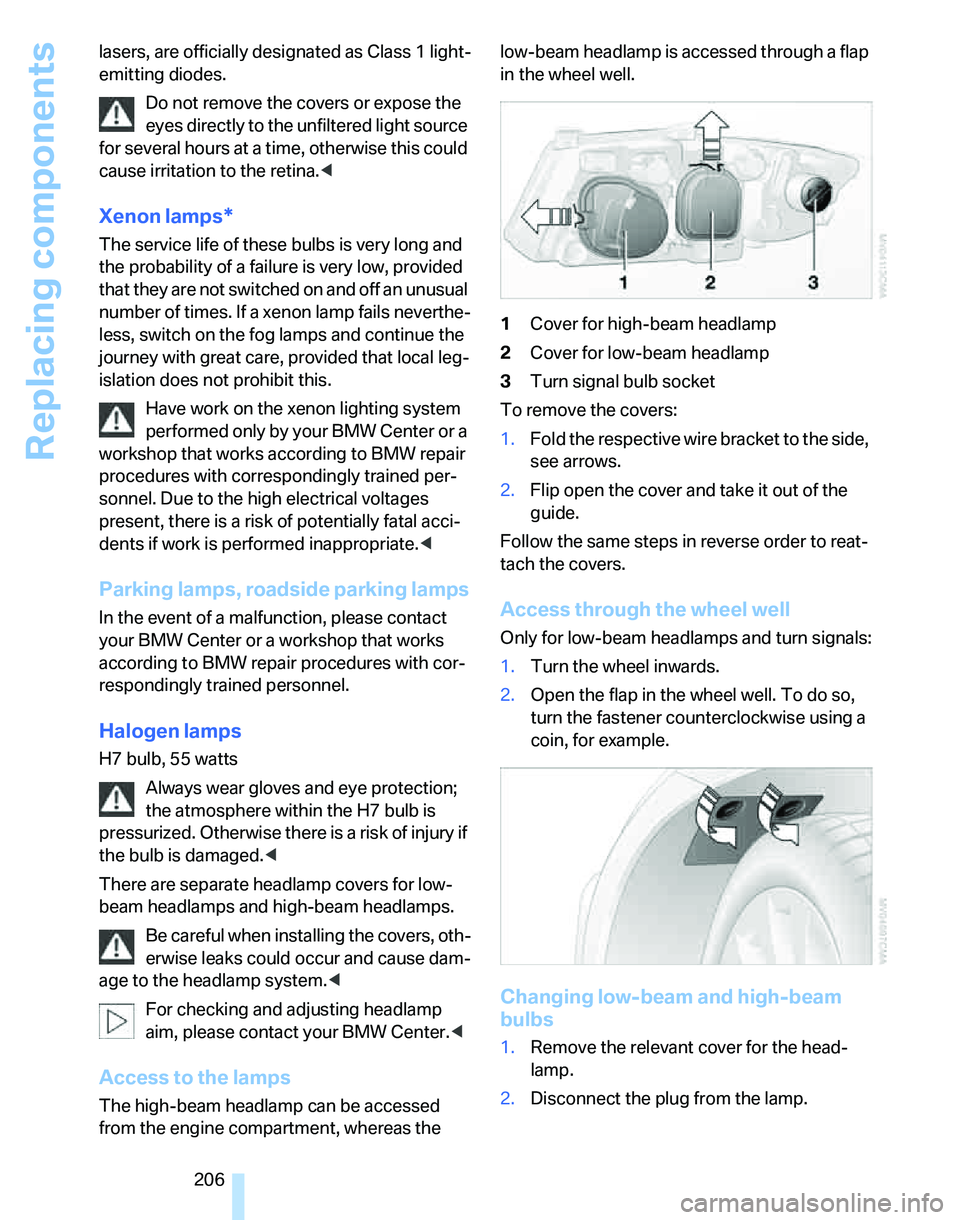
Access to the lamps
The high-beam headlamp can be accessed
from the engine compartment, whereas the low-beam headlamp is accessed through a flap
in the wheel well.
1Cover for high-beam headlamp
2Cover for low-beam headlamp
3Turn signal bulb socket
To remove the covers:
1.Fold the respective wire bracket to the side,
see arrows.
2.Flip open the cover and take it out of the
guide.
Follow the same steps in reverse order to reat-
tach the covers.
Access through the wheel well
Only for low-beam headlamps and turn signals:
1.Turn the wheel inwards.
2.Open the flap in the wheel well. To do so,
turn the fastener counterclockwise using a
coin, for example.
Changing low-beam and high-beam
bulbs
1.Remove the relevant cover for the head-
lamp.
2.Disconnect the plug from the lamp.