2006 BMW 330I check engine
[x] Cancel search: check enginePage 14 of 246
Cockpit
12
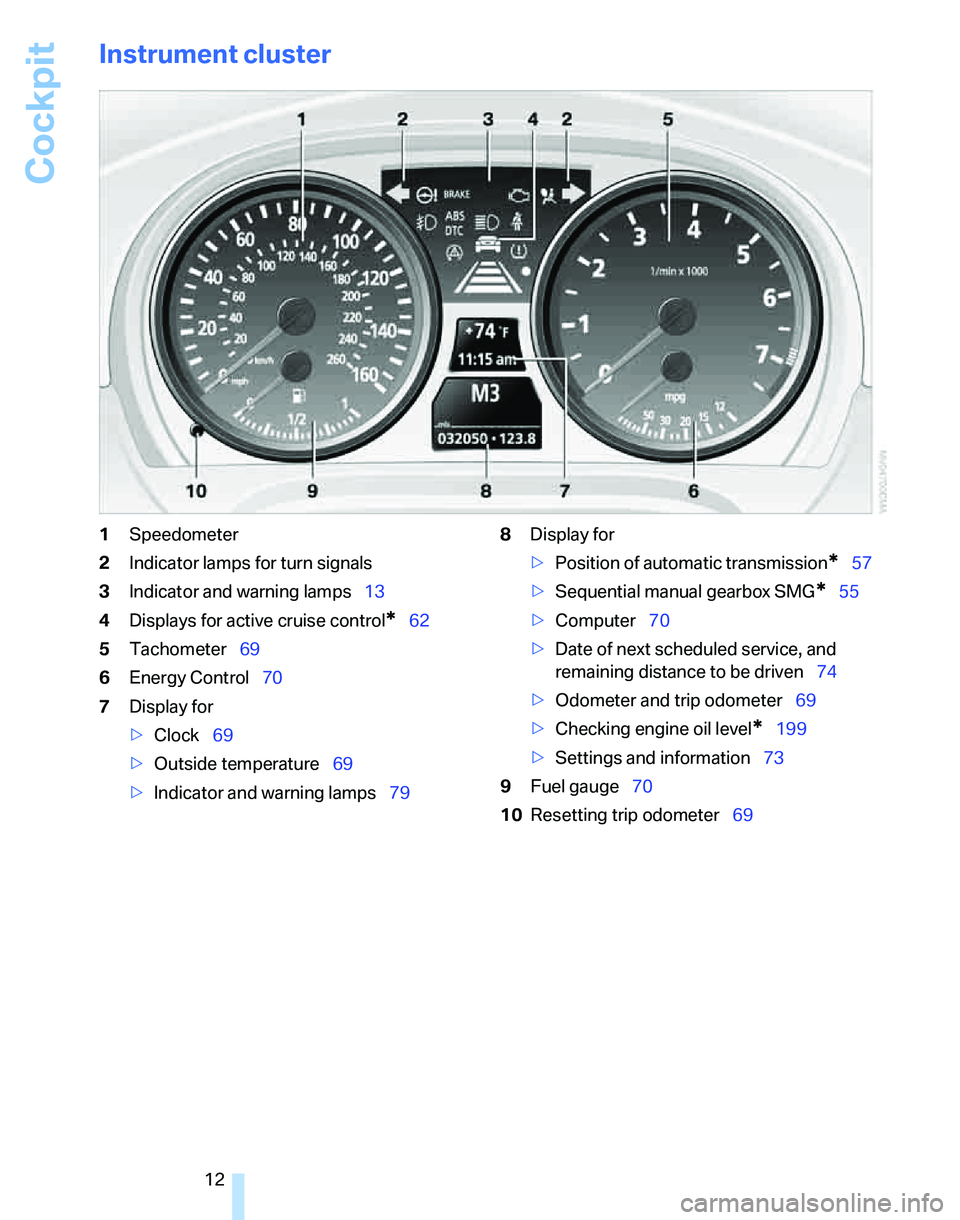
Instrument cluster
1Speedometer
2Indicator lamps for turn signals
3Indicator and warning lamps13
4Displays for active cruise control
*62
5Tachometer69
6Energy Control70
7Display for
>Clock69
>Outside temperature69
>Indicator and warning lamps798Display for
>Position of automatic transmission
*57
>Sequential manual gearbox SMG
*55
>Computer70
>Date of next scheduled service, and
remaining distance to be driven74
>Odometer and trip odometer69
>Checking engine oil level
*199
>Settings and information73
9Fuel gauge70
10Resetting trip odometer69
Page 15 of 246
At a glance
13Reference
Controls
Driving tips
Communications
Navigation
Entertainment
Mobility
Indicator and warning lamps
The concept
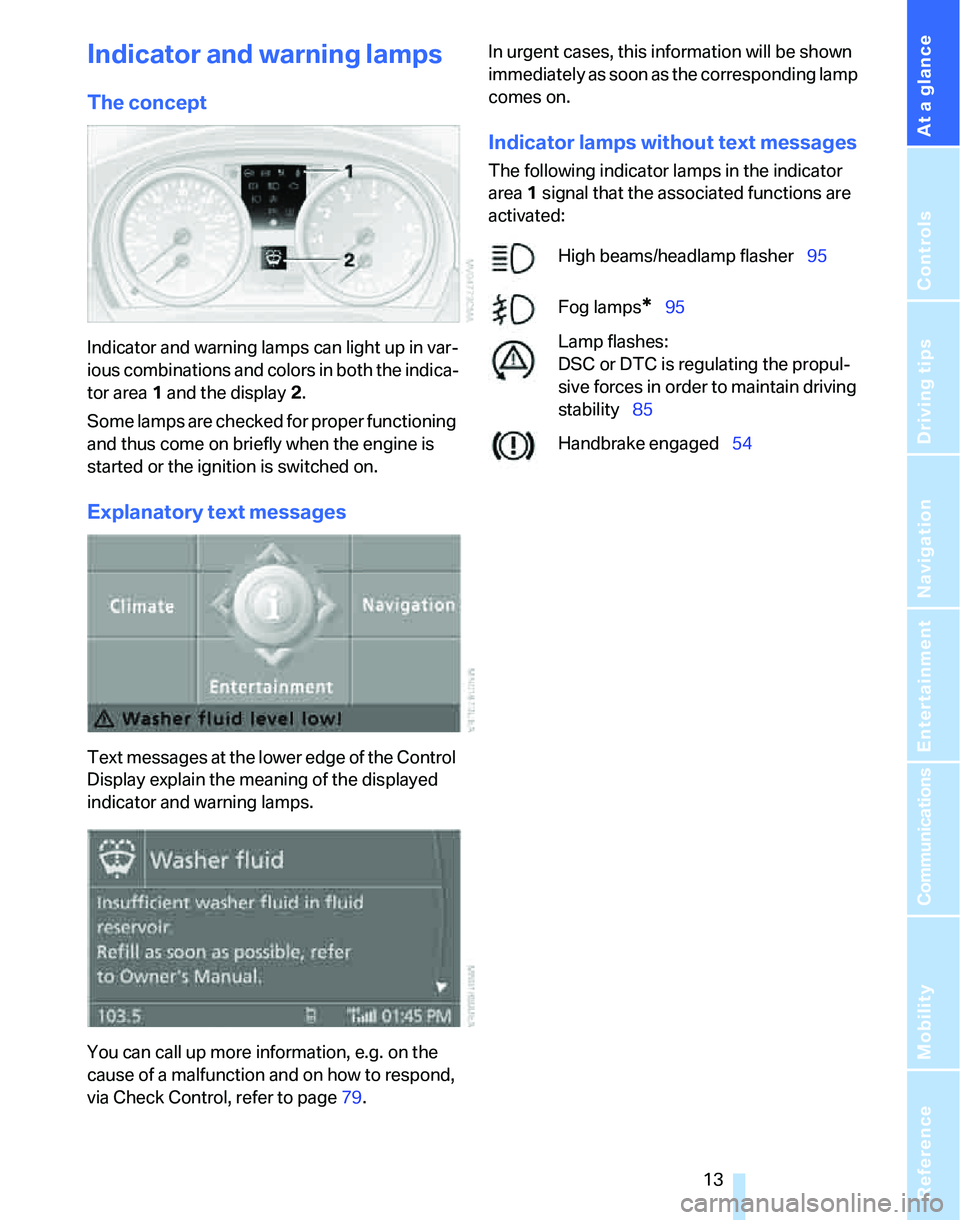
Indicator and warning lamps can light up in var-
ious combinations and colors in both the indica-
tor area 1 and the display 2.
Some lamps are checked for proper functioning
and thus come on briefly when the engine is
started or the ignition is switched on.
Explanatory text messages
Text messages at the lower edge of the Control
Display explain the meaning of the displayed
indicator and warning lamps.
You can call up more information, e.g. on the
cause of a malfunction and on how to respond,
via Check Control, refer to page79.In urgent cases, this information will be shown
immediately as soon as the corresponding lamp
comes on.
Indicator lamps without text messages
The following indicator lamps in the indicator
area1 signal that the associated functions are
activated:
High beams/headlamp flasher95
Fog lamps
*95
Lamp flashes:
DSC or DTC is regulating the propul-
sive forces in order to maintain driving
stability85
Handbrake engaged54
Page 38 of 246
Opening and closing
36
Unlocking
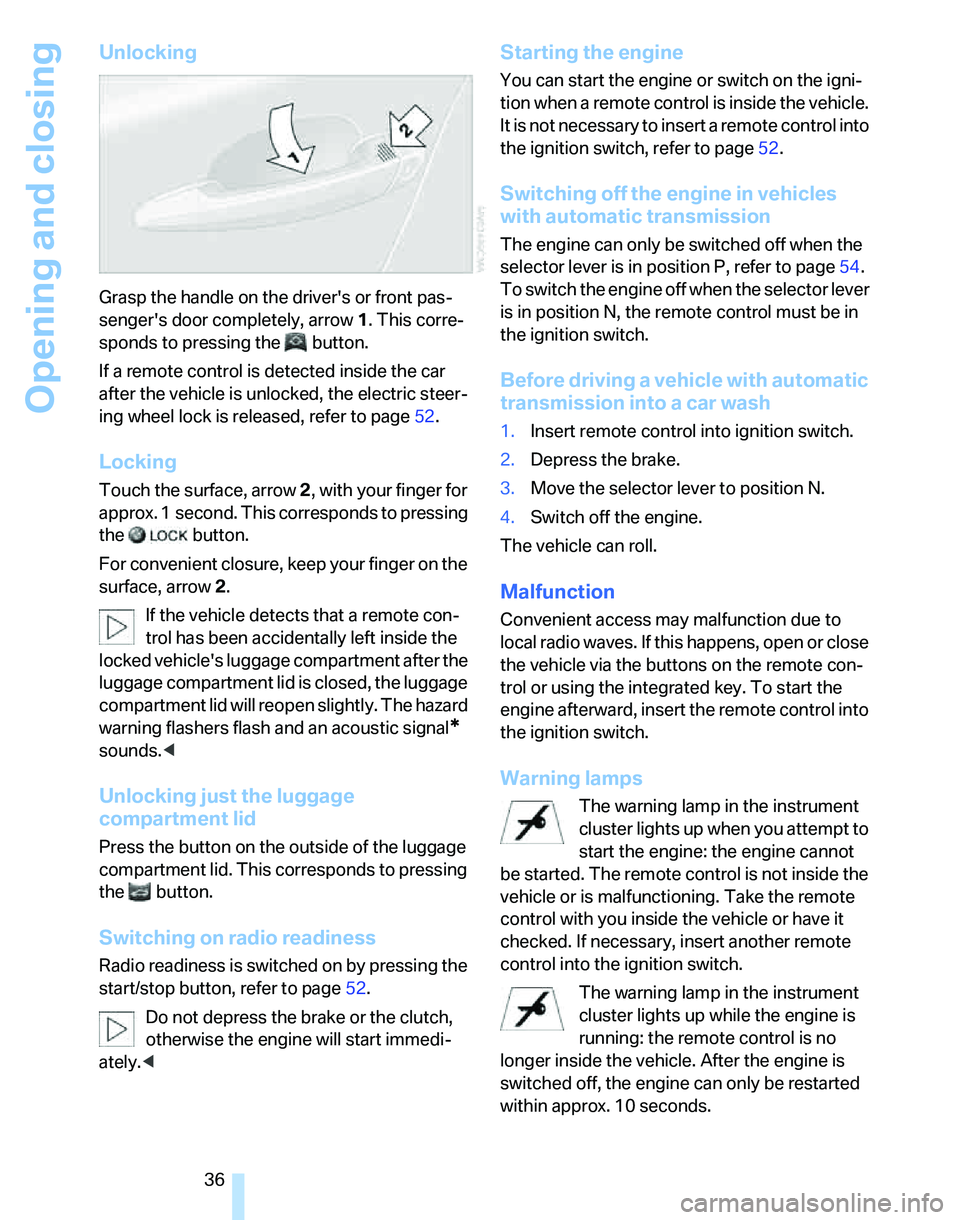
Grasp the handle on the driver's or front pas-
senger's door completely, arrow 1. This corre-
sponds to pressing the button.
If a remote control is detected inside the car
after the vehicle is unlocked, the electric steer-
ing wheel lock is released, refer to page52.
Locking
Touch the surface, arrow 2, with your finger for
approx. 1 second. This corresponds to pressing
the button.
For convenient closure, keep your finger on the
surface, arrow 2.
If the vehicle detects that a remote con-
trol has been accidentally left inside the
locked vehicle's luggage compartment after the
luggage compartment lid is closed, the luggage
compartment lid will reopen slightly. The hazard
warning flashers flash and an acoustic signal
*
sounds.<
Unlocking just the luggage
compartment lid
Press the button on the outside of the luggage
compartment lid. This corresponds to pressing
the button.
Switching on radio readiness
Radio readiness is switched on by pressing the
start/stop button, refer to page52.
Do not depress the brake or the clutch,
otherwise the engine will start immedi-
ately.<
Starting the engine
You can start the engine or switch on the igni-
tion when a remote control is inside the vehicle.
It is not necessary to insert a remote control into
the ignition switch, refer to page52.
Switching off the engine in vehicles
with automatic transmission
The engine can only be switched off when the
selector lever is in position P, refer to page54.
To switch the engine off when the selector lever
is in position N, the remote control must be in
the ignition switch.
Before driving a vehicle with automatic
transmission into a car wash
1.Insert remote control into ignition switch.
2.Depress the brake.
3.Move the selector lever to position N.
4.Switch off the engine.
The vehicle can roll.
Malfunction
Convenient access may malfunction due to
local radio waves. If this happens, open or close
the vehicle via the buttons on the remote con-
trol or using the integrated key. To start the
engine afterward, insert the remote control into
the ignition switch.
Warning lamps
The warning lamp in the instrument
cluster lights up when you attempt to
start the engine: the engine cannot
be started. The remote control is not inside the
vehicle or is malfunctioning. Take the remote
control with you inside the vehicle or have it
checked. If necessary, insert another remote
control into the ignition switch.
The warning lamp in the instrument
cluster lights up while the engine is
running: the remote control is no
longer inside the vehicle. After the engine is
switched off, the engine can only be restarted
within approx. 10 seconds.
Page 71 of 246
Controls
69Reference
At a glance
Driving tips
Communications
Navigation
Entertainment
Mobility
Everything under control
Odometer, outside
temperature display, clock
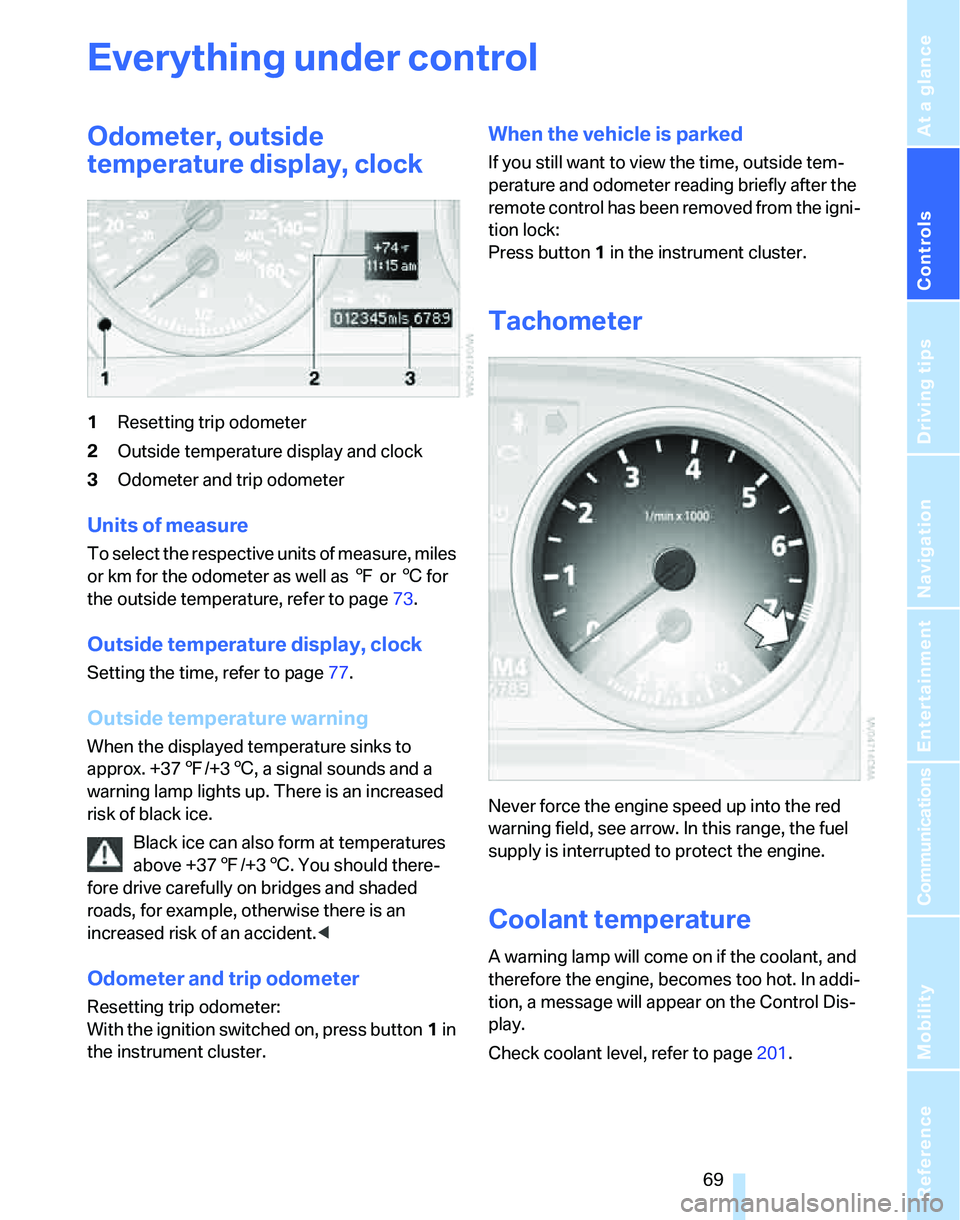
1Resetting trip odometer
2Outside temperature display and clock
3Odometer and trip odometer
Units of measure
T o s e l e c t t h e r e s p e c t i v e u n i t s o f m e a s u r e , m i l e s
or km for the odometer as well as 7 or 6 for
the outside temperature, refer to page73.
Outside temperature display, clock
Setting the time, refer to page77.
Outside temperature warning
When the displayed temperature sinks to
approx. +377/+36, a signal sounds and a
warning lamp lights up. There is an increased
risk of black ice.
Black ice can also form at temperatures
above +377/+36. You should there-
fore drive carefully on bridges and shaded
roads, for example, otherwise there is an
increased risk of an accident.<
Odometer and trip odometer
Resetting trip odometer:
With the ignition switched on, press button1 in
the instrument cluster.
When the vehicle is parked
If you still want to view the time, outside tem-
perature and odometer reading briefly after the
remote control has been removed from the igni-
tion lock:
Press button 1 in the instrument cluster.
Tachometer
Never force the engine speed up into the red
warning field, see arrow. In this range, the fuel
supply is interrupted to protect the engine.
Coolant temperature
A warning lamp will come on if the coolant, and
therefore the engine, becomes too hot. In addi-
tion, a message will appear on the Control Dis-
play.
Check coolant level, refer to page201.
Page 85 of 246
Controls
83Reference
At a glance
Driving tips
Communications
Navigation
Entertainment
Mobility
Technology for driving comfort and safety
PDC Park Distance Control*
The concept
The PDC assists you with maneuvering in tight
parking spaces. Acoustic signals and a visual
indicator
warn you of the presence of an object
in front of
* or behind your car. To measure the
distance, there are four ultrasonic sensors in
each bumper.
These sensors have a range of approx. 6.5 ft/
2 m. However, an acoustic warning does not
sound until an object is approx. 2 ft/60 cm from
the front sensors
* or both rear corner sensors,
or approx. 5 ft/1.50 m from the rear center sen-
sors.
PDC is a parking aid that can indicate
objects when they are approached
slowly, as is usually the case when parking.
Avoid approaching an object at high speed, oth-
erwise physical circumstances may lead to the
system warning being issued too late.<
Automatic mode
With the engine running or the ignition switched
on, the system is activated automatically after
approx. 1 second when you engage reverse
gear or move the automatic transmission selec-
tor lever to position R. Wait this short period
before driving.
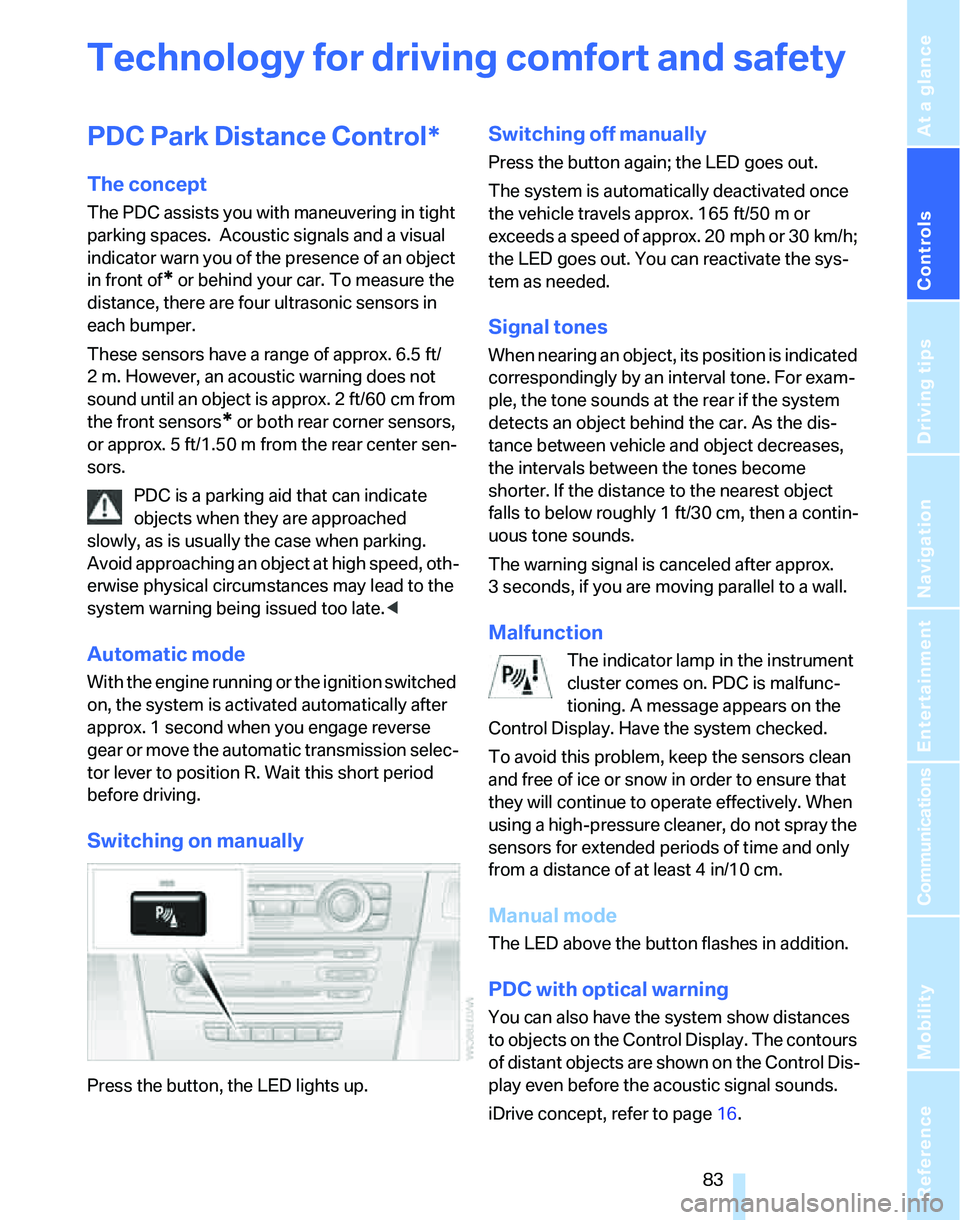
Switching on manually
Press the button, the LED lights up.
Switching off manually
Press the button again; the LED goes out.
The system is automatically deactivated once
the vehicle travels approx. 165 ft/50 m or
exceeds a speed of approx. 20 mph or 30 km/h;
the LED goes out. You can reactivate the sys-
tem as needed.
Signal tones
When nearing an object, its position is indicated
correspondingly by an interval tone. For exam-
ple, the tone sounds at the rear if the system
detects an object behind the car. As the dis-
tance between vehicle and object decreases,
the intervals between the tones become
shorter. If the distance to the nearest object
falls to below roughly 1 ft/30 cm, then a contin-
uous tone sounds.
The warning signal is canceled after approx.
3 seconds, if you are moving parallel to a wall.
Malfunction
The indicator lamp in the instrument
cluster comes on. PDC is malfunc-
tioning. A message appears on the
Control Display. Have the system checked.
To avoid this problem, keep the sensors clean
and free of ice or snow in order to ensure that
they will continue to operate effectively. When
using a high-pressure cleaner, do not spray the
sensors for extended periods of time and only
from a distance of at least 4 in/10 cm.
Manual mode
The LED above the button flashes in addition.
PDC with optical warning
You can also have the system show distances
to objects on the Control Display. The contours
of distant objects are shown on the Control Dis-
play even before the acoustic signal sounds.
iDrive concept, refer to page16.
Page 90 of 246
Technology for driving comfort and safety
88
Malfunction
The warning lamps for the brake sys-
tem light up in yellow. The drive-off
assistant has failed. The car will not
be held in place after the brake is
released. Have the system checked as soon as
possible.
Canadian models display these warn-
ing lamps.
Flat Tire Monitor FTM
The concept
The Flat Tire Monitor monitors tire pressures
while the car is being driven. The system
reports any significant loss of pressure in one
tire in relation to another.
If a tire loses pressure, its rolling radius
changes, and this in turn alters the speed of
rotation. This change is detected and is
reported as a flat tire.
Functional requirement
In order to assure the reliable reporting of a flat
tire, the system must be initialized for the cor-
rect tire inflation pressure.
The system must be reinitialized each
time a tire inflation pressure has been cor-
rected or a wheel or tire has been changed.<
System limitations
The Flat Tire Monitor is unable to warn
the driver of sudden, severe tire damage
caused by external factors, nor can it identify
the gradual loss of pressure that will inevitably
occur in all four tires over a lengthy period of
time.<
In the following situations, the system could be
delayed or malfunction:
>System has not been initialized
>Driving on snowy or slippery road surface
>Performance-oriented style of driving: slip
in the drive wheels, high lateral acceleration>If snow chains are attached
Initializing the system
The initialization is completed during driv-
ing, which can be interrupted at any time.
When driving resumes, the initialization is con-
tinued automatically.
Do not initialize the system while snow chains
are attached.<
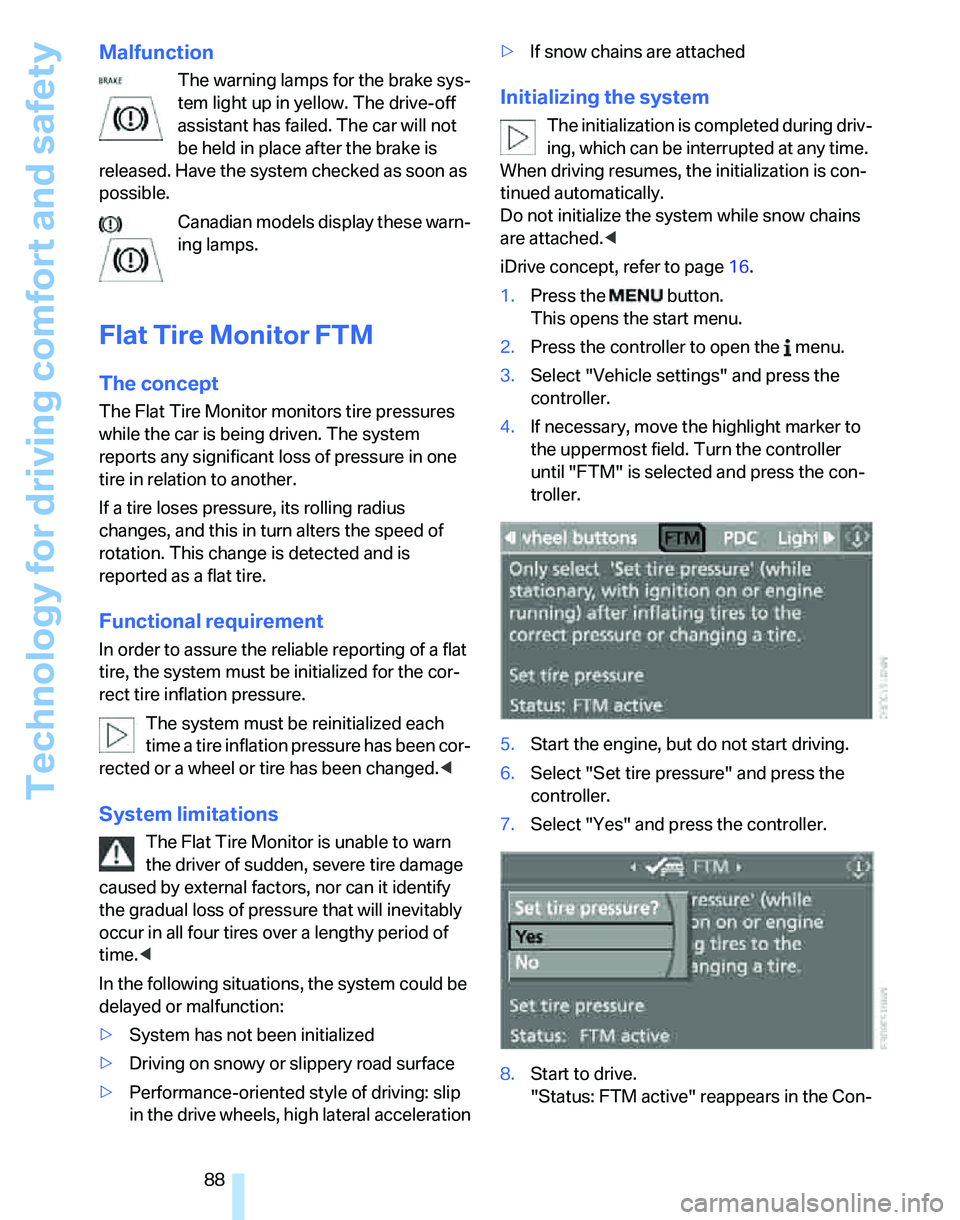
iDrive concept, refer to page16.
1.Press the button.
This opens the start menu.
2.Press the controller to open the menu.
3.Select "Vehicle settings" and press the
controller.
4.If necessary, move the highlight marker to
the uppermost field. Turn the controller
until "FTM" is selected and press the con-
troller.
5.Start the engine, but do not start driving.
6.Select "Set tire pressure" and press the
controller.
7.Select "Yes" and press the controller.
8.Start to drive.
"Status: FTM active" reappears in the Con-
Page 92 of 246
Technology for driving comfort and safety
90 tiously and think well ahead. Have the system
checked.
If the warning lamp lights up during the first
engine starting following a power supply inter-
ruption, the system must be activated by being
initialized.
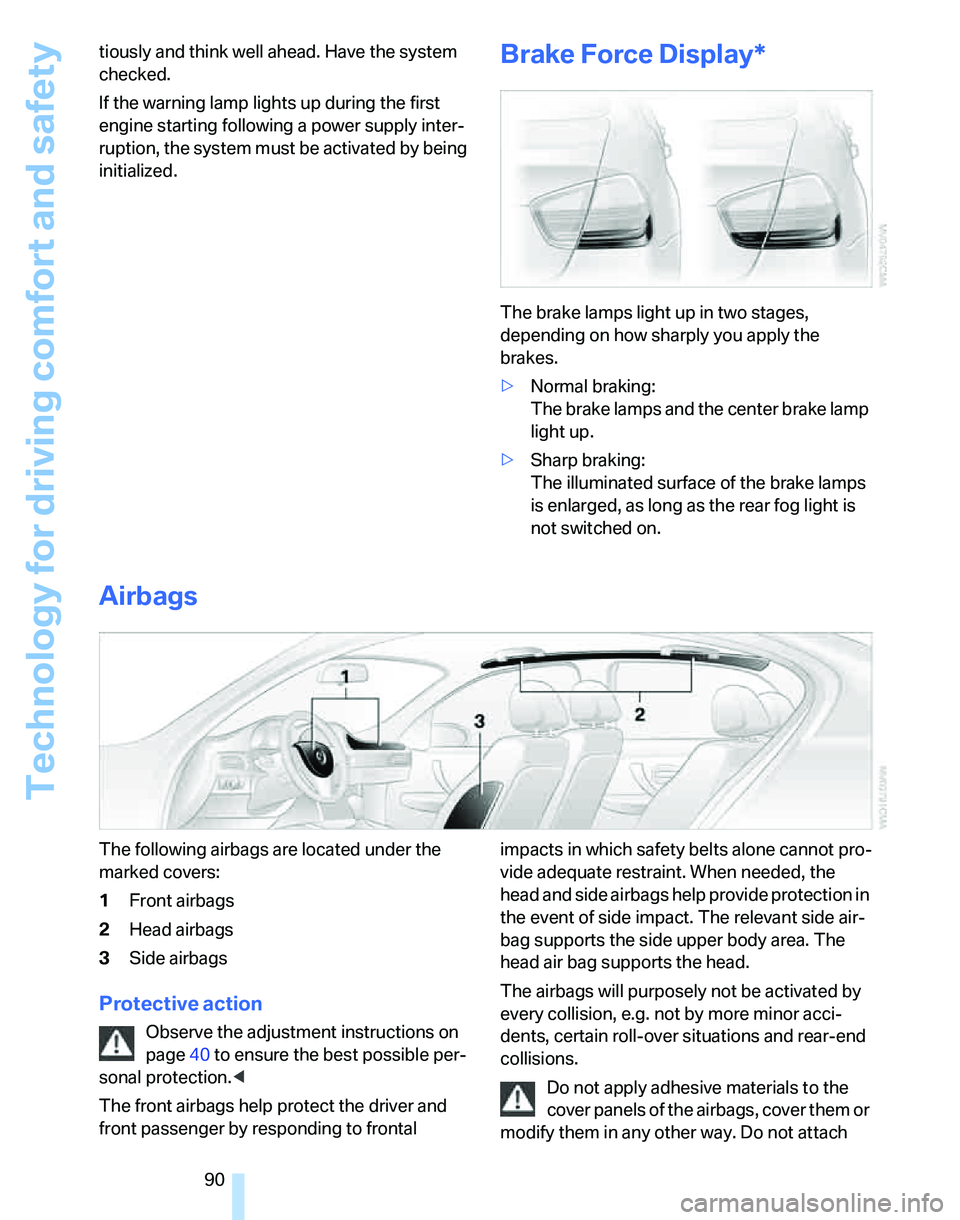
Brake Force Display*
The brake lamps light up in two stages,
depending on how sharply you apply the
brakes.
>Normal braking:
The brake lamps and the center brake lamp
light up.
>Sharp braking:
The illuminated surface of the brake lamps
is enlarged, as long as the rear fog light is
not switched on.
Airbags
The following airbags are located under the
marked covers:
1Front airbags
2Head airbags
3Side airbags
Protective action
Observe the adjustment instructions on
page40 to ensure the best possible per-
sonal protection.<
The front airbags help protect the driver and
front passenger by responding to frontal impacts in which safety belts alone cannot pro-
vide adequate restraint. When needed, the
head and side airbags help provide protection in
the event of side impact. The relevant side air-
bag supports the side upper body area. The
head air bag supports the head.
The airbags will purposely not be activated by
every collision, e.g. not by more minor acci-
dents, certain roll-over situations and rear-end
collisions.
Do not apply adhesive materials to the
cover panels of the airbags, cover them or
modify them in any other way. Do not attach
Page 97 of 246
Controls
95Reference
At a glance
Driving tips
Communications
Navigation
Entertainment
Mobility
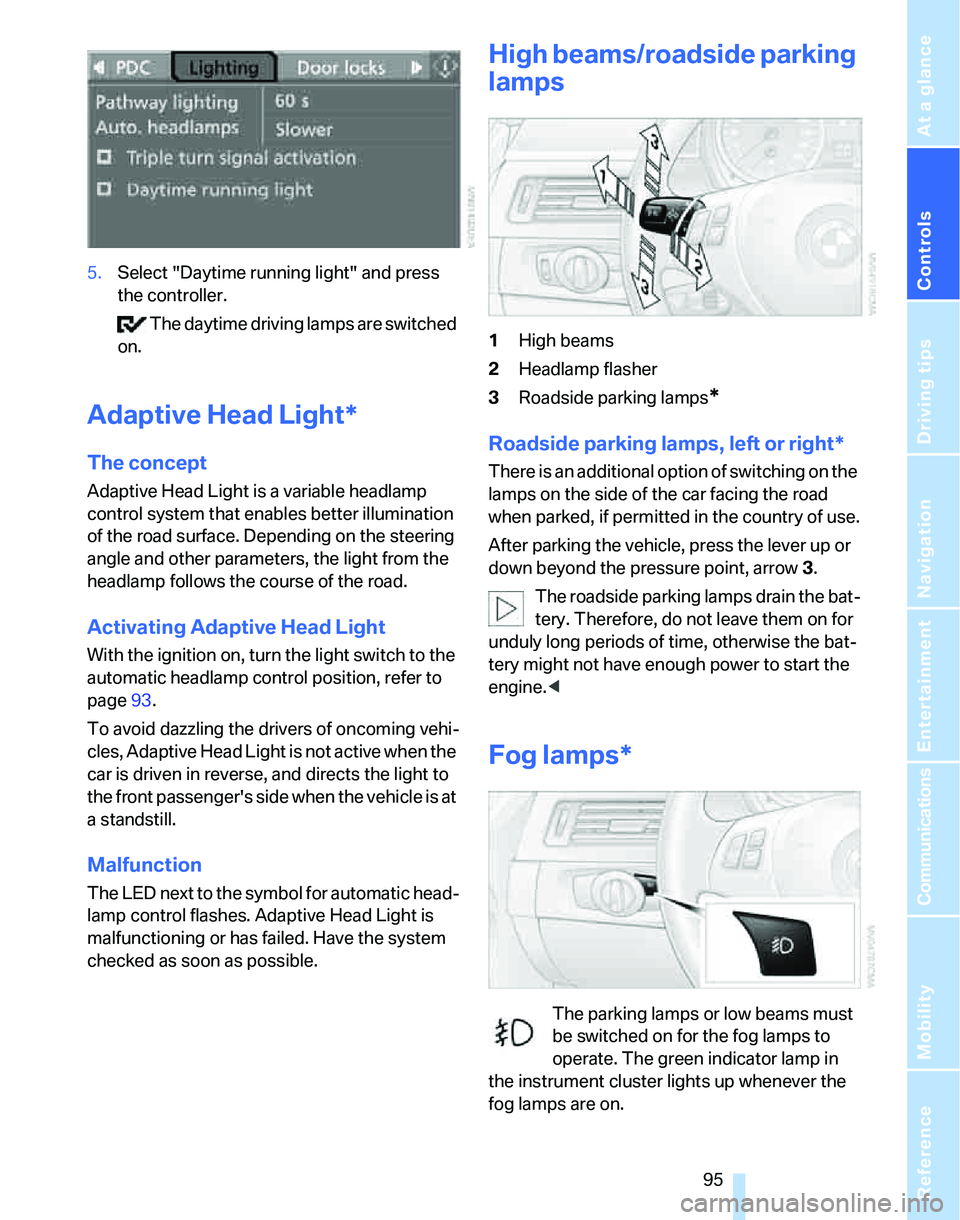
5.Select "Daytime running light" and press
the controller.
The daytime driving lamps are switched
on.
Adaptive Head Light*
The concept
Adaptive Head Light is a variable headlamp
control system that enables better illumination
of the road surface. Depending on the steering
angle and other parameters, the light from the
headlamp follows the course of the road.
Activating Adaptive Head Light
With the ignition on, turn the light switch to the
automatic headlamp control position, refer to
page93.
To avoid dazzling the drivers of oncoming vehi-
cles, Adaptive Head Light is not active when the
car is driven in reverse, and directs the light to
the front passenger's side when the vehicle is at
a standstill.
Malfunction
The LED next to the symbol for automatic head-
lamp control flashes. Adaptive Head Light is
malfunctioning or has failed. Have the system
checked as soon as possible.
High beams/roadside parking
lamps
1High beams
2Headlamp flasher
3Roadside parking lamps
*
Roadside parking lamps, left or right*
There is an additional option of switching on the
lamps on the side of the car facing the road
when parked, if permitted in the country of use.
After parking the vehicle, press the lever up or
down beyond the pressure point, arrow 3.
The roadside parking lamps drain the bat-
tery. Therefore, do not leave them on for
unduly long periods of time, otherwise the bat-
tery might not have enough power to start the
engine.<
Fog lamps*
The parking lamps or low beams must
be switched on for the fog lamps to
operate. The green indicator lamp in
the instrument cluster lights up whenever the
fog lamps are on.