2006 BMW 325XI SPORTS WAGON rear entertainment
[x] Cancel search: rear entertainmentPage 102 of 236

Controls
101Reference
At a glance
Driving tips
Communications
Navigation
Entertainment
Mobility
The corresponding memory button 1 is now
programmed with the signal of the original
hand-held transmitter.
You can operate the system when the engine is
running or when the ignition is switched on.
If the system fails to function even after
repeated programming, check whether
the original hand-held transmitter uses an alter-
nating-code system. To do so, either read the
instructions for the original hand-held transmit-
ter or hold down the programmed memory
button1 of the integrated universal remote
control. If the LED2 on the integrated universal
remote control flashes rapidly for a short while
and then remains lit for about two seconds, the
original hand-held transmitter uses an alternat-
ing-code system. If it uses an alternating-code
system, program the memory buttons1 as
described under Alternating-code hand-held
transmitters.<
Alternating-code hand-held
transmitters
To program the integrated universal remote
control, consult the operating instructions for
the device to be set. You will find information
there on the possibilities for synchronization.
When programming hand-held transmitters that employ an alternating code, please observe
the following supplementary instructions:
P r o g ra m m in g w i ll b e ea s i er w it h t h e a i d o f
a second person.<
1.Park your vehicle within the range of the
remote-controlled device.
2.Program the integrated universal remote
control as described above in the section
Fixed-code hand-held transmitters.
3.Locate the button on the receiver of the
device to be set, e.g. on the drive unit.
4.Press the button on the receiver of the
device to be set. After step 4, you have
approx. 30 seconds for step 5.
5.Press the programmed memory button1 of
the integrated universal remote control
three times.
The corresponding memory button 1 is now
programmed with the signal of the original
hand-held transmitter.
If you have any questions, please contact
your BMW Center.<
Deleting stored programs
Press both outer memory buttons1 for approx.
20 seconds until the LED2 flashes: all stored
programs are cleared.
It is not possible to clear individual programs.
Interior rearview mirror with digital compass*
1Adjustment button
2Display
The display shows you the main or secondary
direction in which you are driving.
Setting compass zones
Depending on the vehicle's geographic loca-
tion, the relevant compass zone must be set.
Page 104 of 236
Controls
103Reference
At a glance
Driving tips
Communications
Navigation
Entertainment
Mobility
Glove compartment
Opening
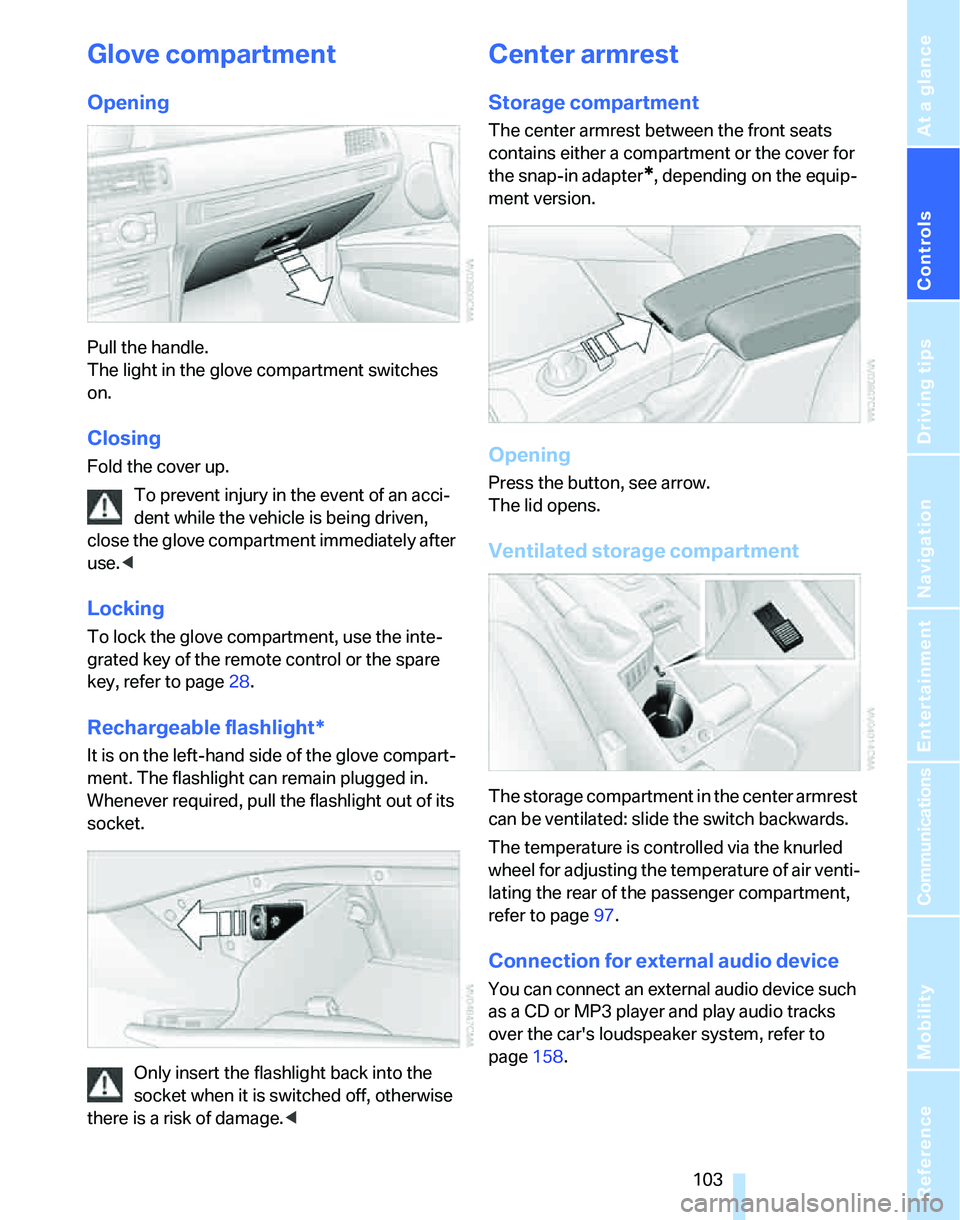
Pull the handle.
The light in the glove compartment switches
on.
Closing
Fold the cover up.
To prevent injury in the event of an acci-
dent while the vehicle is being driven,
close the glove compartment immediately after
use.<
Locking
To lock the glove compartment, use the inte-
grated key of the remote control or the spare
key, refer to page28.
Rechargeable flashlight*
It is on the left-hand side of the glove compart-
ment. The flashlight can remain plugged in.
Whenever required, pull the flashlight out of its
socket.
Only insert the flashlight back into the
socket when it is switched off, otherwise
there is a risk of damage.<
Center armrest
Storage compartment
The center armrest between the front seats
contains either a compartment or the cover for
the snap-in adapter
*, depending on the equip-
ment version.
Opening
Press the button, see arrow.
The lid opens.
Ventilated storage compartment
The storage compartment in the center armrest
can be ventilated: slide the switch backwards.
The temperature is controlled via the knurled
wheel for adjusting the temperature of air venti-
lating the rear of the passenger compartment,
refer to page97.
Connection for external audio device
You can connect an external audio device such
as a CD or MP3 player and play audio tracks
over the car's loudspeaker system, refer to
page158.
Page 106 of 236
Controls
105Reference
At a glance
Driving tips
Communications
Navigation
Entertainment
Mobility
the cigarette lighter and possibly burn them-
selves.<
Ashtray, rear
Opening
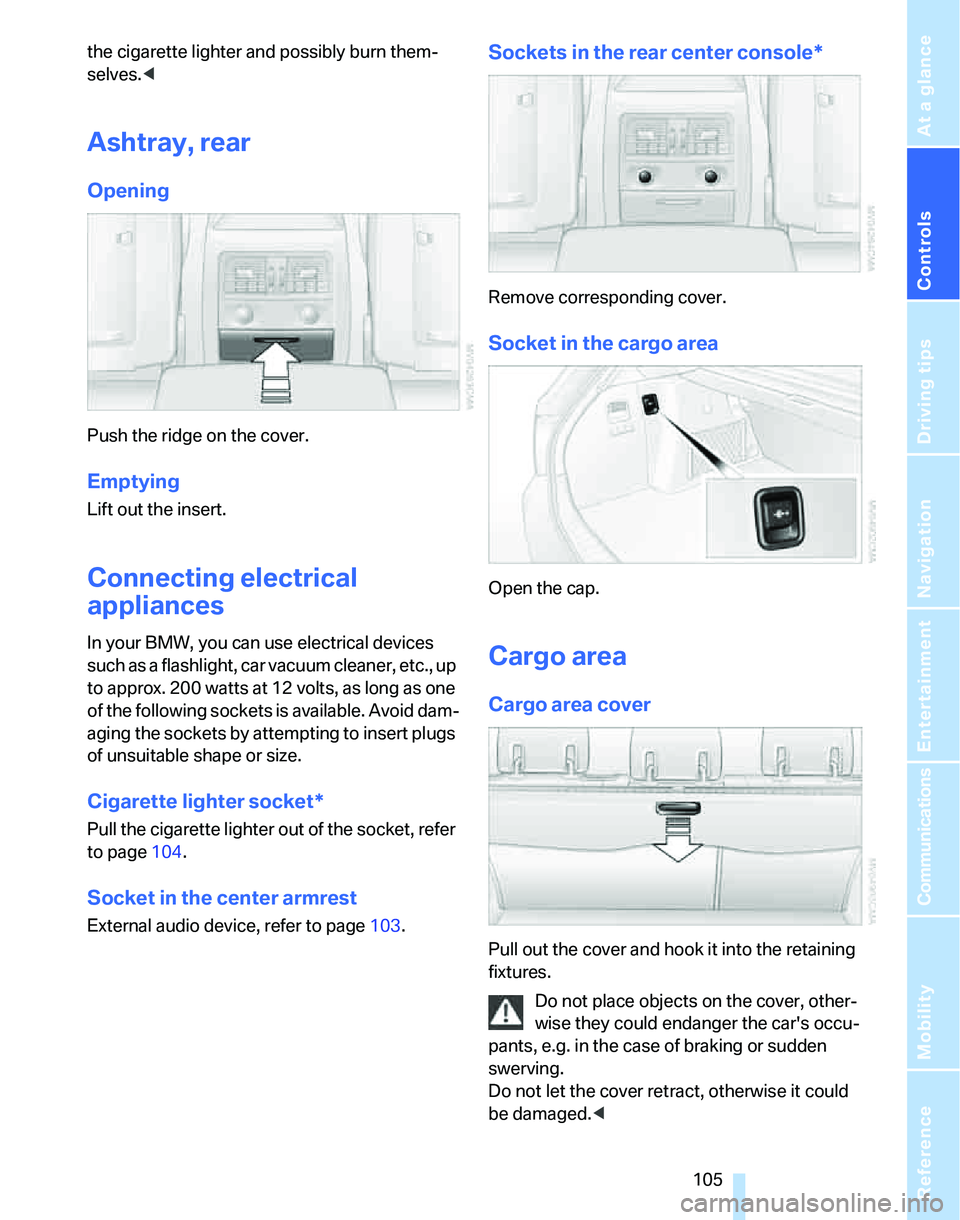
Push the ridge on the cover.
Emptying
Lift out the insert.
Connecting electrical
appliances
In your BMW, you can use electrical devices
such as a flashlight, car vacuum cleaner, etc., up
to approx. 200 watts at 12 volts, as long as one
of the following sockets is available. Avoid dam-
aging the sockets by attempting to insert plugs
of unsuitable shape or size.
Cigarette lighter socket*
Pull the cigarette lighter out of the socket, refer
to page104.
Socket in the center armrest
External audio device, refer to page103.
Sockets in the rear center console*
Remove corresponding cover.
Socket in the cargo area
Open the cap.
Cargo area
Cargo area cover
Pull out the cover and hook it into the retaining
fixtures.
Do not place objects on the cover, other-
wise they could endanger the car's occu-
pants, e.g. in the case of braking or sudden
swerving.
Do not let the cover retract, otherwise it could
be damaged.<
Page 114 of 236

Driving tips
113Reference
At a glance
Controls
Communications
Navigation
Entertainment
Mobility
there is no assurance that the radiation which
results from transmission will be dissipated
from the vehicle interior.<
Interior and exterior mirrors, automatic
dimming feature*
The automatic dimming feature of the interior
and exterior mirrors
* is controlled by two photo
cells in the interior rearview mirror. One photo
cell is in the mirror frame, see arrow; the other is
on the back of the mirror.
In order to ensure that the system functions
correctly, keep the photo cells clean, do not
cover the area between the interior rearview
mirror and windshield, and do not affix adhesive
labels or stickers of any kind to the windshield
directly in front of the mirror.
Hydroplaning
When driving on wet or slushy roads,
reduce road speed. If you do not, a wedge
of water can form between tires and road sur-
face. This situation, known as hydroplaning,
means that the tire can completely lose contact
with the road surface, so that neither the car can
be steered nor the brake be properly applied.<
The risk of hydroplaning increases with declin-
ing tread depth on the tires, refer also to Mini-
mum tread depth on page187.
Driving through water
Drive through water on the road only if it is
not deeper than 1 ft/30 cm, and then only
at walking speed at the most. Otherwise, the
vehicle's engine, the electrical systems and the
transmission may be damaged.<
Use the handbrake on inclines
On inclines, do not hold the vehicle with
the clutch; use the handbrake. Otherwise
greater clutch wear will result.<
Also use the drive-off assistant, refer to
page85.
Braking safely
Your BMW is equipped with ABS as a standard
feature. Applying the brakes fully is the most
effective way of braking in situations in which
this is necessary. Since the vehicle maintains
steering responsiveness, you can still avoid
possible obstacles with a minimum of steering
effort.
Pulsation of the brake pedal, combined with
sounds from the hydraulic circuits, indicate that
ABS is in its active mode.
Driving in wet conditions
When roads are wet or there is heavy rain,
briefly exert gentle pressure on the brake pedal
every few miles. Monitor traffic conditions to
ensure that this maneuver does not endanger
other road users. The heat generated in this
process helps dry the pads and rotors to ensure
that full braking efficiency will then be available
when you need it.
Hills
To prevent overheating and the resulting
reduced efficiency of the brake system,
drive long or steep downhill gradients in the
gear in which the least braking is required. Even
light but consistent brake pressure can lead to
high temperatures, brake wear and possibly
even brake failure.<
You can increase the engine's braking effect by
shifting down, all the way to first gear if neces-
sary. This strategy helps you avoid placing
excessive loads on the brake system. Down-
shifting in manual mode of the automatic trans-
mission, refer to page56.
Never drive with the clutch held down,
with the transmission in idle or with the
engine switched off; otherwise, engine braking
action will not be present or there will be no
Page 116 of 236
Driving tips
115Reference
At a glance
Controls
Communications
Navigation
Entertainment
Mobility
Load
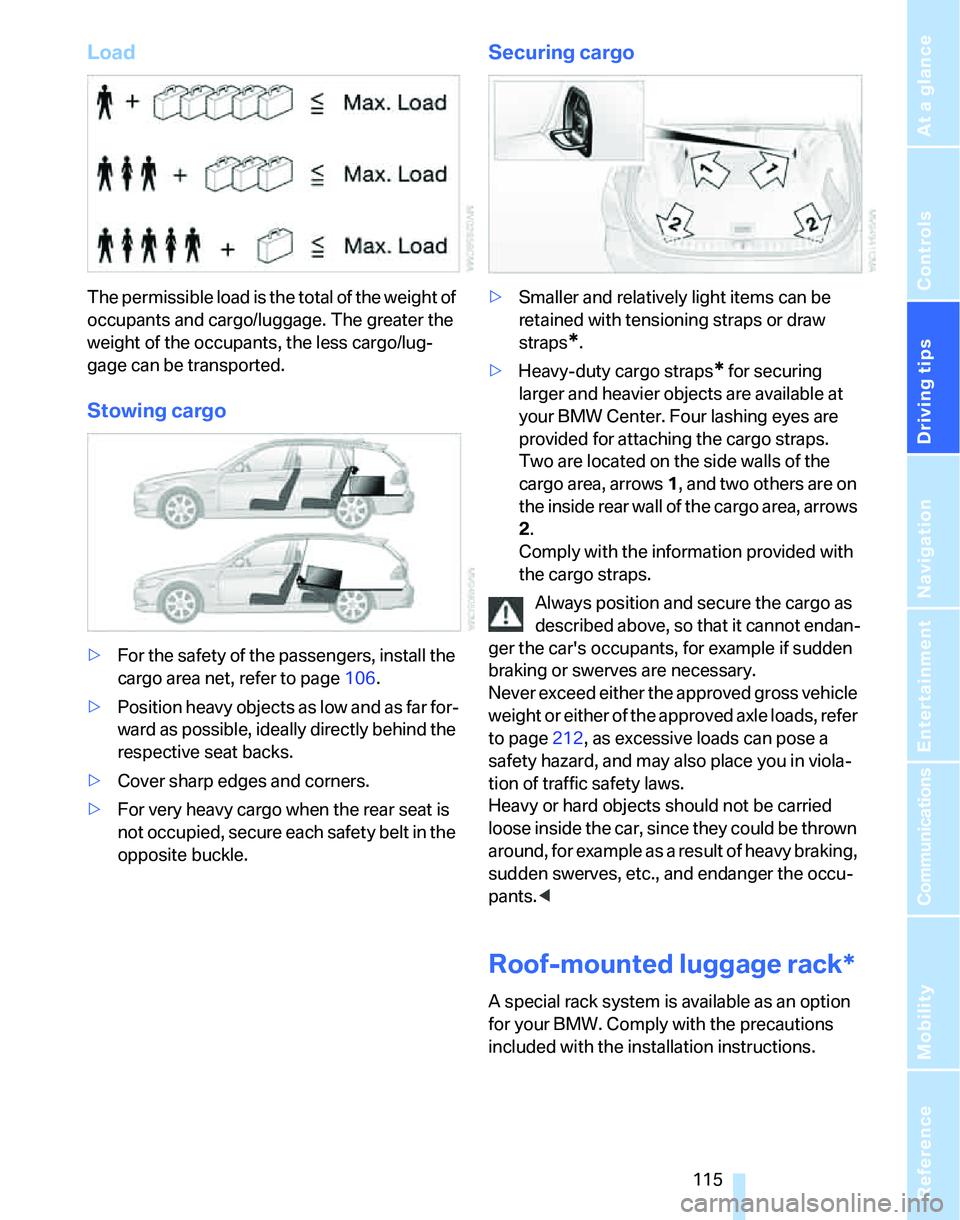
The permissible load is the total of the weight of
occupants and cargo/luggage. The greater the
weight of the occupants, the less cargo/lug-
gage can be transported.
Stowing cargo
>For the safety of the passengers, install the
cargo area net, refer to page106.
>Position heavy objects as low and as far for-
ward as possible, ideally directly behind the
respective seat backs.
>Cover sharp edges and corners.
>For very heavy cargo when the rear seat is
not occupied, secure each safety belt in the
opposite buckle.
Securing cargo
>Smaller and relatively light items can be
retained with tensioning straps or draw
straps
*.
>Heavy-duty cargo straps
* for securing
larger and heavier objects are available at
your BMW Center. Four lashing eyes are
provided for attaching the cargo straps.
Two are located on the side walls of the
cargo area, arrows 1, and two others are on
the inside rear wall of the cargo area, arrows
2.
Comply with the information provided with
the cargo straps.
Always position and secure the cargo as
described above, so that it cannot endan-
ger the car's occupants, for example if sudden
braking or swerves are necessary.
Never exceed either the approved gross vehicle
weight or either of the approved axle loads, refer
to page212, as excessive loads can pose a
safety hazard, and may also place you in viola-
tion of traffic safety laws.
Heavy or hard objects should not be carried
loose inside the car, since they could be thrown
around, for example as a result of heavy braking,
sudden swerves, etc., and endanger the occu-
pants.<
Roof-mounted luggage rack*
A special rack system is available as an option
for your BMW. Comply with the precautions
included with the installation instructions.
Page 142 of 236
Navigation
Entertainment
Driving tips
141Reference
At a glance
Controls
Communications
Mobility
Adjusting volume
Turn knob1 on the CD player until the desired
volume is obtained.
You can also adjust the volume with buttons on
the steering wheel, refer to page11.
The setting is stored for the remote control cur-
rently in use.
Tone control
You can alter various tone settings, e.g. treble
and bass or the speed-dependent volume
increase.
The tone settings are applied to all audio
sources.
The settings are stored for the remote control
currently in use.
Changing tone settings
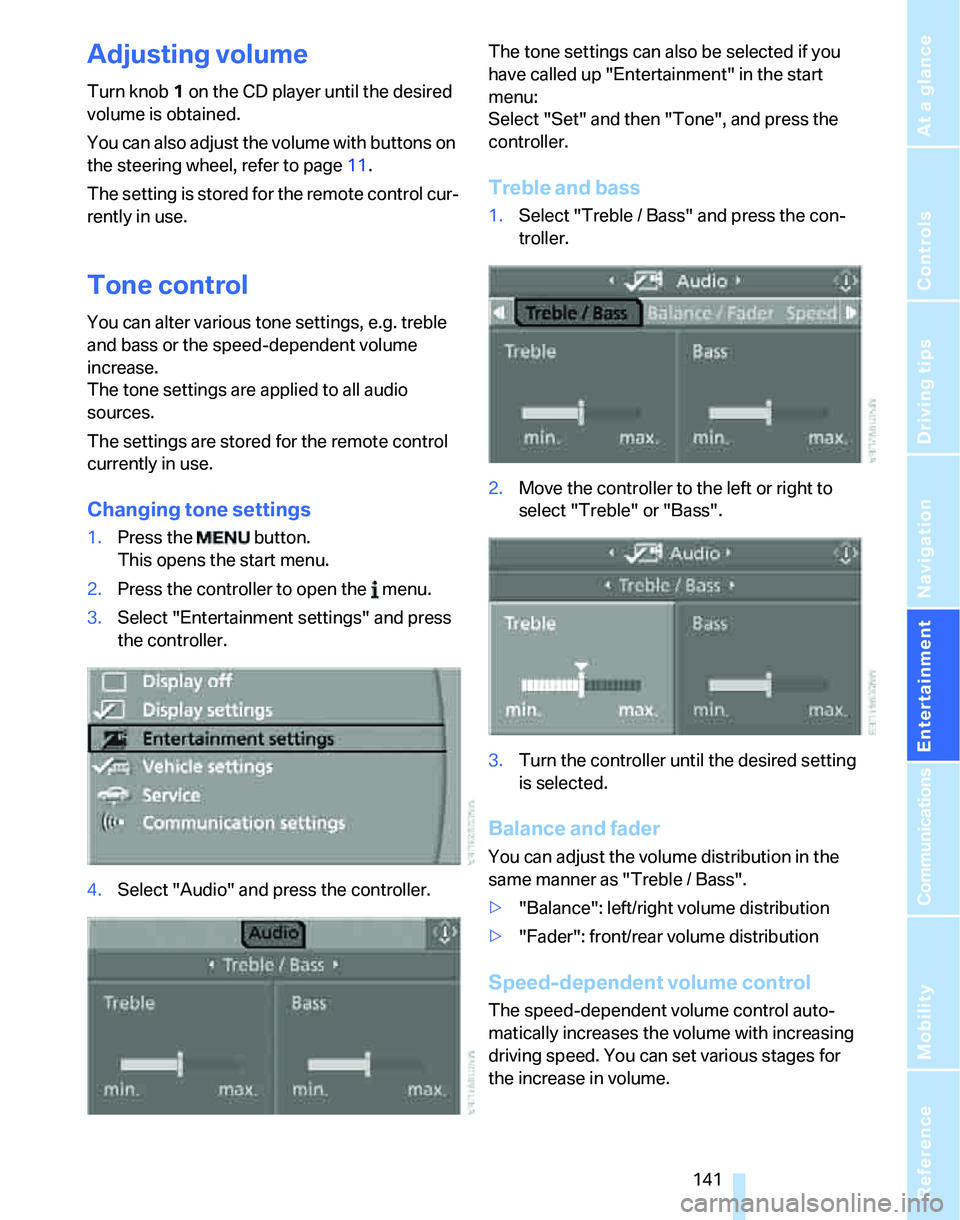
1.Press the button.
This opens the start menu.
2.Press the controller to open the menu.
3.Select "Entertainment settings" and press
the controller.
4.Select "Audio" and press the controller.The tone settings can also be selected if you
have called up "Entertainment" in the start
menu:
Select "Set" and then "Tone", and press the
controller.
Treble and bass
1.Select "Treble / Bass" and press the con-
troller.
2.Move the controller to the left or right to
select "Treble" or "Bass".
3.Turn the controller until the desired setting
is selected.
Balance and fader
You can adjust the volume distribution in the
same manner as "Treble / Bass".
>"Balance": left/right volume distribution
>"Fader": front/rear volume distribution
Speed-dependent volume control
The speed-dependent volume control auto-
matically increases the volume with increasing
driving speed. You can set various stages for
the increase in volume.
Page 186 of 236
Mobility
185Reference
At a glance
Controls
Driving tips
Communications
Navigation
Entertainment
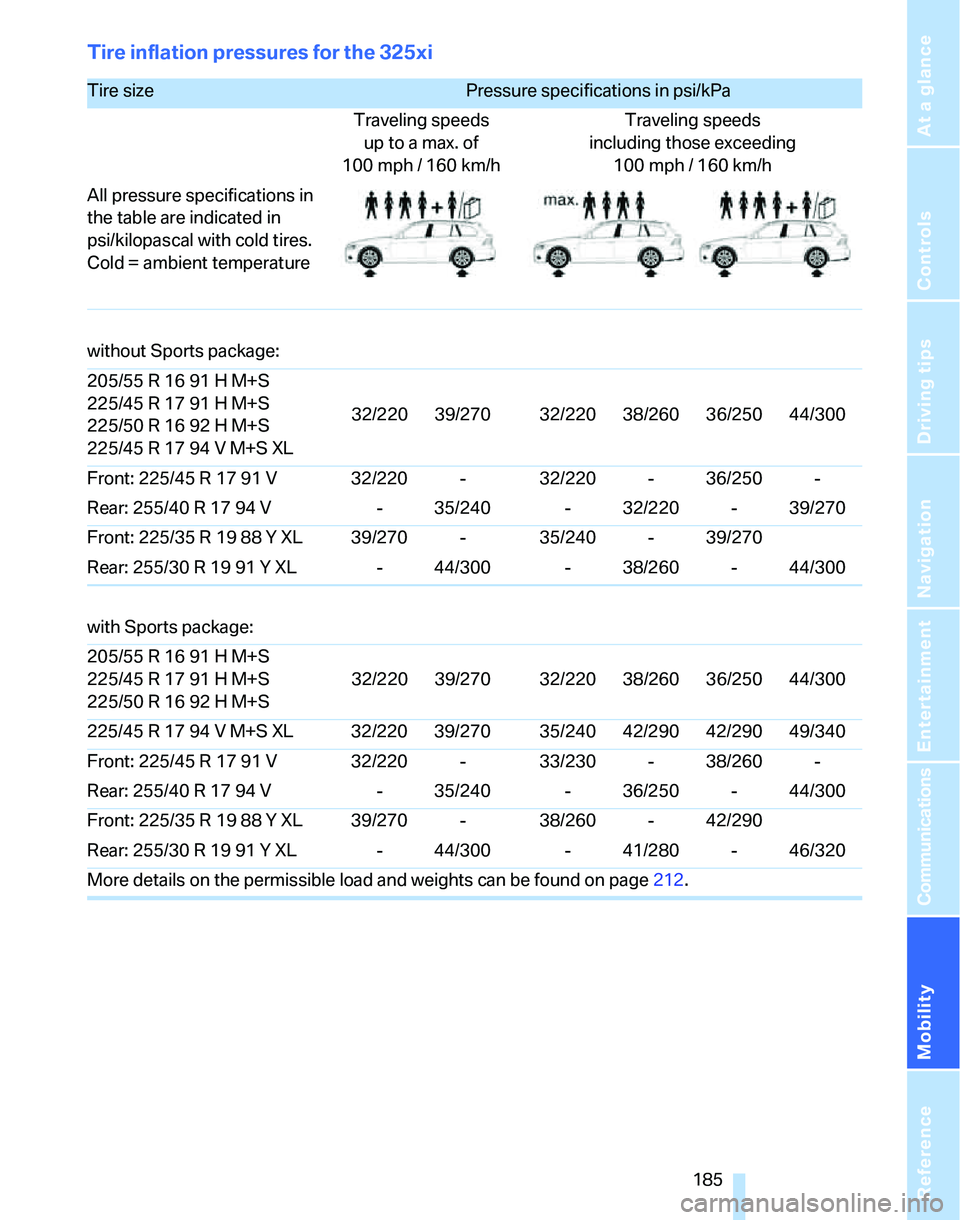
Tire inflation pressures for the 325xi
Tire size Pressure specifications in psi/kPa
Traveling speeds
up to a max. of
100 mph / 160 km/hTraveling speeds
including those exceeding
100mph / 160km/h
All pressure specifications in
the table are indicated in
psi/kilopascal with cold tires.
Cold = ambient temperature
without Sports package:
205/55 R 16 91 H M+S
225/45 R 17 91 H M+S
225/50 R 16 92 H M+S
225/45 R 17 94 V M+S XL32/220 39/270 32/220 38/260 36/250 44/300
Front: 225/45 R 17 91 V 32/220 - 32/220 - 36/250 -
Rear: 255/40 R 17 94 V - 35/240 - 32/220 - 39/270
Front: 225/35 R 19 88 Y XL 39/270 - 35/240 - 39/270
Rear: 255/30 R 19 91 Y XL - 44/300 - 38/260 - 44/300
with Sports package:
205/55 R 16 91 H M+S
225/45 R 17 91 H M+S
225/50 R 16 92 H M+S32/220 39/270 32/220 38/260 36/250 44/300
225/45 R 17 94 V M+S XL 32/220 39/270 35/240 42/290 42/290 49/340
Front: 225/45 R 17 91 V 32/220 - 33/230 - 38/260 -
Rear: 255/40 R 17 94 V - 35/240 - 36/250 - 44/300
Front: 225/35 R 19 88 Y XL 39/270 - 38/260 - 42/290
Rear: 255/30 R 19 91 Y XL - 44/300 - 41/280 - 46/320
More details on the permissible load and weights can be found on page212.
Page 190 of 236
Mobility
189Reference
At a glance
Controls
Driving tips
Communications
Navigation
Entertainment
Run-Flat Tires
When mounting new tires or changing over
from summer to winter tires and vice versa,
mount Run-Flat Tires for your own safety. In the
event of a flat, moreover, no spare wheel is
available. Your BMW Center will be glad to
advise you.
For safety reasons, BMW recommends
that damaged Run-Flat Tires be replaced
rather than repaired.<
Special characteristics of winter tires
BMW recommends winter tires for use in cold
winter driving conditions. Although all-season
M+S tires provide better winter traction than
summer tires, they generally fail to provide the
same levels of cold-weather performance as
winter tires.
Pay attention to speed
Always comply with the speed limit for the
winter tires mounted on your car; failure
to do so could result in tire damage and acci-
dents.<
If the car is capable of speeds higher than that
permitted for the winter tires, a label stating the
maximum permitted speed for the mounted
tires must be displayed in your field of view.
Specialist tire dealers and your BMW Center
can supply these labels.
Storage
Always store wheels and tires in a cool, dry
place with as little exposure to light as possible.
Always protect tires against all contact with oil,
grease and fuels. Do not exceed the maximum
tire inflation pressure indicated on the sidewall
of the tire.
Snow chains*
Only certain fine-link snow chains have been
tested by BMW, classified as safe for use and
recommended. Consult your BMW Center for
more information. Attach snow chains in pairs
and only to the rear wheels. Observe the manu-facturer's instructions when mounting snow
chains. Do not exceed a speed of 30 mph or
50 km/h.
You are not permitted to mount snow chains to
tires of the following sizes:
>255/40 R 17
>255/35 R 18
>255/30 R 19
Do not initialize the Flat Tire Monitor if
snow chains are mounted, otherwise the
instrument might issue an incorrect reading.
When driving with snow chains, you may find it
helpful to activate DTC temporarily, refer to
page83.<