Page 2853 of 2893

���
�(�#�'��������� �����
�������'�����
�-�������)����
�µ
�µ
�µ
�µ
DTC A2-1x (‘‘x’’ can be 0 thru 9 or A thru F):
YES
NO
YES
NO
24-173
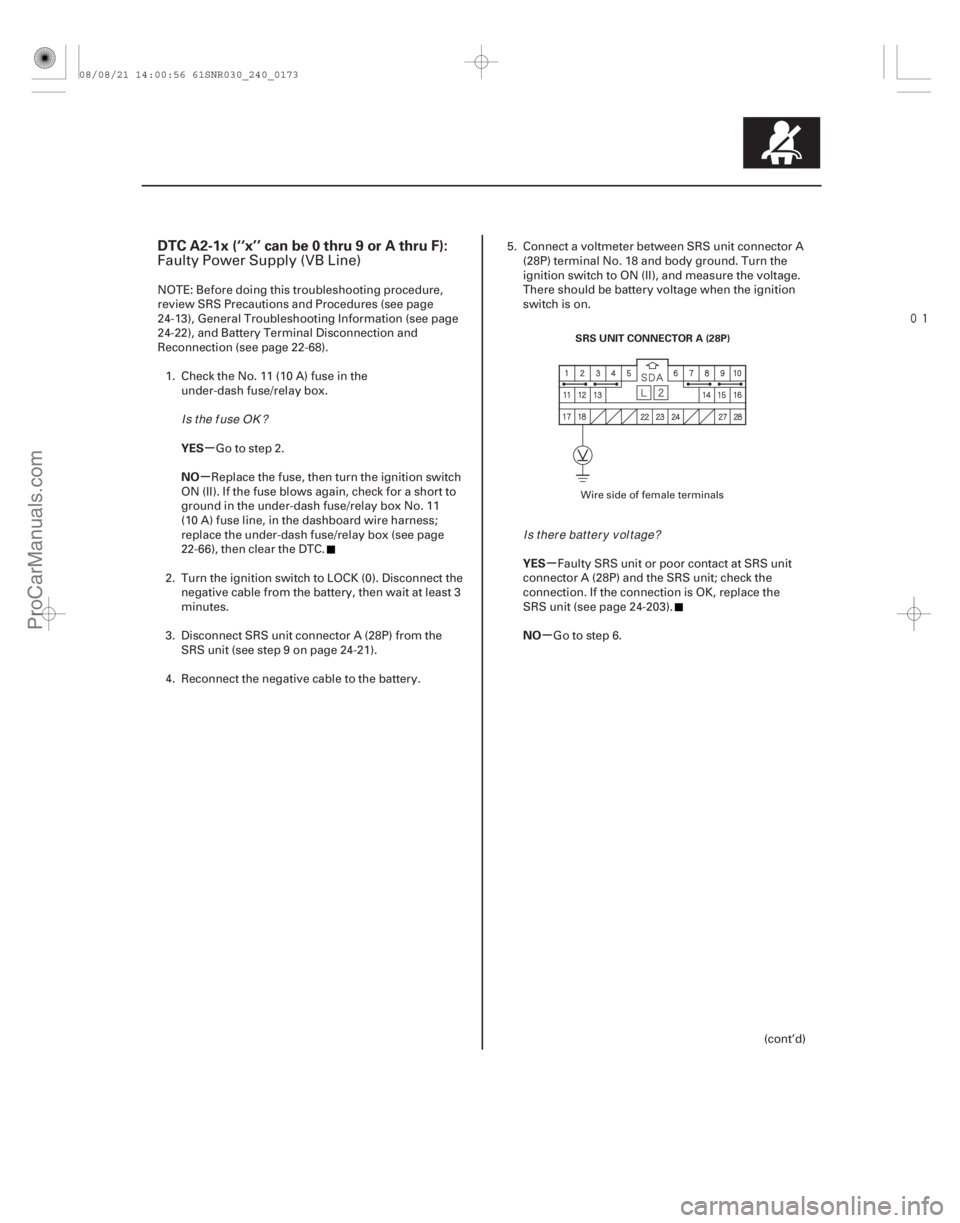
SRS UNIT CONNECTOR A (28P)
Faulty Power Supply (VB Line)
NOTE: Before doing this troubleshooting procedure,
review SRS Precautions and Procedures (see page
24-13), General Troubleshooting Information (see page
24-22), and Battery Terminal Disconnection and
Reconnection (see page 22-68).1. Check the No. 11 (10 A) fuse in the under-dash fuse/relay box.
Go to step 2.
Replace the fuse, then turn the ignition switch
ON (II). If the fuse blows again, check for a short to
ground in the under-dash fuse/relay box No. 11
(10 A) fuse line, in the dashboard wire harness;
replace the under-dash fuse/relay box (see page
22-66), then clear the DTC.
2. Turn the ignition switch to LOCK (0). Disconnect the negative cable from the battery, then wait at least 3
minutes.
3. Disconnect SRS unit connector A (28P) from the SRS unit (see step 9 on page 24-21).
4. Reconnect the negative cable to the battery. 5. Connect a voltmeter between SRS unit connector A
(28P) terminal No. 18 and body ground. Turn the
ignition switch to ON (II), and measure the voltage.
There should be battery voltage when the ignition
switch is on.
Faulty SRS unit or poor contact at SRS unit
connector A (28P) and the SRS unit; check the
connection. If the connection is OK, replace the
SRS unit (see page 24-203).
Go to step 6.
(cont’d)
Wire side of female terminals
IsthefuseOK? Is there battery voltage?
08/08/21 14:00:56 61SNR030_240_0173
ProCarManuals.com
DYNOMITE -2009-
Page 2854 of 2893

����
����
�(�#�'��������� �����
�������'�����
�-�������)����
�µ
�µ �µ
�µ
�µ
�µ
�µ
�µ
YES
NO Special Tools Required
YES
NO
YES
NO
YES
NO
DTC B2-1x:
24-17424-174SRS
DTC Troubleshooting (cont’d)
J
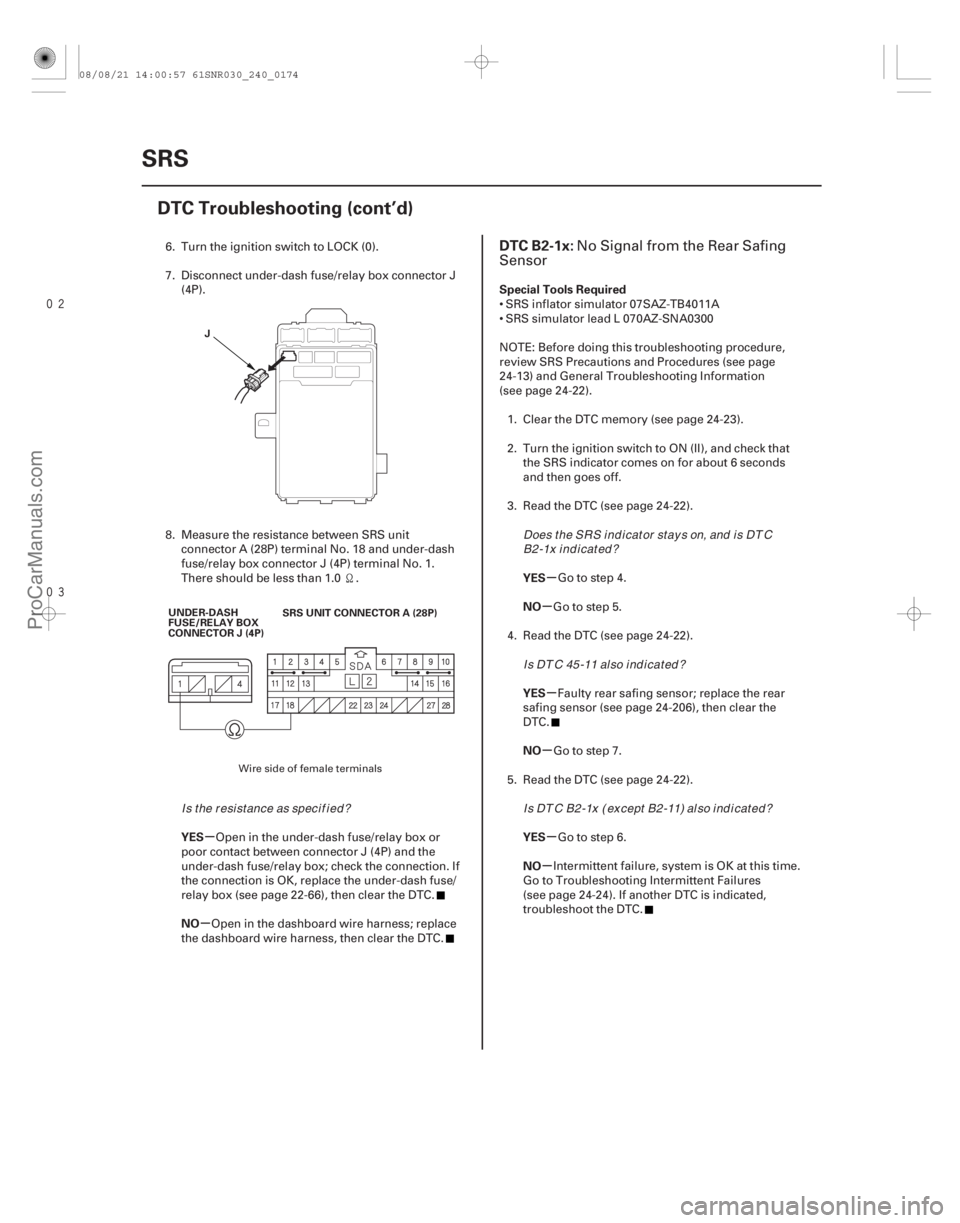
SRS UNIT CONNECTOR A (28P)
UNDER-DASH
FUSE/RELAY BOX
CONNECTOR J (4P)
6. Turn the ignition switch to LOCK (0).
7. Disconnect under-dash fuse/relay box connector J
(4P).
8. Measure the resistance between SRS unit connector A (28P) terminal No. 18 and under-dash
fuse/relay box connector J (4P) terminal No. 1.
There should be less than 1.0 .
Open in the under-dash fuse/relay box or
poor contact between connector J (4P) and the
under-dash fuse/relay box; check the connection. If
the connection is OK, replace the under-dash fuse/
relay box (see page 22-66), then clear the DTC.
Open in the dashboard wire harness; replace
the dashboard wire harness, then clear the DTC. SRS inflator simulator 07SAZ-TB4011A
SRS simulator lead L 070AZ-SNA0300
NOTE: Before doing this troubleshooting procedure,
review SRS Precautions and Procedures (see page
24-13) and General Troubleshooting Information
(see page 24-22).
1. Clear the DTC memory (see page 24-23).
2. Turn the ignition switch to ON (II), and check that the SRS indicator comes on for about 6 seconds
and then goes off.
3. Read the DTC (see page 24-22).
Go to step 4.
Go to step 5.
4. Read the DTC (see page 24-22).
Faulty rear safing sensor; replace the rear
safing sensor (see page 24-206), then clear the
DTC.
Go to step 7.
5. Read the DTC (see page 24-22).
Go to step 6.
Intermittent failure, system is OK at this time.
Go to Troubleshooting Intermittent Failures
(see page 24-24). If another DTC is indicated,
troubleshoot the DTC.No Signal from the Rear Safing
Sensor
Wire side of female terminals
Is the resistance as specif ied? Does the SRS indicator stays on, and is DT C
B2-1x i nd i cat ed ?
Is DTC 45-11 also indicated?
Is DTC B2-1x (except B2-11) also indicated?
08/08/21 14:00:57 61SNR030_240_0174
ProCarManuals.com
DYNOMITE -2009-
Page 2880 of 2893

Disposal of Damaged ComponentsDeployment Tool Check
24-199
1. If installed in a vehicle, follow the removal
procedure for the driver’s airbag (see page 24-188),
front passenger’s airbag (see page 24-189), side
airbag (see page 24-191), side curtain airbag
(see page 24-192), seat belt tensioner (see page
24-4), and seat belt buckle tensioner (see page 24-6).
2. In all cases, make a short circuit by cutting, stripping, and twisting together the two inflator
wires.
NOTE: The driver’s and front passenger’s airbags
have dual inflators. The like color wires go to the
individual inflators.
3. Package the component in exactly the same
packaging that the new replacement part came in.
4. Mark the outside of the box DAMAGED AIRBAG NOT DEPLOYED, DAMAGED SIDE AIRBAG NOT
DEPLOYED, DAMAGED SIDE CURTAIN AIRBAG
NOT DEPLOYED, or DAMAGED SEAT BELT
TENSIONER NOT DEPLOYED so it does not get
confused with your parts stock.
5. Contact your Acura District Parts and Service Manager for instructions on how and where to
return it for disposal. 1. Connect the yellow clips to both switch protector
handles on the tool.
2. Then connect the red lead to the positive battery post and the black lead to the negative battery post.
3. Push the operation switch: The green light should come on, indicating that the tool is operating
properly and is ready for use. If the red light stays
on, the tool is faulty, and another one must be used
for the procedure.
4. Disconnect the tool clips and connectors from the protector handles and the battery.
08/08/21 14:01:59 61SNR030_240_0199
ProCarManuals.com
DYNOMITE -2009-