Page 1814 of 2893
�
�����
����
�(�#�'���������������
���������������
� �����)����
20-13520-135
Rear Seat-back Latch Replacement
A
B
B
A
B
A
B
Fastener Locations
A
:Bolt,2
6x1.0mm
9.8 N·m
(1.0 kgf·m, 7.2 lbf·ft)
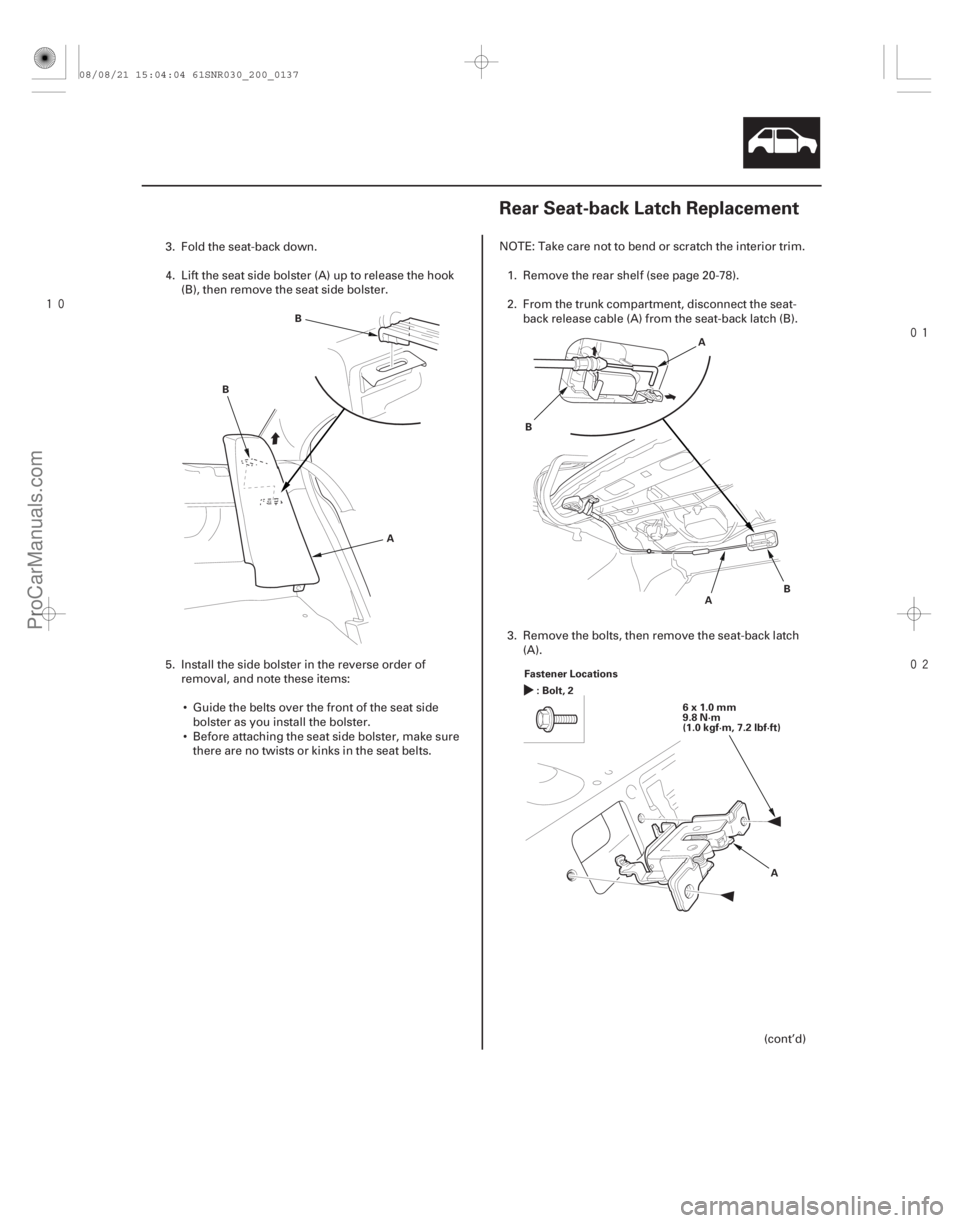
3. Fold the seat-back down.
4. Lift the seat side bolster (A) up to release the hook(B), then remove the seat side bolster.
5. Install the side bolster in the reverse order of removal, and note these items:
Guide the belts over the front of the seat side bolster as you install the bolster.
Before attaching the seat side bolster, make sure there are no twists or kinks in the seat belts. NOTE: Take care not to bend or scratch the interior trim.
1. Remove the rear shelf (see page 20-78).
2. From the trunk compartment, disconnect the seat- back release cable (A) from the seat-back latch (B).
3. Remove the bolts, then remove the seat-back latch (A).
(cont’d)
08/08/21 15:04:04 61SNR030_200_0137
ProCarManuals.com
DYNOMITE -2009-
Page 1815 of 2893
���
���
�(�#�'���������������
����������������� �����)����
20-13620-136 Seats
Rear Seat-back Latch Replacement
(cont’d)
Rear Seat-back Release Lever/Cable
Removal/Installation
Fastener Location
:Clip,1
A
B
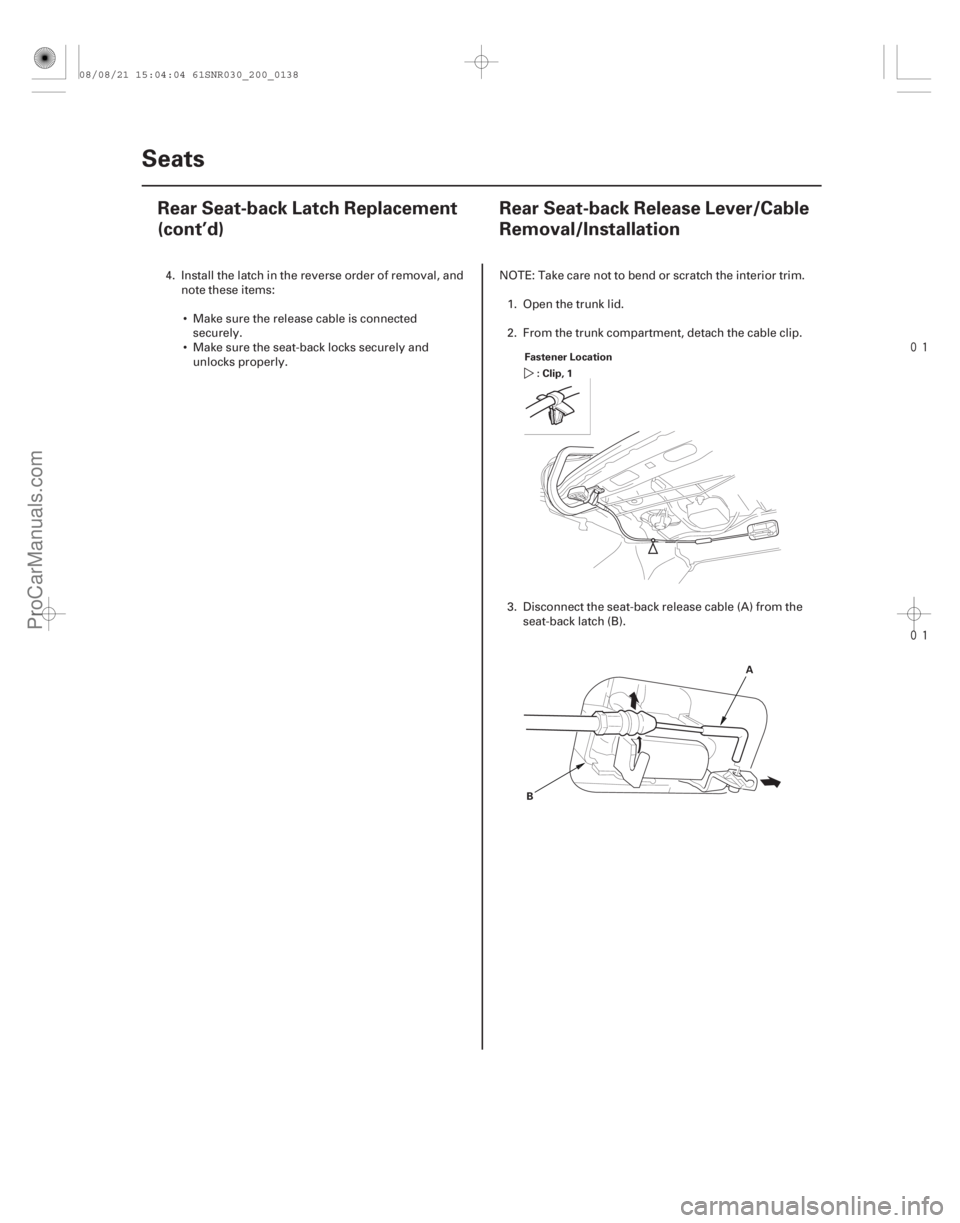
4. Install the latch in the reverse order of removal, and note these items:
Make sure the release cable is connected securely.
Make sure the seat-back locks securely and unlocks properly. NOTE: Take care not to bend or scratch the interior trim.
1. Open the trunk lid.
2. From the trunk compartment, detach the cable clip.
3. Disconnect the seat-back release cable (A) from the seat-back latch (B).
08/08/21 15:04:04 61SNR030_200_0138
ProCarManuals.com
DYNOMITE -2009-
Page 1816 of 2893
���
���
�(�#�'���������������
����������������� �����)����
20-13620-136 Seats
Rear Seat-back Latch Replacement
(cont’d)
Rear Seat-back Release Lever/Cable
Removal/Installation
Fastener Location
:Clip,1
A
B
4. Install the latch in the reverse order of removal, and note these items:
Make sure the release cable is connected securely.
Make sure the seat-back locks securely and unlocks properly. NOTE: Take care not to bend or scratch the interior trim.
1. Open the trunk lid.
2. From the trunk compartment, detach the cable clip.
3. Disconnect the seat-back release cable (A) from the seat-back latch (B).
08/08/21 15:04:04 61SNR030_200_0138
ProCarManuals.com
DYNOMITE -2009-
Page 1840 of 2893
����
20-155
Trunk Lid
Trunk Lid Adjustment
A
B
C D G
H
E
6x1.0mm
18 N·m
(1.8 kgf·m, 13 lbf·ft)
E
6x1.0mm
9.8 N·m (1.0 kgf·m, 7.2 lbf·ft)
H F
F
1")
���
�(�#�'�����������
���������������������"�����)����
20-155
Trunk Lid
Trunk Lid Adjustment
A
B
C D G
H
E
6x1.0mm
18 N·m
(1.8 kgf·m, 13 lbf·ft)
E
6x1.0mm
9.8 N·m (1.0 kgf·m, 7.2 lbf·ft)
H F
F
1. Remove the rear shelf (see page 20-78).
2. Pry up on the notch (A) to release the rear hooks (B) and pivot the striker trim cap (C) on the front hooks (D), thenremove the cap. Slightly loosen each bolt (E).
3. Adjust the trunk lid alignment in the following sequence: Adjust the trunk lid hinges (F) right and left, as well as forward and rearward, by using the elongated holes. Takecare not to hit the rear window when loosening the bolts.
Turn the trunk lid edge cushions (G), in or out as necessary, to make the trunk lid fit flush with the body at the rear and side edges.
Adjust the fit between the trunk lid and the trunk lid opening by moving the striker (H).
4. Tighten the bolts to the specified torque.
5. Make sure the trunk lid opens properly and locks securely.
6. Reinstall all removed parts.
08/08/21 15:04:57 61SNR030_200_0157
ProCarManuals.com
DYNOMITE -2009-
Page 1841 of 2893
����
Special Tool Required
20-156
Trunk Lid
Trunk Lid Torsion Bar Replacement
B
A
A
B
B
A
07AAF-SNAA100 A
A B
=Normal position
=Higher")
���
��������
���
�(�#�'�����������
�������������������
� �����)����
Special Tool Required
20-156
Trunk Lid
Trunk Lid Torsion Bar Replacement
B
A
A
B
B
A
07AAF-SNAA100 A
A B
=Normal position
=Higher tension
Torsion bar assembly tool 07AAF-SNAA100
1. Remove the torsion bars (A) from the torsion bar center clip (B).
2. Put on gloves to protect your hands. Remove the torsion bars with the torsion bar assembly tool
from both trunk lid hinges. First remove the left
torsion bar (A), then remove the right torsion bar
(B). 3. Remove the torsion bar center clip (A) from the
body.
4. Install the torsion bar in the reverse order of removal, and note these items:
The shapes of the left torsion bar (A) and the right torsion bar (B) are shown. Install the torsion
bars properly.
Adjust the torsion bars forward or rearward with the torsion bar assembly tool.
The torsion bars were installed at the factory in the normal position, as shown.
Make sure the trunk lid opens properly and locks securely.
08/08/21 15:04:58 61SNR030_200_0158
ProCarManuals.com
DYNOMITE -2009-
Page 1842 of 2893
���� ���
�(�#������������
�������������������
� �����)����
20-15720-157
Trunk Lid Weatherstrip
Replacement Trunk Lid Cushion Replacement
A
B
C
D A
F")
���
�(�#�'�����������
�������������������
� �����)���� ���
�(�#�'�����������
�������������������
� �����)����
20-15720-157
Trunk Lid Weatherstrip
Replacement Trunk Lid Cushion Replacement
A
B
C
D A
Front A
B C
C
A
1. Remove the trunk lid weatherstrip (A) by pulling it off.
2. Apply clear weatherstrip sealant (B) into the channel of the trunk lid weatherstrip all the way
around.
3. Locate the painted alignment mark (C or D) on the trunk lid weatherstrip. Align the painted mark in the
center of the trunk lid opening, and install the trunk
lid weatherstrip all the way around in the direction
shown. Make sure there are no wrinkles in the
weatherstrip.
4. Check for water leaks (see step 9 on page 20-29). NOTE: Put on gloves to protect your hands.
1. Remove the trunk lid trim (see page 20-82).
2. Detach the clips (A) by pushing it from the hole in the trunk lid (B), then remove the trunk lid cushion
(C). Take care not to scratch the trunk lid.
3. Install the cushion in the reverse order of removal.
08/08/21 15:04:58 61SNR030_200_0159
ProCarManuals.com
DYNOMITE -2009-
Page 1855 of 2893
���� ���
�(�#������������
�����������������
�
� �����)����
20-16820-168 Exterior Trim
Side Sill Protection Tape
Replacement
Rear License Trim Replac")
���
�(�#�'�����������
��������������������� �����)���� ���
�(�#�'�����������
�����������������
�
� �����)����
20-16820-168 Exterior Trim
Side Sill Protection Tape
Replacement
Rear License Trim Replacement
AB
C
D
E F
A
D Fastener Locations
: Clip, 4
A : Clip, 2 B
A BC
D
B AA
A
1. Slowly peel up the old side sill protection tape.
2. Clean the body bonding surface with a shop towel
dampened in isopropyl alcohol. After cleaning,
keep oil, grease, and water from getting on the
surface.
3. Peel the adhesive backing from the side sill protection tape.
4. Align the alignment marks (A) of the side sill protection tape (B) with the body line (C), and align
the alignment marks (D) of the application tape (E)
with the round body bulge (F), then press the side
sill protection tape into place. 1. Detach the clips (A, B), and on both sides of the rear
license trim (C), release the edge of the trim from
the inner taillight (D), then remove the trim. Take
care not to scratch the trunk lid.
2. Install the trim in the reverse order of removal, and note these items:
If the clips are damaged or stress-whitened, replace them with new ones.
Push the clips into place securely.
08/08/21 15:05:04 61SNR030_200_0170
ProCarManuals.com
DYNOMITE -2009-
Page 1856 of 2893
���
����
�(�#�'�����������
��������������������� �����)����
For Some Models
20-169
Trunk Lid Spoiler Replacement
:Nut,2 :Bolt,2
Fastener Locations
6x1.0mm
9.8 N·m
(1.0 kgf·m,
7.2 lbf·ft) B
C
B A
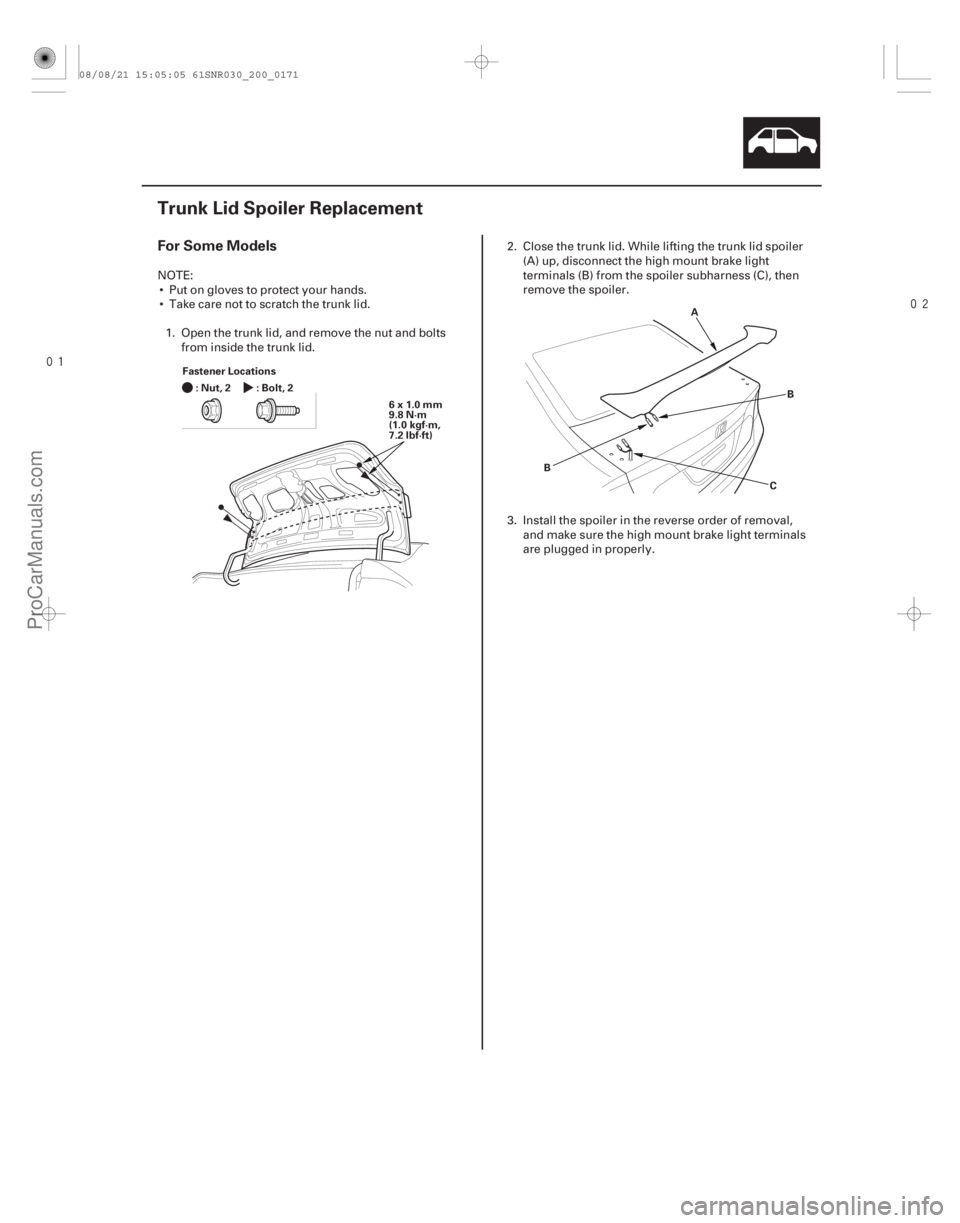
NOTE:
Put on gloves to protect your hands.
Take care not to scratch the trunk lid.
1. Open the trunk lid, and remove the nut and bolts from inside the trunk lid. 2. Close the trunk lid. While lifting the trunk lid spoiler
(A) up, disconnect the high mount brake light
terminals (B) from the spoiler subharness (C), then
remove the spoiler.
3. Install the spoiler in the reverse order of removal, and make sure the high mount brake light terminals
are plugged in properly.
08/08/21 15:05:05 61SNR030_200_0171
ProCarManuals.com
DYNOMITE -2009-