Page 2358 of 2893
����
Seek Stop Test
23-7823-78 Audio System
Sound Quality Diagnosis (cont’d)
8. Compare the client’s vehicle’s sound quality results")
�´
�´
�´
�´
�(�#�'������� ���
���������������������������)����
Seek Stop Test
23-7823-78 Audio System
Sound Quality Diagnosis (cont’d)
8. Compare the client’s vehicle’s sound quality results
to the known-good vehicle’s results.
If the sound quality in the customer’s vehicle is comparable to the sound quality in the known-
good vehicle, then the client’s vehicle is
operating as designed.
If the sound quality is not comparable, check these items in order.
– Loose or improperly installed speakers or other hardware that may become excited by
the vibrations generated by the speakers
– Poor power or ground to the stereo amplifier (Type S model)
– Damaged speaker(s)
– Faulty amplifier (Type S model)
– Faulty navigation unit
– Faulty audio unit Do this test to check the performance of the audio unit’s
AM and FM reception. Refer to symptom
troubleshooting: audio sound weak or distorted, or no
sound is heard from speakers (display is normal)
(see page 23-39) before continuing with this test.
NOTE:
Window tint, aftermarket theft-recovery devices and other aftermarket accessories may reduce radio
reception.
Changes in cloud cover and other atmosphere conditions will affect the ab ility of the navigation unit
or audio unit to receive radio signals.
1. Park the client’s vehicle in an open area away from buildings or other obstructions.
2. Park a known-good vehicle (same year, model, and trim level) next to the client’s vehicle, facing the
same direction.
3. Start the engine in the client’s vehicle, and turn on the radio.
4. Set the FM receiver to 87.7 MHz.
5. Press the Seek button and record the first station that the navigation unit or audio unit locks onto.
6. Press the Seek button repeatedly, and write down each station that the navigation unit or audio
unit locks onto until the station recorded in step 5 is
reached again.
7. Set the AM receiver to 530 kHz.
8. Press the Seek button, and record the first station that the navigation unit or audio unit locks
on to.
9. Press the Seek button repeatedly, and write down each station that the navigation unit or audio
unit locks onto until the station recorded in step 8 is
reached again.
08/08/21 14:05:35 61SNR030_230_0081
ProCarManuals.com
DYNOMITE -2009-
Page 2360 of 2893
���
Without navigation 6 CD type
23-80 Audio System
Audio Unit Removal/Installation
A
B
C
B
A
BSRS components are located in this area. Review")
���
����
�(�#�'�����#�����
�����
�
�
�
���
���
� �����)���
Without navigation 6 CD type
23-80 Audio System
Audio Unit Removal/Installation
A
B
C
B
A
BSRS components are located in this area. Review the
SRS component location (see page 24-11).
Also review the precautions and procedures (see page
24-13) in the SRS section before doing repairs or
service.
NOTE: Put on gloves to protect your hands.
Take care not to scratch the dashboard and related parts.
Lay a workshop towel under the parts when working on them to protect the face panel from scratches or
other damage.
Do not work in a dusty or dirty place.
Discharge static electricity from your body before and during the work.
Do not touch the circuit board(s) with your bare hands.
Do not work with dirty hands.
Be careful not to fold the flat plate cable.
Do not touch the terminal connector of the flat plate cable with your bare hands. (If you have touched it,
wipe it off thoroughly.)
Eject all the discs before removing the audio unit to prevent damaging the CD player’s load mechanism.
If you are replacing the audio unit, write down the sudio presets (if possible), and enter them into the
new audio unit.
1. Remove the meter inner visor (see page 20-100). 2. Remove the center pocket hole lid and the bolts,
then pull out the center panel (A).
3. Disconnect the connectors (B), and the air hose (C) then remove the center panel.
4. Remove the screws, and the audio unit (A) from the center panel display (B).
08/08/21 14:05:35 61SNR030_230_0083
ProCarManuals.com
DYNOMITE -2009-
Page 2361 of 2893
.
6. Install the audio unit in the reverse order of
removal, and make sure all connectors and
antenna lead")
��������
Without navigation 1 CD type
23-81
A
AB
B C
5. Remove the screws and the brackets (A).
6. Install the audio unit in the reverse order of
removal, and make sure all connectors and
antenna lead are secure. SRS components are located in this area. Review the
SRS component location (see page 24-11).
Also review the precautions and procedures (see page
24-13) in the SRS section before doing repairs or
service.
NOTE:
Put on gloves to protect your hands.
Take care not to scratch the dashboard and related parts.
Lay a workshop towel under the parts when working on them to protect the face panel from scratches or
other damage.
Do not work in a dusty or dirty place.
Discharge static electricity from your body before and during the work.
Do not touch the circuit board(s) with your bare hands.
Do not work with dirty hands.
Be careful not to fold the flat plate cable.
Do not touch the terminal connector of the flat plate cable with your bare hands. (If you have touched it,
wipe it off thoroughly.)
Eject all the discs before removing the audio unit to prevent damaging the CD player’s load mechanism.
If you are replacing the audio unit, write down the sudio presets (if possible), and enter them into the
new audio unit.
1. Remove the meter inner visor (see page 20-100).
2. Remove the center pocket hole lid and bolts, then pull out the center panel (A).
3. Disconnect the connectors (B) and the air hose (C), then remove the center panel.
(cont’d)
08/08/21 14:05:36 61SNR030_230_0084
ProCarManuals.com
DYNOMITE -2009-
Page 2362 of 2893
����
��������
�(�#�'�����#�����
�����
�
�
���������
� �����)���
’08 model with navigation
23-8223-82 Audio System
Audio Unit Removal/Installation
(cont’d)
XM Receiver Removal/Installation
A
A
A B
A
C A
A
B
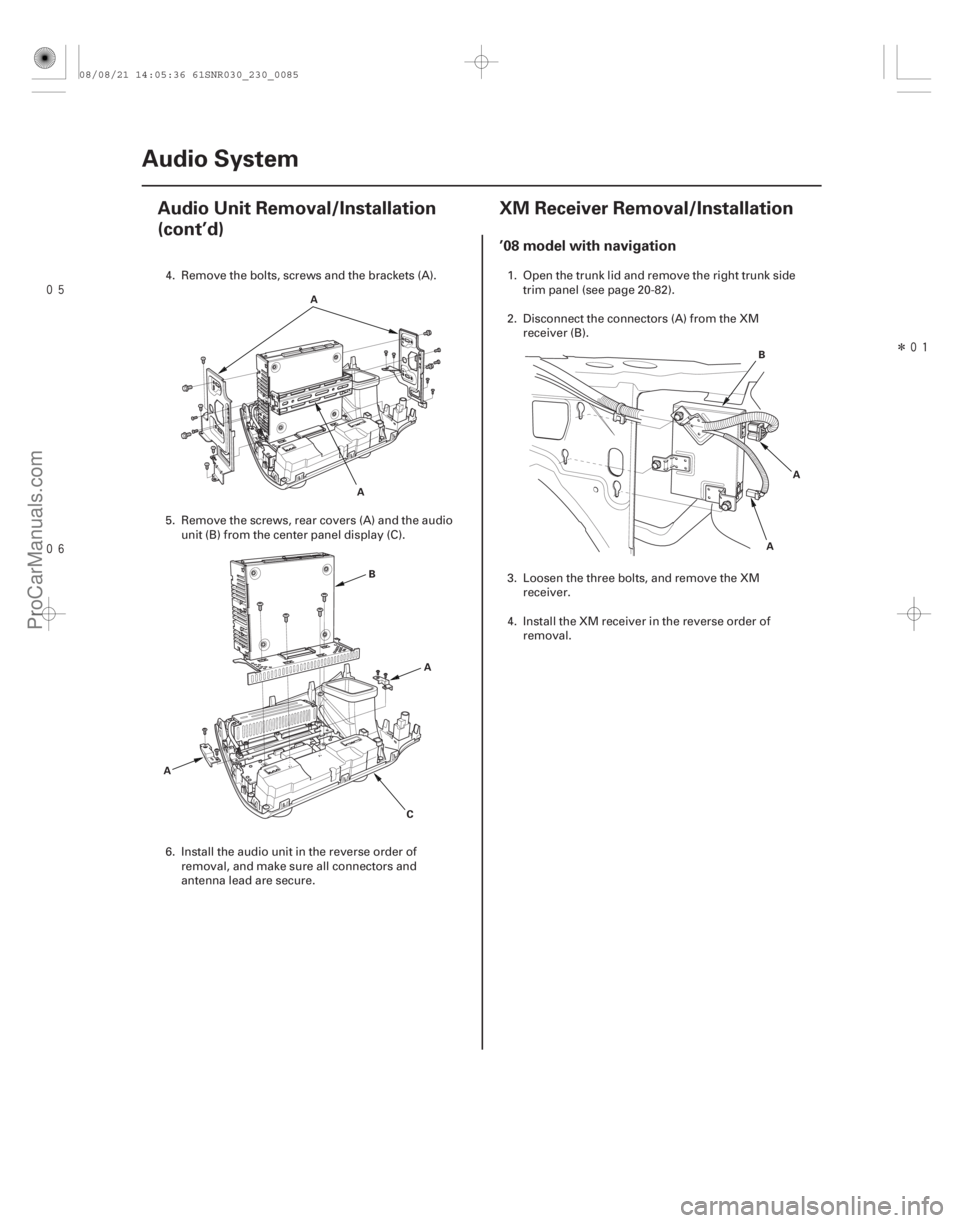
4. Remove the bolts, screws and the brackets (A).
5. Remove the screws, rear covers (A) and the audio
unit (B) from the center panel display (C).
6. Install the audio unit in the reverse order of removal, and make sure all connectors and
antenna lead are secure. 1. Open the trunk lid and remove the right trunk side
trim panel (see page 20-82).
2. Disconnect the connectors (A) from the XM receiver (B).
3. Loosen the three bolts, and remove the XM receiver.
4. Install the XM receiver in the reverse order of removal.
08/08/21 14:05:36 61SNR030_230_0085
ProCarManuals.com
DYNOMITE -2009-
Page 2363 of 2893
����
��������
�(�#�'�����#�����
�����
�
�
���������
� �����)���
’08 model with navigation
23-8223-82 Audio System
Audio Unit Removal/Installation
(cont’d)
XM Receiver Removal/Installation
A
A
A B
A
C A
A
B
4. Remove the bolts, screws and the brackets (A).
5. Remove the screws, rear covers (A) and the audio
unit (B) from the center panel display (C).
6. Install the audio unit in the reverse order of removal, and make sure all connectors and
antenna lead are secure. 1. Open the trunk lid and remove the right trunk side
trim panel (see page 20-82).
2. Disconnect the connectors (A) from the XM receiver (B).
3. Loosen the three bolts, and remove the XM receiver.
4. Install the XM receiver in the reverse order of removal.
08/08/21 14:05:36 61SNR030_230_0085
ProCarManuals.com
DYNOMITE -2009-
Page 2366 of 2893
���
���
�(�#�'�����������
�����������
�������
� �����)����
Subwoofer (Type S model) ’07-08 models
23-8523-85
Auxiliary Jack Assembly
Replacement
A
B A
B
1. Remove the rear tray (see page 20-78).
2. Remove the four mounting bolts from the
subwoofer (A).
3. Disconnect the 2P connector (B), and remove the subwoofer.
4. Install the subwoofer in the reverse order of removal. 1. With navigation: Remove the navigation unit
(see page 23-155).
Without navigation: Remove the audio unit
(see page 23-80).
2. Carefully pull out the auxiliary jack assembly (A), then disconnect the 5P connector (B).
3. Install the auxiliary jack assembly in the reverse order of removal.
08/08/21 14:05:38 61SNR030_230_0088
ProCarManuals.com
DYNOMITE -2009-
Page 2367 of 2893
���
���
�(�#�'�����������
�����������
�������
� �����)����
Subwoofer (Type S model) ’07-08 models
23-8523-85
Auxiliary Jack Assembly
Replacement
A
B A
B
1. Remove the rear tray (see page 20-78).
2. Remove the four mounting bolts from the
subwoofer (A).
3. Disconnect the 2P connector (B), and remove the subwoofer.
4. Install the subwoofer in the reverse order of removal. 1. With navigation: Remove the navigation unit
(see page 23-155).
Without navigation: Remove the audio unit
(see page 23-80).
2. Carefully pull out the auxiliary jack assembly (A), then disconnect the 5P connector (B).
3. Install the auxiliary jack assembly in the reverse order of removal.
08/08/21 14:05:38 61SNR030_230_0088
ProCarManuals.com
DYNOMITE -2009-
Page 2370 of 2893
���
�(�#�'�����#�����
�����
�
�����������
� �����)����
’08 model with navigation
23-88Audio System
XM Antenna Replacement
A
B
C
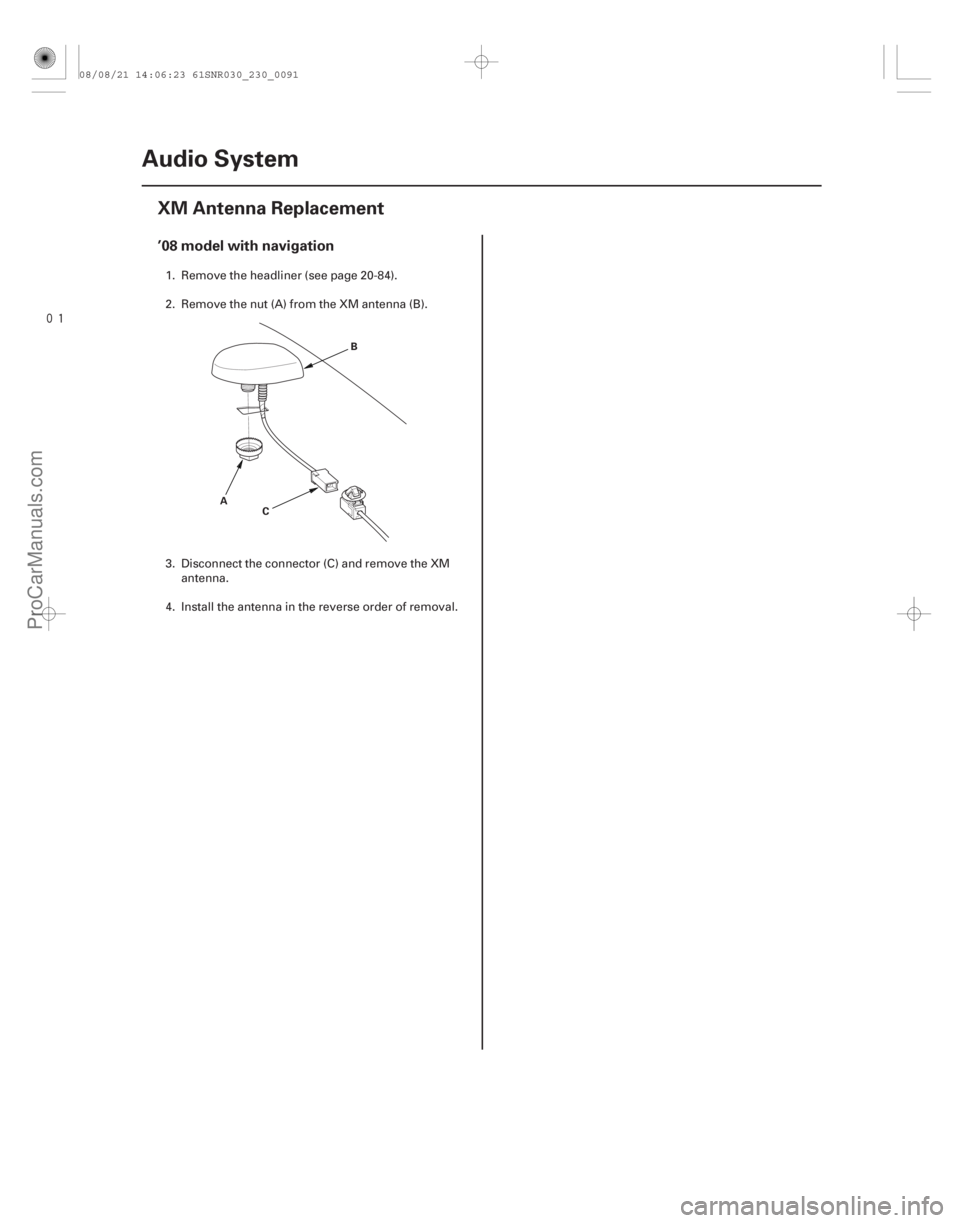
1. Remove the headliner (see page 20-84).
2. Remove the nut (A) from the XM antenna (B).
3. Disconnect the connector (C) and remove the XM antenna.
4. Install the antenna in the reverse order of removal.
08/08/21 14:06:23 61SNR030_230_0091
ProCarManuals.com
DYNOMITE -2009-