Page 1751 of 2893
����
S
pecial Tools RequiredC-Pillar Trim
20-75
A
D
B
C
E A
C D
E
F
A
B
KTC trim tool set SOJATP2014
SRS components are located in this area. Re")
��������
�(�#�'��������������������������������� �����)����
S
pecial Tools RequiredC-Pillar Trim
20-75
A
D
B
C
E A
C D
E
F
A
B
KTC trim tool set SOJATP2014
SRS components are located in this area. Review the
S
RS component locations (see page 24-11) and the
precautions and procedures (see page 24-13) before
doing repairs or service.
NOTE: Follow the C-pillar trim installation procedure carefully; improper installation could cause the side
curtain airbag to deploy improperly and possibly
cause injury.
Put on gloves to protect your hands.
Use the appropriate tool from the KTC trim tool set to avoid damage when removing components.
Take care not to scratch the trim and panels.
The front clip in the C-pillar trim (A) consists of a grommet (B) and a pin (C). The grommet expanded
with the pin secures it to the body panel (D). The
projections (E) on the pin are broken during removal,
so the clip must be replaced with a new one when the
trim is reinstalled. 1.
Remove these items:
Rear seat cushion (see page 20-133)
Rear seat side bolster (see page 20-134)
Rear door opening seal, as needed (see step 3 on page 20-68)
2. Fold the seat-back forward.
3. Hit the front clip in the C-pillar trim (A) with a rubber mallet. The clip is near the triangle mark (B).
Hitting the clip breaks the projections (C) on the pin
(D) and pushes it into the grommet (E) on the body
(F).
NOTE: The clip must be replaced with a new one
when the C-pillar trim is reinstalled.
(cont’d)
08/08/21 15:01:34 61SNR030_200_0077
ProCarManuals.com
DYNOMITE -2009-
Page 1756 of 2893
��������
����
�(�#�'��������������������������������� �����)�
��
S
pecial Tools Required
20-80 Interior Trim
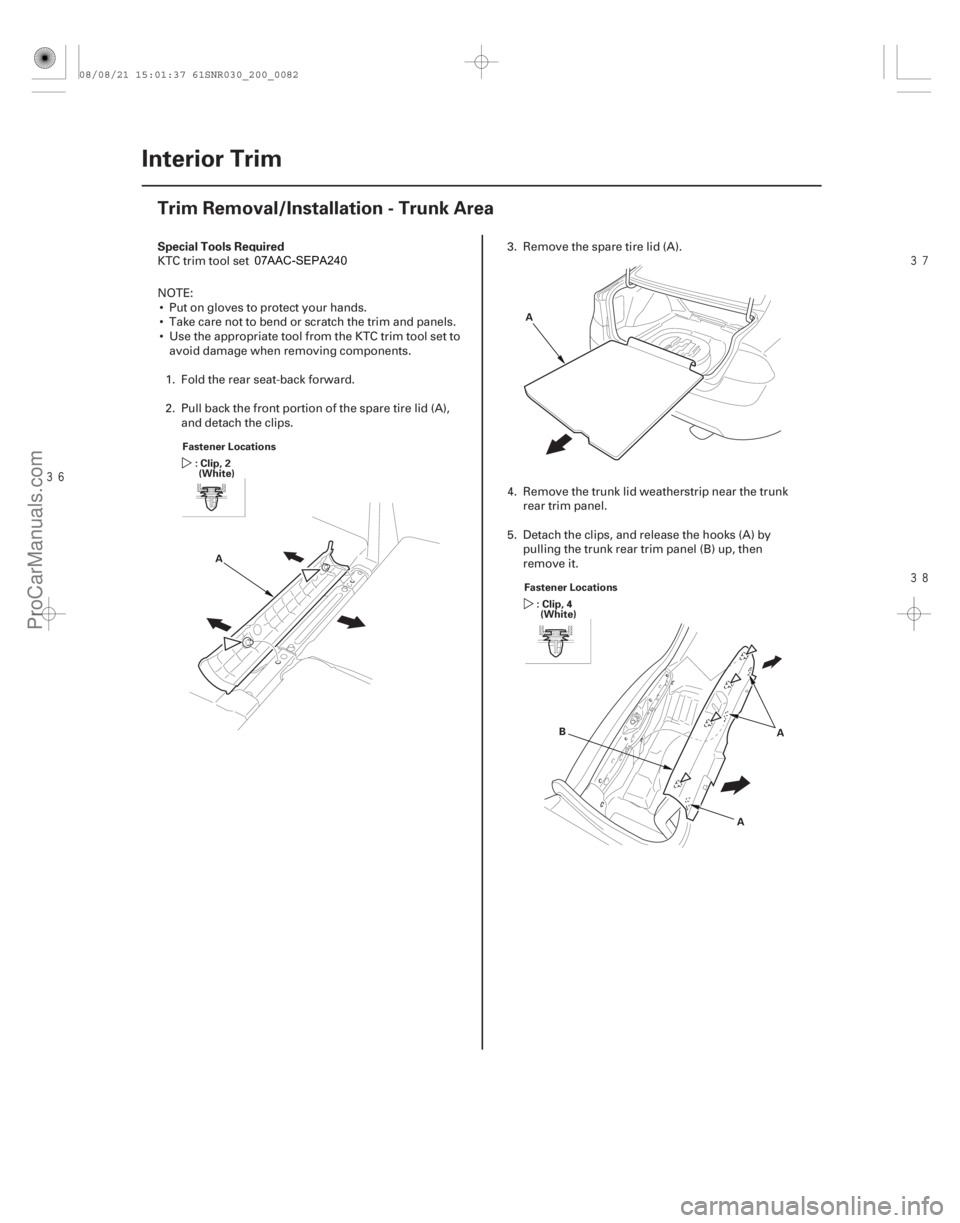
Trim Removal/Installation - Trunk Area
Fastener Locations
: Clip, 2(White)
A A
F
astener Locations: Clip, 4(White)
A
B
A
KTC trim tool set SOJATP2014
NOTE:
Put on gloves to protect your hands.
Take care not to bend or scratch the trim and panels.
Use the appropriate tool from the KTC trim tool set to avoid damage when removing components.
1. Fold the rear seat-back forward.
2. Pull back the front portion of the spare tire lid (A), and detach the clips. 3
. Remove the spare tire lid (A).
4. Remove the trunk lid weatherstrip near the trunk rear trim panel.
5. Detach the clips, and release the hooks (A) by pulling the trunk rear trim panel (B) up, then
remove it.
08/08/21 15:01:37 61SNR030_200_0082
ProCarManuals.com
DYNOMITE -2009-
Page 1794 of 2893
����
Resetting Head Restraint Position
Inspection
20-117
Front Seat Active Head Restraint Inspection
A
B
Locked B BB
Full stroke Normal
250")
���
����
����
�(�#�'���������������
���������
�����
�"�����)����
Resetting Head Restraint Position
Inspection
20-117
Front Seat Active Head Restraint Inspection
A
B
Locked B BB
Full stroke Normal
250 mm
(9.84 in.)
A
B
C
D
250 mm
(9.84 in.)
Above50mm(2.0in.)
(Level)
A
NOTE: If the vehicle has been in a collision, always
inspect the active head restraint, even if they appear
reusable, by doing the following procedure.1. Push the head restraint (A) forward fully from the locked position to release the inertial lock (B).
2. Slowly raise the head restraint into the normal position. 3. Fold the seat-back forward, then recline the seat-
back to the first lock position, and adjust the head
restraint to the highest position.
4. Apply masking tape on the top of the head restraint.
5. Make marks (A) on both sides at 250 mm (9.84 in.) upward from the roots of the head restraint frame
(B) along the back of the head restraint (C) surface.
Make a center of these points as a datum point (D).
6. Push the head restraint (A) forward, and measure the level amount of the head restraint movement.
The head restraint should move than 50 mm (2.0 in.)
without resistance. If it is less than 50 mm (0.2 in.),
or the head restraint does not move smoothly,
replace the seat frame assembly:
Passenger’s seat (see page 20-120)
Driver’s seat (see page 20-122)
08/08/21 15:03:06 61SNR030_200_0119
ProCarManuals.com
DYNOMITE -2009-
Page 1809 of 2893
���
����
�(�#�'���������������
����������������� �����)����
Seat-back
20-131
Rear Seat Removal/Installation
Fastener Locations B
:Bolt,3
8x1.25mm
22 N·m
(2.2 kgf·m, 16 lbf·ft)
C
D E
A
B
C EFastener Location
:Bolt,1
8x1.25mm
22 N·m
(2.2 kgf·m, 16 lbf·ft) A
B
A
NOTE: Take care not to scratch the body or tear the seat
covers. 1. Remove the right seat-back (A). –1 Fold the right seat-back down.
–2 Release the Velcro fasteners (B), and pull backthe seat-back cover (C), then remove the bolts.
–3 Release the hooks (D) of the pivot bracket (E). 2. Remove the bolt, then remove the center pivot
bracket (A).
3. If necessary, remove the bushing (B).
(cont’d)
08/08/21 15:04:02 61SNR030_200_0133
ProCarManuals.com
DYNOMITE -2009-
Page 1810 of 2893
��������
����
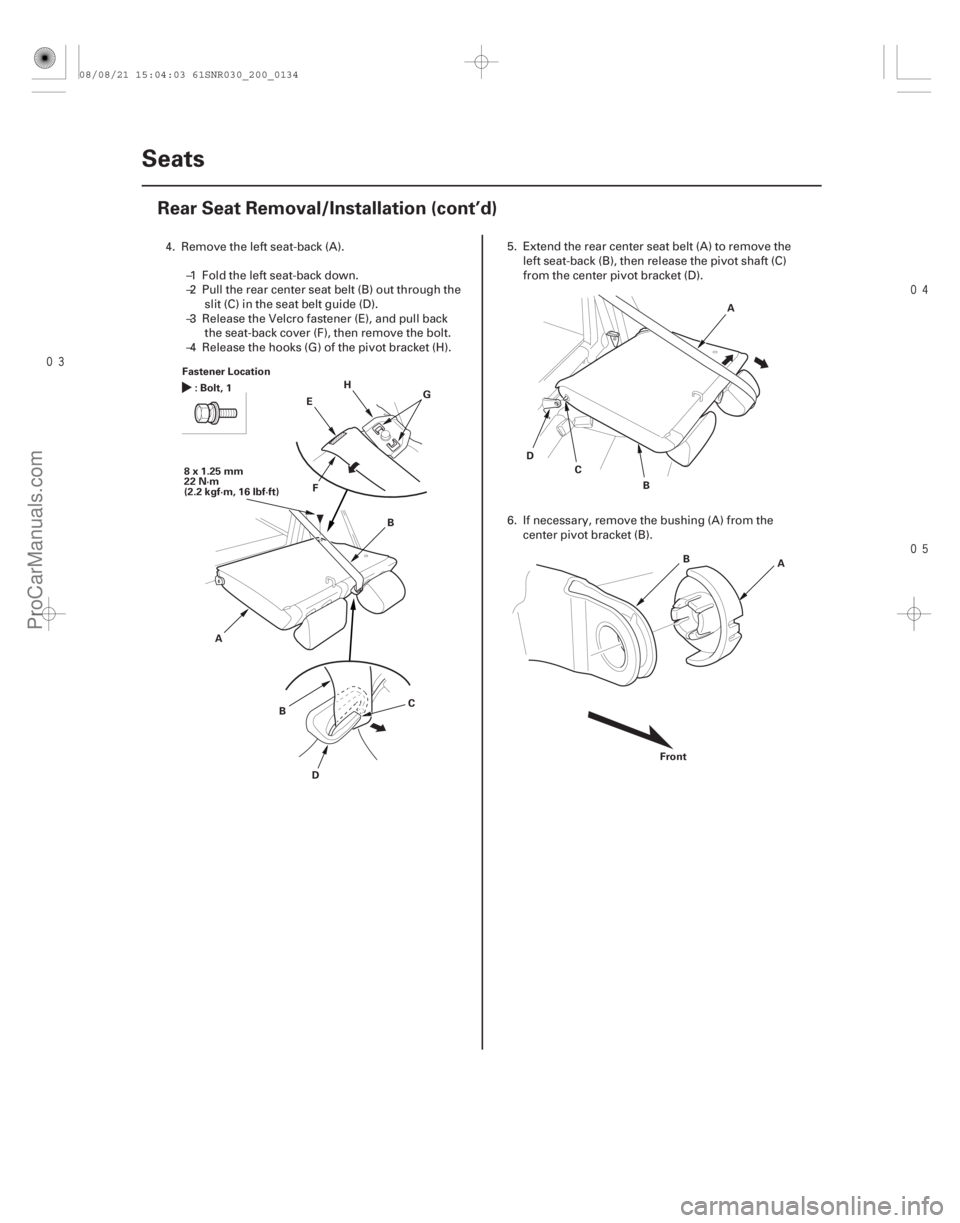
20-132Seats
Rear Seat Removal/Installation (cont’d)
Fastener Location
:Bolt,1
8x1.25mm
22 N·m
(2.2 kgf·m, 16 lbf·ft) FG
H
A B
C
D
E
B A
B
C
D
A
B
Front
4. Remove the left seat-back (A). –1 Fold the left seat-back down.
–2 Pull the rear center seat belt (B) out through theslit (C) in the seat belt guide (D).
–3 Release the Velcro fastener (E), and pull back the seat-back cover (F), then remove the bolt.
–4 Release the hooks (G) of the pivot bracket (H). 5. Extend the rear center seat belt (A) to remove the
left seat-back (B), then release the pivot shaft (C)
from the center pivot bracket (D).
6. If necessary, remove the bushing (A) from the center pivot bracket (B).
08/08/21 15:04:03 61SNR030_200_0134
ProCarManuals.com
DYNOMITE -2009-
Page 1813 of 2893
�
�����
����
�(�#�'���������������
���������������
� �����)����
20-13520-135
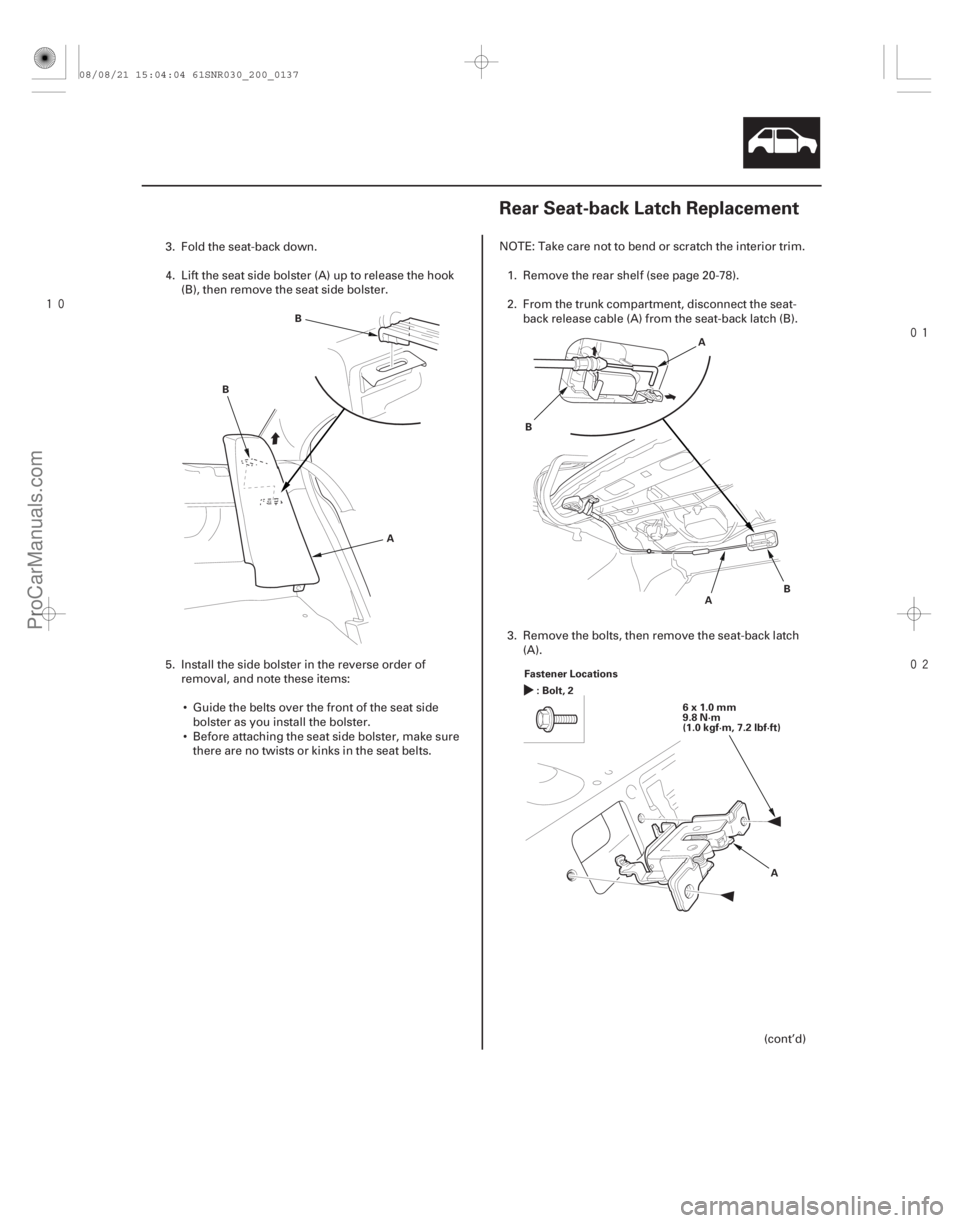
Rear Seat-back Latch Replacement
A
B
B
A
B
A
B
Fastener Locations
A
:Bolt,2
6x1.0mm
9.8 N·m
(1.0 kgf·m, 7.2 lbf·ft)
3. Fold the seat-back down.
4. Lift the seat side bolster (A) up to release the hook(B), then remove the seat side bolster.
5. Install the side bolster in the reverse order of removal, and note these items:
Guide the belts over the front of the seat side bolster as you install the bolster.
Before attaching the seat side bolster, make sure there are no twists or kinks in the seat belts. NOTE: Take care not to bend or scratch the interior trim.
1. Remove the rear shelf (see page 20-78).
2. From the trunk compartment, disconnect the seat- back release cable (A) from the seat-back latch (B).
3. Remove the bolts, then remove the seat-back latch (A).
(cont’d)
08/08/21 15:04:04 61SNR030_200_0137
ProCarManuals.com
DYNOMITE -2009-
Page 1814 of 2893
�
�����
����
�(�#�'���������������
���������������
� �����)����
20-13520-135
Rear Seat-back Latch Replacement
A
B
B
A
B
A
B
Fastener Locations
A
:Bolt,2
6x1.0mm
9.8 N·m
(1.0 kgf·m, 7.2 lbf·ft)
3. Fold the seat-back down.
4. Lift the seat side bolster (A) up to release the hook(B), then remove the seat side bolster.
5. Install the side bolster in the reverse order of removal, and note these items:
Guide the belts over the front of the seat side bolster as you install the bolster.
Before attaching the seat side bolster, make sure there are no twists or kinks in the seat belts. NOTE: Take care not to bend or scratch the interior trim.
1. Remove the rear shelf (see page 20-78).
2. From the trunk compartment, disconnect the seat- back release cable (A) from the seat-back latch (B).
3. Remove the bolts, then remove the seat-back latch (A).
(cont’d)
08/08/21 15:04:04 61SNR030_200_0137
ProCarManuals.com
DYNOMITE -2009-
Page 1826 of 2893
���� ���
����
�(�#����������������
����������������� �����)����
20-14320-143
Rear Seat Side Bolster Cover
Replacement Rear Seat Cushion Cover
Rep")
����
�(�#�'���������������
���������������
� �����)���� ���
����
�(�#�'���������������
����������������� �����)����
20-14320-143
Rear Seat Side Bolster Cover
Replacement Rear Seat Cushion Cover
Replacement
A
C
A
C C
B
A
B
AB
NOTE: Take care not to tear or damage the seat covers.
1. Remove the seat side bolster (see page 20-134).
2. Release all the hook strips (A), fold back the seat side bolster cover (B), and release the cover from
the hooks (C).
3. Install the cover in the reverse order of removal, and to prevent wrinkles when installing a side
bolster cover, make sure the material is stretched
evenly over the pad before securing the hook strips.NOTE:
Take care not to tear or damage the seat covers.
Put on gloves to protect your hands.
1. Remove the seat cushion (see page 20-133).
2. From the back of the seat-back, pass both lower retainers (A) through the slots in the seat cushion
pad, and release all the upholstery rings (B), and
fold back the seat cushion cover.
3. Pull back the edge of the seat cushion cover all the way around, and release the upholstery rings (A),
from the seat cushion cover (B) through the hole in
the seat cushion pad, then remove the seat cushion
cover.
(cont’d)
08/08/21 15:04:08 61SNR030_200_0145
ProCarManuals.com
DYNOMITE -2009-