Page 148 of 456
5-21
WARNING
_ Wait for the engine and radiator to cool before
removing the radiator cap. You could be
burned by hot fluid and steam blown out under
pressure. Always put a thick rag over the cap
when opening. Allow any remaining pressure
to escape before completely removing the cap. _
EBU01083
Throttle lever
Check to see that the throttle lever operates cor-
rectly. It must open smoothly and spring back to
the idle position when released. Have a Yamaha
dealer repair as necessary for proper operation.
EBU01162
Fittings and fasteners
Always check the tightness of chassis fittings and
fasteners before a ride. Take the machine to a
Yamaha dealer or refer to the Service Manual for
correct tightening torque.Coolant reservoir capacity
(up to the maximum level mark):
0.3 L
U5KM63.book Page 21 Monday, March 15, 2004 11:44 AM
Page 274 of 456

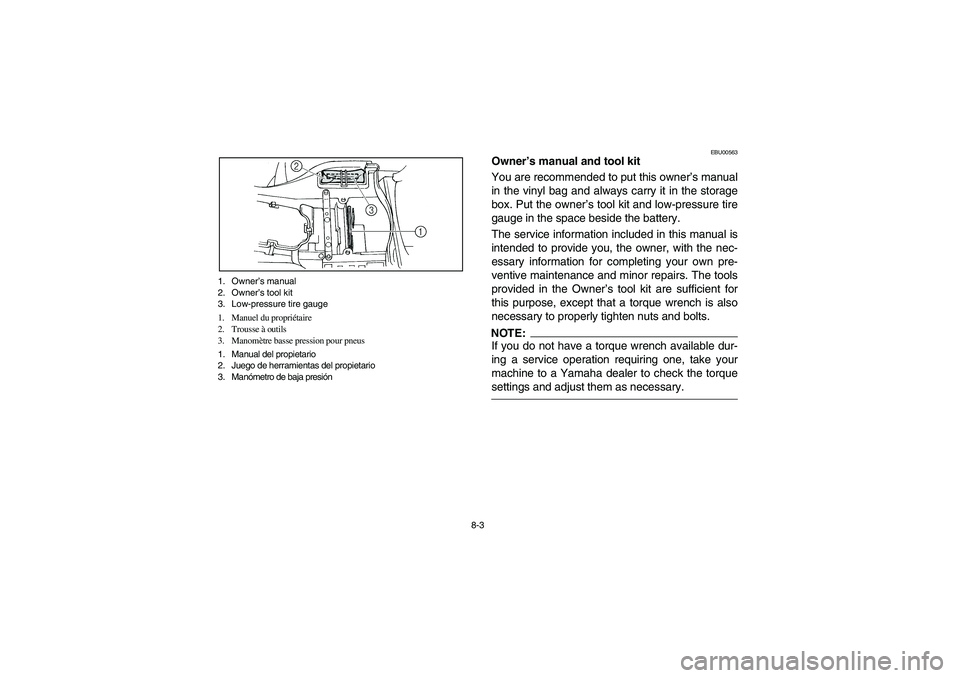
8-3 1. Owner’s manual
2. Owner’s tool kit
3. Low-pressure tire gauge
1. Manuel du propriétaire
2. Trousse à outils
3. Manomètre basse pression pour pneus
1. Manual del propietario
2. Juego de herramientas del propietario
3. Manómetro de baja presión
EBU00563
Owner’s manual and tool kit
You are recommended to put this owner’s manual
in the vinyl bag and always carry it in the storage
box. Put the owner’s tool kit and low-pressure tire
gauge in the space beside the battery.
The service information included in this manual is
intended to provide you, the owner, with the nec-
essary information for completing your own pre-
ventive maintenance and minor repairs. The tools
provided in the Owner’s tool kit are sufficient for
this purpose, except that a torque wrench is also
necessary to properly tighten nuts and bolts.NOTE:_ If you do not have a torque wrench available dur-
ing a service operation requiring one, take your
machine to a Yamaha dealer to check the torque
settings and adjust them as necessary. _
U5KM63.book Page 3 Monday, March 15, 2004 11:44 AM
Page 300 of 456
8-29 1. Quick fastener (× 2) 2. Panel C
1. Fixation rapide (× 2) 2. Cache C
1. Fijador rápido (× 2) 2. Panel C
2. Remove the quick fasteners and pull the pan-
el upward.
To install1. Place the panel in the original position and in-
stall the quick fasteners.
2. Install the front carrier by installing the bolts
and tightening them to the specified torques.
3. Install the stay covers.Tightening torques:
Carrier bolt (top):
26 Nm (2.6 m·kgf)
Carrier bolt (under fenders):
7 Nm (0.7 m·kgf)
U5KM63.book Page 29 Monday, March 15, 2004 11:44 AM
Page 308 of 456
8-37 1. Seat under bracket 2. Panel G
1. Support de la base de la selle 2. Cache G
1. Ménsula inferior del asiento 2. Panel G
3. Remove the seat under bracket and the pan-
el by pulling them off.
To install1. Place the panel and the seat under bracket in
the original position.
2. Install the rear carrier by installing the bolts
and tightening them to the specified torques.
3. Install the seat. Tightening torques:
Carrier bolt (top):
26 Nm (2.6 m·kgf)
Carrier bolt (under fenders):
7 Nm (0.7 m·kgf)
U5KM63.book Page 37 Monday, March 15, 2004 11:44 AM
Page 318 of 456
8-47 1. O-ring
1. Joint torique
1. Junta tórica
1. Torque wrench
1. Clé dynamométrique
1. Llave de apriete
NOTE:_ An oil filter wrench is available at a nearby
Yamaha dealer. _7. Apply a light coat of engine oil to the O-ring of
the new oil filter cartridge.NOTE:_ Make sure the O-ring is seated properly. _8. Install the new oil filter cartridge with an oil fil-
ter wrench, and then tighten it to the specified
torque with a torque wrench.
Tightening torque:
Oil filter cartridge:
17 Nm (1.7 m·kgf)
U5KM63.book Page 47 Monday, March 15, 2004 11:44 AM
Page 320 of 456
8-49
9. Install panels D and E.
10. Install the engine oil drain bolt, and then tight-
en it to the specified torque.
11. Add the specified amount of recommended
engine oil, and then install the engine oil filler
cap and tighten it. Tightening torque:
Engine oil drain bolt:
30 Nm (3.0 m·kgf)
Recommended engine oil:
See page 10-2.
Oil quantity:
Without oil filter cartridge replacement:
1.9 L
With oil filter cartridge replacement:
2.0 L
U5KM63.book Page 49 Monday, March 15, 2004 11:44 AM
Page 324 of 456
8-53 1. Final gear oil filler bolt
1. Boulon de l’orifice de remplissage du carter de transmission finale
1. Perno de relleno de aceite de la transmisión final
1. Final gear oil drain bolt
1. Boulon de vidange du carter de transmission finale
1. Perno de drenaje de aceite de la transmisión final
EBU08801
Final gear oil
The final gear case must be checked for oil leak-
age before each ride. If any leakage is found, have
a Yamaha dealer check and repair the ATV.
Replacing the final gear oil
1. Place the ATV on a level surface.
2. Place a container under the final gear case to
collect the used oil.
3. Remove the oil filler bolt and the drain bolt to
drain the oil.
4. Install the drain bolt and tighten it to the spec-
ified torque.
Tightening torque:
Final gear oil drain bolt:
23 Nm (2.3 m·kgf)
U5KM63.book Page 53 Monday, March 15, 2004 11:44 AM
Page 326 of 456
8-55
5. Fill the final gear case with the specified
amount of the recommended oil.CAUTION:_ Be sure no foreign material enters the final
gear case. _6. Install the filler bolt and tighten it to the speci-
fied torque.
7. Check for oil leakage. If oil leakage is found,
check for the cause. Recommended oil:
SAE 80 API GL-4 Hypoid gear oil
Oil quantity:
0.25 L
Tightening torque:
Final gear oil filler bolt:
23 Nm (2.3 m·kgf)
U5KM63.book Page 55 Monday, March 15, 2004 11:44 AM