Page 191 of 263
2005 VOLVO XC90
6. Side turn signals WY5W W2,1x9,5d
7. Brake lights, backup lights P21W BAY15d
8. Rear turn signals PY21W BA15s
9. Rear parking lights P21/4W BAZ15s
10. Vanity mirror lighting 1.2W SV5.5
11. Front footwell lighting, cargo area lighting C5W SV8.5
WARNING!
Bi-Xenon headlights (option) - due to the high voltage used by these h\
eadlights, these bulbs should
only be replaced by an authorized Volvo service technician.
pg. 150 Maintenance
Retaining pins
Replacing high/low beams/turn signal/parking light bulbs
The entire lamp housing must be lifted out when replacing these bulbs.
To lift out the lamp housing:
1. Switch off the ignition.
2. Open the hood.
3. Pull up the retaining pins (see the illustration above).
4. Lift out the lamp housing.
file:///K|/ownersdocs/2005/2005_XC90/05xc90_09b.htm (6 of 25)12/30/200\
6 4:42:40 PM
Page 192 of 263
2005 VOLVO XC90
CAUTION
- Do not touch the glass on the halogen bulbs with your fingers. Grease,\
oil, or any other impurities
can be carbonized onto the bulb and cause damage to the reflector.
- Be sure to use bulbs of the correct type and voltage.
Location of the bulbs in the headlight housing
1. Low beam headlight/Bi-Xenon headlight (option)
2. High beam headlight
3. Turn signal
4. Parking light
5. Side marker light
pg. 151 Maintenance
file:///K|/ownersdocs/2005/2005_XC90/05xc90_09b.htm (7 of 25)12/30/200\
6 4:42:40 PM
Page 193 of 263

2005 VOLVO XC90
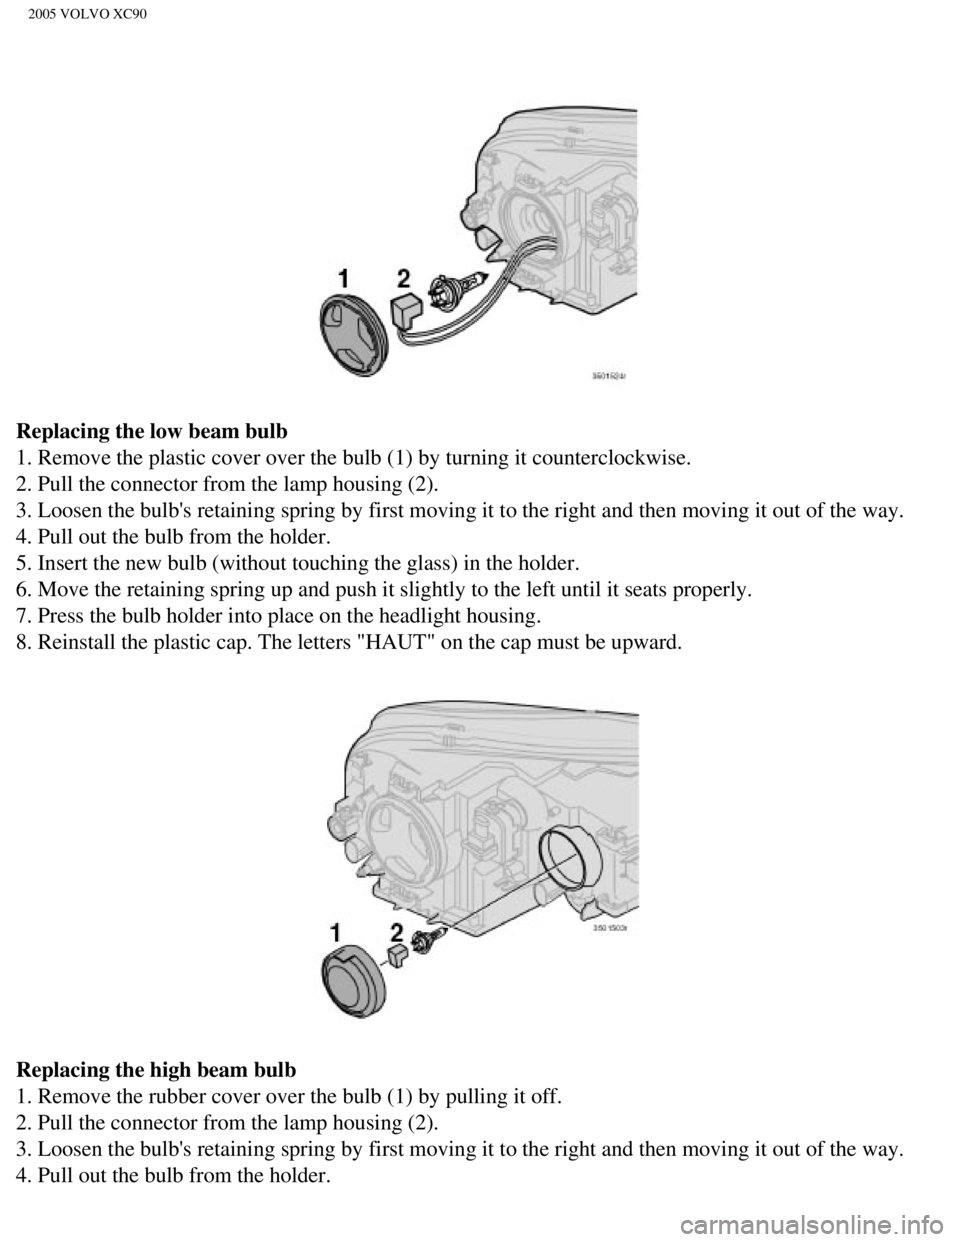
Replacing the low beam bulb
1. Remove the plastic cover over the bulb (1) by turning it counterclo\
ckwise.
2. Pull the connector from the lamp housing (2).
3. Loosen the bulb's retaining spring by first moving it to the right an\
d then moving it out of the way.
4. Pull out the bulb from the holder.
5. Insert the new bulb (without touching the glass) in the holder.
6. Move the retaining spring up and push it slightly to the left until i\
t seats properly.
7. Press the bulb holder into place on the headlight housing.
8. Reinstall the plastic cap. The letters "HAUT" on the cap must be upwa\
rd.
Replacing the high beam bulb
1. Remove the rubber cover over the bulb (1) by pulling it off.
2. Pull the connector from the lamp housing (2).
3. Loosen the bulb's retaining spring by first moving it to the right an\
d then moving it out of the way.
4. Pull out the bulb from the holder.
file:///K|/ownersdocs/2005/2005_XC90/05xc90_09b.htm (8 of 25)12/30/200\
6 4:42:40 PM
Page 207 of 263
2005 VOLVO XC90
pg. 160 Maintenance
Fuses (contd)
No. Amperage
1. Heated passenger's seat 15A
2. Heated driver's seat 15A
3. Horn 15A
4. -
5. Audio system 10A
6. -
7. -
8. Alarm siren 5A
9. Brake light switch feed 5A
10. Instrument panel, climate system, power driver's seat, Occupant Weig\
ht Sensor (USA) 10A
11. 12-volt sockets - front and rear seats 15A
12. -
13. -
14. -
15. ABS, STC/DSTC 5A
16. Power steering, Bi-Xenon headlights (option) 10A
17. Driver's side front fog light (option) 7.5A
18. Passenger's side front fog light (option) 7.5A
19. -
20. -
21. Transmission control module 10A
22. Driver's side high beam 10A
file:///K|/ownersdocs/2005/2005_XC90/05xc90_09b.htm (22 of 25)12/30/20\
06 4:42:40 PM
Page 208 of 263
2005 VOLVO XC90
23. Passenger's side high beam10A
24. -
25. -
26. -
27. -
28. Power passenger's seat (option) 5A
29. -
30. -
31. -
32. -
33. Vacuum pump 20A
34. Pump - windshield and tailgate washers 15A
35. -
36. -
pg. 161 Maintenance
Fuses (contd)
Fuses in the cargo compartment
The fuses in the cargo area are located behind the panel on the driver's\
side of the cargo compartment.
When replacing a blown fuse, be sure to replace it with a new one of the\
same color and amperage
(written on the fuse).
file:///K|/ownersdocs/2005/2005_XC90/05xc90_09b.htm (23 of 25)12/30/20\
06 4:42:40 PM
Page 254 of 263
2005 VOLVO XC90
Fuel filler door - unlocking 33
Fuel filler door - unlocking manually
34
Fuel Formulations
87
Fuel gauge
26
Fuel tank, capacity
167
Fuses
157
G
Gasoline
86
Geartronic
93
Geartronic - kickdown
94
Geartronic - manual shifting
94
General information
ii
Generator warning light
29
Glove compartment
69
H
Handling
92
Hazard warning flashers
38
Headlight flasher
35
Headlight washer
36
Headlights
33
Headphones
178
Heated front seats
38, 54
High beam "flash"
35
High beam indicator
26
High/low beams - replacing
150
Hoisting the car
138
Home Safe System
35
HomeLink® Universal Transceiver
196
Hood - opening
42
I
IC
14
Immobilizer (start inhibitor)
76
file:///K|/ownersdocs/2005/2005_XC90/05xc90_12.htm (5 of 14)12/30/2006\
4:42:46 PM
Page 262 of 263
2005 VOLVO XC90
Tire pressure, see page 113, and the label located on the inside of the fuel tank cover.
1 Turn signal
2 High beam
3 Parking light
4 Low beam
5 Fog light, front
6 Fog light, rear
7 Back-up light
8 Parking light/tail
light
9 Turn signal
10 Brake light
See
page 149 for more information on replacing bulbs.
Supplement - SAFETY - AIRBAG LABELS
Page 5 of your owner's manual shows outdated airbag labels. This supplement sh\
ows the correct
positions and text of airbag warning labels located on your vehicle's da\
shboard and sun visors.
This supplement belongs together with your owner's manual. See the Safet\
y section of your owner's
manual for additional information about airbags and child safety.
file:///K|/ownersdocs/2005/2005_XC90/05xc90_12.htm (13 of 14)12/30/200\
6 4:42:46 PM