2005 VOLVO S80 parking brake
[x] Cancel search: parking brakePage 56 of 123
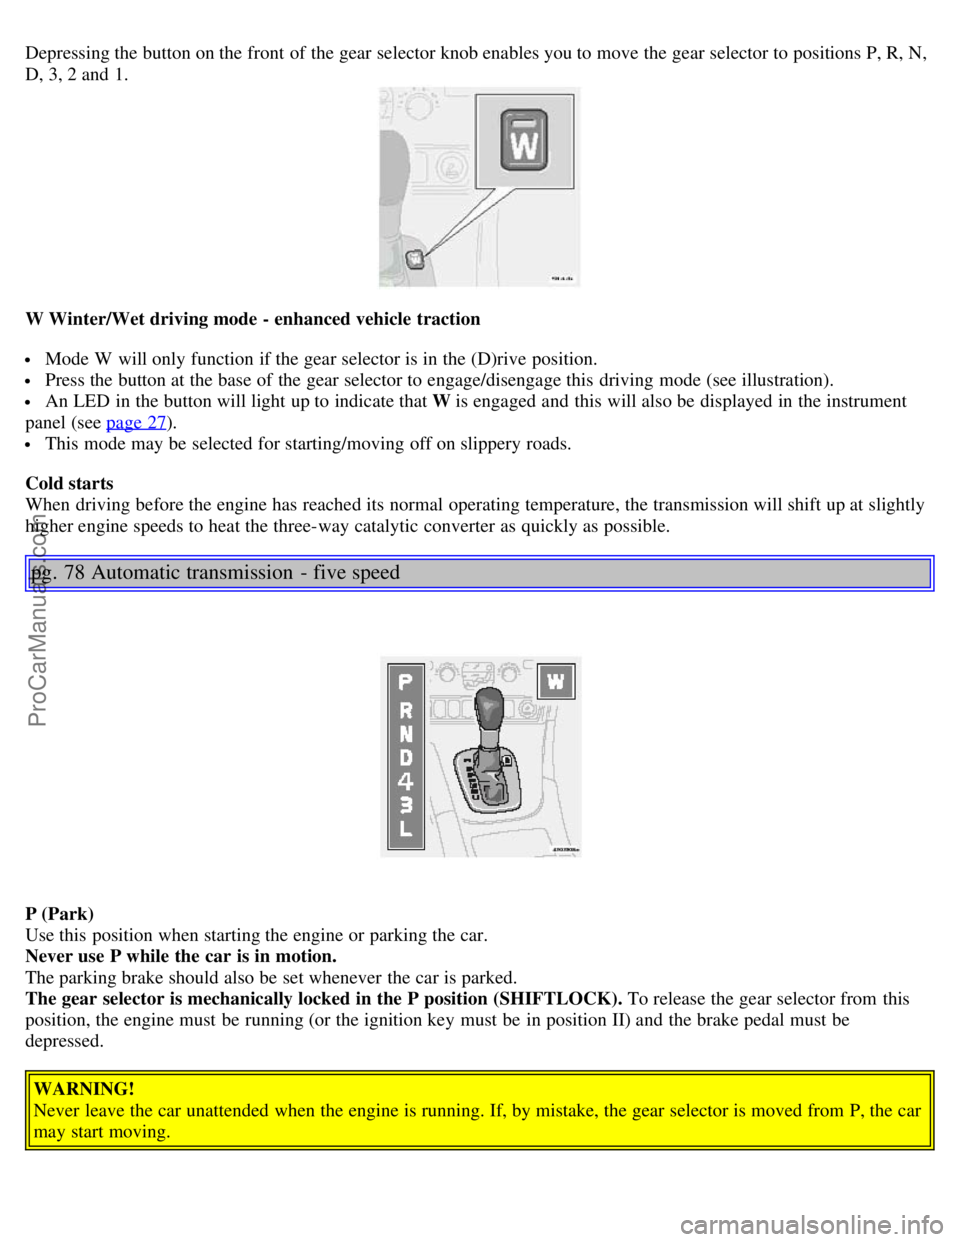
Depressing the button on the front of the gear selector knob enables you to move the gear selector to positions P, R, N,
D, 3, 2 and 1.
W Winter/Wet driving mode - enhanced vehicle traction
Mode W will only function if the gear selector is in the (D)rive position.
Press the button at the base of the gear selector to engage/disengage this driving mode (see illustration).
An LED in the button will light up to indicate that W is engaged and this will also be displayed in the instrument
panel (see page 27
).
This mode may be selected for starting/moving off on slippery roads.
Cold starts
When driving before the engine has reached its normal operating temperature, the transmission will shift up at slightly
higher engine speeds to heat the three-way catalytic converter as quickly as possible.
pg. 78 Automatic transmission - five speed
P (Park)
Use this position when starting the engine or parking the car.
Never use P while the car is in motion.
The parking brake should also be set whenever the car is parked.
The gear selector is mechanically locked in the P position (SHIFTLOCK). To release the gear selector from this
position, the engine must be running (or the ignition key must be in position II) and the brake pedal must be
depressed.
WARNING!
Never leave the car unattended when the engine is running. If, by mistake, the gear selector is moved from P, the car
may start moving.
ProCarManuals.com
Page 57 of 123
R (Reverse)
Never engage R while the car is moving.
N (Neutral)
Neutral - no gear engaged. Use the parking brake.
D (Drive)
D is the normal driving position and should be used as often as possible to help improve fuel economy. The car should
not be moving when shifting from R to the D position.
4 (Intermediate gear)
The transmission will shift automatically between gears 4, 3, 2 or 1 from this position. The transmission cannot shift
up to (D)rive from fourth gear.
3 (Intermediate gear)
The transmission will shift automatically between gears 3, 2 and 1 from this position. The transmission cannot shift
up to fourth gear or (D)rive from third gear.
L (Low gears)
The transmission is locked in gears 1 and 2 when the selector is in this position.
NOTE:
· Gears 4, 3, or L can be used if you are driving in a mountainous area, towing a trailer or to increase engine braking
effect.
· The transmission has a built-in limiter designed to help prevent excessive engine speeds (high rpm) when gears 4, 3,
or L are selected.
Automatic transmission - adaptive system
The automatic transmission is controlled by an adaptive system that constantly monitors the way in which the
transmission functions. It senses and adapts each gear shift for optimal performance.
pg. 79 Automatic transmission - five speed
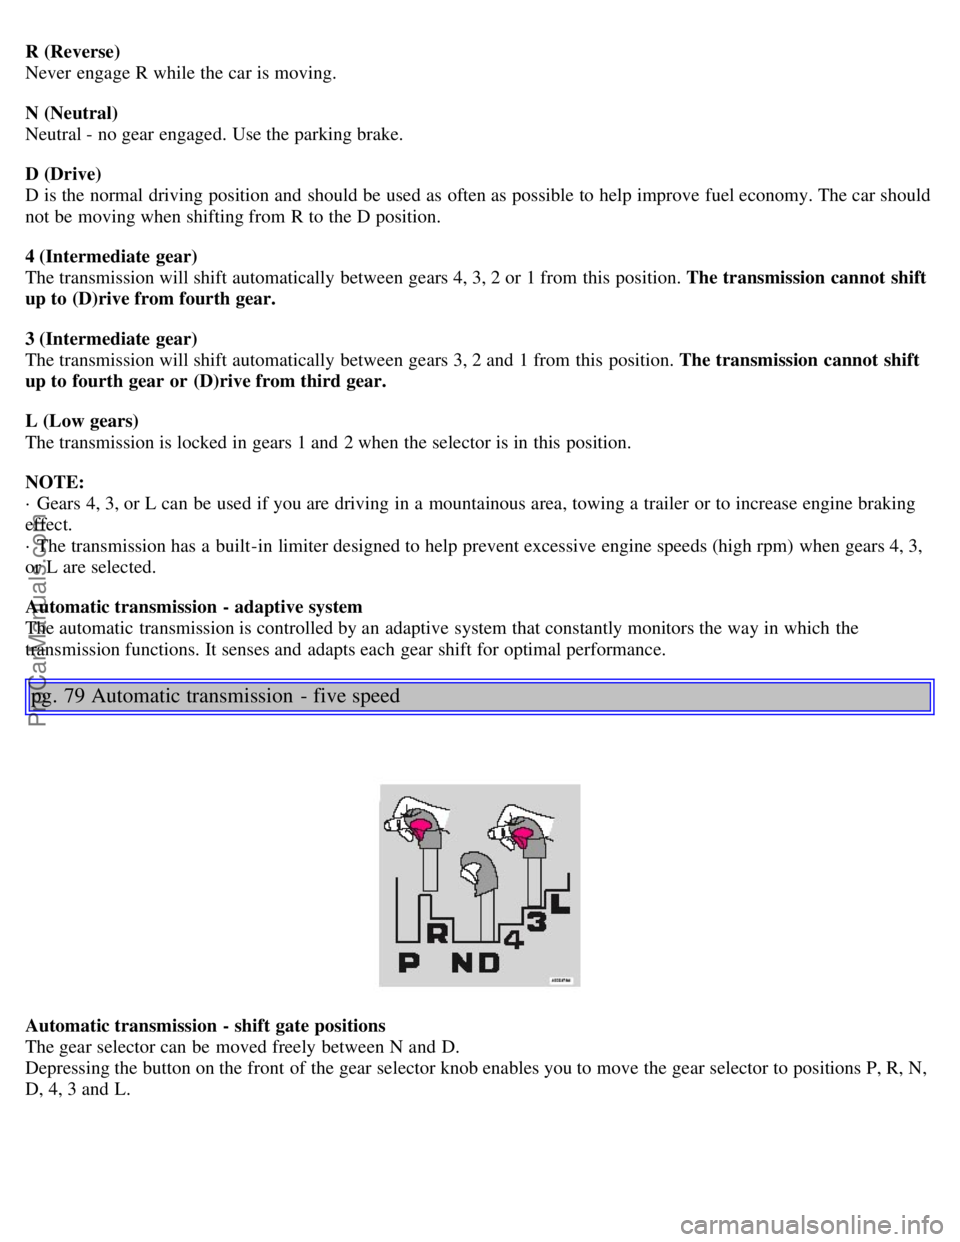
Automatic transmission - shift gate positions
The gear selector can be moved freely between N and D.
Depressing the button on the front of the gear selector knob enables you to move the gear selector to positions P, R, N,
D, 4, 3 and L.
ProCarManuals.com
Page 58 of 123
W Winter/Wet driving mode - enhanced vehicle traction
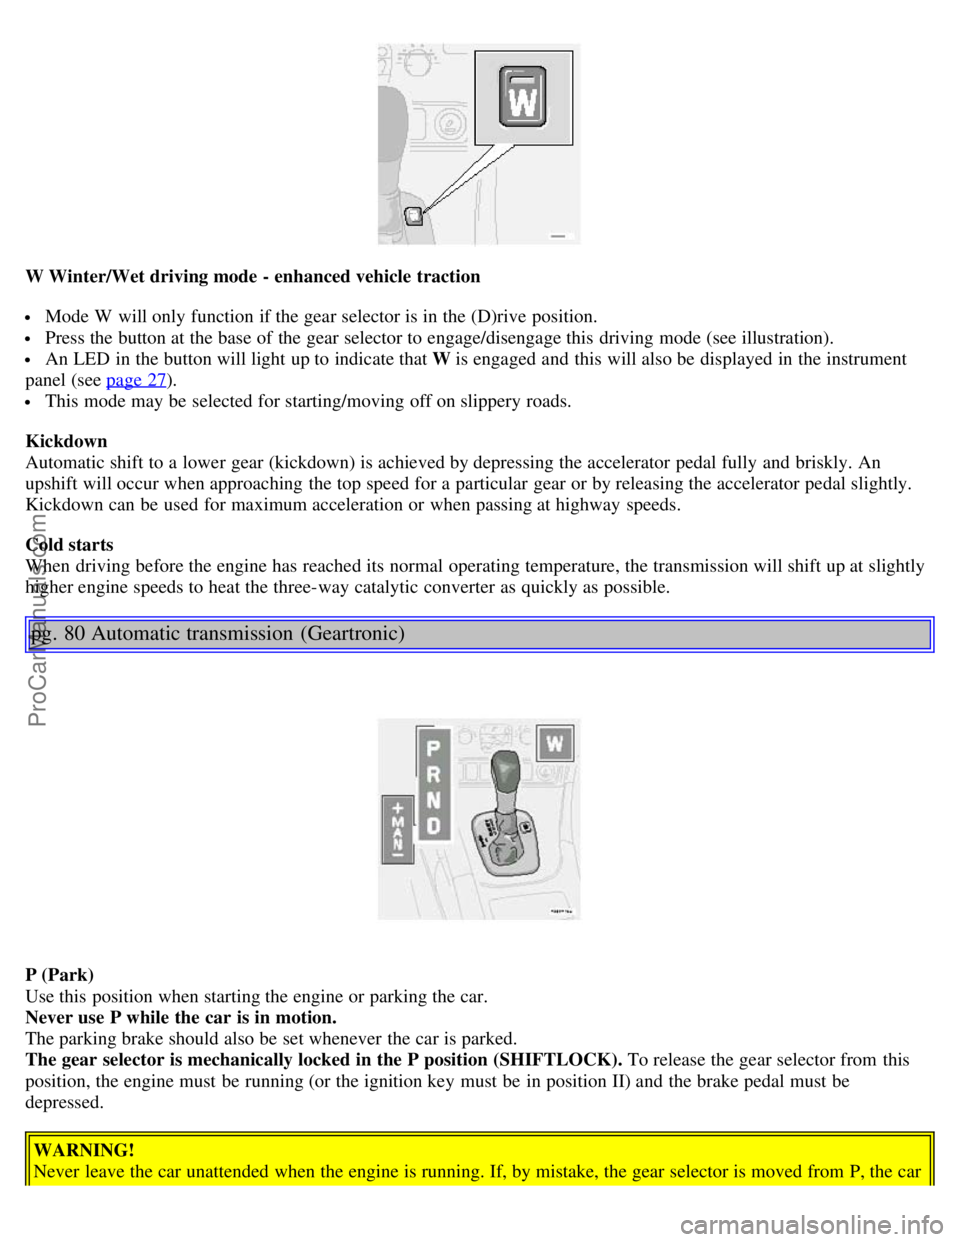
Mode W will only function if the gear selector is in the (D)rive position.
Press the button at the base of the gear selector to engage/disengage this driving mode (see illustration).
An LED in the button will light up to indicate that W is engaged and this will also be displayed in the instrument
panel (see page 27
).
This mode may be selected for starting/moving off on slippery roads.
Kickdown
Automatic shift to a lower gear (kickdown) is achieved by depressing the accelerator pedal fully and briskly. An
upshift will occur when approaching the top speed for a particular gear or by releasing the accelerator pedal slightly.
Kickdown can be used for maximum acceleration or when passing at highway speeds.
Cold starts
When driving before the engine has reached its normal operating temperature, the transmission will shift up at slightly
higher engine speeds to heat the three-way catalytic converter as quickly as possible.
pg. 80 Automatic transmission (Geartronic)
P (Park)
Use this position when starting the engine or parking the car.
Never use P while the car is in motion.
The parking brake should also be set whenever the car is parked.
The gear selector is mechanically locked in the P position (SHIFTLOCK). To release the gear selector from this
position, the engine must be running (or the ignition key must be in position II) and the brake pedal must be
depressed.
WARNING!
Never leave the car unattended when the engine is running. If, by mistake, the gear selector is moved from P, the car
ProCarManuals.com
Page 59 of 123
may start moving.
R (Reverse)
Never engage R while the car is moving forward.
N (Neutral)
Neutral - no gear engaged. Use the parking brake.
D (Drive)
D is the normal driving position and should be used as often as possible to help improve fuel economy. The car should
not be moving when shifting from R to the D position.
Kickdown
Automatic shift to a lower gear (kickdown) is achieved by depressing the accelerator pedal fully and briskly. An
upshift will occur when approaching the top speed for a particular gear or by releasing the accelerator pedal slightly.
Kickdown can be used for maximum acceleration or when passing at highway speeds. Kickdown does not function
when the transmission is in the manual shift (geartronic) mode (see next page).
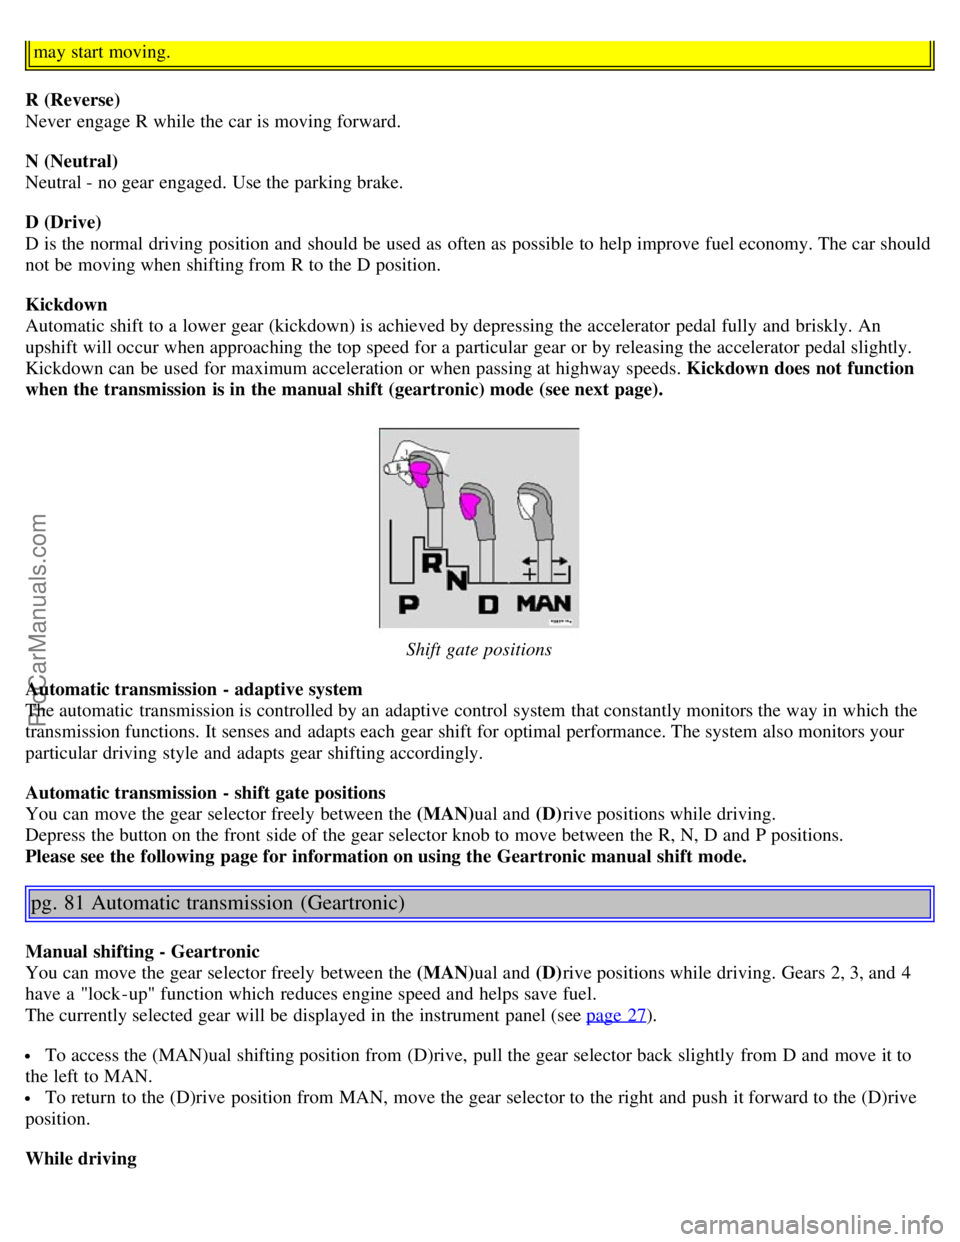
Shift gate positions
Automatic transmission - adaptive system
The automatic transmission is controlled by an adaptive control system that constantly monitors the way in which the
transmission functions. It senses and adapts each gear shift for optimal performance. The system also monitors your
particular driving style and adapts gear shifting accordingly.
Automatic transmission - shift gate positions
You can move the gear selector freely between the (MAN) ual and (D)rive positions while driving.
Depress the button on the front side of the gear selector knob to move between the R, N, D and P positions.
Please see the following page for information on using the Geartronic manual shift mode.
pg. 81 Automatic transmission (Geartronic)
Manual shifting - Geartronic
You can move the gear selector freely between the (MAN) ual and (D)rive positions while driving. Gears 2, 3, and 4
have a "lock -up" function which reduces engine speed and helps save fuel.
The currently selected gear will be displayed in the instrument panel (see page 27
).
To access the (MAN)ual shifting position from (D)rive, pull the gear selector back slightly from D and move it to
the left to MAN.
To return to the (D)rive position from MAN, move the gear selector to the right and push it forward to the (D)rive
position.
While driving
ProCarManuals.com
Page 62 of 123

· Press the Park assist button on the center console (see page 31) to temporarily deactivate the system(s).
· The indicator light in the button will go out when the system(s) have been deactivated.
· If the vehicle is equipped with front and rear park assist, both systems will be deactivated by pressing the button.
NOTE:
It may be necessary to deactivate one or both of the park assist systems in certain cases.
· Rear park assist: towing a trailer, carrying bicycles in a rear-mounted carrier, etc, could trigger the rear park assist
system's sensors.
· Front park assist: it may not be possible to combine auxiliary headlights and front park assist since these lights
could trigger the system's sensors.
Faults in the system
If a fault should occur in the system, the LED in the button will be switched off and a message will be displayed in the
text window.
Cleaning the sensors
For the system to function properly, the sensors in the front and/or rear bumpers should be kept clean. They can be
cleaned with car washing detergent and a sponge.
WARNING!
These systems are designed to be a supplementary aid when parking the vehicle. They are not, however, intended to
replace the driver's attention and judgement.
pg. 84 Driving economy
Economical driving conserves natural resources
Better driving economy may be obtained by thinking ahead, avoiding rapid starts and stops and adjusting the speed of
your vehicle to immediate traffic conditions. Observe the following rules:
Bring the engine to normal operating temperature as soon as possible by driving with a light foot on the accelerator
pedal for the first few minutes of operation. A cold engine uses more fuel and is subject to increased wear.
Whenever possible, avoid using the car for driving short distances. This does not allow the engine to reach normal
operating temperature.
Drive carefully and avoid rapid acceleration and hard braking.
Do not exceed posted speed limits.
Avoid carrying unnecessary items (extra load) in the car.
Maintain correct tire pressure. Check tire pressure regularly (when tires are cold).
Remove snow tires when threat of snow or ice has ended.
Note that roof racks, ski racks, etc., increase air resistance and also fuel consumption.
Avoid using automatic transmission kickdown feature unless necessary.
Avoid using the air conditioning when it is not required. When engaged, the A/C compressor places an additional
load on the engine. However, at higher driving speeds, fuel consumption will be lower with the air conditioning on and
the windows closed than with the air conditioning off and the windows open.
Using the onboard trip computer's fuel consumption modes can help you learn how to drive more economically.
Other factors that decrease gas mileage are:
Dirty air cleaner
Dirty engine oil and clogged oil filter
Dragging brakes
Incorrect front end alignment
Some of the above mentioned items and others are checked at the standard Maintenance Service intervals.
ProCarManuals.com
Page 76 of 123

a temporary spare tire.
CAUTION!
The car must not be driven with wheels of different dimensions or with a spare tire other than the one that came with
the car. The use of different size wheels can seriously damage your car's transmission.
pg. 110 Changing wheels
Insert flat end of lug wrench and turn/pull straight out
Changing wheels
The spare wheel is located under the carpet on the trunk floor. The jack and crank are secured in the wheel recess.
There are two jack attachment points on each side of the car.
To change a wheel:
Engage the parking brake.
Put the gear selector in (P)ark.
Remove the wheel cap (where applicable) using the lug wrench in the tool bag.
With the car still on the ground, use the lug wrench to loosen the wheel bolts 1/2 -1 turn by exerting downward
pressure. Turn the bolts counterclockwise to loosen.
Loosen wheel bolts
Position the jack on the bar in the attachment ( A in the illustration below) and crank while simultaneously guiding
ProCarManuals.com
Page 78 of 123
Install the wheel cap (where applicable).
WARNING!
· The jack must correctly engage the bar in the jack attachment (A). The car's weight must not rest on the jack
attachment (B). See illustration on page 110
.
· Be sure the jack is on a firm, level, non-slippery surface.
· Never allow any part of your body to be extended under a car supported by a jack.
· Use the jack intended for the car when replacing a wheel. For any other job, use stands to support the side of the
car being worked on.
· Apply the parking brake and put the gear selector in the (P)ark position.
· Block the wheels standing on the ground, use rigid wooden blocks or large stones.
· The jack should be kept well-greased
CAUTION:
The car must not be driven with wheels of different dimensions or with a spare tire other than the one that came
with the car. The use of different size wheels can seriously damage your car's transmission.
Correct tightening torque on wheel bolts must be observed. The wheel bolts should never be greased or lubricated.
The extended, chromed wheel bolts must not be used with steel rims, as they make it impossible to fit the hub caps.
pg. 112
This page intentionally left blank.
Contents | Top of Page
ProCarManuals.com
Page 84 of 123

29-
30-
31 -
32 -
33 Vacuum pump 20A
34 Washer pump - headlight wipers (certain models) 15A
35 -
36 -
pg. 118 Fuses in the trunk
Fuses in the trunk
The fuses in the trunk are located behind the panel on the driver's side. When replacing a blown fuse, be sure to
replace it with a new one of the same color and amperage (written on the fuse).
Ordinary fuses
Location Amperage
1 Backup lights 10A
2 Parking lights, foglights, trunk lighting, license plate lighting, brake lights 20A
3 Accessory control module 15A
4 -
5 Rear Electronic Module 10A
6 CD-changer (option), Navigation system (option) 7.5A
7 Trailer wiring (30-feed) 15A
8 12-volt socket - trunk 15A
ProCarManuals.com