2005 VOLVO S80 display
[x] Cancel search: displayPage 62 of 123

· Press the Park assist button on the center console (see page 31) to temporarily deactivate the system(s).
· The indicator light in the button will go out when the system(s) have been deactivated.
· If the vehicle is equipped with front and rear park assist, both systems will be deactivated by pressing the button.
NOTE:
It may be necessary to deactivate one or both of the park assist systems in certain cases.
· Rear park assist: towing a trailer, carrying bicycles in a rear-mounted carrier, etc, could trigger the rear park assist
system's sensors.
· Front park assist: it may not be possible to combine auxiliary headlights and front park assist since these lights
could trigger the system's sensors.
Faults in the system
If a fault should occur in the system, the LED in the button will be switched off and a message will be displayed in the
text window.
Cleaning the sensors
For the system to function properly, the sensors in the front and/or rear bumpers should be kept clean. They can be
cleaned with car washing detergent and a sponge.
WARNING!
These systems are designed to be a supplementary aid when parking the vehicle. They are not, however, intended to
replace the driver's attention and judgement.
pg. 84 Driving economy
Economical driving conserves natural resources
Better driving economy may be obtained by thinking ahead, avoiding rapid starts and stops and adjusting the speed of
your vehicle to immediate traffic conditions. Observe the following rules:
Bring the engine to normal operating temperature as soon as possible by driving with a light foot on the accelerator
pedal for the first few minutes of operation. A cold engine uses more fuel and is subject to increased wear.
Whenever possible, avoid using the car for driving short distances. This does not allow the engine to reach normal
operating temperature.
Drive carefully and avoid rapid acceleration and hard braking.
Do not exceed posted speed limits.
Avoid carrying unnecessary items (extra load) in the car.
Maintain correct tire pressure. Check tire pressure regularly (when tires are cold).
Remove snow tires when threat of snow or ice has ended.
Note that roof racks, ski racks, etc., increase air resistance and also fuel consumption.
Avoid using automatic transmission kickdown feature unless necessary.
Avoid using the air conditioning when it is not required. When engaged, the A/C compressor places an additional
load on the engine. However, at higher driving speeds, fuel consumption will be lower with the air conditioning on and
the windows closed than with the air conditioning off and the windows open.
Using the onboard trip computer's fuel consumption modes can help you learn how to drive more economically.
Other factors that decrease gas mileage are:
Dirty air cleaner
Dirty engine oil and clogged oil filter
Dragging brakes
Incorrect front end alignment
Some of the above mentioned items and others are checked at the standard Maintenance Service intervals.
ProCarManuals.com
Page 63 of 123

NOTE: Vehicles equipped with automatic transmissions should use (D)rive as often as possible and avoid using
"kickdown" to help improve fuel economy.
Cooling system
The risk for engine overheating is greatest, especially in hot weather, when:
Towing a trailer up steep inclines for prolonged periods at wide open throttle and low engine rpm.
Stopping the engine suddenly after high speed driving (so-called "after-boiling" can occur).
To avoid overheating, the following rules should be followed:
Do not drive for prolonged periods at engine speeds above 4500 rpm if you are towing a trailer in hilly terrain.
Reduce speed when towing a trailer up long, steep inclines. The risk of overheating can be reduced by switching off
the air conditioning system for a short time.
Do not let the engine idle unnecessarily for prolonged periods.
Do not mount auxiliary lamps in front of the grill.
When the risk of overheating is imminent, or in the event of overheating (the temperature gauge goes repeatedly into,
or stays continually in, the red section), the following precautions should be taken:
Switch off the air conditioning system.
Pull off the road, away from traffic, stop the car and put the gear selector into Park. Do not stop the engine!
Switch the heater to full (maximum) position. Increase the engine speed to approx. 2000 rpm (twice idling speed)
until the temperature begins to drop.
If the warning light in the center of the instrument panel is red, and the message "Coolant level low stop engine" is
displayed, switch off the engine as soon as possible.
WARNING!
Do not remove coolant expansion tank cap. The coolant will be extremely hot.
If necessary, see page 132
for information on checking and topping-up the coolant level.
Contents | Top of Page
ProCarManuals.com
Page 69 of 123

When low inflation pressure is detected, TPMS will light up the tire pressure warning light () in the instrument
panel, and will display a message in the text window. The wording of this message is determined by the degree of
inflation pressure loss.
When the tire pressure monitoring system warning light is on, one or more of your tires is significantly under-inflated.
You should stop and check your tires as soon as possible, and inflate them to the proper pressure as indicated on the
vehicle's tire information placard.
Driving on a significantly under-inflated tire causes the tire to overheat and can lead to tire failure. Under-inflation
also reduces fuel efficiency and tire tread life, and may affect the vehicle's handling and stopping ability. Each tire,
including the spare, should be checked monthly when cold and set to the recommended inflation pressure as specified
in the vehicle placard and owner's manual.
NOTE: TPMS indicates low tire pressure but does not replace normal tire maintenance. For information on correct tire
pressure, please refer to the table on page 101
, or consult your Volvo retailer.
Erasing warning messages
When a low tire pressure warning message has been displayed, and the tire pressure warning light has come on:
1. Use a tire pressure gauge to check the inflation pressure of all four tires.
2. Re-inflate the tire(s) to the correct pressure (consult the tire pressure placard or the table on page 101
).
3. Drive the car for at least one minute at a speed of 20 mph (30 km/h) or faster.
This will erase the warning text and the warning light will go out.
WARNING!
Incorrect inflation pressure could lead to tire failure, resulting in a loss of control of the vehicle.
Changing tires
Please note the following when changing or replacing the factory installed TPMS wheels/tires on the vehicle:
Only the factory-mounted wheels are equipped with TPMS sensors in the valves.
If the vehicle is equipped with a temporary spare tire, this tire does not have a TPMS sensor.
If, for example, winter wheels/tires are used that are not equipped with TPMS sensors, the message TIRE PRESSURE
SYSTEM SERVICE REQUIRED will be displayed after the car has been driven for several minutes at approximately
35 mph (50 km/h) or faster.
This message will remain on until wheels with TPMS sensors are mounted on the vehicle and it has been driven for at
least one minute at a speed of 20 mph (30 km/h) or faster.
TPMS valves can be fitted on winter wheels or full-size spare wheels/tires. Consult your Volvo retailer.
CAUTION!
When inflating tires with TPMS valves, press the pump's mouthpiece straight onto the valve to help avoid bending or
otherwise damaging the valve.
pg. 103 Wheels and tires
Self supporting run flat tires (option)
Certain models equipped with the Tire Pressure Monitoring System (TPMS) can also be equipped with self supporting
ProCarManuals.com
Page 70 of 123

run flat tires.
Tires of this type have specially reinforced sidewalls that make it possible to continue driving in the event of a drop in
inflation pressure. Tires of this type are mounted on special rims.
NOTE: Self supporting run flat tires are only available in conjunction with TPMS.
If a self supporting run flat tire should lose inflation pressure, the yellow TPMS warning symbol (
) in the
instrument panel lights up to alert the driver, and a message will be shown in the text window in the instrument panel.
If this occurs, reduce vehicle speed to a maximum of 50 mph (80 km/h). The vehicle can be driven approximately 50
miles (80 km), or somewhat farther if the vehicle is not heavily loaded. The tire should be replaced as soon as
possible.
Hard braking and sudden steering maneuvers should be avoided.
In certain cases, it may be difficult to see which self supporting run flat tire is defective. To determine which tire is
damaged, check the inflation pressure of all four tires.
WARNING!
• Only specially trained persons should mount self supporting run flat tires.
• If self supporting run flat tires are mounted, the vehicle must be equipped with a Tire Pressure Monitoring System.
• After a low pressure warning has been displayed, do not exceed 50 mph (80 km/h).
• Avoid severe cornering and hard braking, and minimize the distance traveled before replacing the self supporting
run flat tire.
• Self supporting run flat tires cannot be repaired. They must be replaced if damaged or punctured.
pg. 104 Wheels and tires
Tire designations
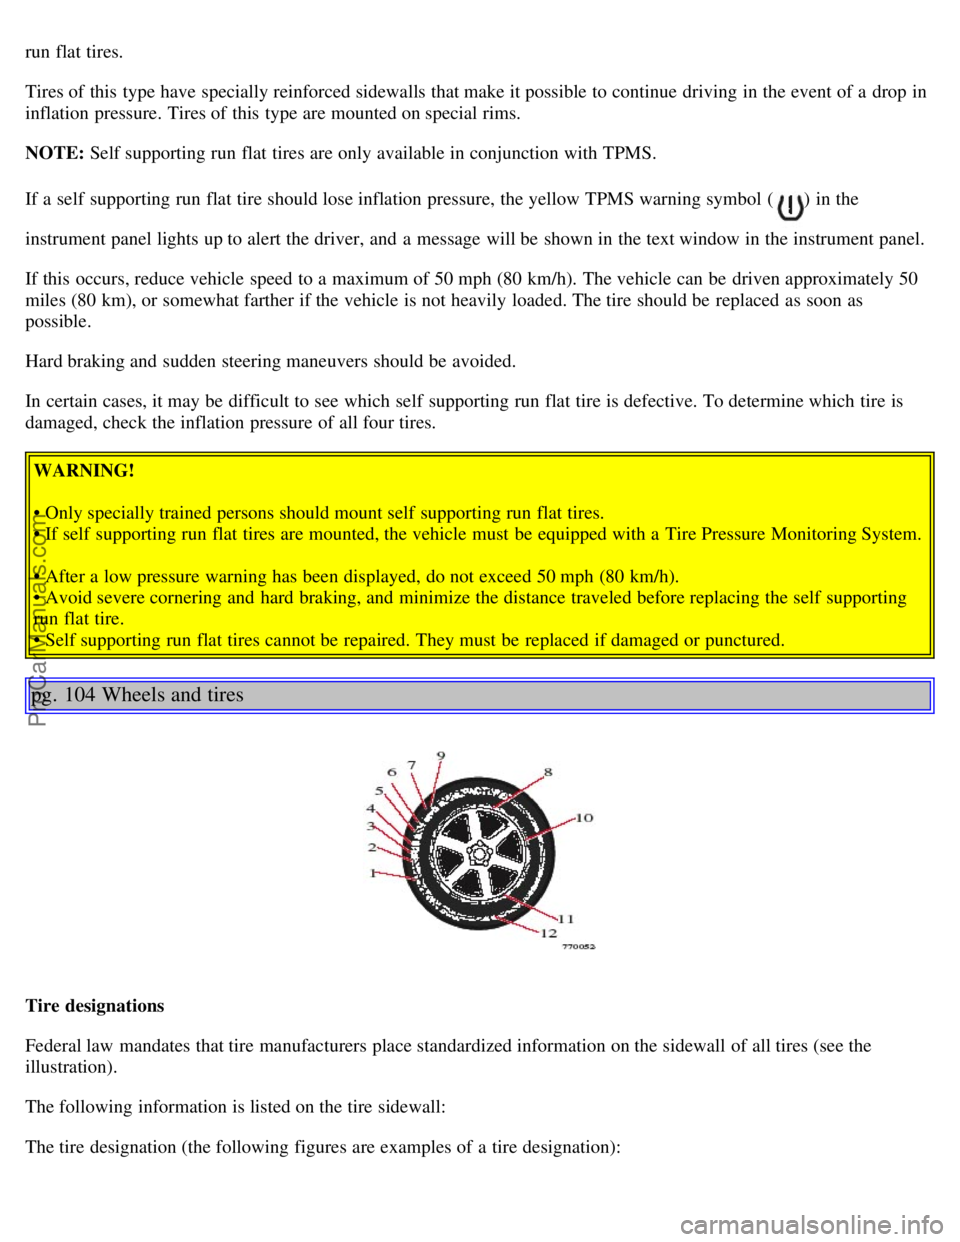
Federal law mandates that tire manufacturers place standardized information on the sidewall of all tires (see the
illustration).
The following information is listed on the tire sidewall:
The tire designation (the following figures are examples of a tire designation):
ProCarManuals.com
Page 82 of 123

Fuse box on the edge of the dashboard
Fuses are located inside the access panel on the edge of the dashboard. When replacing a blown fuse, be sure to
replace it with a new one of the same color and amperage (written on the fuse).
Location Amperage
1 Power driver's seat (option) 25A
2 Power passenger's seat (option) 25A
3 Climate system blower 30A
4 Control module - front passenger's door 25A
5 Control module - driver's door 25A
6 Ceiling lighting, upper electrical control module 10A
7 Moon roof (option) 15A
8 Ignition switch, SRS system, engine control module,
immobilizer 7.5A
9 Onboard diagnostics, headlight switch, steering wheel angle sensor, steering wheel control
module 5A
10 Audio system 20A
11 Audio system amplifier 30A
12 Navigation system display (option) 10A
13 -
14 -
15 -
16 -
17 -
18 -
19 -
20 -
21 -
22 -
23 -
24 -
25 -
26 -
27 -
28 -
29 -
30 -
31 -
32 -
33 -
34 -
35 -
36 -
37 -
ProCarManuals.com
Page 102 of 123

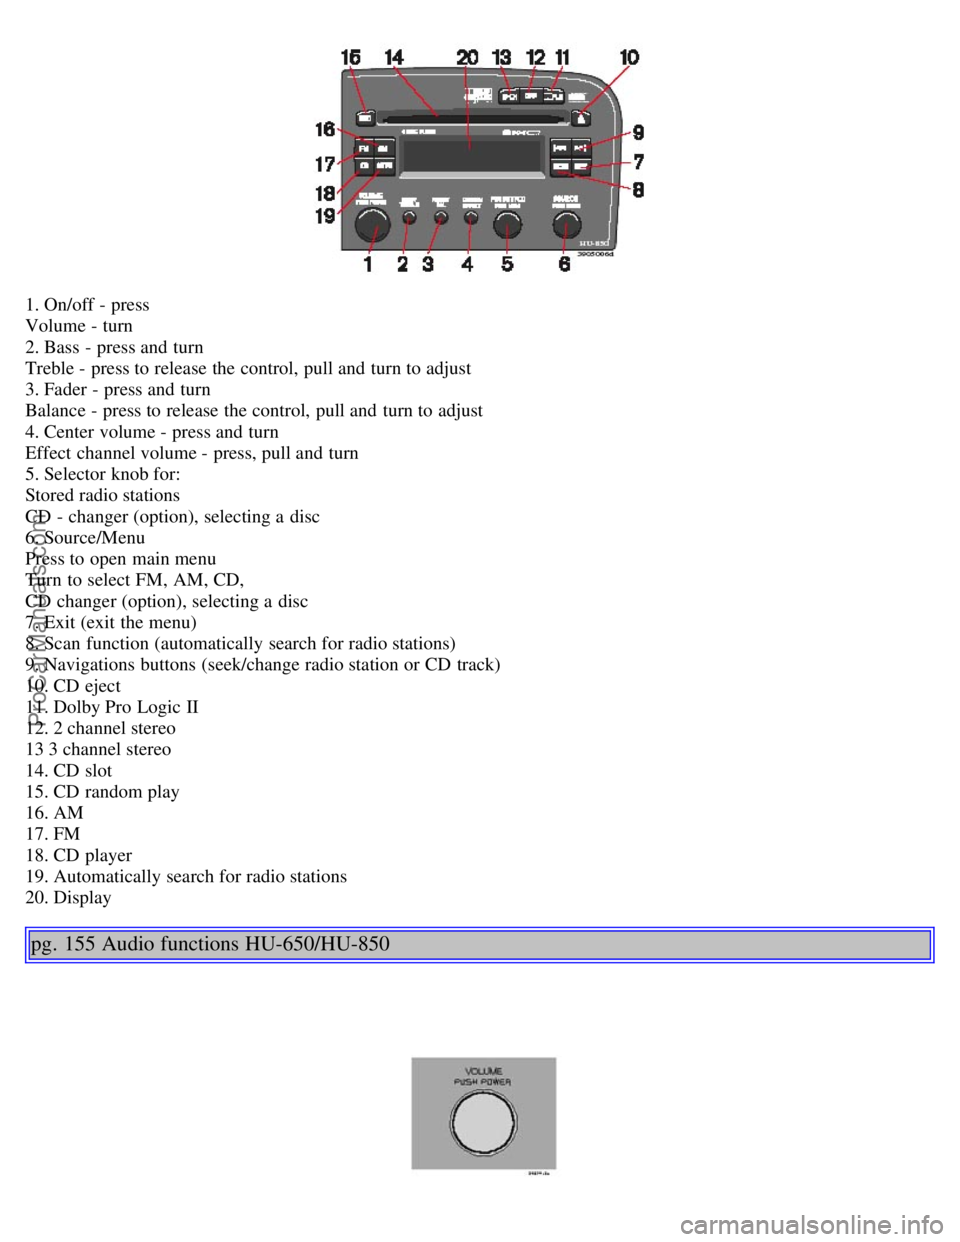
1. On/off - press
Volume - turn
2. Bass - press and turn
Treble - press to release the control, pull and turn to adjust
3. Fader - press and turn
Balance - press to release the control, pull and turn to adjust
4. Center volume - press and turn
Effect channel volume - press, pull and turn
5. Selector knob for:
Stored radio stations
CD - changer (option), selecting a disc
6. Source/Menu
Press to open main menu
Turn to select FM, AM, CD,
CD changer (option), selecting a disc
7. Exit (exit the menu)
8. Scan function (automatically search for radio stations)
9. Navigations buttons (seek/change radio station or CD track)
10. CD eject
11. Dolby Pro Logic II
12. 2 channel stereo
13 3 channel stereo
14. CD slot
15. CD random play
16. AM
17. FM
18. CD player
19. Automatically search for radio stations
20. Display
pg. 155 Audio functions HU-650/HU-850
ProCarManuals.com
Page 104 of 123

Fader - Balance front/rear
Adjust front/rear speaker balance by pressing the button to extend the control and turning it to the left (more sound
from the rear speakers) or to the right (more sound from the front speakers). A "detent" indicates "equalized" balance.
Press the button back in when you have made the adjustment.
Balance right/left
Adjust left/right speaker balance by pressing the button to extend the control, pulling it out as far as possible and then
turning it to the left (more sound from the left speakers) or to the right (more sound from the right speakers). A
"detent" indicates "equalized" balance. Press the button back in when you have made the adjustment.
Selecting a sound source
The sound source (e.g. AM, FM, etc) can be selected in two ways:
· Use the sound source buttons (see the right illustrations above).
· Turn the SOURCE knob (see illustration above) to select a sound source (AM, FM, cassette, or CD). Press the knob
to select the AM or FM band of your choice.
The sound source selected will be shown in the display.
pg. 157 Audio systems HU-650/HU-850
Scan
Press the SCAN button to start the station scan function. When a station is found, scanning stops for approximately 10
seconds, after which scanning will continue.
Press the SCAN or EXIT button when a station has been found if you would like to listen to that station and to
discontinue the scan function.
Station seek up/down
Press
to start the seek function. The radio seeks the next audible station and tunes it in. Repeat the procedure
to continue the seek function.
Manual station search
Press
and hold it down. MAN will be shown in the display. The radio scans slowly in the selected direction
and will increase the scanning speed after a few seconds. Release the button when the desired frequency appears in the
ProCarManuals.com
Page 105 of 123

display.
The frequency can be fine-tuned by short presses on the keys.
The system will remain in manual search mode for 5 seconds after the button is released, after which it will return to
seek mode.
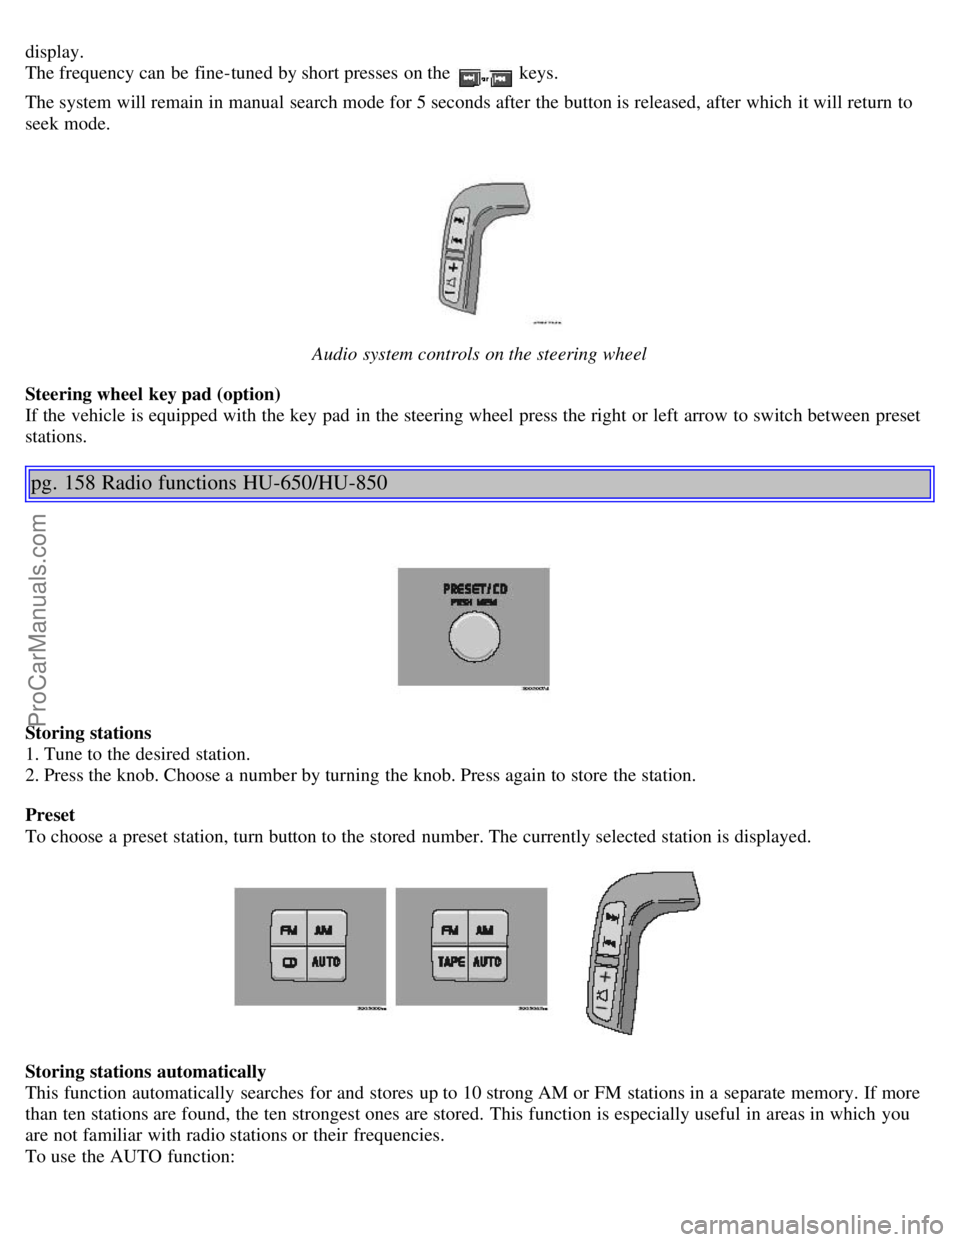
Audio system controls on the steering wheel
Steering wheel key pad (option)
If the vehicle is equipped with the key pad in the steering wheel press the right or left arrow to switch between preset
stations.
pg. 158 Radio functions HU-650/HU-850
Storing stations
1. Tune to the desired station.
2. Press the knob. Choose a number by turning the knob. Press again to store the station.
Preset
To choose a preset station, turn button to the stored number. The currently selected station is displayed.
Storing stations automatically
This function automatically searches for and stores up to 10 strong AM or FM stations in a separate memory. If more
than ten stations are found, the ten strongest ones are stored. This function is especially useful in areas in which you
are not familiar with radio stations or their frequencies.
To use the AUTO function:
ProCarManuals.com