Page 97 of 123
 35W D2R
3. Front foglights 55W H1
4. Front parking lights, rear side marker lights, rear foot")
pg. 149 Electrical system
BulbsBulb TypeSocket
1. High/low beams 55W H7
2. Bi -Xenon headlight (option) 35W D2R
3. Front foglights 55W H1
4. Front parking lights, rear side marker lights, rear footwell lighting W5WW2.1x9.5d
Front side marker lights W3WW2.1x9.5d
5. Front turn signals PY21WBAU 15s
6. Side turn signals (amber) WY5WW2.1x9.5d
7. Brake lights, backup lights, rear turn signals P21WBA15s
8. Rear foglight, parking light P21/4WBAZ15d
9. Rear parking light R5WBA15s
10. License plate lighting, front footwell lighting, trunk lighting C5WSV8.5
11. Vanity mirror 1.2WSV5.5
WARNING!
Bi -Xenon headlights (option) - due to the high voltage used by these headlights, these bulbs should only be replaced
by an authorized Volvo service technician.
Electrical system
12 Volt, negative ground.
Voltage-controlled generator. Single-wire system with chassis and engine used as conductors. Grounded on chassis.
Battery
Voltage: 12 Volt, capacity: 600 A/115 min. reverse capacity
The battery contains corrosive and poisonous acids. It is of the utmost importance that old batteries are disposed of
correctly. Your Volvo retailer can assist you in this matter.
Generator
Rated output: max. current: 140 A
ProCarManuals.com
Page 98 of 123

Starter motor:
Output: 1.7 kW
All specifications are subject to change without prior notice.
pg. 150 On Call Roadside Assistance
Volvo On Call Roadside Assistance
Your new Volvo comes with a four-year On Call Roadside Assistance program. Additional information, features, and
benefits are described in a separate information package in your glove compartment.
If you have misplaced your package, dial:
In the U.S.A.
1-800-63-VOLVO (1-800-638-6586)
In Canada:
1-800-263-0475
Technician certification
In addition to Volvo factory training, Volvo supports certification by the National Institute for Automotive Excellence
(A.S.E.). Certified technicians have demonstrated a high degree of competence in specific areas. Besides passing
exams, each technician must also have worked in the field for two or more years before a certificate is issued. These
professional technicians are best able to analyze vehicle problems and perform the necessary service procedures to
keep your Volvo at peak operating condition.
Contents | Top of Page
ProCarManuals.com
Page 99 of 123

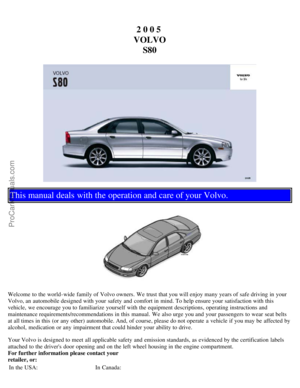
2 0 0 5
VOLVO S80
Chapter 10 - Audio systems
pg. 151 Audio systems
Introduction152
HU-650 overview153
HU-850 overview154
Audio functions HU-650/HU-850155
Radio functions HU-650/HU-850157
CD player HU-650162
Internal CD changer - HU-850163
External CD changer (option) - HU-650/HU-850164
Cassette deck HU-650165
Dolby Surround Pro Logic II HU-850166
Audio systems - specifications168
HomeLink® Universal Transceiver (option)169
pg. 152 Introduction
The audio system in your car is operated with the buttons and knobs in the system's front panel. Certain functions,
such as adjusting the volume, changing radio stations or tracks on a CD, etc, can also be controlled with the optional
steering wheel-mounted keypad.
The audio system is available in two versions:
HU-650
Features: AM/FM radio, single-disc CD player, cassette player, 4x25W output, six speakers.
HU-850
Features: AM/FM radio, integrated 6-disc CD changer, 4x50W or 4x70W output plus 25W Dolby Pro Logic II, eleven
speakers.
ProCarManuals.com
Page 100 of 123

Compact disc care
· Before using a new disc for the first time, remove any burrs in the center/outer edge by running the stem of a pen or
similar object around the hole/edge of the disc.
· Use high quality discs only.
· Keep the discs clean. Wipe them with a soft, clean, lint-free cloth, working from the center outwards. If necessary,
dampen the cloth with a neutral soap solution. Dry thoroughly before using.
· Never use cleaning spray or antistatic liquid. Use only cleaners specifically made for CDs.
· Use discs of the correct size only (3.5" discs should never be used). The discs should conform to the norms EN60908
(IEC60908).
· Do not put tape or labels on the disc itself.
· Volvo does not recommend the use of plastic outer rings on the disc.
· Condensation may occur on discs/optical components of the changer in cold winter weather. The disc can be dried
with a clean, lint-free cloth. Optical components in the CD changer may, however, take up to one hour to dry off.
· Never attempt to play a disc which is damaged in any way.
· When not in use, the discs should be stored in their covers. Avoid storing discs in excessive heat, direct sunlight or
dusty locations.
Cassettes
· Store cassettes in their cases.
· Do not touch the tape surface with your fingers.
· Tapes should not be exposed to direct sunlight or extreme temperatures.
· Keep tapes away from oil, grease and other contaminants.
· For optimal tape deck performance Volvo does not recommend the use of C-120 tapes.
· Take up slack using a pen or a pencil before inserting a cassette in the cassette slot.
Cassette cleaning
We recommend the use of the Volvo Cleaning Cassette available as a genuine Volvo accessory. Regular use improves
sound quality, cleans vital parts and prevents tape tangle.
pg. 153 Audio system HU-650 - overview
ProCarManuals.com
Page 101 of 123
1. On/off - press
Volume - turn
2. Selector knob for:
Stored radio stations
Press to store a station
CD changer - selecting disc (option)
3. Selector knob:
Radio _ FM, AM
Cassette
CD
CD changer (option)
Press to open the main menu.
4. Fader - press and turn
Balance - press to release the control, pull and turn to adjust
5. Exit (exit the menu)
6. Scan function (automatically search for radio stations)
7. Navigations buttons (seek/change radio station or CD track)
8. CD eject
9. CD slot
10. CD random play
11. FM
12. AM
13. CD player
14. Automatically search for radio stations
15. Bass - press and turn
Treble - press to release the control, pull and turn to adjust
16. Tape direction selector
CD changer (option) - random play
17. Cassette opening
18. Cassette eject
pg. 154 Audio system HU-850 - overview
ProCarManuals.com
Page 102 of 123
1. On/off - press
Volume - turn
2. Bass - press and turn
Treble - press to release the control, pull and turn to adjust
3. Fader - press and turn
Balance - press to release the control, pull and turn to adjust
4. Center volume - press and turn
Effect channel volume - press, pull and turn
5. Selector knob for:
Stored radio stations
CD - changer (option), selecting a disc
6. Source/Menu
Press to open main menu
Turn to select FM, AM, CD,
CD changer (option), selecting a disc
7. Exit (exit the menu)
8. Scan function (automatically search for radio stations)
9. Navigations buttons (seek/change radio station or CD track)
10. CD eject
11. Dolby Pro Logic II
12. 2 channel stereo
13 3 channel stereo
14. CD slot
15. CD random play
16. AM
17. FM
18. CD player
19. Automatically search for radio stations
20. Display
pg. 155 Audio functions HU-650/HU-850
ProCarManuals.com
Page 103 of 123

Switch on/off
Press the knob to switch on or turn off the radio.
Volume control
Turn the knob clockwise to increase volume. Volume control is electronic and does not have an end stop. If you have
a key pad in the steering wheel, increase or decrease the volume with the + or- buttons.
Volume control - ALARM
If a CD is playing when the radio receives an alarm bulletin (available in certain areas only), the CD player enters
pause mode. The bulletin is broadcast at the volume selected for this type of message.
After the bulletin has been completed, the audio system reverts to the originally selected sound source (radio or CD),
which is played at the volume that was selected for that source.
If the bulletin volume is adjusted while the bulletin is being broadcast, this new volume is saved and used for
subsequent bulletins.
Bass
Adjust the bass by pressing the button to extend the control and turning it to the left (less bass) or to the right (more
bass). A "detent" indicates "equalized" bass. Press the button back in when you have made the adjustment.
Treble
Adjust the treble by pressing the button to extend the control, pulling it out as far as possible, and then turning it to the
left (less treble) or to the right (more treble). A "detent" indicates "equalized" treble. Press the button back in when you
have made the adjustment.
MID EQ level
This function is used to fine-tune the balance of sound in the speakers. To set the level:
1. Press SOURCE.
2. Turn the SOURCE knob, select ADVANCED MENU and press SOURCE.
3. Turn the SOURCE knob, select AUDIO SETTINGS and press SOURCE.
4. Turn the SOURCE knob, select MID EQ LEVEL and press SOURCE.
5. Turn the SOURCE knob, select the desired level and press SOURCE.
6. Press EXIT.
pg. 156 Radio functions HU-650/HU-850
ProCarManuals.com
Page 104 of 123
 or to the right (more sound")
Fader - Balance front/rear
Adjust front/rear speaker balance by pressing the button to extend the control and turning it to the left (more sound
from the rear speakers) or to the right (more sound from the front speakers). A "detent" indicates "equalized" balance.
Press the button back in when you have made the adjustment.
Balance right/left
Adjust left/right speaker balance by pressing the button to extend the control, pulling it out as far as possible and then
turning it to the left (more sound from the left speakers) or to the right (more sound from the right speakers). A
"detent" indicates "equalized" balance. Press the button back in when you have made the adjustment.
Selecting a sound source
The sound source (e.g. AM, FM, etc) can be selected in two ways:
· Use the sound source buttons (see the right illustrations above).
· Turn the SOURCE knob (see illustration above) to select a sound source (AM, FM, cassette, or CD). Press the knob
to select the AM or FM band of your choice.
The sound source selected will be shown in the display.
pg. 157 Audio systems HU-650/HU-850
Scan
Press the SCAN button to start the station scan function. When a station is found, scanning stops for approximately 10
seconds, after which scanning will continue.
Press the SCAN or EXIT button when a station has been found if you would like to listen to that station and to
discontinue the scan function.
Station seek up/down
Press
to start the seek function. The radio seeks the next audible station and tunes it in. Repeat the procedure
to continue the seek function.
Manual station search
Press
and hold it down. MAN will be shown in the display. The radio scans slowly in the selected direction
and will increase the scanning speed after a few seconds. Release the button when the desired frequency appears in the
ProCarManuals.com
 1
1 2
2 3
3 4
4 5
5 6
6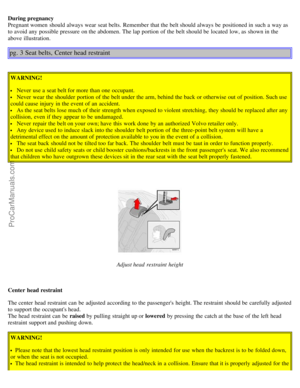 7
7 8
8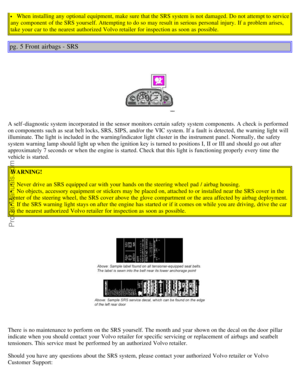 9
9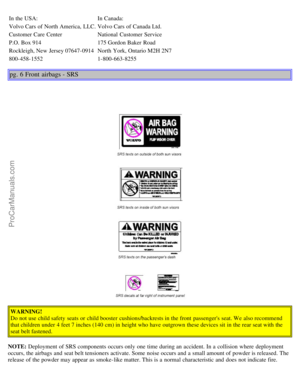 10
10 11
11 12
12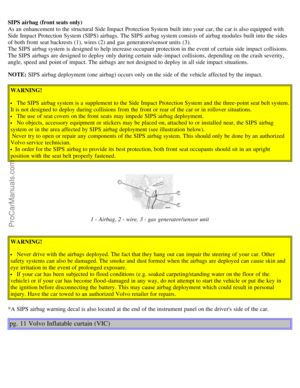 13
13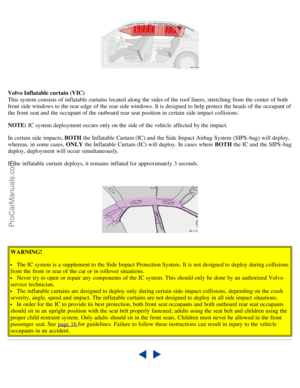 14
14 15
15 16
16 17
17 18
18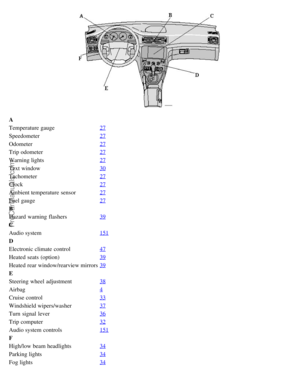 19
19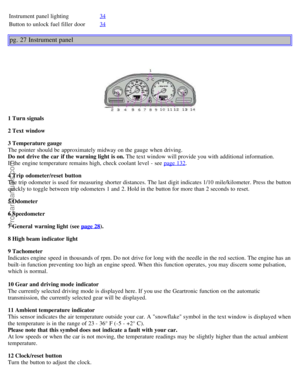 20
20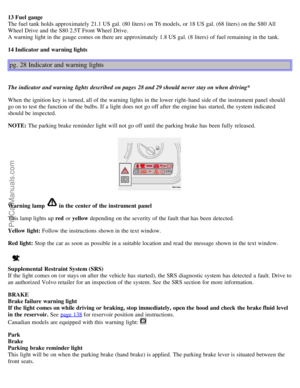 21
21 22
22 23
23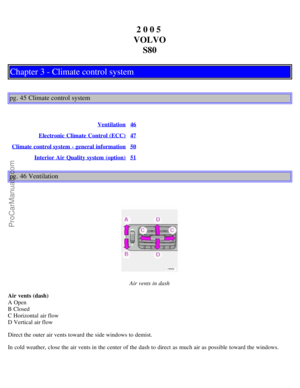 24
24 25
25 26
26 27
27 28
28 29
29 30
30 31
31 32
32 33
33 34
34 35
35 36
36 37
37 38
38 39
39 40
40 41
41 42
42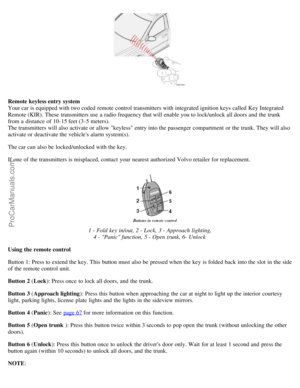 43
43 44
44 45
45 46
46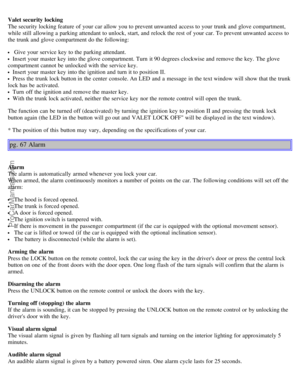 47
47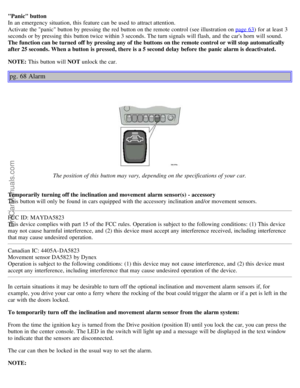 48
48 49
49 50
50 51
51 52
52 53
53 54
54 55
55 56
56 57
57 58
58 59
59 60
60 61
61 62
62 63
63 64
64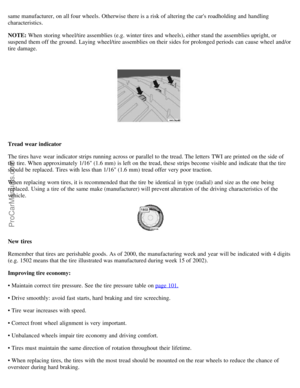 65
65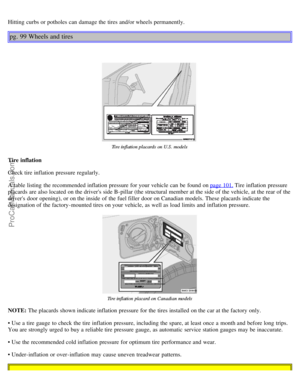 66
66 67
67 68
68 69
69 70
70 71
71 72
72 73
73 74
74 75
75 76
76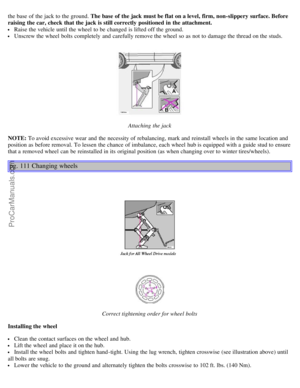 77
77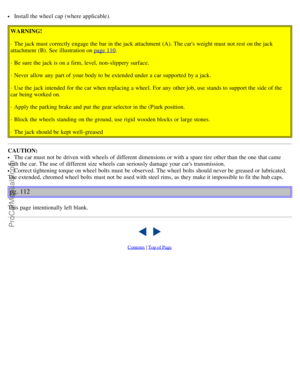 78
78 79
79 80
80 81
81 82
82 83
83 84
84 85
85 86
86 87
87 88
88 89
89 90
90 91
91 92
92 93
93 94
94 95
95 96
96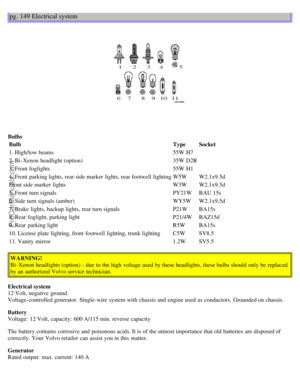 97
97 98
98 99
99 100
100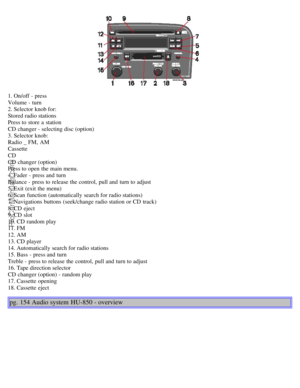 101
101 102
102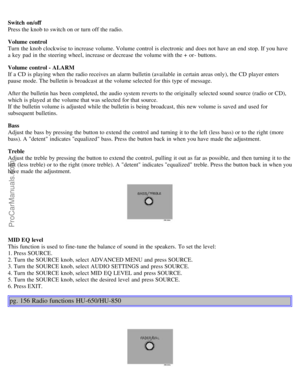 103
103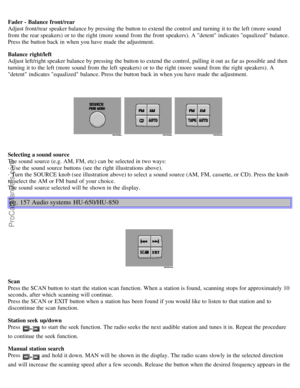 104
104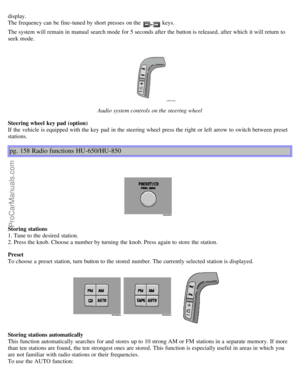 105
105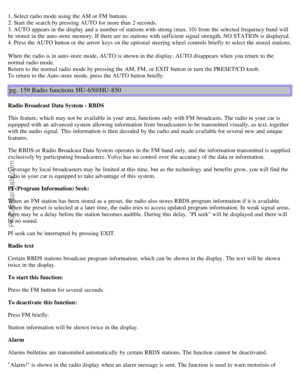 106
106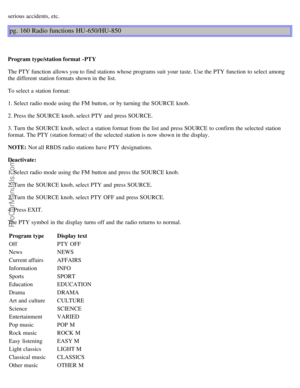 107
107 108
108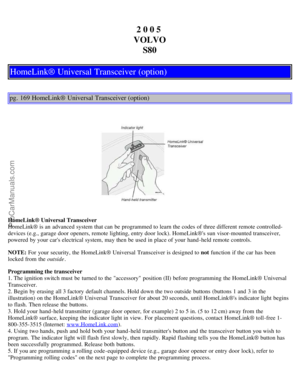 109
109 110
110 111
111 112
112 113
113 114
114 115
115 116
116 117
117 118
118 119
119 120
120 121
121 122
122
3. Selector knob:
Radio _ FM, AM
Cassette
CD
CD")
