2005 VOLKSWAGEN GOLF wheel
[x] Cancel search: wheelPage 194 of 444
Press button.
Compass
+ 1
-1
Bock
Tips
In display F uncti on
T he
name of the d is played menu
Increase th e set value b y I
Decreases th e set val ue by I
The Compa ss menu closes and t he last di sp layed menu opens aga in.
T
he menu s s hown in t he display depend s on the
ve hicle electro nics and the options in stalled on
yo ur ve hicle. If you are not s u re, ask your rized Volkswagen deale r or qualified work s hop for
Steer ing
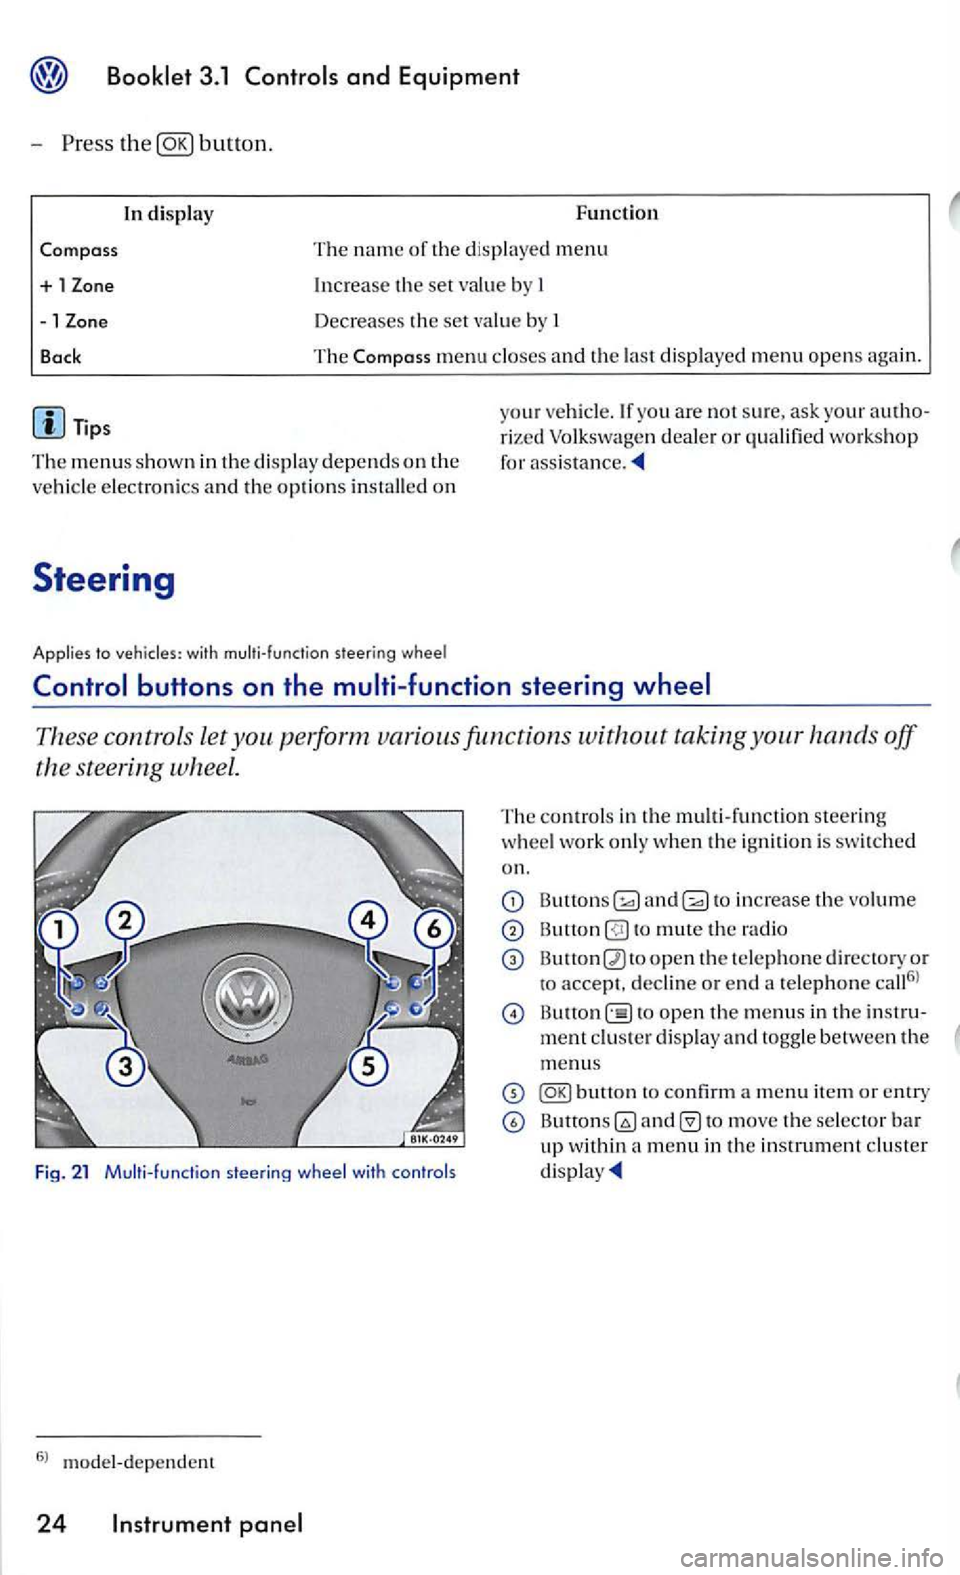
Applies to vehicles: with multi-function steer ing whee l
These contro ls let taking your hands off
the steering wheel.
Fig. 21 Multi- funct ion
The contro ls in th e m ult i- fun ctio n steering
w heel work only when the ignition is swi tched
on.
and to increase the vo lume
to mute th e radio
open th e te le phone d irectory or
to accept. decli ne or e nd a te lephone call6
l
open th e menus in th e
to move the selector bar up within a menu in th e in strument cluster
Page 195 of 444
Applies to vehicles' with
and drive 1:
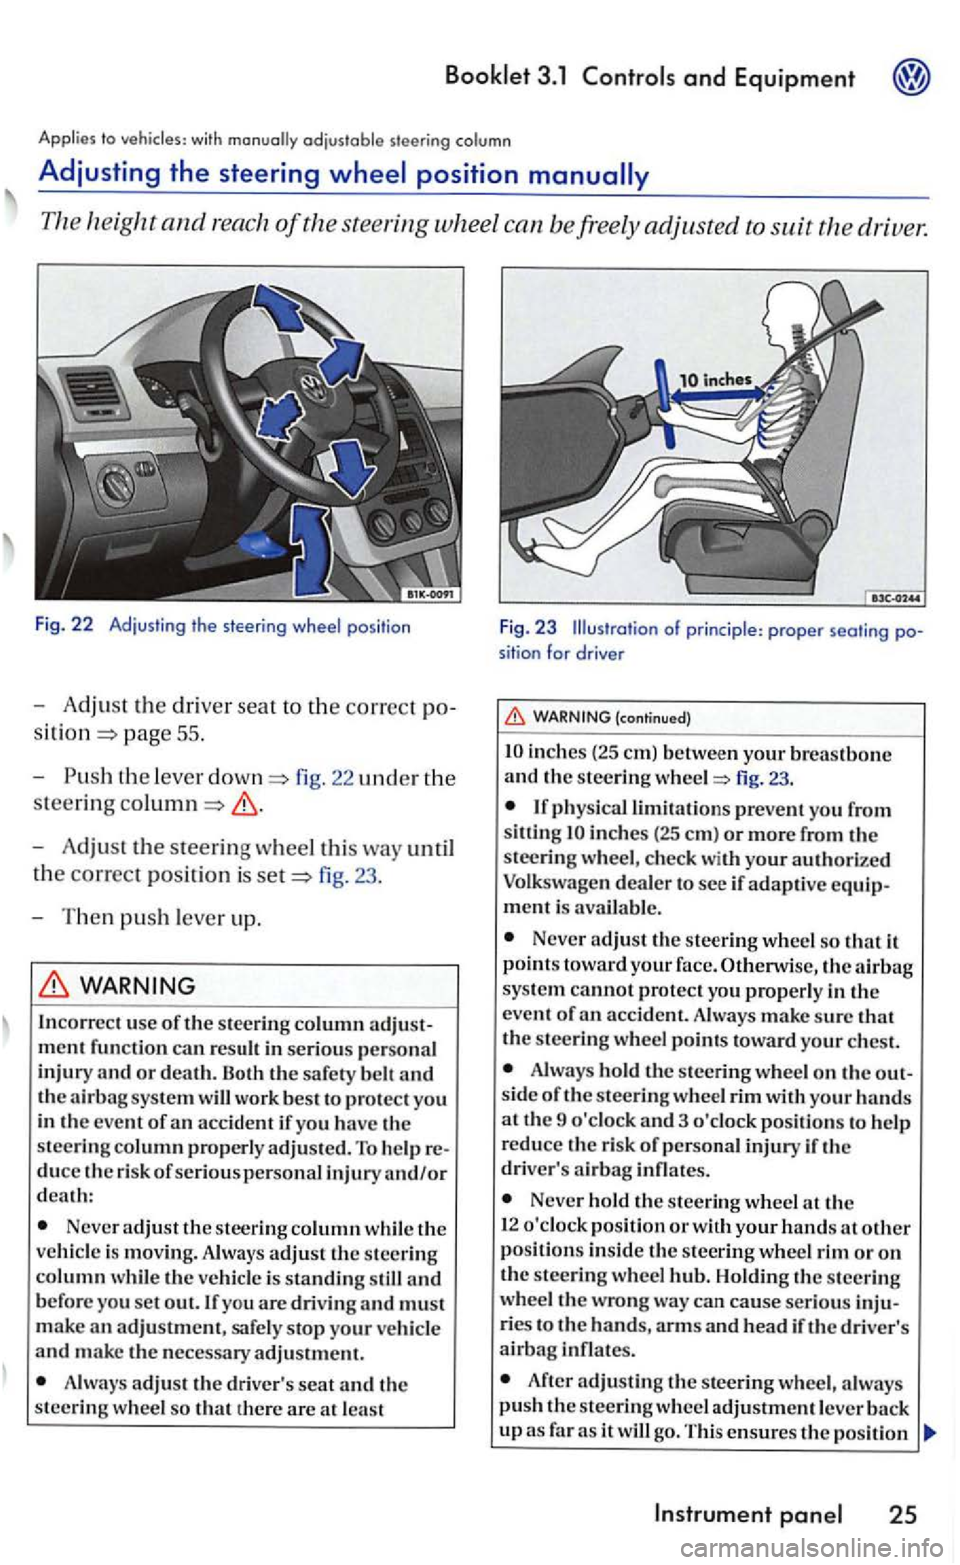
Fig. 22 Adjust in g t he s tee ring wheel pos itio n
-Adjust the dri ver seat to the correct po
pag e 55 .
- Push
the leve r fig. 22 uncl er the
steering
-Adjust the steering wheel this way until
t h e
correct posit ion is fig. 23 .
- T hen
push lever up.
WARNING
In correc t use of the stee ring column
Neve r adjust the steer ing column while th e
ve hicl e is movin g. Always adjust th e steering column w hil e th e veh icle is standing still and b efore you set out. If you are drivin g and must
m ake an adjustment, safe ly stop your ve hicl e and make the necessary adjustment.
A lways adjus t th e driv er's seat and th e
steering w hee l so that th ere are at lea st
F ig. 23 Illustration of princi ple : proper seati ng position for drive r
(continued)
inch es (2 5 em) betwe en your breastbone and th e s teering fig. 23.
inches (25 em ) or more from the
steeri ng w heel, c hec k with your authori ze d
Volkswagen deale r to see if adaptive equipment is avai la ble .
Never adjust the steering wheel so that it
p oin ts toward your face. Otherwise, the sys te m cannot protect yo u properly in the
e ve nt of
Alwa ys hold the s teering wheel o n the out
s id e of the s teering whee l rim with your hands at th e 9 o'clock and 3 o 'clock pos itions to help
r educe th e risk of p ersonal injury if th e
driver' s
Never hold the stee rin g wheel th e
1 2 o'clock pos ition or w ith your hands at other position s in side th e s teering wheel rim or on the steerin g wheel Holdin g th e s teerin g
wheel the wrong wa y ca n cause serious inju
ries t o the hands, arm s and hea d if the driver's airbag infl ates.
After adjusting the stee rin g wheel, a lwa ys push the s teerin g wh eel adjustment leve r
Instrument
Page 197 of 444
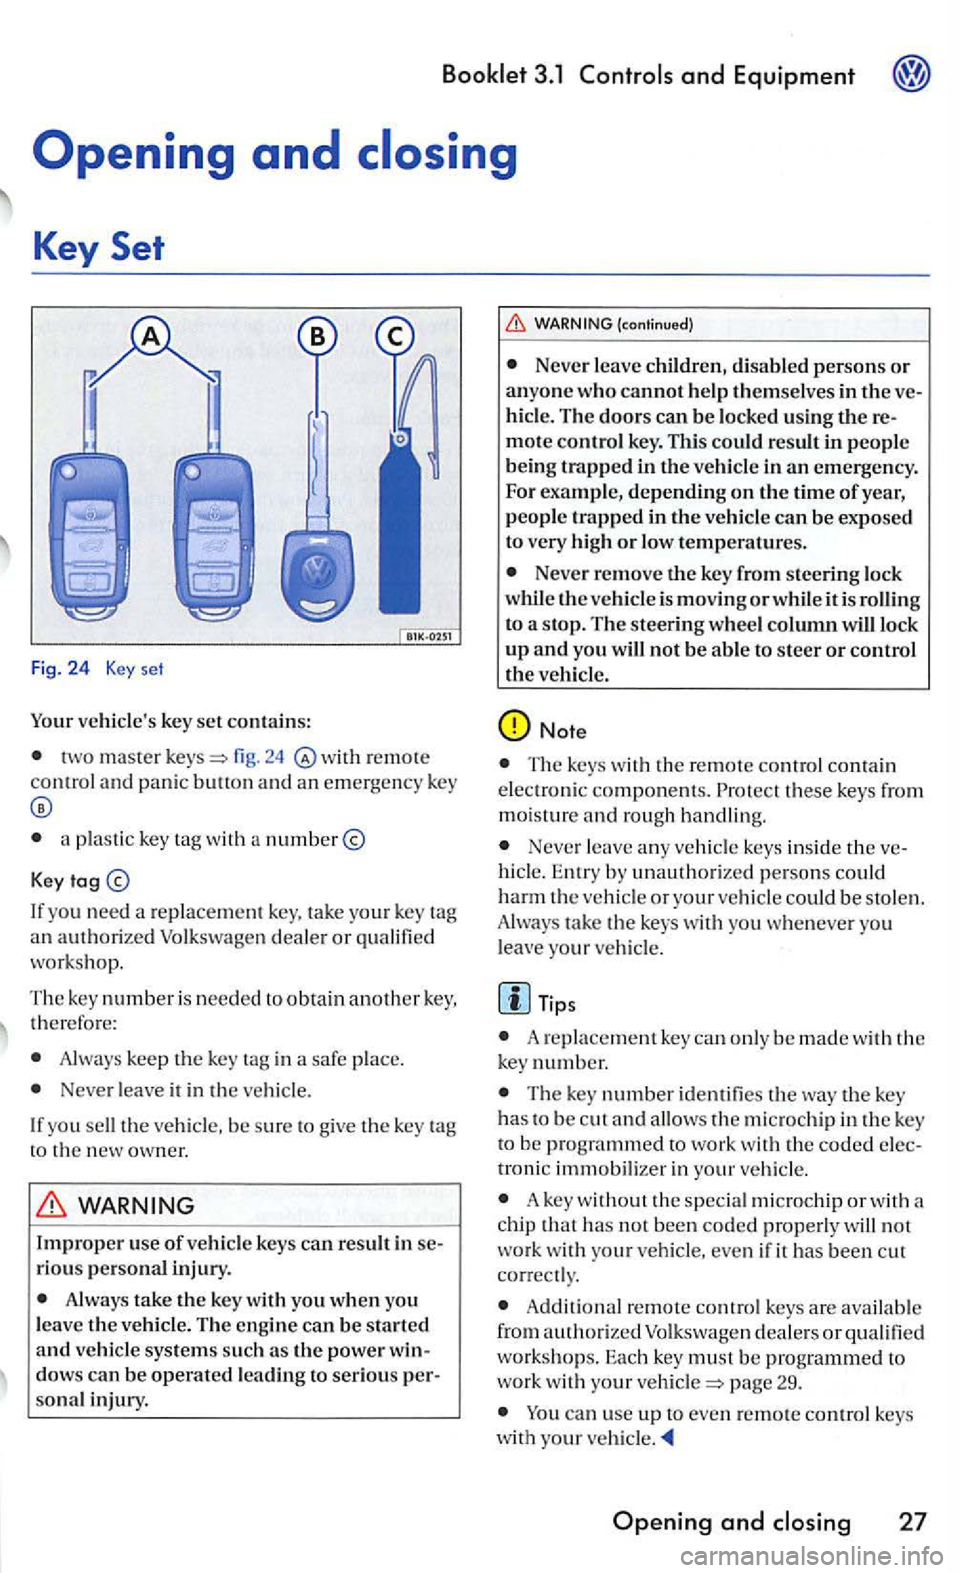
Your vehicle's key set contains:
two master r e mot e control and panic butt on and an emergency key
a plastic key with a number@
Key
If yo u n eed a replace ment ke y. tak e your key
work shop.
The key numbe r i s needed to obtain another key, th erefo re:
Always keep the key tag in a safe place.
Ne ver leave it in the ve hicle.
I f
you sell the ve hicl e. be sure to giv e the key
sonal injury.
(continued)
Neve r leave ch ildren, disabled persons or anyone who cannot help themselves in the hicl e. The doors can be lock ed using
or low tempera tures.
Never remove the key from steering lock
w hil e the vehicle is moving or while it is rolling
to a stop. The steering wheel column will lock up and you will not be able to steer or control the veh icle.
Note
Th e keys with the remote control contai n
e lec troni c component s. these ke ys from
m oisture and rough handling.
Never leave any ve hicl e keys insid e th e hicl e. Entry by unauthorize d pe rso ns co uld harm the vehicl e or your vehicl e cou ld be stol en .
Alway s take the keys with you whe neve r you
l eav e your ve hicl e.
Tips
A re pla cement key ca n only be made w ith ke y number.
The key number identifie s the key has to be c ut and allo ws micro chip in the key
troni c immobilizer in your vehicle .
A key without the special microchip or with a
c hip that has not bee n coded properl y will not work wi th you r vehicle, even if it has been c ut
co rrect ly .
A dd ition al remote contro l keys are availab le
from authori zed Volk swage n dealers or to work with your pag e 29.
ca n use up to even remote co ntrol keys
w ith your
Opening and
Page 198 of 444
3.1
key
Locking and
remote control key can lock and unlo ck the vehicle from a distance.
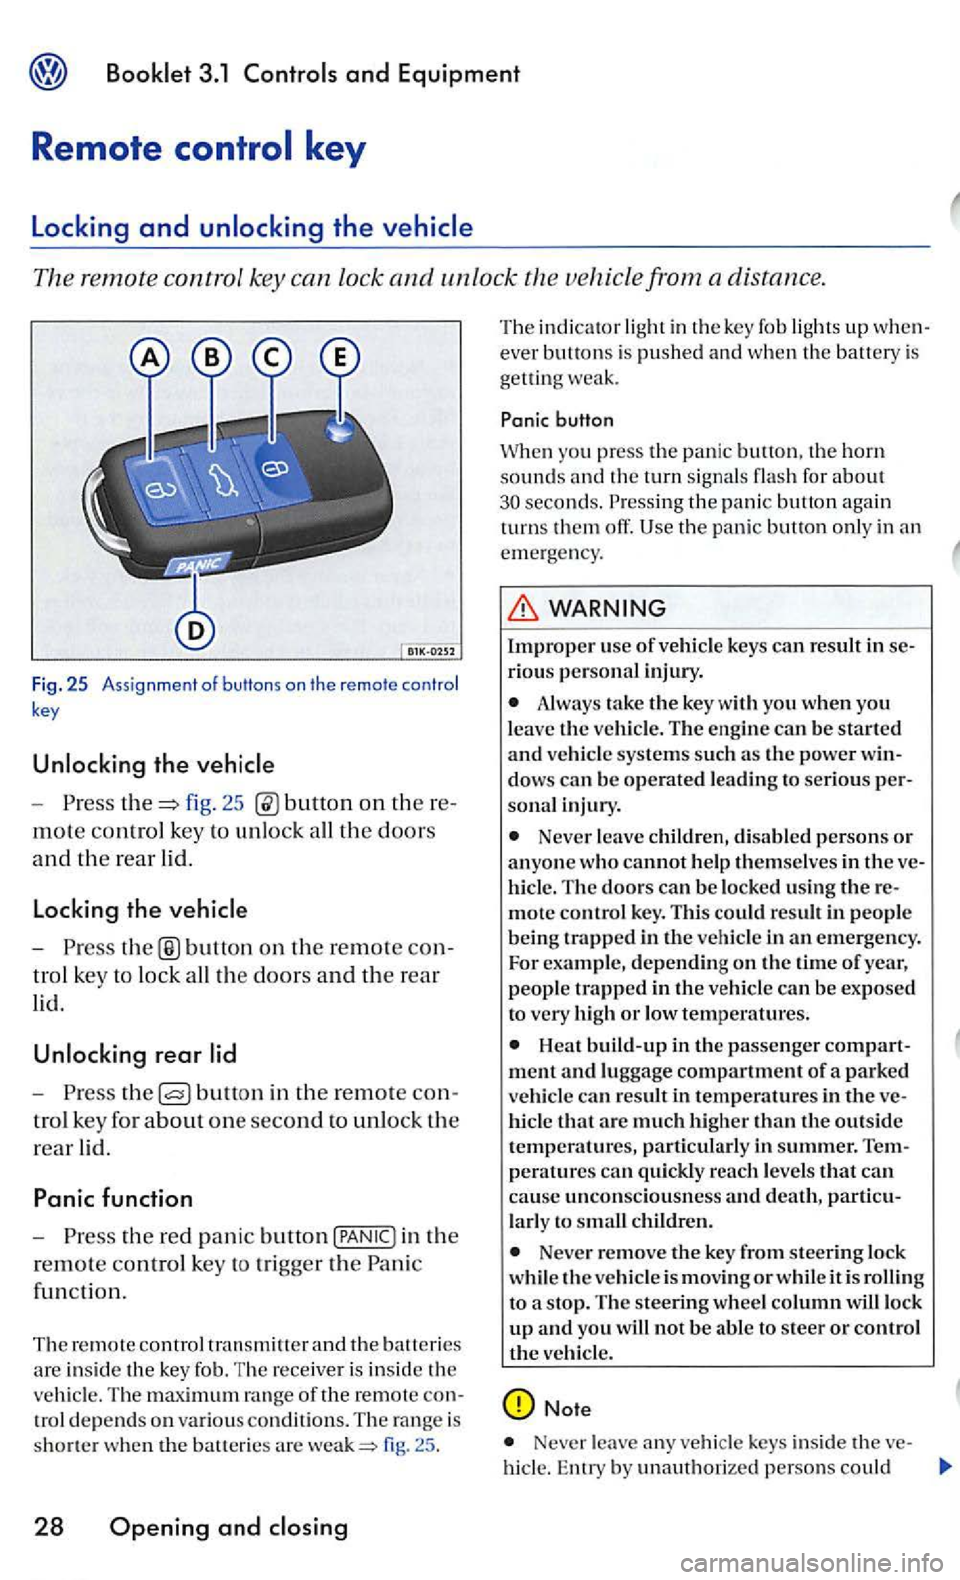
Fig. 25 Ass ignment of butt ons on the remote control
key
- P res s fig. 25 on th ere
mote control key to unl ock all th e doors
and th e rear lid.
Locking the
-button on the rem ote con
t ro l key to lock all the doors and the rear
lid.
rear
-Press bullo n in the re mote con
tro l key for a
bout one second to unlock the
rear lid.
Panic function
-Press the red pani c button in the
r
emote co ntrol key to tri gge r the Pan ic
fun cti
on.
Th e remote control
fig. 25 .
28 Opening and
T he ind ica tor lig ht in th e key fob ligh ts up w hen
ever bu tto ns is pushed a nd when th e batt ery is
get ting weak.
button
Whe n you press the panic the horn sounds the turn signal s flas h for about the pani c button again
turn s them off.
WARNING
Improper us e of vehicle keys can result in serio us perso nal inj ury .
Always take the key with yo u when you leave the ve hicle. The engine can be started and vehicle systems su ch as th e power win
dow s can be operated l ead ing to seri o us person al in ju ry.
Never leave childr en, disabl ed p erson s or anyone who cannot help them selves in t he ve
hi cle . The doors can be locked using the re
mote control key. T his co uld result in peo pl e
being trapped in th e vehicl e in an emergency.
For example, depending on the time of year, people trapped i n th e vehicl e can be exposed
t o very high or low tem peratures.
hicl e that arc much high er than the outside temperatures, particularly in summer. T empe ra tures can quickly reac h levels that can
cause uncon scio usnes s and death, partic u
l a rl y to sm all children.
Neve r remove the key from steering lock
whi le th e vehicle is mov in g or whil e it is t o a s top. The s teering wheel column wiU lock up and you will not be a bl e to steer or control the veh icle.
Note
Never leave any veh icle keys inside the ve-
hicl e. En try by unauth orized persons could
Page 216 of 444
and Equipment
and high beam
signa l and high leve r also operates
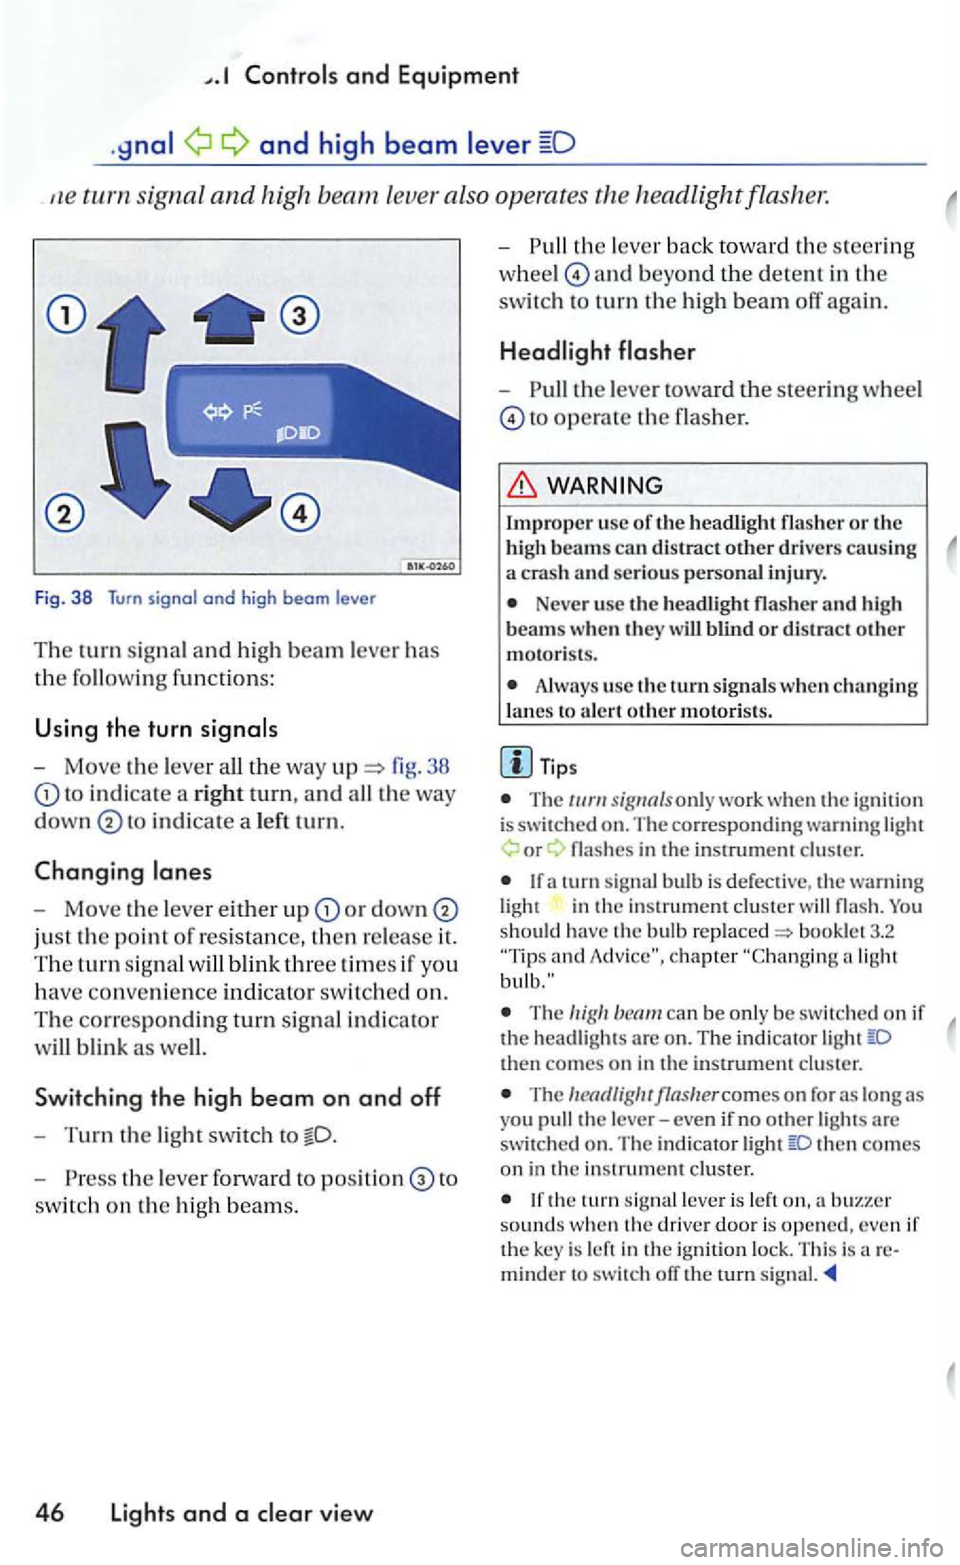
Fig. 38 Turn signal and high beam le ve r
Th e turn signal a n d hi gh beam lever has
the followin g functions:
U sing the turn
- Move the lever 38
to in d icate a rig ht tu rn, and
in dicate a le ft tu rn.
Changing
-Move the leve r either u p or down
just the point of resistance, then re lease it.
The tu rn sig n al
Sw itchin g the high b eam on and off
-Turn the light swit ch to
- P ress the lever forward to to
switc h on the hig h beam s.
4 6 Lights and a view
-th e lever back to wa rd th e s teering
w hee l
and beyond the dete n t in the
switc h to turn th e high beam off again.
-the lever toward the steeri ng wheel
to operate the flasher.
Impro per usc of th e headli ght flasher o r the
h igh beams can distract other drive rs causing a crash an d serious personal injury.
Neve r use the headli gh t flasher and h igh
beam s w hen th ey w ill blind o r distract other motoris ts .
Always use the turn s ig nals w hen ch a nging
l a nes to a le rt oth e r m otori sts .
T ips
T he only work whe n the ig nition is switched on. The co rre sponding warning or
in the in strument cluster
and
The can be only be sw itc hed on if the head ligh ts are o n . The indi cator then comes on in the instrument cluster.
The
then co mes on in the in strument cluster.
the tu rn leve r is left sounds w hen th e driver door is opened, even if the key is left in the ign ition lock. This is areminder to switch ofT the rurn signal.
Page 220 of 444
and Equipment
Brief wiping
- Move the lever down to positi on
give the windshi eld a briefwip e. The w iper
will begin to m ove faster if yo u keep th e
l ever pre
ssed down for longer than
2 seconds.
Switching off the wipers
-Move the leve r up to
Windshield wiper and washer system
(windshi eld)
-th e lever toward the s teerin g wheel
t o
pos iti on
win ter position
The windshi eld wipers will move to th e ''Se rvice if yo u switch the igniti on on br iefly and then it ofT aga in, w hile press in g t he
win dshi eld wiper lever dow n The w indshie ld wiper arms ca n be moved forward so that they do not free ze to the
the wind shield be fo re
driving ofT.
Worn or dirt y wiper blades will reduce bility and increase th e risk of colli sions and rio us inju ry.
Never use t11e front wiper/wash er in
free zing weat her fi rst defro sting the
(continued)
wi ndshie ld . T he washer solution m ay freeze on the window and reduce
Always clean th e windshield wiper blades and all windows regu larly .
A lway s replace wi per blades that are worn, damaged or do not kee p the windshie ld clear.
Note
Befo re u sin g th e wiper s for the fir st tim e in co ld weather, m ake su re the wiper blades are not
fro zen t o th e windshield. To p revent damage to
th e w iper b lades and the wip er motor, a lways
l oose n blades frozen to the windsh ie ld b efore operating the w ipers. Usin g th e serv ice po sition describe d above can be a convenience in co ld weather.
Th e w indshie ld wipe rs will onl y wo rk when the ig nition is switch e d on and th e e ngin e hood
is close d.
Th e prev iou s w iping sp ee d will be cally selec ted when the vehi cle s top s, when wiping page 49, fig. 44 or is lected . The selected wipin g spee d will resume when the ve hicle drives off aga in.
The windshi eld will be wiped aga in after about five second s once the windshie ld wiper and was her sys te m h as been operated if th e
hicl e is mov ing.
If th e "int ermittent feature has been
se lec te d, the int ervals are linked to th e speed of the ve hicl e i.e. the interva ls will b e sh o rt er w he n
th e vehicle is trave ling faster.
T he wiper will try to wipe away an y obstacles that are on t h e windshield . The w ip er will stop
m oving if the obstacle blocks its pat11. Remo ve
t h e o bstacle and switch the wip er back on
Page 225 of 444
Booklet 3.1
passe nger's seat can
b e adju ste d in many ways to suit the physical
need s of the vehicl e occ upants. position is
very important for:
fast and easy operat ion of all control s on the instrument panel,
safe driving ,
optimum prote ction from the s afet y belts
and airb ag booklet 2.1
Driv ers or passengers who are unbelted, out of position or too close to the airb ag can be seri
ously injured or killed by an airbag as it unfolds. To help reduce the risk of serious personal injury:
Always adjust th e driver's seat and the steeri ng whe el so that there are a t lea st in ches (25 em) betwe en you r brea stbone and the ste erin g w heel.
Always hold the steering wheel on the out
s ide of th e s teering wheel rim with your hands at the 9 o'clock and 3 o'clock position s to he lp
reduce the risk of personal inju ry if the driver 's airbag inflates.
Never hold the steering wheel
Passengers must always sit in an upright position and never lean agains t or pl ace an y
(co ntinued)
part of their body too close to the area where the airbags are loca ted.
Alway s make sure there are at least inch es (25 em) between instrument panel.
Eac h passenger must always sit on a sea t of their own and prope rly fasten and wear the safety belt belon ging to that scat.
Before driving, always adjust the front
seats and head r estraints properly.
Never adju st th e sea ts while the vehicle is
moving. sea t may move unexpec tedly and yo u could lose control of the vehicle.
Always keep your feet on the floor in front of the sc at. Never rest on tl1e in strument panel, out of the window, etc. The airbag
s ystem and safety belt will not be able to pro
te ct you properly and can even increase the
ri sk of injury in
Never drive with backres t reclined or tilted far backJ The the backres ts are t ilted back, greater risk of injury due to
incorrect positioning ofthe safety belt and im
proper seating position.
b elts only offer maximu m prot ec
tion when the se atback is securely lat ch ed in
Children must alway s ride in child seats.
Seats and storage 55
Page 229 of 444
Tips
Depen ding on the particu lar model, th ere may be diff ere n ces in the controls. For exa mpl e, on some seats and powe r control s may be combined.
Th e rots fo r the passeng er's seat m ay
differ fro m those of the dri ver's seat.
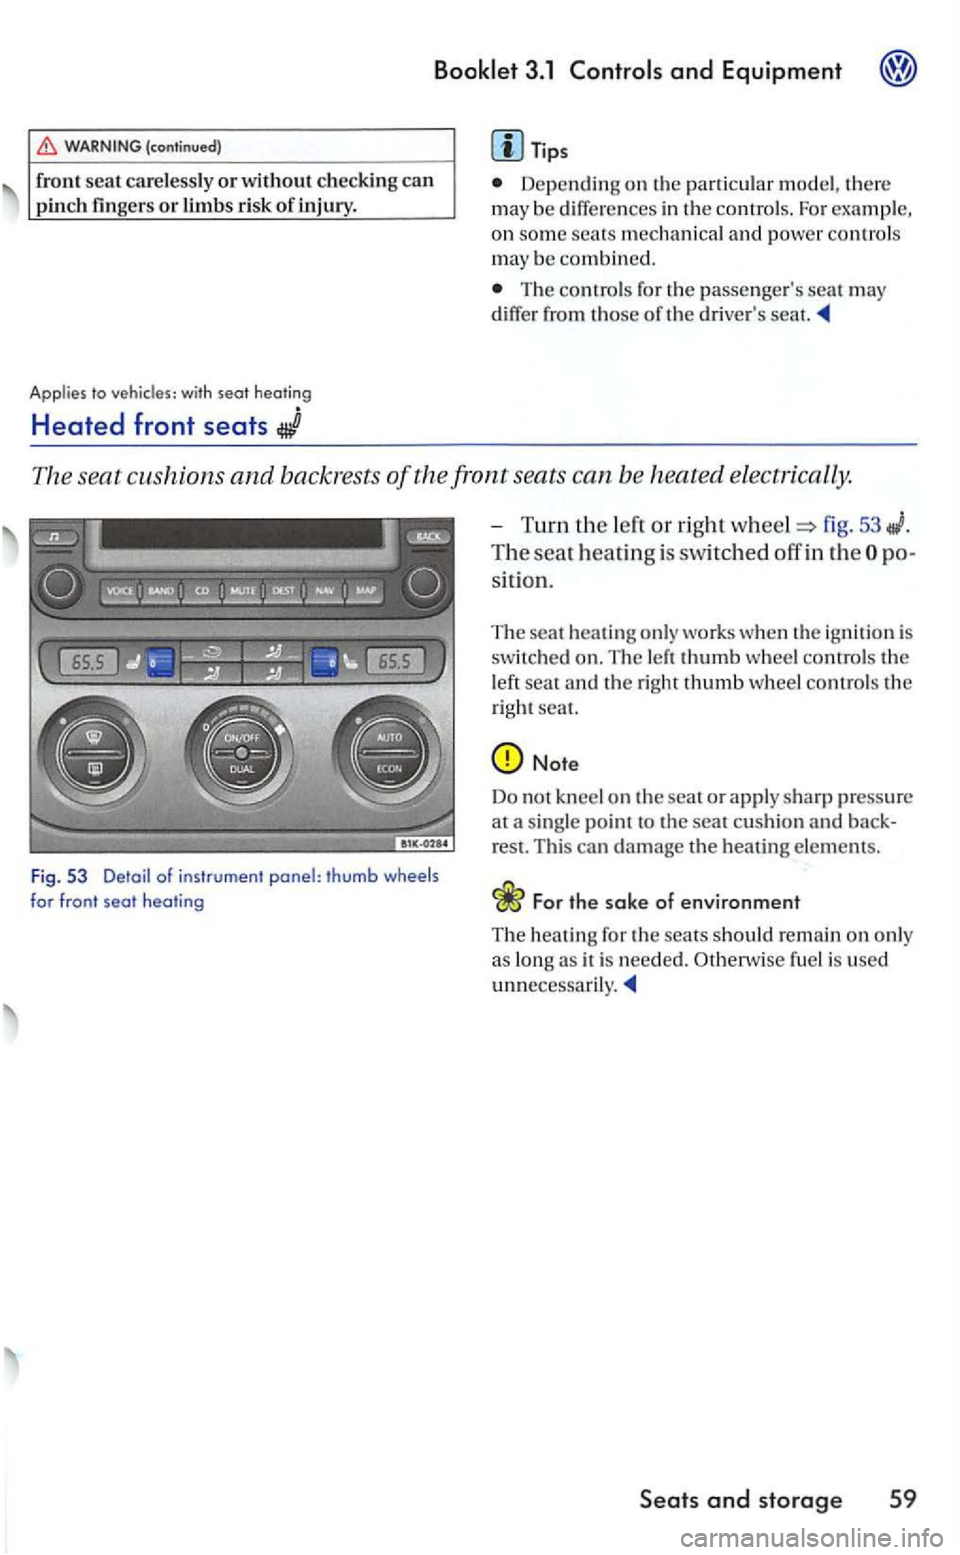
The seat cushions and backrests of the front seats can b e heated electrically.
Fig . 53 Detail of instrument panel: thumb wheels for front seat heating
-Turn the lert o r right wheel=> fig. 53
The seat heatin g is switched off in th e
hea tin g only works when the ig nition is
sw itched o n. The left thumb w hee l co ntrols th e
l eft sea t and th e righ t thumb wheel co ntrol s th e
right seat.
For the sake of environment
T he heati n g for the sears sh o uld remain on only
a s lon g as it is nee ded. Oth erw ise fuel is used
Seats and storage 59