2005 VOLKSWAGEN GOLF wiper blades
[x] Cancel search: wiper bladesPage 220 of 444
and Equipment
Brief wiping
- Move the lever down to positi on
give the windshi eld a briefwip e. The w iper
will begin to m ove faster if yo u keep th e
l ever pre
ssed down for longer than
2 seconds.
Switching off the wipers
-Move the leve r up to
Windshield wiper and washer system
(windshi eld)
-th e lever toward the s teerin g wheel
t o
pos iti on
win ter position
The windshi eld wipers will move to th e ''Se rvice if yo u switch the igniti on on br iefly and then it ofT aga in, w hile press in g t he
win dshi eld wiper lever dow n The w indshie ld wiper arms ca n be moved forward so that they do not free ze to the
the wind shield be fo re
driving ofT.
Worn or dirt y wiper blades will reduce bility and increase th e risk of colli sions and rio us inju ry.
Never use t11e front wiper/wash er in
free zing weat her fi rst defro sting the
(continued)
wi ndshie ld . T he washer solution m ay freeze on the window and reduce
Always clean th e windshield wiper blades and all windows regu larly .
A lway s replace wi per blades that are worn, damaged or do not kee p the windshie ld clear.
Note
Befo re u sin g th e wiper s for the fir st tim e in co ld weather, m ake su re the wiper blades are not
fro zen t o th e windshield. To p revent damage to
th e w iper b lades and the wip er motor, a lways
l oose n blades frozen to the windsh ie ld b efore operating the w ipers. Usin g th e serv ice po sition describe d above can be a convenience in co ld weather.
Th e w indshie ld wipe rs will onl y wo rk when the ig nition is switch e d on and th e e ngin e hood
is close d.
Th e prev iou s w iping sp ee d will be cally selec ted when the vehi cle s top s, when wiping page 49, fig. 44 or is lected . The selected wipin g spee d will resume when the ve hicle drives off aga in.
The windshi eld will be wiped aga in after about five second s once the windshie ld wiper and was her sys te m h as been operated if th e
hicl e is mov ing.
If th e "int ermittent feature has been
se lec te d, the int ervals are linked to th e speed of the ve hicl e i.e. the interva ls will b e sh o rt er w he n
th e vehicle is trave ling faster.
T he wiper will try to wipe away an y obstacles that are on t h e windshield . The w ip er will stop
m oving if the obstacle blocks its pat11. Remo ve
t h e o bstacle and switch the wip er back on
Page 277 of 444
. . .. . . . . . . . . . . . .. . . 2
Brak es . .. . . .. .. .. . .. .. .. . .. .. .. . .. .. ... . 2 steering . . . . . . . . . . . . . . . . . . . . . . . . . . 8
Eng ine
management and exhaust sys tem . 9
Driving and protecting the
environment .. . .. .. .. .. .. .. .. . . . .. .. . 12
Break-in Period .. . .. .. .. .. .. .. .. .. .. .. .. . 12
towing .. .. . .. .. .. .. . .. . . .. . . .. .. . 15
Driv e economically and
core and
exterio r . . . . . . . . . . . . . . . .. . 22
Core of the in terior . . . . . . . . . . . . . . 28
Acce ssories, new parts, repairs
and modifications .. .. .. .. .. .. .. .. .. 31
Accessories and ports . . . . . . . . . . . . . . . . . . . 31
Repair s ond technical modifications . . . . . . 32
phones and
modules . . . . .. .. . . . . . . . . . . . . . . .. . 34
Checkin g and .. .. .. .. .. .. .. . 35
supply .. .. .. .. .. .. .. . .. .. .. .. .. . .. .. 37 Working in the engine comportment . . . . . 39
Engine .. .. .. .. .. .. .. .. .. .. . .. . .. .. .. . 42
................................. 47
Washer and windsh ield wiper blades
Broke . . . . . . . . . . . . . . . . . . . . . . . . . . . . . . 53
and spore . . . . . . . . . . . .. . .. . . .. .. .. .. . .. . .. .. 82
Emergency or opening . . . . . . . . . . . 88
Fuses . . . . . . . . . . . . . . . . . . . . . . . . . . . . . . . . . . .
. . .. . .. .. .. .. .. .. .. 93
Jump starting .. . .. .. . .. .. . .. . .. .. .. . .. .. . 99 Towing .................................. ........................
index .................
Page 301 of 444
Booklet 3.2 Tips and Advice
Dampen the windows w ith commer
cially avai lable, alcohol-based g lass
clean er.
Dr y the windows with a clean chamois
or a lint-free cloth.
Removing snow
- Use a s mall brush to remov e snow from
the windows and mirror s.
Removing ice
-Use a de-i cer spra y.
U se a clean cloth to dry th e windows. The
c h amois leather, whic h was use d to wip e paint
surfaces, contains oily res idu e from protective
agents and would smear th e
poss ible use a de- ic in g spray to remove ice. you have to use an ice scraper, push it on ly in one dire ctio n- away from 0.
Use window cleane r or a silico ne remover to re
move rubber, oil, grease silicone depo sits.
Wiper blades should be cleaned regularly.
Clean wiper blades are important so that
y
ou can see.
- Use a so
ft cloth to re mov e dust and dirt
from the windshi eld wiper blades.
- U se window clean
er to clean the w ind
s hi eld wip er blad es. U se a s
ponge or a
cloth to re
move stubborn dirt.
Wax deposits have to be remove d with sp ecial
cleaner. Wax deposits on the windshield could cause the wiper blades to rub. A window clea ner sp ecifica lly for removing wax will stop the b lades
f rom rubbing if added to the windshie ld wash wa te r. Grease removing cleaners will not remove
wax deposits.
WARNING
Poor visi bili ty inc re ases the risk of collisions and oth er ac cid ent s.
Always make sure all win dows are clear of ice , snow , and cond ensation for goo d vis ibility -out the windshie ld, side and rear windows.
Never use warm or h ot water to re move snow and ice from wind ows and mirro rs. This could
ca use th e glass to crack!
The heati ng ele ment s for the rear defogger
a re on t h e in side of the rear window. To preve nt damage, do not put sticke rs over the heatin g e l
ements o n the in side of the rear w indow.
Never move the ice scraper back and forth to
p reve nt dirt from being ground against the gla ss
when you pull the sc raper back towa rds yo u.
Cleaning and protection 25
Page 327 of 444
Sin ce regular water is usually not adequate for
clean ing the win dshield, add a cleaning solution
to th e wa ter. follow the dilution instruc
t io ns on the package.
Sto p! Befo re wor king in the e ngine comp art
m en t, always read and heed WARNINGS 39. The engine co mpartment of a ny motor ve hicle is a po tentially dan gero us area an d can cause serious personal in jury.
Changing windshield wiper blades
3.2 Tip s and Advice
Note
Do not use engine coolant, anti-freeze or any other so lut ions that can damage th e ve hicle
Damag ed
wip er
- Switch the ig nition on briefly and
swit ch it back off again.
-
Within seconds of swit ch in g off the
ignition , push th e windshi eld wiper leve r
clown to the brief wipin g positi on. The
winclshie l
cl wipers will
fig. Llso
t h a t yo u can easily access the w iper
b l
ades.
- Lift the wiper arm away from the w ind
s
hie ld. Do not pull the a rm by th e blade.
Fig. 12 Illustrat io n of princi ple: Changing fron t
wiper blade
- Hold the re lease button fig. 12
and a t th e sa m e time pull the w iper
b l
ade in the d irection of the arrow.
- Insta
ll a new wi per blade of th e sam e
l
ength and type o n the wiper arm and
press the wiper blad e in
th e w iper arrn s back aga inst the
w
indshiel d. The windshield wi per arms
will r
eturn to their orig in al positio n when
you turn on th e ig n ition and operate th e
windshield wiper le ver or when you dri ve
fas t
er than 3 mph (5 km/ h).
Ch ec king and 51
Page 328 of 444
3.2 Tips and Advice
Replacement wiper blades are available from your authorize d Volkswagen dealer.
lf the windshield wipers rub, or if th ey are dam
aged they s hou ld be replace d, or cleaned if they are dirt y.
If th is
does not produ ce the desi red results, th e setting angle of the windshield wiper arms m ay
b e in correct and sh o ul d be checked and adju sted if neces sa ry by an a uthorize d Volkswage n dealer or qualified worksh op.
WARN ING
Worn or dirty wiper blades will reduce v is iand increase th e risk of accide nt leading
to seriou s pe rso nal injury to you and your passengers.
WARNING (continued )
Alw ays clea n th e windshield wiper blades
a n d all windows regularly.
Always make sure to change the wiper bla des once or tw ice a yea r.
D am aged or dirt y windshi eld wipers can
scra tc h th e windshield.
Never use gasoline. nail polish r em over,
paint thinner o r similar produc ts to clea n th e
windows. This could damage the windshie ld
w iper blades.
Neve r move the windshield wipe r or wind
s hi eld wiper arm manually-thi s co uld cause
damage!
To preven t damage to th e w ipin g sys te m , a l
w ays loosen blades frozen to tl1e g lass be fore op
e rat ing th e
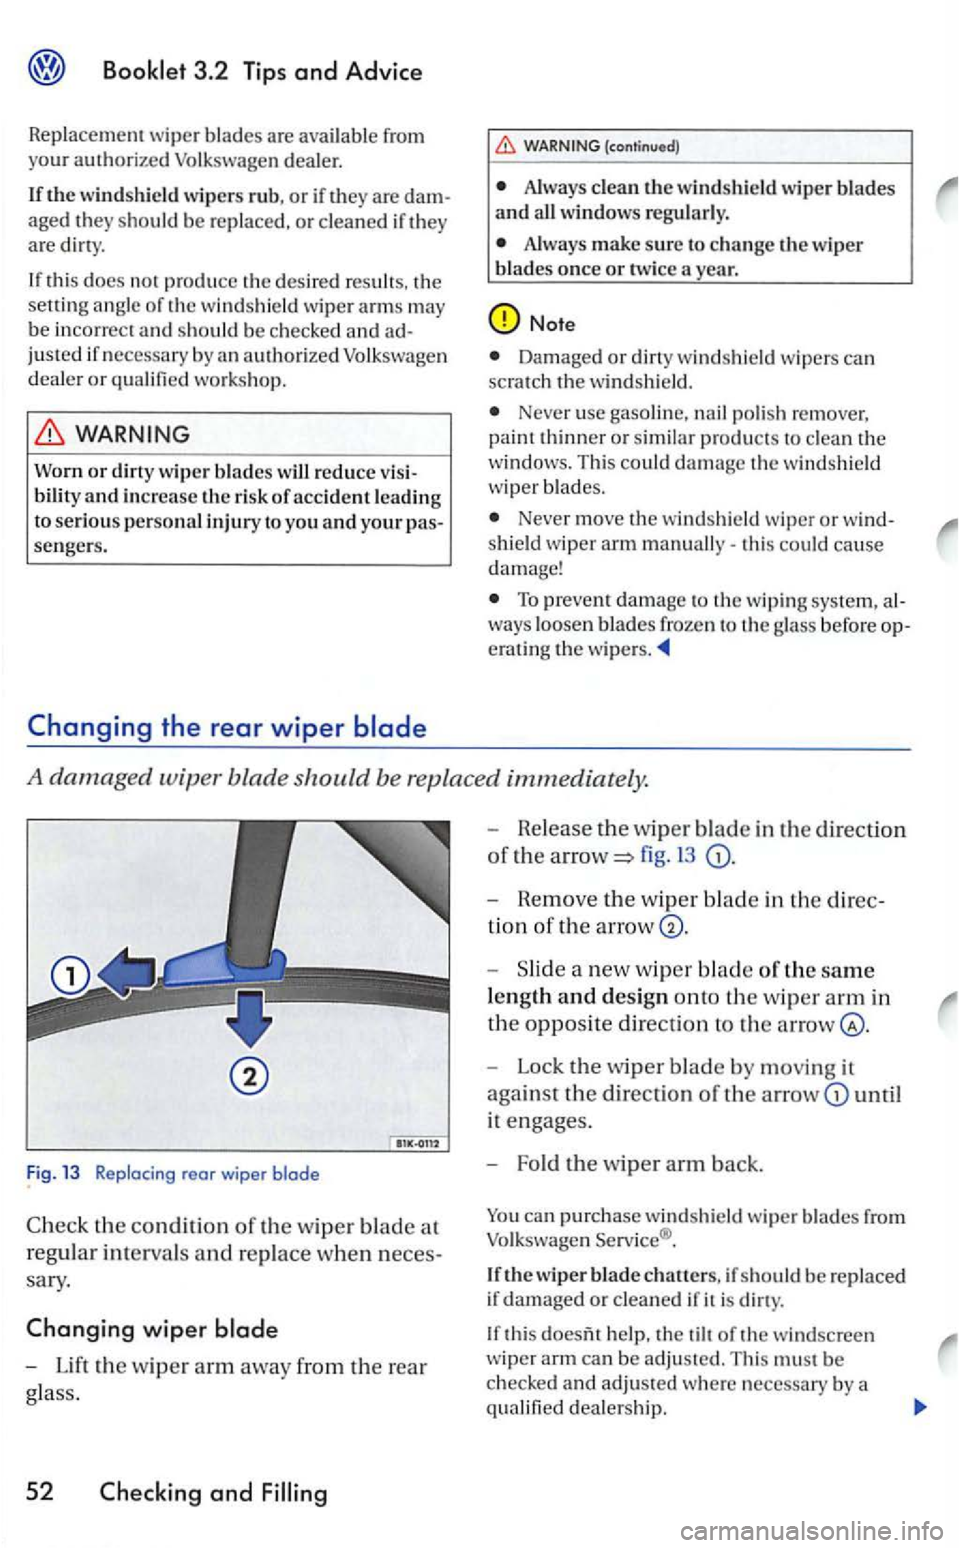
A damaged wiper blade should be replace d immediately.
Fig. 13 Replacing rear wiper blade
Check the condit io n of th e w ip er blade at
r
egul ar interva ls and rep lace when n eces
sary.
Changing wiper
-Lift the w ip er arm away from the rear
glass.
52 Checking and
- Release th e wiper blade in the direction
of th e a rrow=> 13
- Hemove the w ip er bla d e in the direc
tion of the arrow
-a new w iper blade of the same
le n gth and design onto th e w iper arm in
the oppos it e directio n to th e
- Lock the wiper blade by moving it
aga in
st the direction of th e until
it engages.
- Fo ld the
wiper arm back.
can pu rchase wind shield wiper blades from Volkswage n Service ®.
If th e wiper blade chatters, if sh o ul d be re pla ced
i f damaged or cleaned if it is dirty.
If thi s help, the tilt of the windsc reen
w iper arm can be adju sted. Thi s must b e
c h ecke d and adju sted where necessary by a
q ualified dea lershi p.