2005 VOLKSWAGEN GOLF ignition
[x] Cancel search: ignitionPage 153 of 444
WARNING
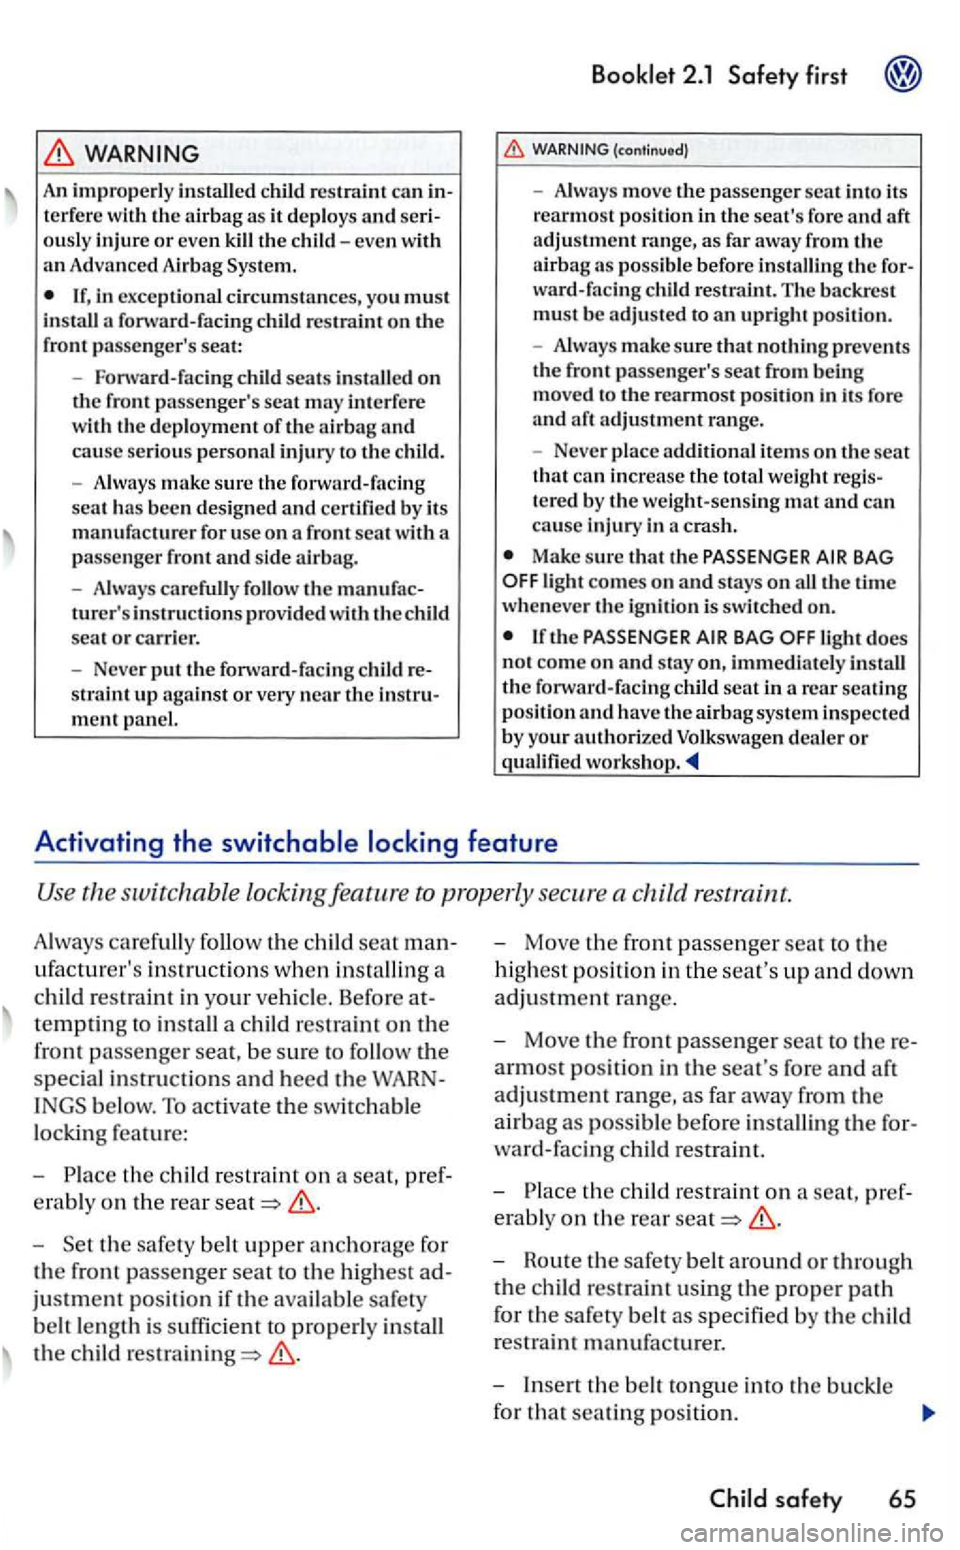
An imprope rl y in sta lled child ca n interfe re w ith the airba g as it de ploys and se riously inju re or eve n kill the c hild -eve n w ith an Advan ced Airbag Sys te m .
m ent pan el.
Booklet 2.1 Safety first
(continued)
- Always move the passenge r scat int o its
reannos t pos ition in the sea t's fo re and aft
a dju stment range, as fa r away fr o m th e
a irbag as p oss ible befo re i nstalli ng the fo r
ward- faci ng c hild res tra .int. The backrest must be adjusted to an uprigh t posi tion.
- Always
make sure th at nothi ng p reve nts
t h e fro nt passenge r's seat fro m being moved to the rearmost p osit ion in its fore
a nd a ft ad justment r an ge.
- Neve r pl
ace ite ms o n th e seat th a t ca n the to ta l we ight regis
t e re d by the weight-sensin g and ca n
cause injury in a cras h.
Make sure that th e PASSENGER AIR B A G the time wheneve r the ignition is swi tche d on.
light d oes
n o t come o n and stay on , i mmediate ly install the forwa rd-fa cin g child seat in
th e seat man
ufacturer's i nstructio ns w he n
res traint in your
th e
s
peci a l in struct ions and heed the WARN
INGS below. To activa te t he switchable
lock ing fe a ture:
-
t h e c hild res traint on a seat, pref
e ra bl y on th e r
ear
-Set the safety belt upper anchorage for
the fron t passenger seat to the highest ad
justment position if t he availab le safety
be lt le ngt h is s
ufficient to properly
the child
- Move the front passenger seat t o the
hig h es t position in th e seat's up and down
adjustment rang e.
- Move
the front passenger seat to there
armost position in d1e seat's fore and aft
adjustment range, as far away from the
ai r
bag as possible before the for
ward-facing child
restrai nt.
-th e child res tra int on a seat, pref
erably on the rea r
-Houte th e safety belt around or through
th e
C hild safety 65
Page 190 of 444
and Equipment
Applies to with multi-function indicotor
Multi -Function
The Multi -Function Indica tor (MF!) shows you various trave l data .
tion
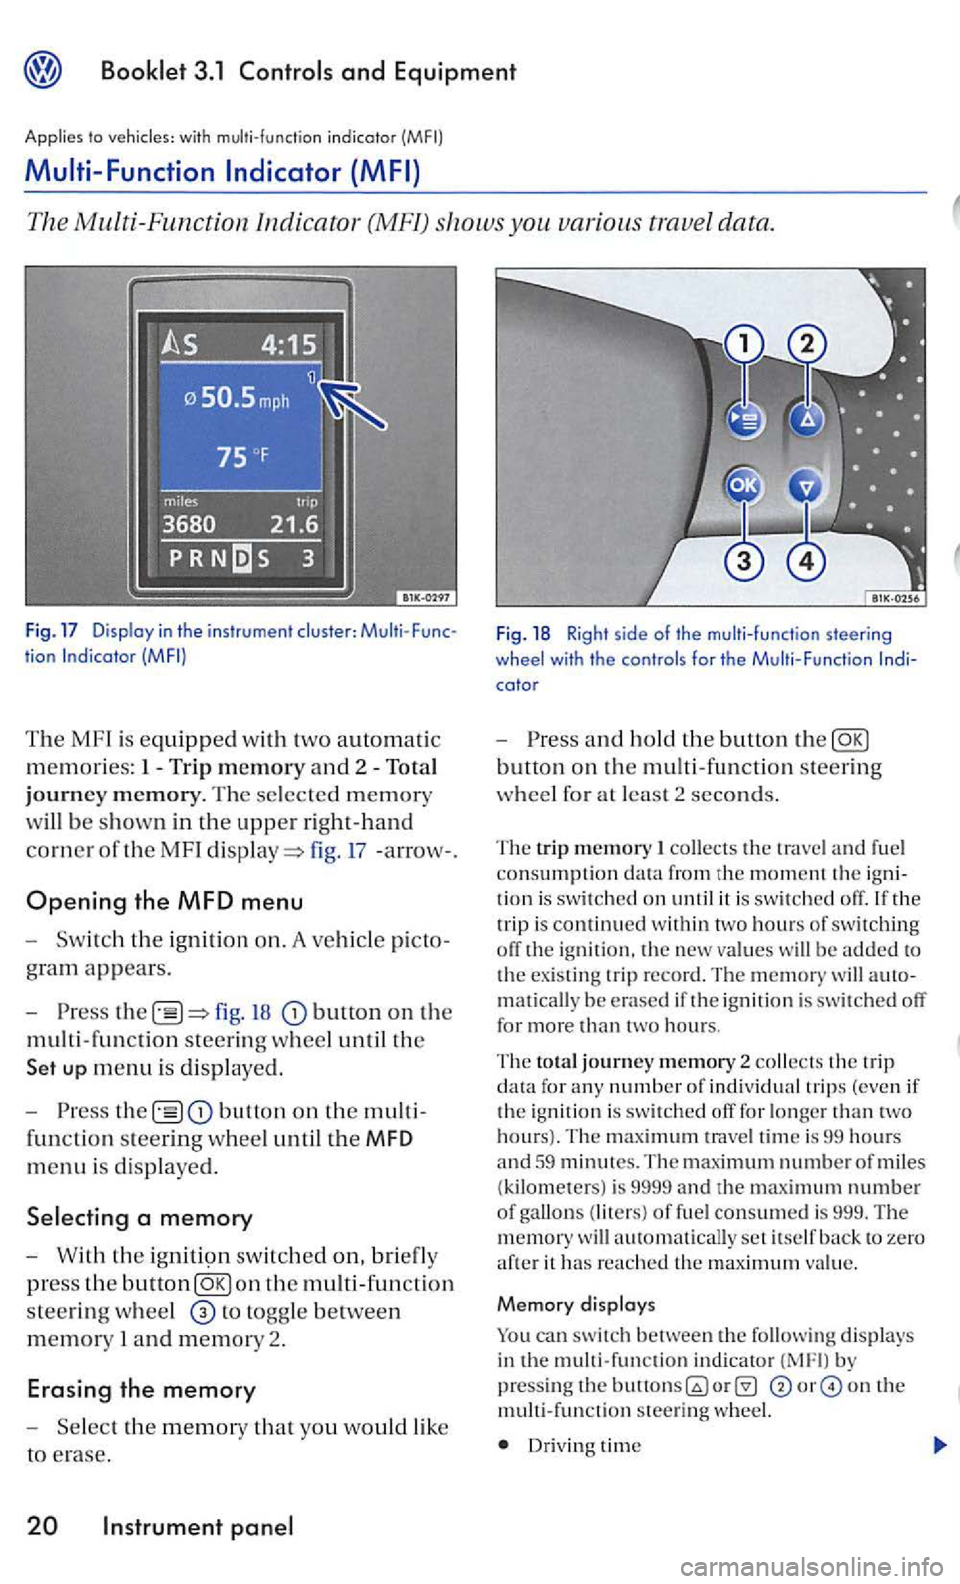
The MF l is equipped with two automatic
m e
mories: 1- Trip m emory and 2 -To ta l
j o
urney m em ory. The se lected memory
w
ill be s hown in the uppe r r ight-hand
co rner
oft he MF I fig. 17 -arrow- .
Opening the MFD menu
t h e ig nition on. A ve hicle picto
gram appears.
fig. button on the
m ult i- fun c
tion steering wheel until th e
up menu is di spl ay ed.
the button on th e multi
functio n st
eering wheel until the MFD
menu is displaye d .
W ith th e ig n iti9n switch ed on, briefly
press the button
to togg le between
mem ory I and memory 2.
Erasing the memory
Fig. 18 Righ t s ide of the multi-func tion steering
wheel with th e controls for the M ult i-Function
a n d ho ld t he butto n th e
collects the trave l a nd fuel
consumption the trip i s continued w ith in tw o hours of switching off the ig nition. th e new value s w ill be added to
t h e existing trip r ecord. The m emory will matically be e rased if i gnition i s switch ed off for more than two hours.
The to ta l journey m em ory 2 collects the trip data fo r any number of individ ual trip s (even if
t h e ignition is swi tched off for longer than tw o hours). T he trave l tim e is 99 hours and 59 minutes. The maximum number of miles (kilometers) is 9999 and th e maximum number of gallon s (liters) of fue l consumed is 999. The w ill automatically set itself back to zero aft e r it has re a ched th e maximu m value.
M emory d isplays
can switch between the follow in g displays in th e multi-function indicator b y pressin g the on th e mult i-func tion s teering wheel.
Dr iv in g time
Page 193 of 444
Booklet 3.1 Controls and Equipment
with compass and sound syste m
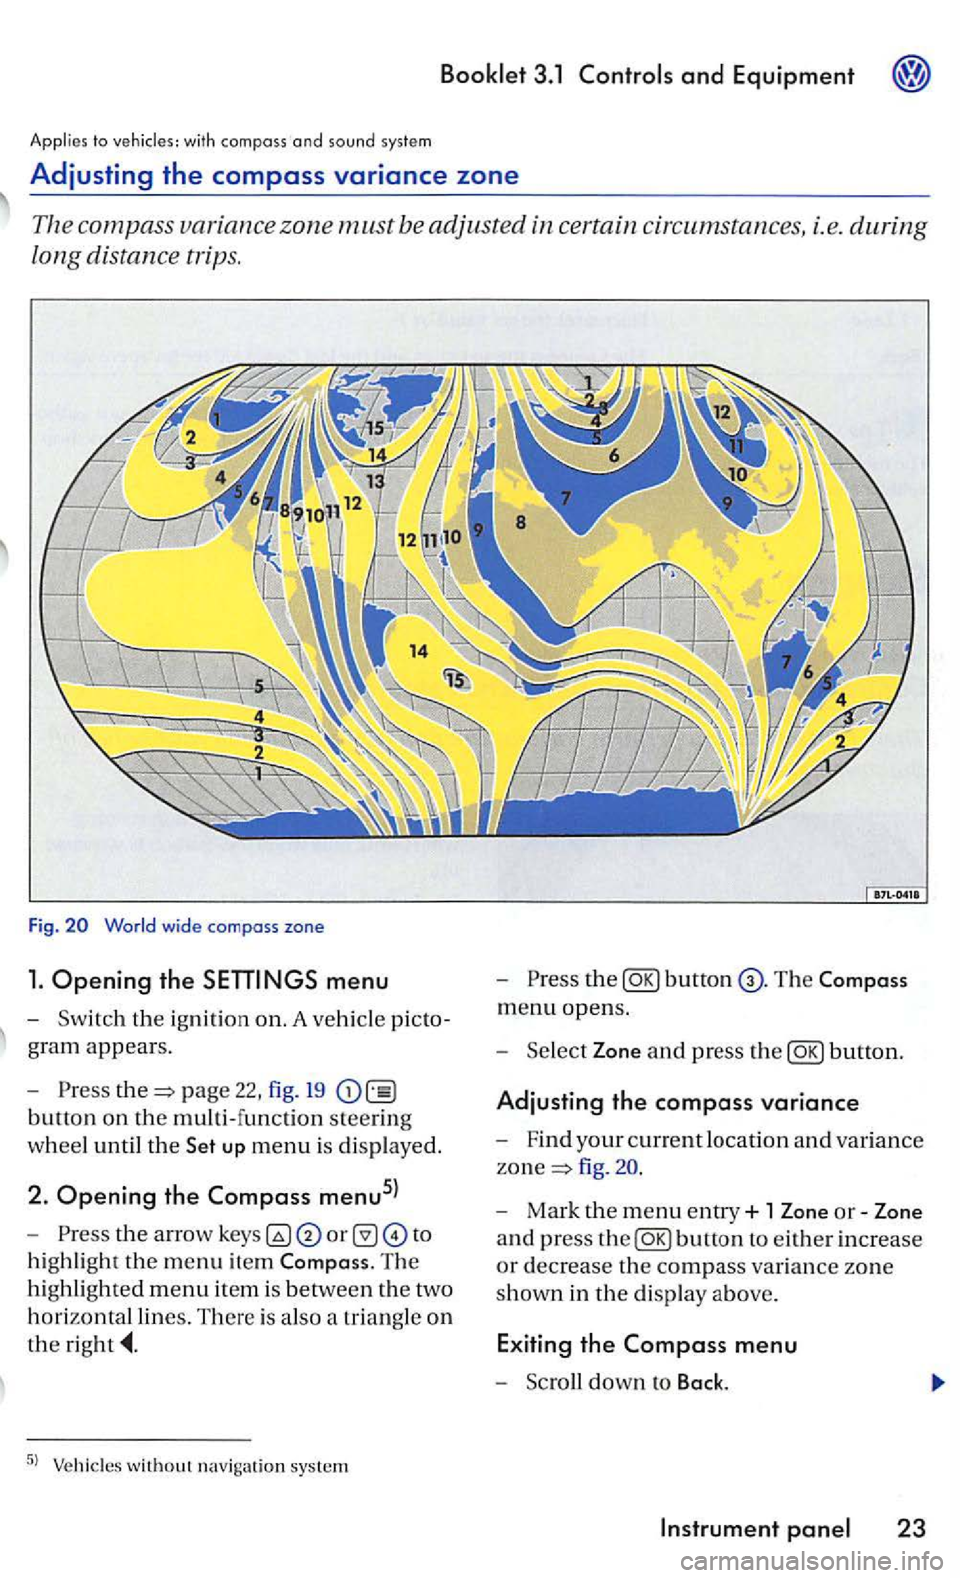
Adjusting the compass variance zone
Th e com pass zone must be adjusted certain circum stances, i.e. during
long distance trips.
Fig.
menu
-Sw itch the ignition on. A ve hicl e picto
g ra m
appears.
- Pre
ss page 22, fig. 19
button on the multi-function steering
w h
eel until the up menu is displayed.
2. Opening the Compass menu5l
-th e arrow to
h ig hli
ght the m enu item The
hi ghlighted menu item is betwee n th e two
h
orizontal lines. There is also a triangle o n
the
the
menu opens.
- Sel
ect Zone and press the
fig .
- Mark the menu entry+ 1 Zone or-Zone
a n d press
the
Page 194 of 444
Press button.
Compass
+ 1
-1
Bock
Tips
In display F uncti on
T he
name of the d is played menu
Increase th e set value b y I
Decreases th e set val ue by I
The Compa ss menu closes and t he last di sp layed menu opens aga in.
T
he menu s s hown in t he display depend s on the
ve hicle electro nics and the options in stalled on
yo ur ve hicle. If you are not s u re, ask your rized Volkswagen deale r or qualified work s hop for
Steer ing
Applies to vehicles: with multi-function steer ing whee l
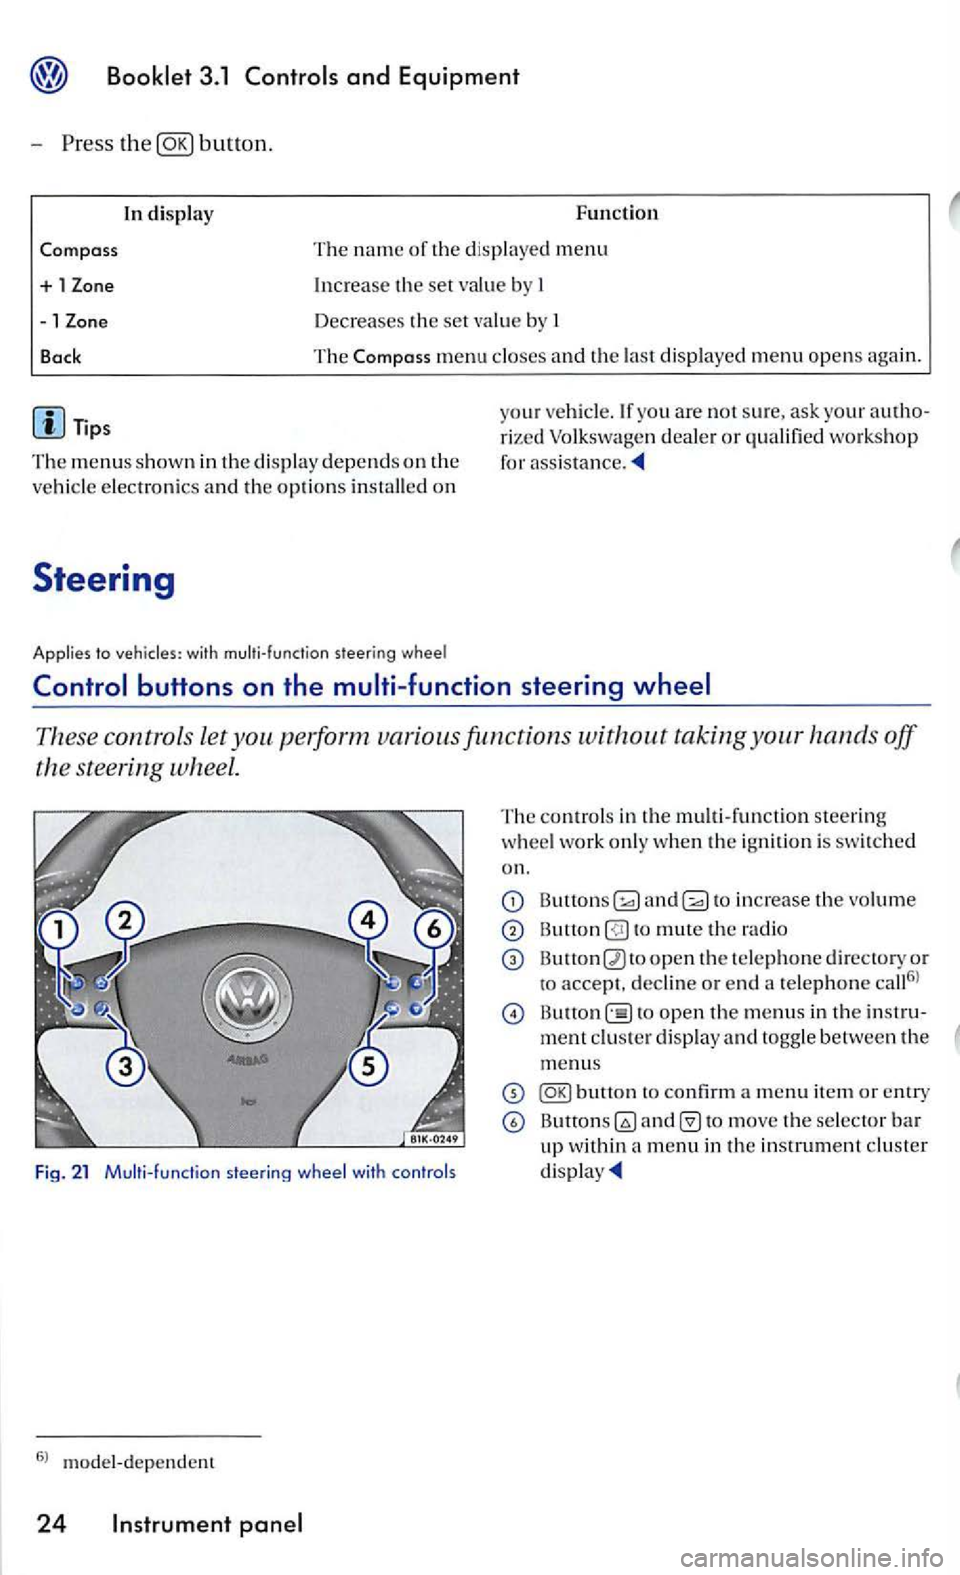
These contro ls let taking your hands off
the steering wheel.
Fig. 21 Multi- funct ion
The contro ls in th e m ult i- fun ctio n steering
w heel work only when the ignition is swi tched
on.
and to increase the vo lume
to mute th e radio
open th e te le phone d irectory or
to accept. decli ne or e nd a te lephone call6
l
open th e menus in th e
to move the selector bar up within a menu in th e in strument cluster
Page 200 of 444
and Equipment
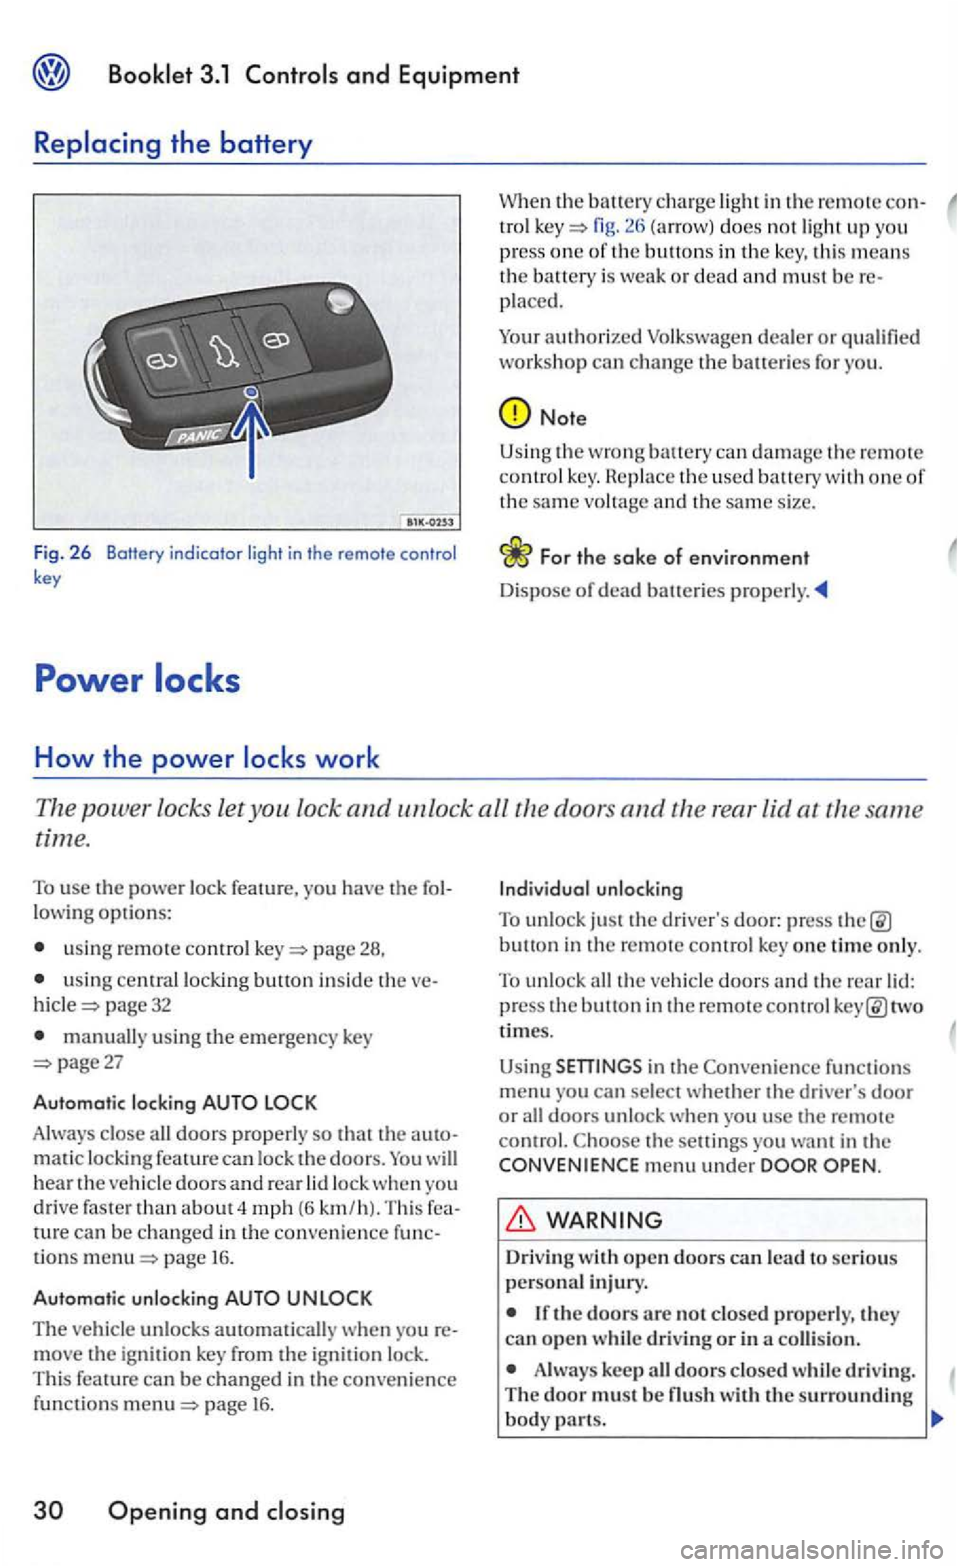
Fig. 2 6 Botfery indicator light in the remote control key
How the power
in the remote con-tro l fig. does not ligh t up you
press one of th e buttons in the key, this means the battery is weak or dead and must be placed.
Your
authorized
Note
Using the wrong can damage t h e remote co ntrol key. th e used battery with one of the same vo ltage and th e same size.
Th e power locks let you lock and unlock all the doors and the rear lid at the same
time.
To use the power lock feature, you have the
usin g remote control page 28,
u sing central locking button inside the page 32
manually using the emergency key page27
Automatic locking
Always close all doors properly so that the matic locking feature can lock the doors. will hear the vehicle doors an d rear lock when yo u
drive faster than about 4 mph (6 km /h). Thi s can be changed in the convenience tions page 16.
Automatic unlocking
The vehicle unlocks automatically w hen yo u move the ignit ion key from the ignition lock.
This feature can be changed in the convenience funct io ns page 16 .
Openin g and
button in the remote control key one time only.
To unlock all the veh icle doors and the rear two
times.
Using
functions menu you can sel ect whether the driver's door or all doors unlock when you usc the remote control. the setti ngs you want in the menu under
Driv ing
Always keep all doors closed whil e driving. The door must be
Page 203 of 444
3.1
lock th e veh icle usin g the centra l
l ock ing button whil e th e driver's doo r is still open, the driver 's door will not lock. Th is featu re
Doors
Doo rs which are not closed prop erly can open while you are driving.
If a door is not clo sed properly, th e
wa rnin g
light in the instrume n t clust er
or a m essage in the disp lay7
> appears. T he
m essa ge al so
comes on wit h th e ignition
switched off and goes out approximately
I S
seconds a fte r locking the ve hicl e.
- Stop th e vehicle.
-
t h e door and close it again (to th e
second catch).
Applies to doors
WARNING
A door whi ch is no t closed properly can accident ally open and cause injuri es and accidents.
Never close a door in attentive ly or w ith out checkin g first -can i nju re yourse lf or o ther peopl e. Always make certain that no o ne is
s ta nd in g w ithin range of the door that is bein g
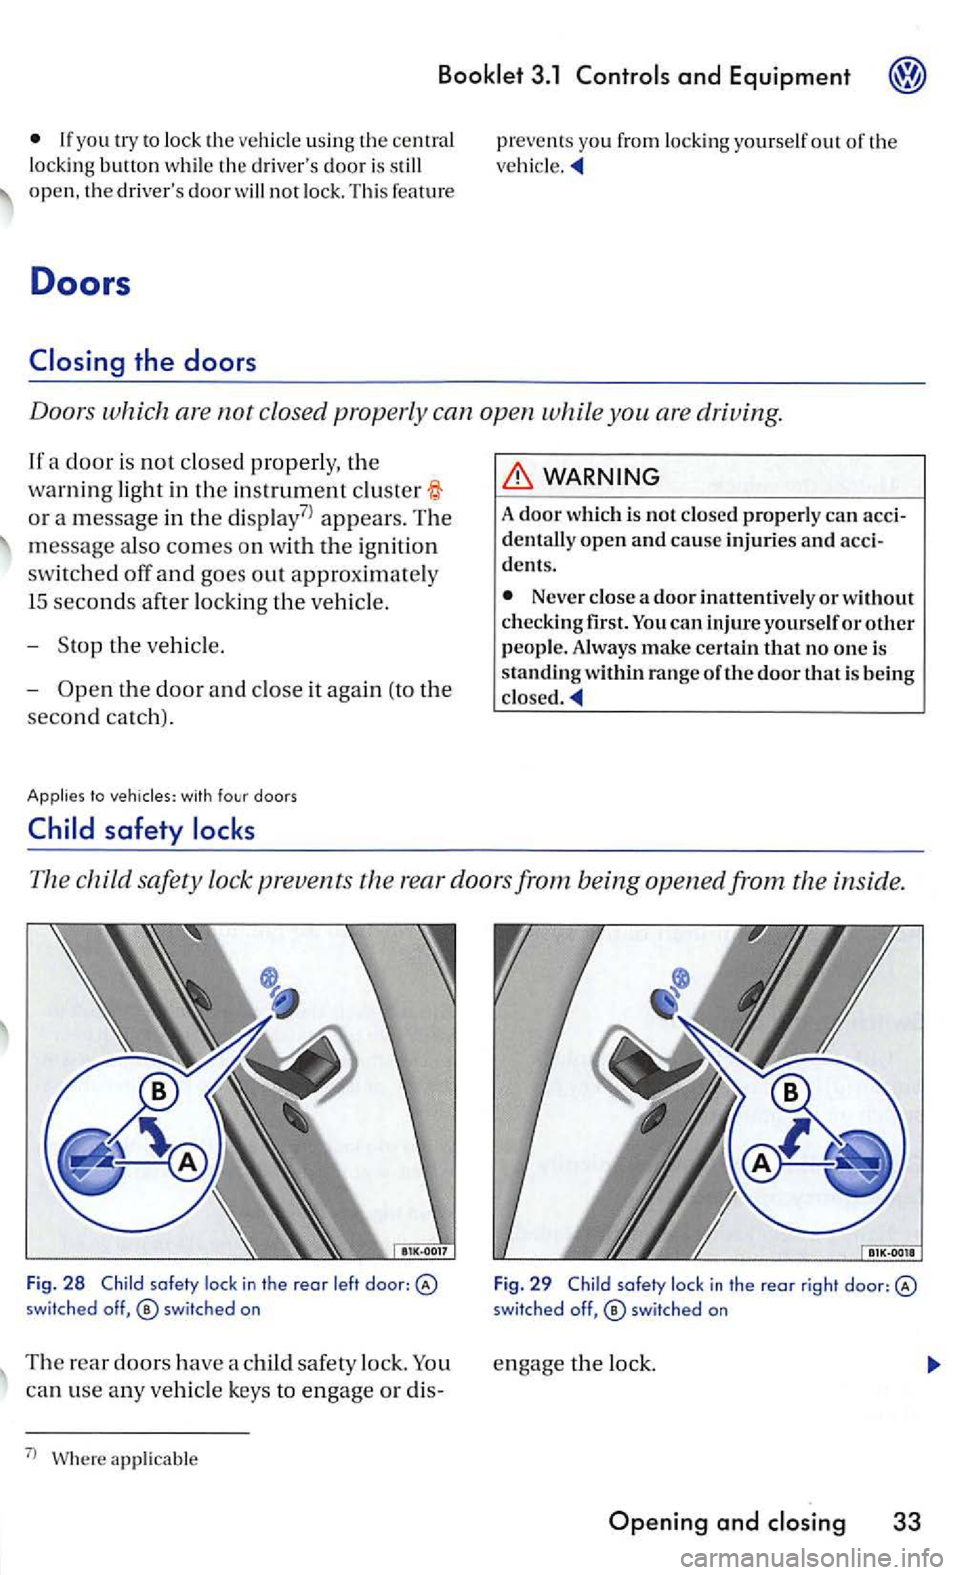
The child safety lock prevents th e r ear doors from being opened from the inside.
Fig. 2 8 Child lock in th e reor l eft door: switched off,
can use any ve hicle keys to e ngage or dis-
7
l applicable F
ig .
29 Child
Page 208 of 444
Booklet 3.1
the driv er's door. The
other doors each have a switch for their own window.
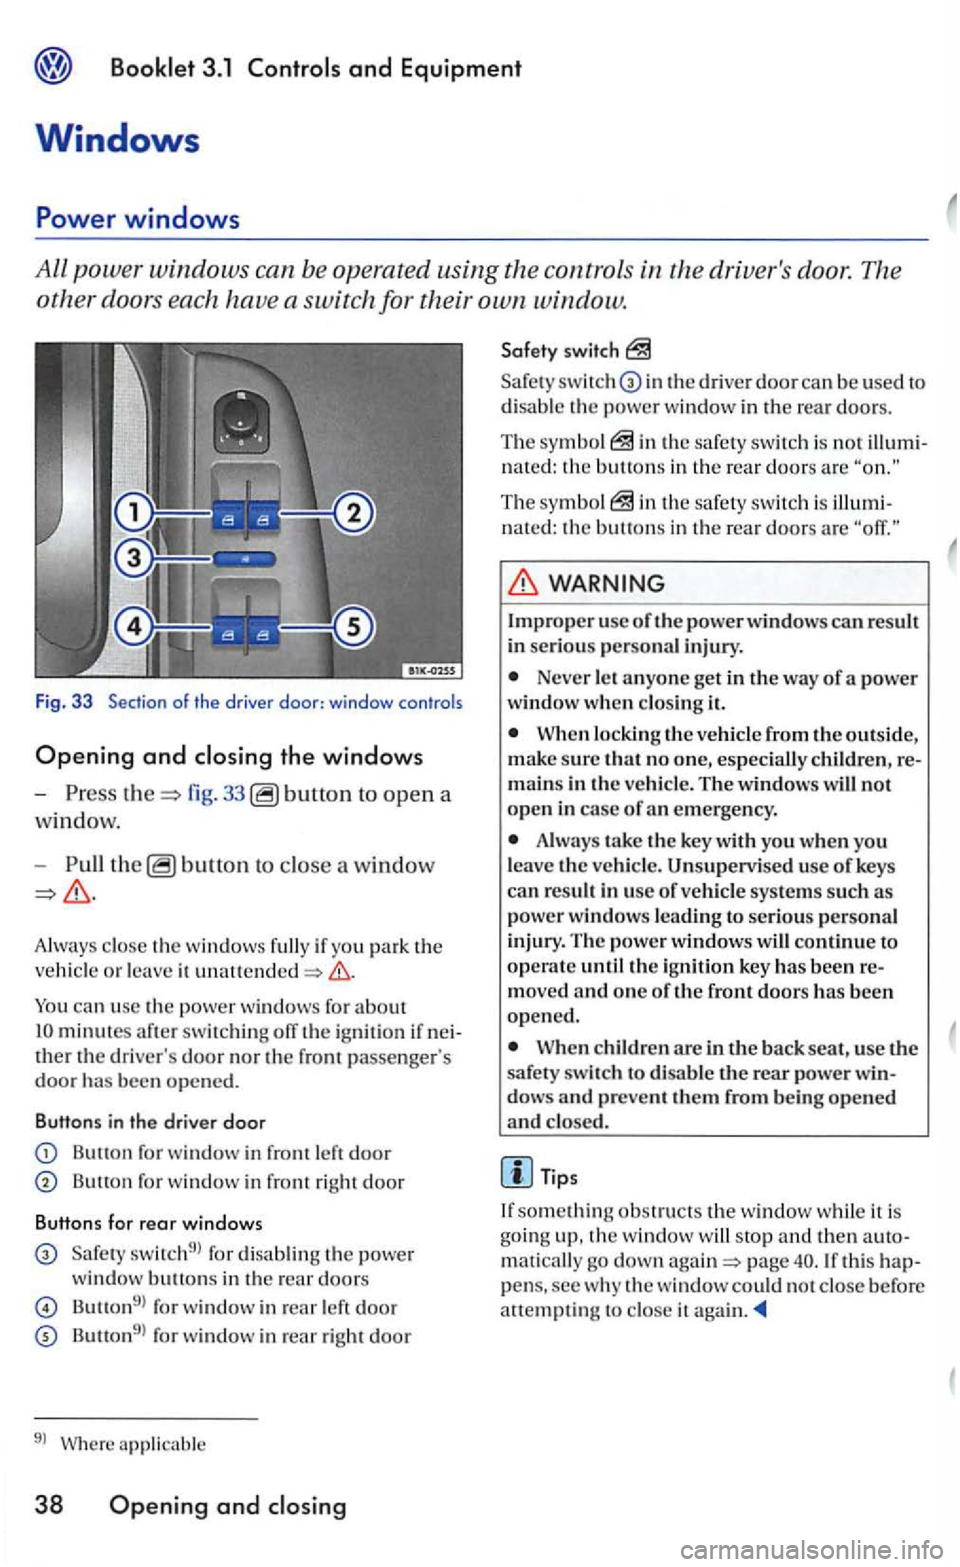
Fig. 3 3 Section of the driver door: windo w controls
Opening and closing the windows
-fig. 33 to open a
wi
ndow.
-b utto n to close a window
minutes after switch ing off the ign ition if ther the dri ver's door nor the front passe nger's door bee n opened.
Butt ons in the driver door
Button for window in front
Butto n for window in front right door
Butt ons fo r rear windows
switch9l for disa blin g th e powe r
window buttons in the rear doors
Button9l for window in left door
Button9l for window in rear right door
9l Where applicab le
38 Ope ning and closing
switch
in the driver door can be used to
d isab le the powe r w indow in the rear doors.
The sym bo l the safety switch is not n a ted : the buttons in the rea r doors are
The symbo l nated: the buttons in th e rea r doors are
Improper usc of the power window s can result in serious personal injury.
Never let a n yo ne get in th e way of a power window w hen clo sing it.
When locking the ve hicle fro m the outside, su re that no one, especially children, mains in th e ve hicle. The w indows will not open in case of emergency.
Alwa ys take the key with you wh en you
l eave the ve hicle. Unsupervised use of keys
ca n re sult in use o f vehicl e sys te m s such as power window s lead ing to serio us pe rsonal in jury. Th e powe r windows will continue to operate until the ignition key bee n
When children are in the back seat, use the
s afet y switch to disable the rear power dows and prevent them from being opened and closed.
Tip s
something obstructs the w indow while it is goin g up, the window will stop maticall y go down page pens, sec w hy the window could not close before att empting to close it
Page 213 of 444
and Equipment
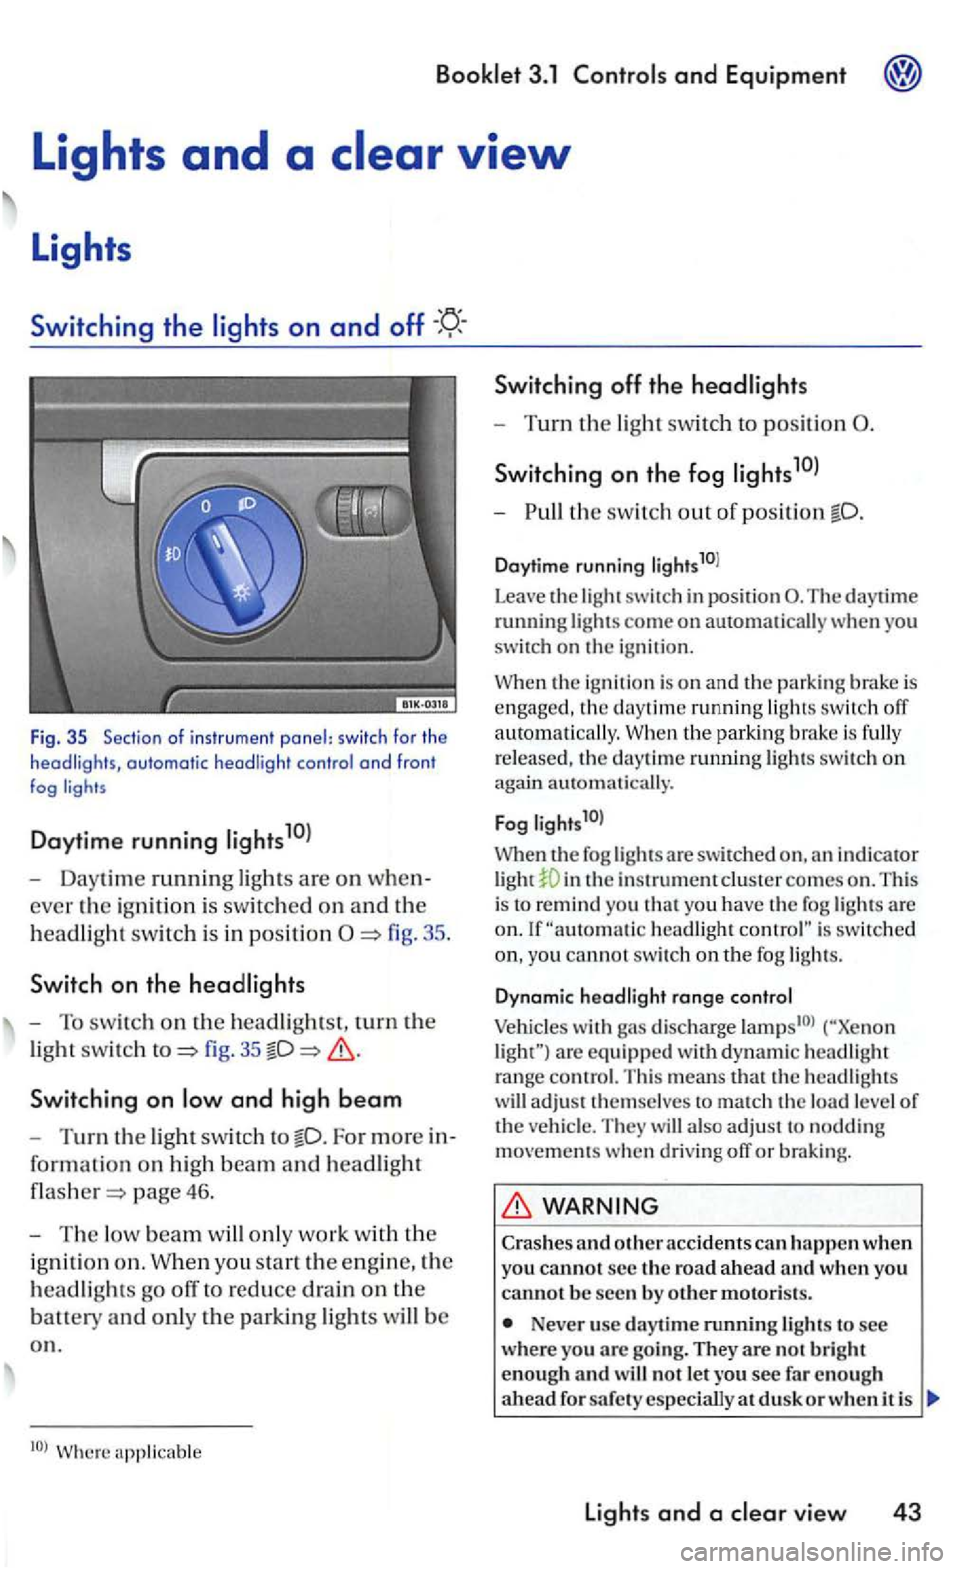
Fig . 35 Sec tio n of i nstr u m ent panel: switc h fo r th e headligh ts, automatic headli ght contro l a nd fron t fog
Daytime running
- Daytime running ligh ts are on when
ever the ig ni tio n i s sw itc hed on an d th e
h
eadlig ht swit c h i s in positi on
fig. 35
Switchin g on
For more in
for ma
tion on hig h beam an d headlight
page 46.
-The low beam w ill only work w it h th e
i g ni
tion o n . W hen you sta rt the e ngin e, the
h
eadlights go off to reduce drain on the
batt ety an d only th e parkin g lights will b e
o n .
Switching off th e headlights
- Turn the light swit ch to position
S wi tch ing on the fog
-th e switch out o f position
Daytime running li g hts10l
Leave
the light switch in posit ion The daytime running lights come on automatically you
switch on the igni tio n.
the ignition is o n and the parking brake is engaged , the daytime running ligh ts switch off
a uto m atically. the park in g bra ke is fully
r e leased , th e daytime ru nning lights swit c h on again automati cally.
F
og l ights1 0l
When th e fog lights a re swit ch ed in th e instrument clus te r comes on . This
i s to remind you t h at yo u have the fog lights are headlight is switc hed
yo u cannot switc h on th e fog ligh ts.
D ynam ic hea d light range co ntrol
Vehicles with gas discharge are eq uip ped w ith d yn am ic headlig h t range contro l. T his means that th e headlig hts
w ill adjust t hemselves to match th e load level of the ve hicl e. They will also ad ju st to noddin g movements when d riving off or braking.
WARNING
Crashes and o ther acc idents can h appen when you cannot s e c the ro a d a head and w hen you canno t b e seen by o th er motoris ts.
Never use day tim e running lights to see wher e you arc goi ng. They are no t b rig h t
enough an d w ill not le t you see fa r en o ug h
a head d usk o r w hen i t is
lights and a vie w 43