2005 VOLKSWAGEN GOLF ignition
[x] Cancel search: ignitionPage 304 of 444
WARNING (continued)
partment.
Always le t the engin e cool down ple te ly befor e opening the engine
hood. Hot components will burn skin on
W hen the engine has coo led dow n and you are ready to open the eng in e hood:
- He move
the key from the ignition.
- Appl y th e
parking brak e firml y and put the selector in
-Keep c hildr en and others away from the vehicle.
WARNIN G (cont inued)
Neve r reach into the a rea around or touch
th e radi ator fan. w it h th e blad es can
r es ult in seriou s personal injury. Always
moved from the ign ition.
For the sake of environment
gre a se and oil dep osits can r un off when th e engi ne is was hed. The polluted waste water must pass th rough an oil se pa ra tor before posal. Have the engin e cl ea ned only by an
- Use a cl ean, damp cloth to clean plastic
parts and th e in strument panel.
- If thi s does not work, use a special
WARNING
so lvents on surfaces where airb ags are located can change the way airb ags deploy in
a crash.
with woode n interior ri m
thi s does not provide sa tisfac tory
sults, use a gentle soap solution.
28
(con tinued)
Neve r clean the instrument pan el a nd the
s u rfaces above airbag modul es with cleaning
products containing so lvents.
contain ing solvents will change
the p roperti es of the plas tics and may cause pla stic parts t o break and fly around w he n the
a irbag deploys in a cras h causing injury .
Note
products th at contain so lvents will damage plas tic mate ria ls .
product s that contain solvents will damag e plas tic materia ls .
Page 315 of 444
Booklet 3.2 Tips and Advice
be taken working on
(Automatic tran smissio n).
2. Apply th e parkin g brake firmly.
3. off the eng in e and remove the
k
ey f rom the ignition.
4. Wail
for the engine to cool down.
5. Keep chi ldren and othe rs away from the
ve hicle .
6.
the e ngin e hood.
All serv ice fluids. sp ark plugs . batteri es etc. are
constantly being develo ped and improved. kept up-to-da te
by the manufactur er. For thi s reaso n mend that you have these replaced by an rized Volkswage n dealer. A lways read the notes
b elow . Th e e ngin e or any motor vehicle is a hazardous
WARNING
E ngine
fo rni a cause cancer and birth defec ts and reproduc tive harm. In additio n, certain fluid s
containe d in vehicl es and cerlain products of component wea r co ntain or emit ch e m ica ls
kn ow n to th e to ca use
ca ncer a nd birth defect s o r o th er r eproductive
h arm.
Ba ttery pos ts,
th e of to
(continued)
cause ca ncer and reproductive harm. hands after handling.
WARNING
T he e ng in e comparlmenl of any m olo rvc hicl c
is a polcnli ally dangero us area ca n ca use seriou s pe rso nal inju ry.
Alwa ys use extreme ca ution when doin g
any work in he e ng in e compartment. Always
follow commonl y acce pled p rac tice s and usc common se nse. Neve r risk perso nal
injury.
Never perform any work in the e ng in e
compartment unless you know exactl y how to
ca rry ou t th e job
ni cal info rm ation and th e correcltools ! you arc uncerla in w hat to have the wo rk
p erformed by an aulhorized Volkswage n
d ealer or works hop. Se rious
form ed work.
Neve r o pe n the engine hood if you see stea m or coola nl escap in g fro m the en g in e comparrment. I-Iots team orcoolanl ca n cause serious burns. Alw ays wait until yo u no longe r sec or hear stea m or coolant escap ing fro m the engine.
Alwa ys le t th e en g in e cool do wn pl ete ly before care full y opening the engine
h ood. I-lo t compone nt s will burn sk in on tacl.
th e e ng in e has coo le d down and you
selecto r mati c transmi ssio n).
- Rem ove th e k
ey from the ign ition.
- K
eep children and others away from
Page 316 of 444
WARNING (continued)
Never reach into the area around or tou ch the radiator fan. Contact w ith the blade s can resuh in se riou s personal injury. Always m ember that the radiator fan is controll ed and can turn on
m oved from the ignit ion.
Never unscrew the coolant expa nsio n tank cap when th e engin e is hot. A hot engine will heat the coo la nt and put it under pressure . mov in g a cap that i s under pressure ca n rcsuh in seriou s personal injury and/or burns.
A lway s prote ct face, hand s and arms from hot esca ping coolant or steam b y cove ring the ca p with a large, thick rag.
Turn the cap slow ly a nd very carefully in a
counter- clo ckw ise direction whil e applying
light downward pressure on the top of the cap.
Never spill on hot engine parts o r hot
e xhau st sys te m . S pilled
Neve r short-circuitthc elec trica l sys te m ,
es peciall y w here th e jumper cabl es are tached -th e balleri es could explode!
Neve r leave any objects in the e ngine partment, for exam ple cleaning rag s and too ls. Objects
Neve r work unde r the veh ic le unless you
h ave safely secured th e ve hicl e from movin g.
I f yo u must work under th e ve hicl e wit h th e
w hee ls on th e ground, always make sure the vehicl e is on leve l ground, th e wh eels arc
b locked from movin g and th e key is not in the
ignition.
Always support your ve hicle with safety
s tands if you have to wo rk underneath it. The
ja ck suppli ed with the ve hicle is not s tron g enough for this purpose and can co llap se causin g se riou s personal injury.
If you have to perform a check or r ep a ir
w hen th e e ngine is running, there arc more
ri sks from
the ro tating parts, such as the drive
WARNING (con tinued)
Neve r to uch the e lec tr ica l w ir in g of the ig ni tio n sys tem.
Always make sure that j ewe lry, loose clothing and lo ng hair do not get caught in
rota ting engine pans. Before startin g any work remove jewelry, tie back and cover
hair, and do not wear clothing that can hang down and get caught in mov ing gin e parts.
Always use extre me cauti on if the erator pedal has to be depresse d to perform
a ch eck. The vehicle could move suddenly, eve n if the parking brake is applied.
If wor k on the fu el sys te m or th e electrica l
syste m is necessa ry:
Always discon nect th e balleries. Make
sure th e vehicle is unlo cked when
Neve r sm oke .
Neve r work nea r heaters, wa te r h eaters of other open names .
A lways have an approve d fire ext guis her nearby.
To avo id electrical shock and personal jury w hil e the eng ine is running or being
s tarted :
n ever touch ignition cables,
never to uch othe r component s of the
high vohage electronic ignition syste m,
never touch the gas discharged (Xeno n) headlights wiring.
Note
Whe n chang ing or topp ing orr service fluids. make absolutel y ce rtain that you fill the fluid s
into the corr ect reservoirs. Using incorrec t fluids will resuh in serious malf unct ions and engine
damage!
For the sake of environment
Service fluid leaks are harmful to the environ-
ment. Reg ularl y check the ground undernea th
your vehicle . you find spots of oil or other
fluids. have your vehic le checked by your rized dealer or a qualified
Page 317 of 444
Booklet 3.2 Tips and Advice
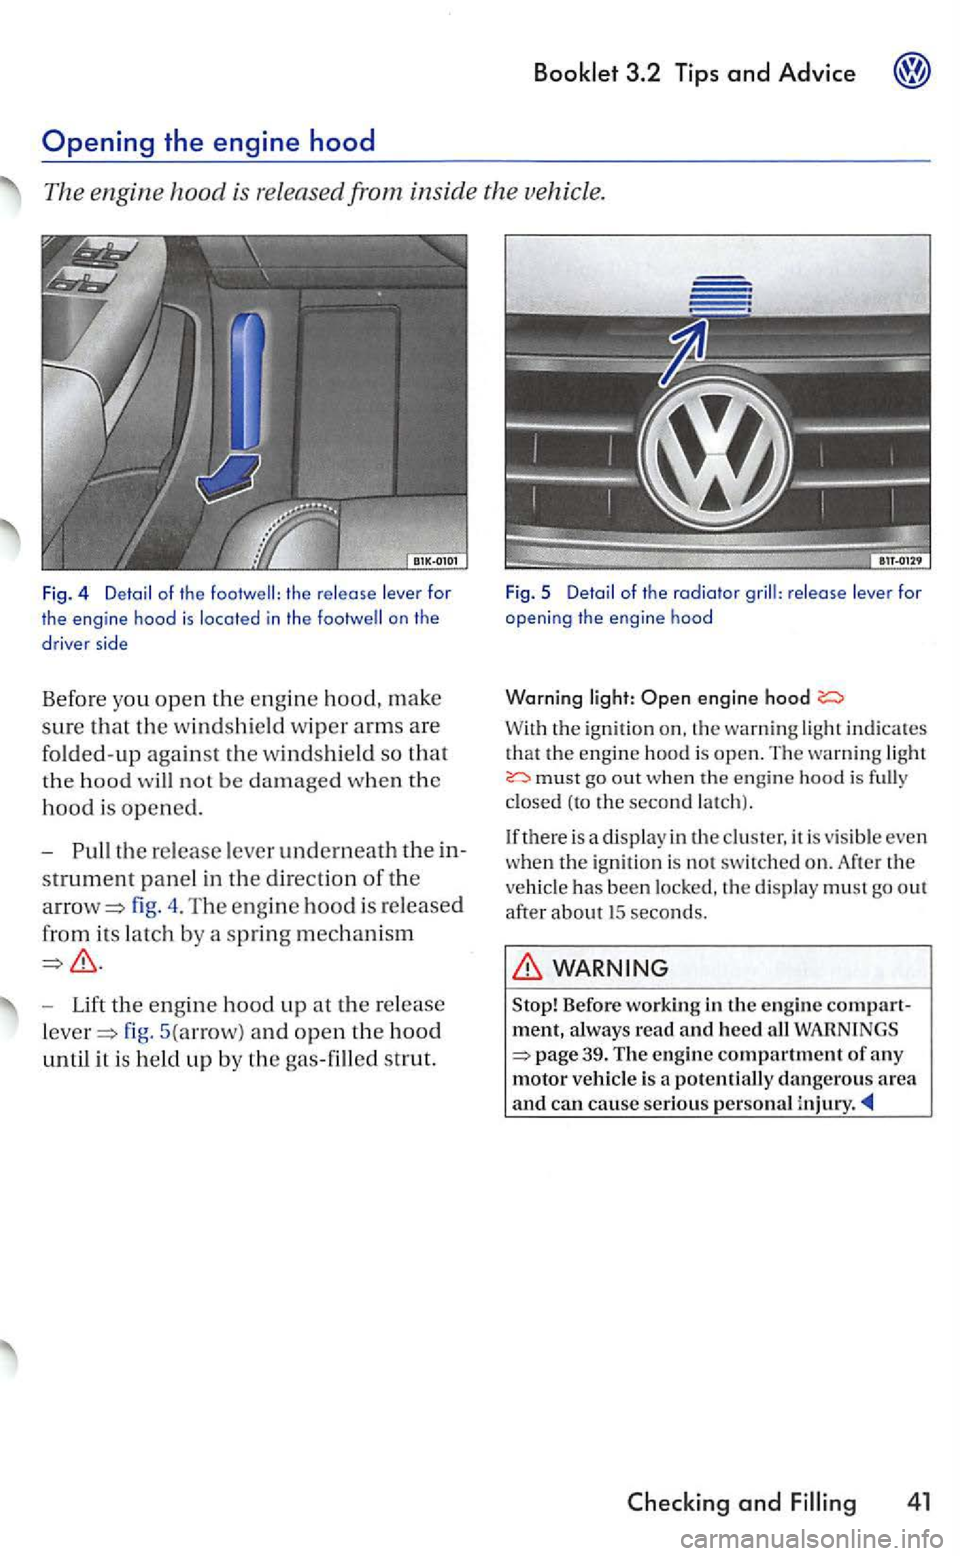
th e release lever for
the engine hood is located in the on the
d rive r side
Befor e you open the engine hood, make
sure that the w indshi eld wiper arms are
folded-up against the winds hi eld so that
the hood will not be damaged when the
hood is opened.
fig . 4 . The engi ne hood is released
from its latch by a s
pring mechanism
Lift the engin e hood up at the re lease
fig. 5(arrow) and open the hood
until it is held up by the gas-filled strut.
Fig . 5 Detail of the radiator release lever open ing the en gine hood
Warning engine hood
With the ignition on, the warnin g light indicate s
that the engine hood is open. The warning light must out when the engine hood is closed (to the second latch ).
If there is a displa y
in the cluster, it is visible even
when the ignit io n is not switched on. After the
vehicle has been locked, the disp lay must go out after about 15 seconds .
WARNING
Before working in lhe engine compartment, always read and heed all WARNINGS 39. The engine compartment of any motor vehicl e is a potentially dangerous area and can cause se riou s personal injury.
Page 327 of 444
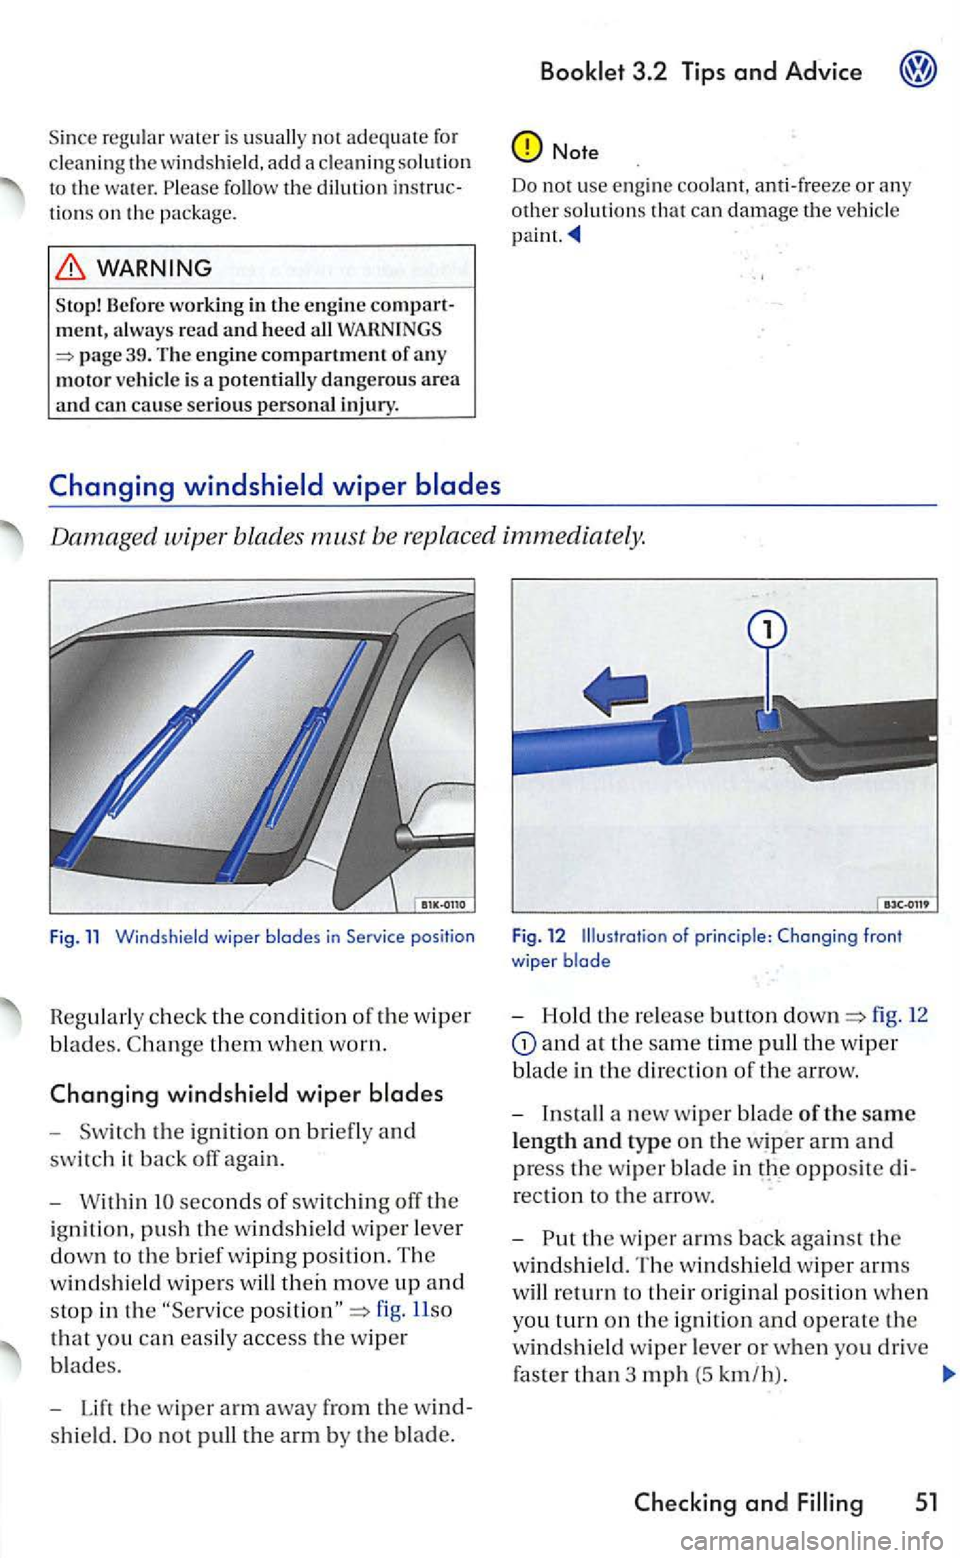
Sin ce regular water is usually not adequate for
clean ing the win dshield, add a cleaning solution
to th e wa ter. follow the dilution instruc
t io ns on the package.
Sto p! Befo re wor king in the e ngine comp art
m en t, always read and heed WARNINGS 39. The engine co mpartment of a ny motor ve hicle is a po tentially dan gero us area an d can cause serious personal in jury.
Changing windshield wiper blades
3.2 Tip s and Advice
Note
Do not use engine coolant, anti-freeze or any other so lut ions that can damage th e ve hicle
Damag ed
wip er
- Switch the ig nition on briefly and
swit ch it back off again.
-
Within seconds of swit ch in g off the
ignition , push th e windshi eld wiper leve r
clown to the brief wipin g positi on. The
winclshie l
cl wipers will
fig. Llso
t h a t yo u can easily access the w iper
b l
ades.
- Lift the wiper arm away from the w ind
s
hie ld. Do not pull the a rm by th e blade.
Fig. 12 Illustrat io n of princi ple: Changing fron t
wiper blade
- Hold the re lease button fig. 12
and a t th e sa m e time pull the w iper
b l
ade in the d irection of the arrow.
- Insta
ll a new wi per blade of th e sam e
l
ength and type o n the wiper arm and
press the wiper blad e in
th e w iper arrn s back aga inst the
w
indshiel d. The windshield wi per arms
will r
eturn to their orig in al positio n when
you turn on th e ig n ition and operate th e
windshield wiper le ver or when you dri ve
fas t
er than 3 mph (5 km/ h).
Ch ec king and 51
Page 342 of 444
3.2 Tips and Advice
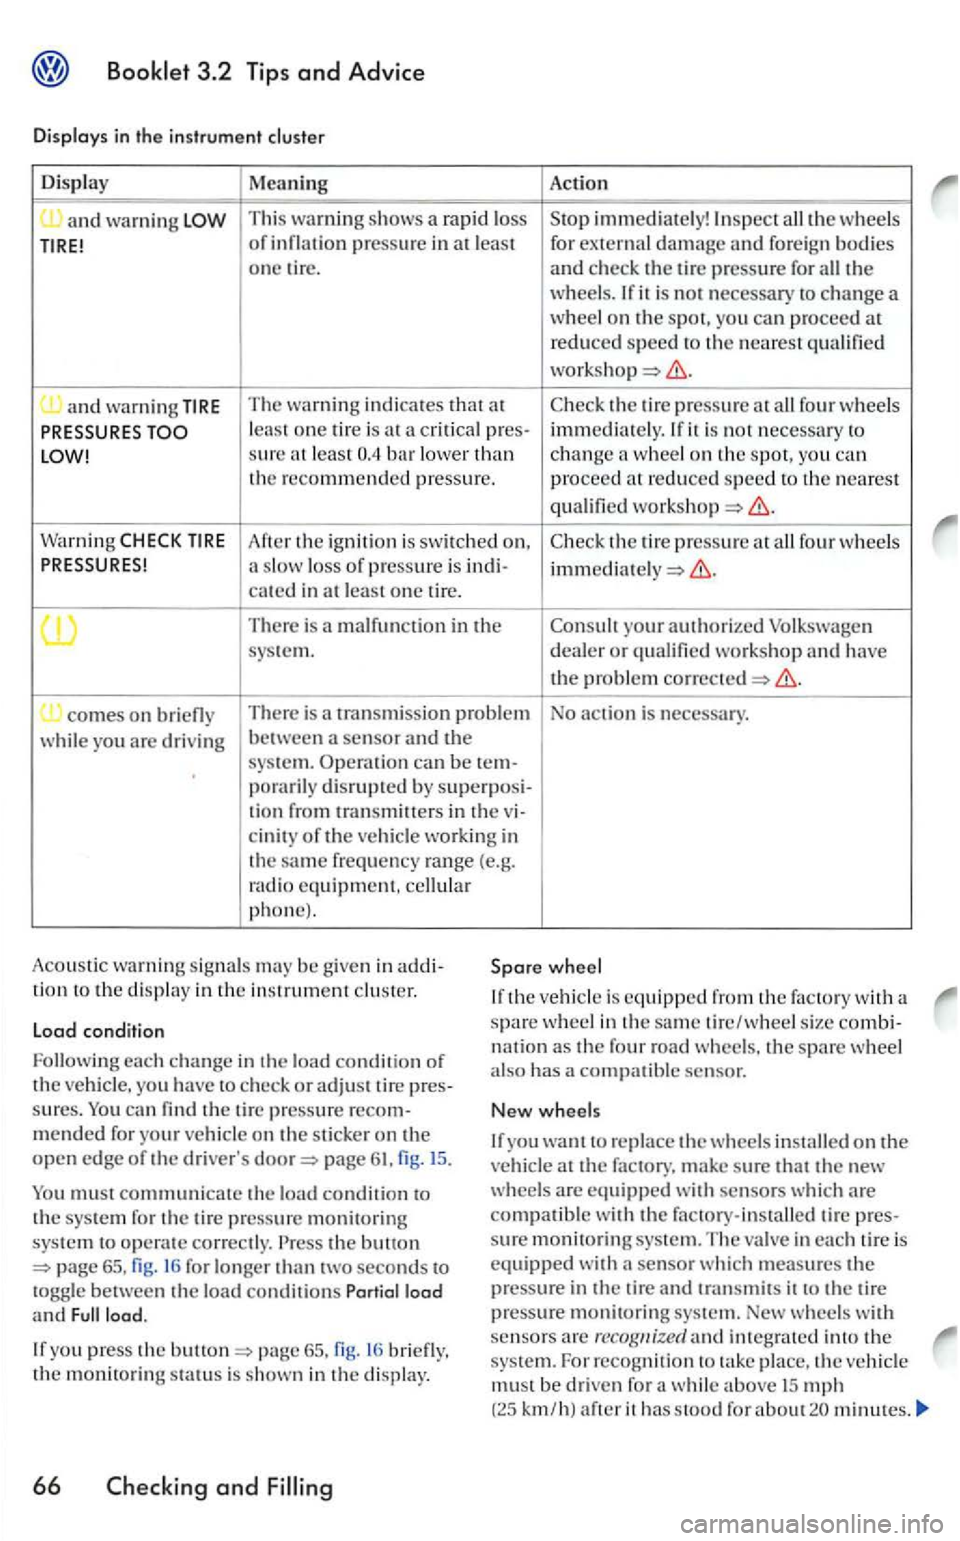
Displays in the instrument
Display Meaning Act io n -and warni ng T hi s warning shows a rapid loss immediately! In spect the wheels of p ressure in least for external damage and for eign bodies
o ne tir e. and check th e tire pressure for th e wheels. If it is not necessary to change a wheel on the spot, you pro ceed at
reduced s p e ed to the nea re st
and warnin g TIRE The warning ind ic a tes that at Check th e tire pressure at four wheels
sure at least
Warn ing After the ignition is switched on. Check th e tire pressure at four wheels a slow loss of pressure is in di-ca tcd in at le a st one tire.
T here is a malfunction in the your authorized Volkswagen
sys tem. dealer o r
comes o n
disrupted by superposi-
tion from transmi tters in the
the same frequency range (e.g.
rad io equipment. phone).
Load condition
Followi ng
each change in th e load conditio n of
th e yo u have check or adjust tir e sure s. can
page
mus t communicate th e load condition to the sys te m for the tire pressure monitoring system to operat e correctly. the bullon 16 for lo nger th an two seconds to
If you press the bullon briefly. th e monitoring status is shown in the display.
66
wheel
If the vehicle is equipped the fac tory with a
spare wheel in th e same tire /wheel s ize
you re place the w heels o n the at the factory. make sure that the new
w heels are equipped with se nsors whic h are compatible with the factory-installe d tire sure monitoring sys te m. The val ve in each tire is equipped with
mus t be dri ven for a while above mph (25 km/h ) after it has s tood fo r about
Page 371 of 444
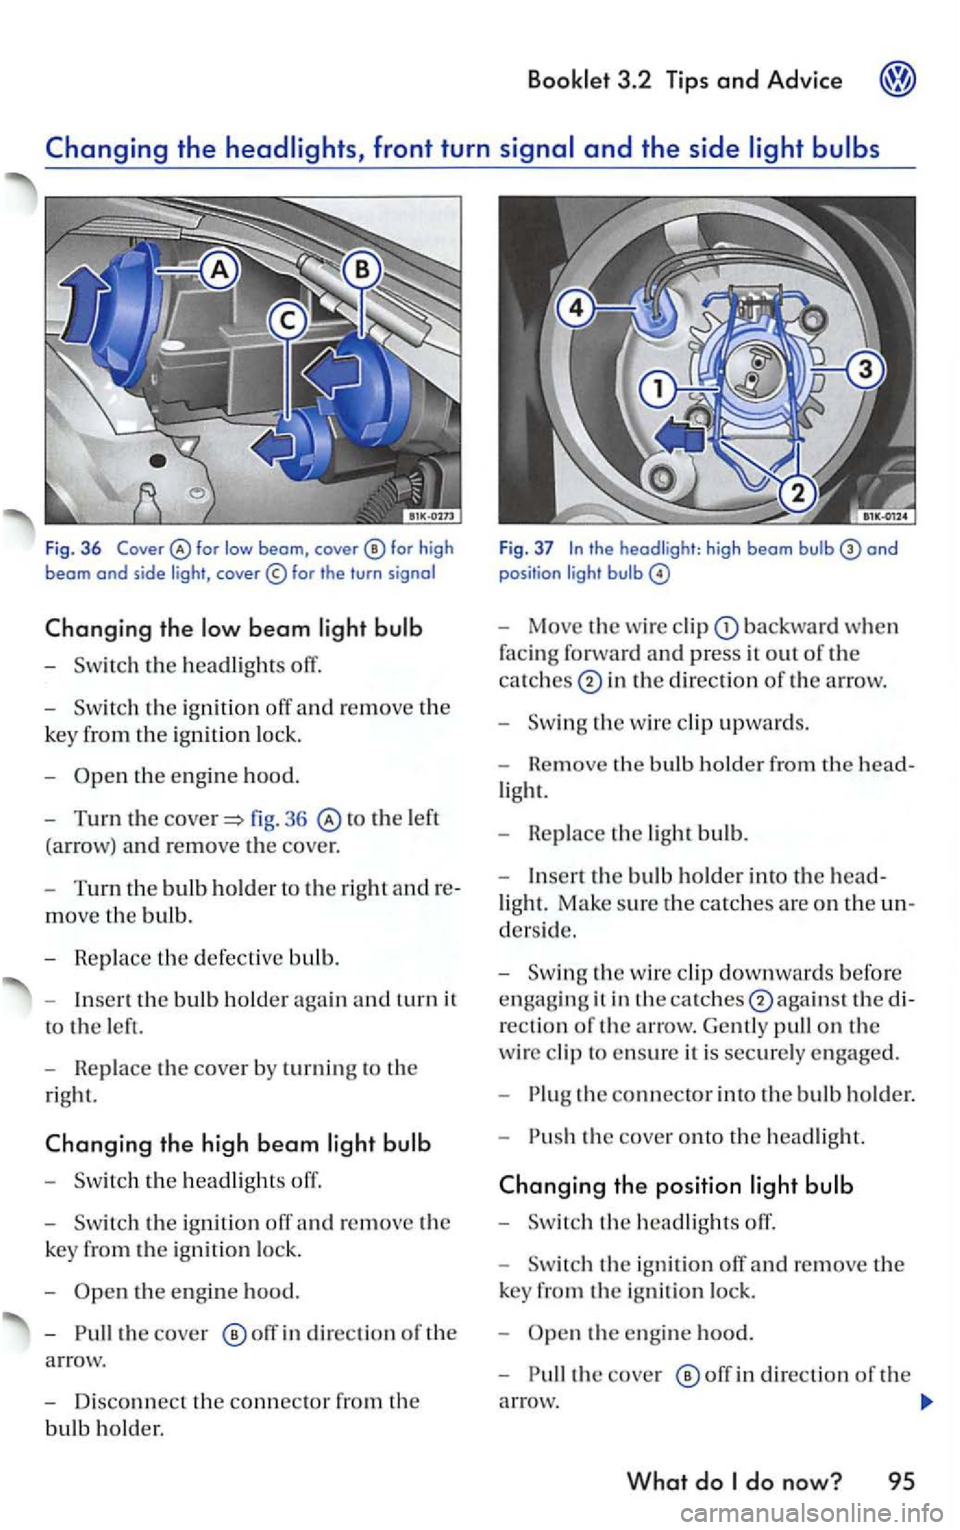
Fig . 36 for high beam and side light ,
th e ignition off and re m ove the
k
ey fro m the ignition lo ck .
-
to the left
(a rrow) a
nd re move the cove r.
- T
urn th e bulb holder t o the right andre
move th e bulb.
- R ep lace th e defec tive bulb.
-
t h e bulb h o ld er again and turn it
t o
the left.
-
Replace t h e cover by turning to th e
rig ht.
the high beam light bulb
-
the ig nition
th e en gin e hood.
-
o ff in direc tio n of the
a rrow.
- Disco
nnect the connec tor fro m the
bulb hold er.
Bookl et 3.2 Tips and Advice
Fig. 37
- Move th e wi re cli p backward when
f
acin g forwa rd and press it ou t of the
ca tc h
es in th e di rection of the arrow.
-
the w ire clip upward s.
- Rem ove th e bul b ho ld er fro m the h
ead-
light.
- Repl
ace th e light bu lb .
- In
sert the bulb ho ld er into th e head-
light. Make sure the catches are on th e un
d ers ide.
-
the wire clip downwards befo re
e n
gagin g it in thecatc hes0again sl the di
r
ectio n of th e arrow. Gently pull on th e
wire clip to ensure it is securely e ngage d.
-
th e connector into the bul b ho ld e r.
-
the cove r onto the hea dlight.
the e ngi ne hood.
-
the cove r off in direction of t h e
a rro
w.
What do
Page 373 of 444
(continued)
swagen dealer or a qualified workshop. rious personal injury m ay resu lt from erl y perfo rmed work.
Booklet 3.2 Tips and Advice
Note
Do not touch glass bulb with bare hands.
A bulb can on ly be rep laced by a bulb of the same type. The model identification is either on the bulb base or on the bulb
turn
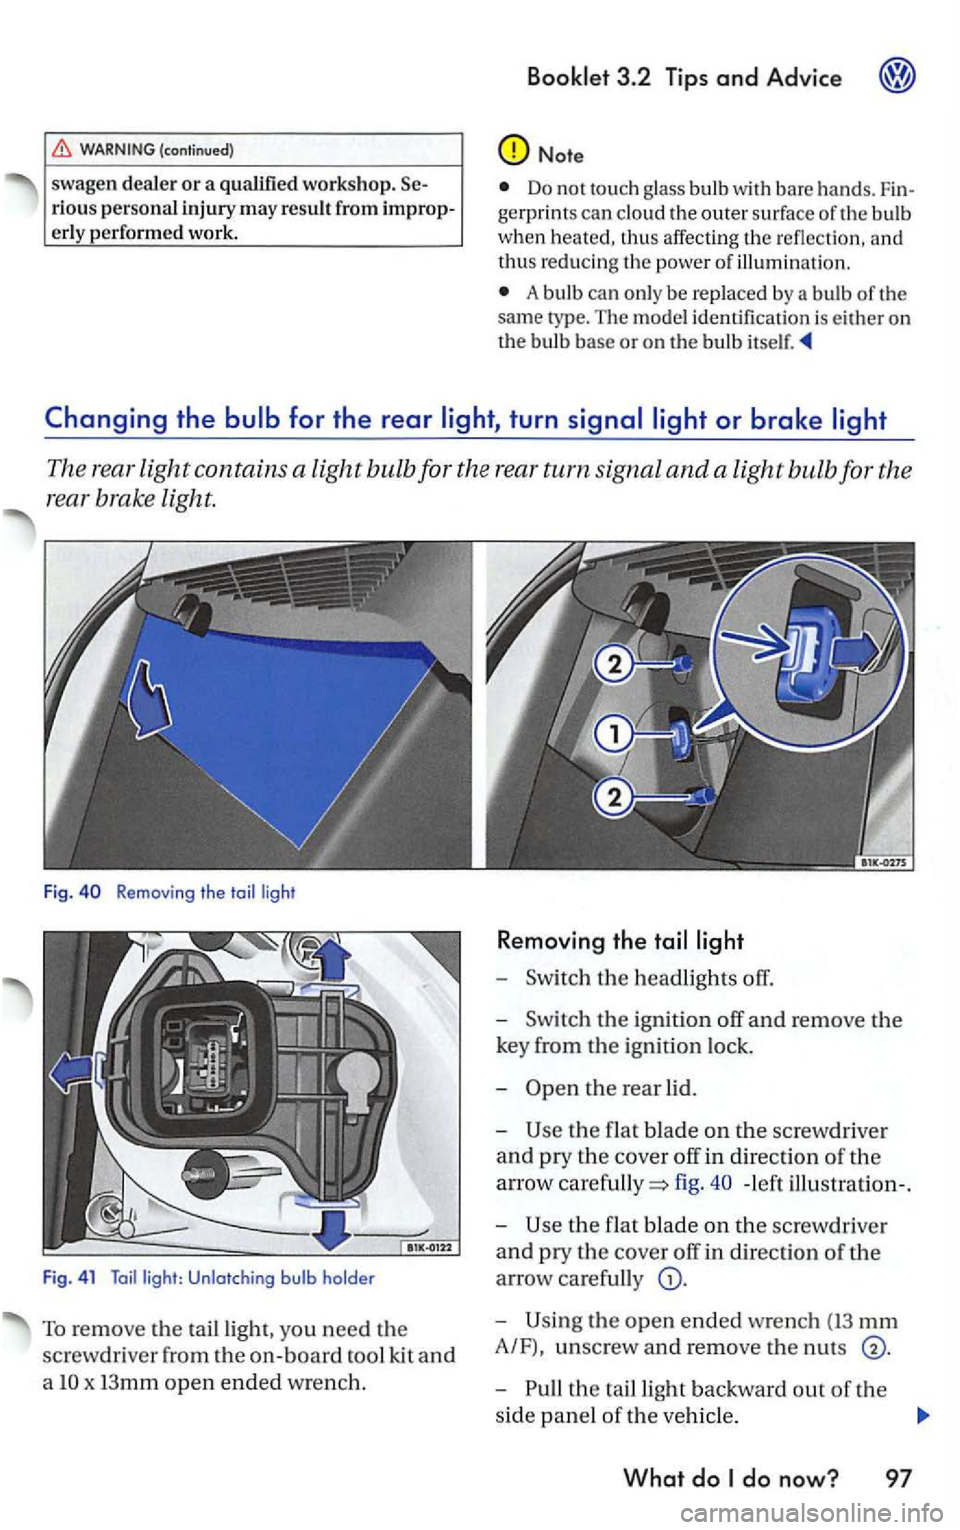
The rear light contains a light bulb fo r the rear turn signal and a light bulb for the
rea r brake light.
Fig . Removing the toi l ligh t
F ig . 4 1
Toil light: Unlotching bulb holde r
To remov e the tailligh t, yo u need the
screwdr iver from th e
on-board tool kit and
a
x I3mm open ended wrench.
R e moving the
-the headlights off.
-the ign ition off and remove the
key from the ignition lock.
-
the flat blade on th e screw driver
and pry the cover off in direction of th e
arrow
fig. - left illu stration-.
-
the f lat b lade on the sc rewdri ver
and pry the cover off in direction of the
arrow carefully
the open ended wrench (13 mm
A/F), unscrew and remo ve the nut s
the ta illight backward out of the
side panel
of th e veh icle .
What do