Page 173 of 687
Downloaded from www.Manualslib.com manuals search engine 3C-20 STEERING WHEEL AND COLUMN
Page 174 of 687

Downloaded from www.Manualslib.com manuals search engine FRONT SUSPENSION 3D-1
6F1
6F2
6G
1A
6K
7A
7A1
3D
7F
8A
8A
8B
8C
8D
8E
9
10
10A
10B
SECTION 3D
FRONT SUSPENSION
CONTENTS
General Description ....................................... 3D-2
4WD Control System .................................... 3D-2
Diagnosis ........................................................ 3D-8
Diagnosis Table ........................................... 3D-8
4WD Controller and ITS Circuit Check ....... 3D-10
4WD Control System Check ...................... 3D-11
Stabilizer bar / bushing check ................ 3D-13
Shock Absorber and/or Coil Spring
Check ......................................................... 3D-14
Leading Arm / Lateral Rod / Steering
Knuckle Check ........................................... 3D-14
Leading Arm Bushing / Lateral Rod
Bushing Check ........................................... 3D-15
Kingpin / Kingpin Bearing Check ................ 3D-15
Barfield Joint Check ................................... 3D-15
Steering Knuckle Seal Check ..................... 3D-15
Wheel Disc, Nut and Bearing Check .......... 3D-16On-Vehicle Service ...................................... 3D-17
Stabilizer Bar / Bushings ............................ 3D-17
Front Shock Absorber ................................ 3D-19
Coil Spring ................................................. 3D-19
Bump Stopper and Spring Upper Seat ...... 3D-21
Wheel Hub / Bearing / Oil Seal .................. 3D-21
Steering Knuckle / Wheel Spindle.............. 3D-28
Front Axle Shaft / Oil Seal / Kingpin
Bearing Outer Race ................................... 3D-32
Steering Knuckle Seal................................ 3D-34
Lateral Rod ................................................ 3D-35
Leading Arm / Bushing............................... 3D-36
Front Axle Housing .................................... 3D-38
Tightening Torque Specifications .............. 3D-44
Required Service Material ........................... 3D-44
Special Tool .................................................. 3D-45
WARNING:
When hoisting vehicle, be sure to select the lifting point suitable for the service work referring to Sec-
tion 0A.
NOTE:
All front suspension fasteners are an important attaching part in that it could affect the performance
of vital parts and systems, and/or could result in major repair expense. They must be replaced with
one of the same part number or with an equivalent part if replacement becomes necessary. Do not
use a replacement part of lesser quality or substitute design. Torque values must be used as speci-
fied during reassembly to assure proper retention of this part.
Never attempt to heat, quench or straighten any front suspension part. Replace it with a new part or
damage to the part may result.
Page 175 of 687
Downloaded from www.Manualslib.com manuals search engine 3D-2 FRONT SUSPENSION
General Description
4WD Control System
The 4WD control system consists of a 4WD switch, a vacuum switch, a vacuum tank, two vacuum switching
valves (VSV1 and VSV2) and air locking hub assemblies.
The 4WD controller controls locking or unlocking of the air locking hub according to operation of the transfer shift
control lever.
Vacuum generated in the intake manifold passes through the check valve and stored in the vacuum tank.
According to signals from the 4WD switch, the 4WD controller activates VSV1 (for unlocking) or VSV2 (for lock-
ing) to apply vacuum from the vacuum tank so that the front axle and the wheel hub are disengaged or engaged.
1. Front axle housing 3. Steering knuckle 5. Wheel spindle 7. Wheel bearing
2. Shock absorber 4. Kingpin 6. Wheel hub 8. Front axle shaft (4WD)
Page 176 of 687
Downloaded from www.Manualslib.com manuals search engine FRONT SUSPENSION 3D-3
1. Air locking hub assembly 4. VSV2 7. 4WD controller 10. 4WD indicator light 13. ABS controller
2. VSV1 5. Vacuum accumulation tank 8. Intake manifold 11. 4WD switch 14. Transfer
3. Check valve 6. Vacuum switch 9. Wheel spindle 12. Combination meter
Page 179 of 687

Downloaded from www.Manualslib.com manuals search engine 3D-6 FRONT SUSPENSION
OPERATION
2WD
→ 4WD
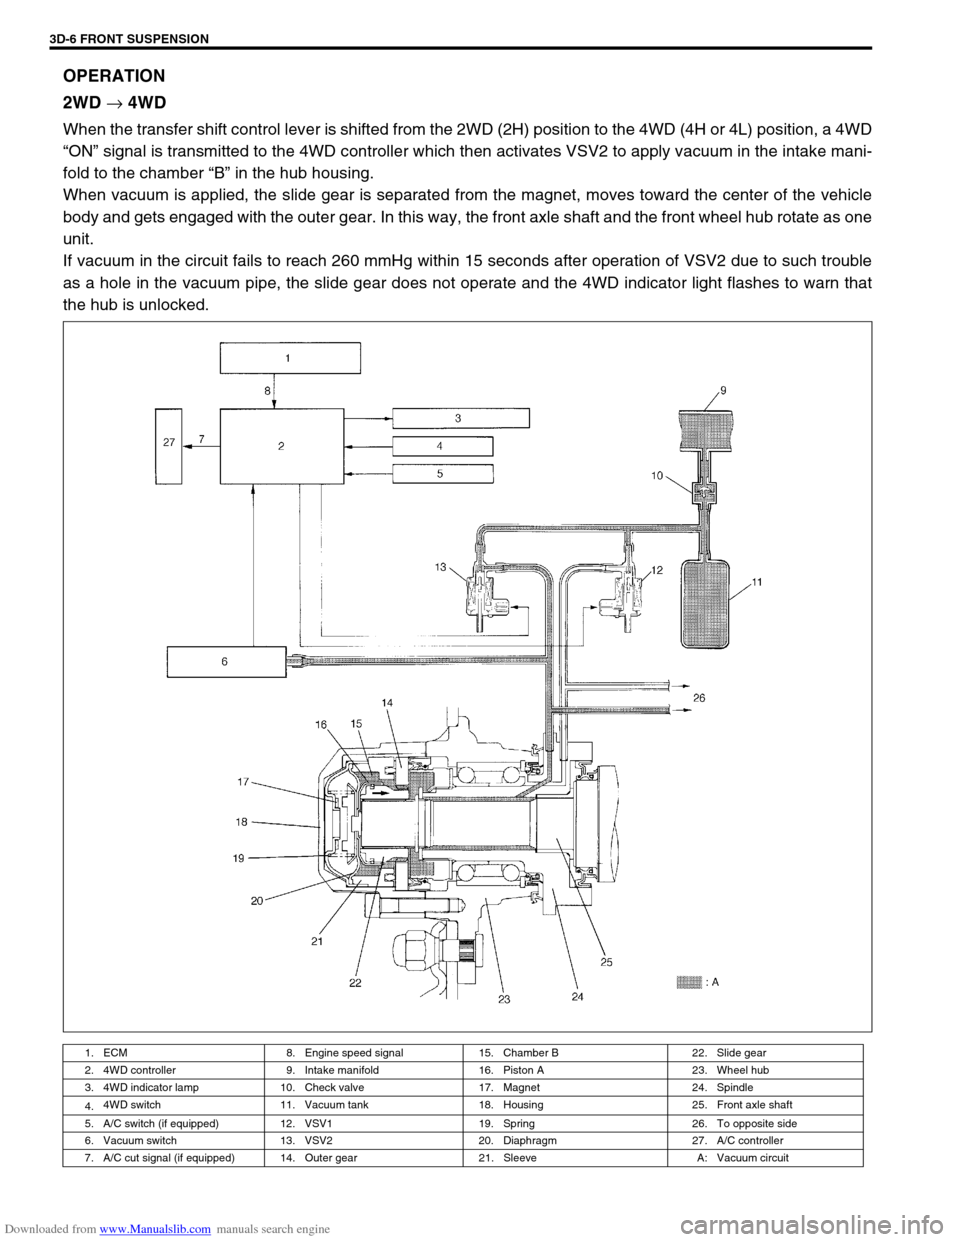
When the transfer shift control lever is shifted from the 2WD (2H) position to the 4WD (4H or 4L) position, a 4WD
“ON” signal is transmitted to the 4WD controller which then activates VSV2 to apply vacuum in the intake mani-
fold to the chamber “B” in the hub housing.
When vacuum is applied, the slide gear is separated from the magnet, moves toward the center of the vehicle
body and gets engaged with the outer gear. In this way, the front axle shaft and the front wheel hub rotate as one
unit.
If vacuum in the circuit fails to reach 260 mmHg within 15 seconds after operation of VSV2 due to such trouble
as a hole in the vacuum pipe, the slide gear does not operate and the 4WD indicator light flashes to warn that
the hub is unlocked.
1. ECM 8. Engine speed signal 15. Chamber B 22. Slide gear
2. 4WD controller 9. Intake manifold 16. Piston A 23. Wheel hub
3. 4WD indicator lamp 10. Check valve 17. Magnet 24. Spindle
4.4WD switch 11. Vacuum tank 18. Housing 25. Front axle shaft
5. A/C switch (if equipped) 12. VSV1 19. Spring 26. To opposite side
6. Vacuum switch 13. VSV2 20. Diaphragm 27. A/C controller
7. A/C cut signal (if equipped) 14. Outer gear 21. Sleeve A: Vacuum circuit
Page 180 of 687
Downloaded from www.Manualslib.com manuals search engine FRONT SUSPENSION 3D-7
4WD
→ 2WD
When the transfer shift control lever is shifted from the 4WD (4H or 4L) to the 2WD (2H) position, the 4WD con-
troller activates VSV1 and the intake manifold vacuum is applied to the chamber “A” in the hub housing. As the
slide gear is shifted to the wheel side by the vacuum force and disengaged from the outer gear, rotation of the
front wheel hub is not transmitted to the front axle shaft.
1. EPI & A/C controller 8. Engine speed signal 15. Chamber A 22. Slide gear
2. 4WD controller 9. Intake manifold 16. Piston A 23. Wheel hub
3. 4WD indicator lamp 10. Check valve 17. Magnet 24. Spindle
4.4WD switch 11. Vacuum tank 18. Housing 25. Front axle shaft
5. A/C switch (if equipped) 12. VSV1 19. Spring 26. To opposite side
6. Vacuum switch 13. VSV2 20. Diaphragm 27. A/C controller
7. A/C cut signal (if equipped) 14. Outer gear 21. Sleeve A: Vacuum circuit
Page 188 of 687

Downloaded from www.Manualslib.com manuals search engine FRONT SUSPENSION 3D-15
Leading Arm Bushing / Lateral Rod Bushing
Check
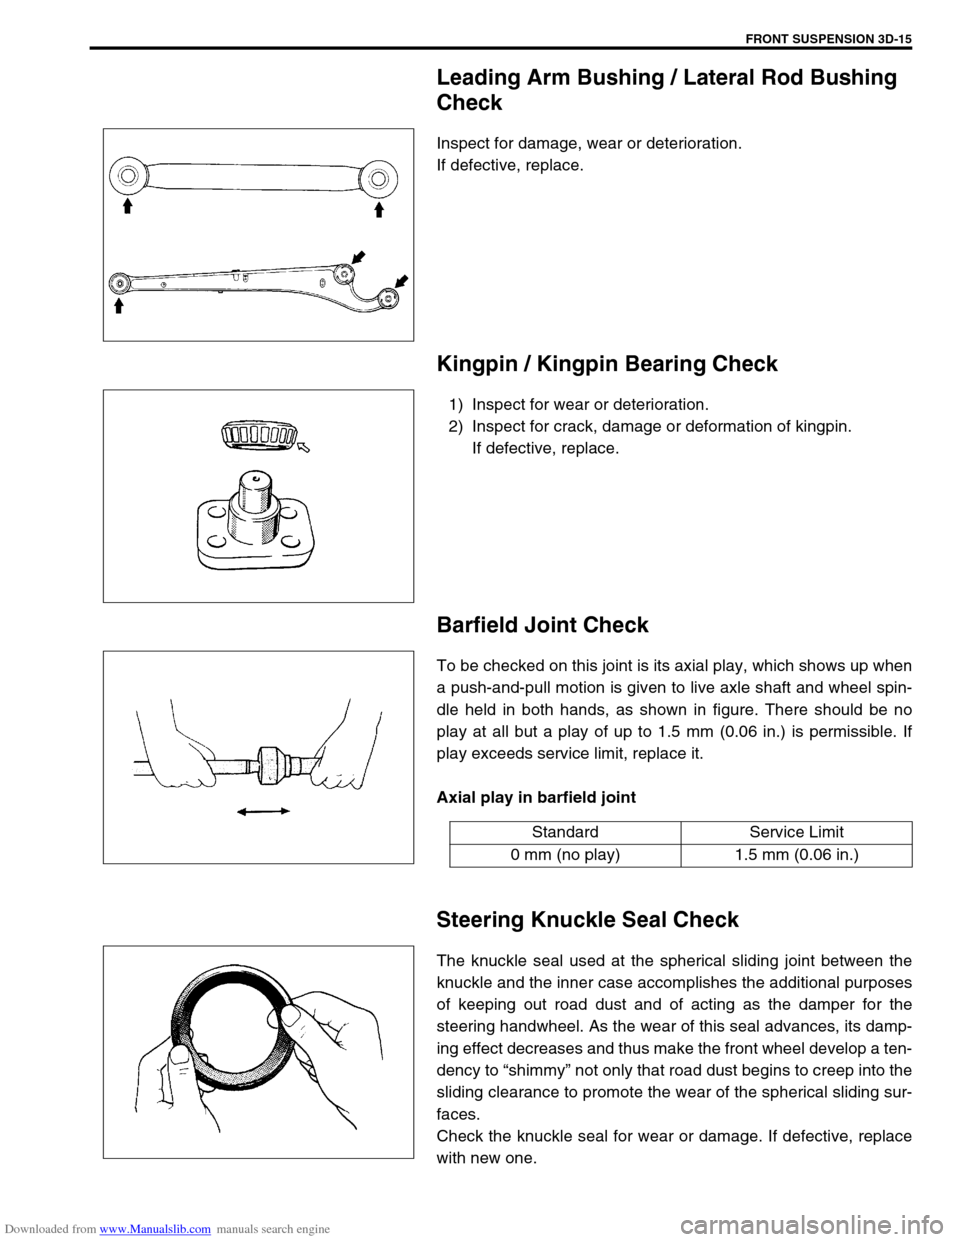
Inspect for damage, wear or deterioration.
If defective, replace.
Kingpin / Kingpin Bearing Check
1) Inspect for wear or deterioration.
2) Inspect for crack, damage or deformation of kingpin.
If defective, replace.
Barfield Joint Check
To be checked on this joint is its axial play, which shows up when
a push-and-pull motion is given to live axle shaft and wheel spin-
dle held in both hands, as shown in figure. There should be no
play at all but a play of up to 1.5 mm (0.06 in.) is permissible. If
play exceeds service limit, replace it.
Axial play in barfield joint
Steering Knuckle Seal Check
The knuckle seal used at the spherical sliding joint between the
knuckle and the inner case accomplishes the additional purposes
of keeping out road dust and of acting as the damper for the
steering handwheel. As the wear of this seal advances, its damp-
ing effect decreases and thus make the front wheel develop a ten-
dency to “shimmy” not only that road dust begins to creep into the
sliding clearance to promote the wear of the spherical sliding sur-
faces.
Check the knuckle seal for wear or damage. If defective, replace
with new one.
Standard Service Limit
0 mm (no play) 1.5 mm (0.06 in.)
Page 189 of 687
Downloaded from www.Manualslib.com manuals search engine 3D-16 FRONT SUSPENSION
Wheel Disc, Nut and Bearing Check
1) Inspect each wheel disc for dents, distortion and cracks.
Disc in badly damaged condition must be replaced.
2) Check wheel nuts for tightness and as necessary, retighten
them to specification.
Tightening torque
Wheel nuts
(a) : 95 N·m (9.5 kg-m, 69.0 lb-ft)
3) Check wheel bearing for wear. After retightening lock nut to
specified torque, apply dial gauge to wheel hub center and
measure thrust play.
Wheel bearing thrust play limit
: 0.05 mm (0.002 in)
When measurement exceeds limit, replace bearing.
4) By rotating wheel actually, check wheel bearing for noise and
smooth rotation. If defective, replace bearing.