2005 SUBARU FORESTER engine
[x] Cancel search: enginePage 194 of 477
4-13
Climate control
– CONTINUED –
NOTE
With the fan speed control dial in the AUTO posi-
tion and the air flow control dial in the “ ”,
“ ”, or “ ” position, the fan does not oper-
ate during engine warmup until the engine coolant
temperature exceeds approx. 122 °F (50 °C).
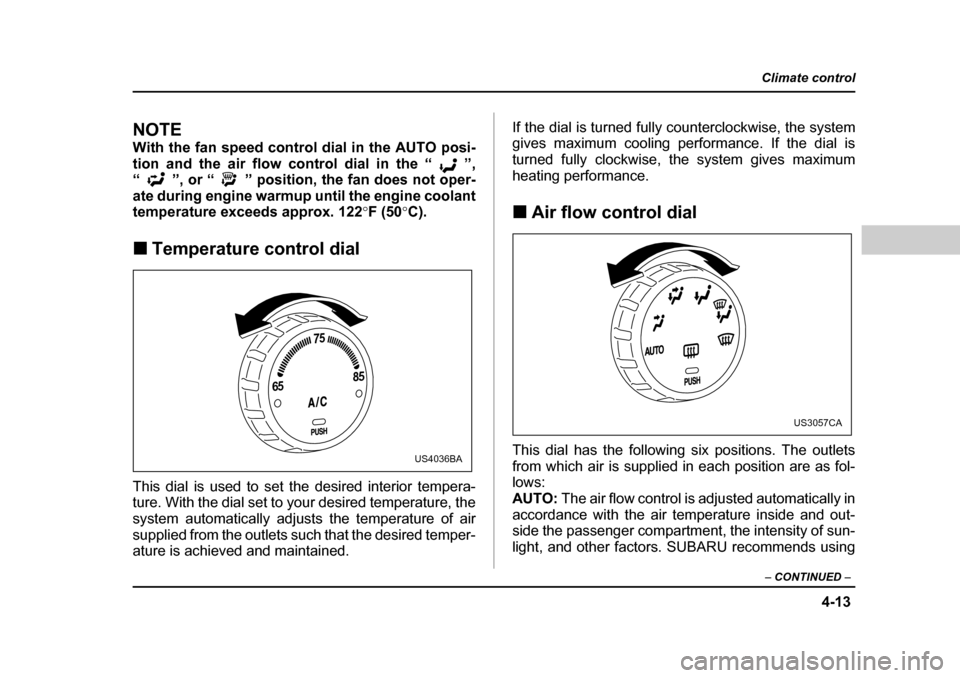
�„ Temperature control dial
This dial is used to set the desired interior tempera-
ture. With the dial set to your desired temperature, the
system automatically adjusts the temperature of air
supplied from the outlets such that the desired temper-
ature is achieved and maintained. If the dial is turned fully counterclockwise, the system
gives maximum cooling performance. If the dial is
turned fully clockwise, the system gives maximum
heating performance. �„
Air flow control dial
This dial has the following six positions. The outlets
from which air is supplied in each position are as fol-
lows:AUTO: The air flow control is adjusted automatically in
accordance with the air temperature inside and out-
side the passenger compartment, the intensity of sun-
light, and other factors. SUBARU recommends using
65 75
85
US4036BA
US3057CA
Page 199 of 477
4-18
Climate control
�„
Cooling and dehumidifying in high hu-
midity and low temperature weather
conditions
Under certain weather conditions (high relative humid-
ity, low temperatures, etc.) a small amount of water
vapor emission from the air outlets may be noticed.
This condition is normal and does not indicate any
problem with the air conditioning system. �„ Air conditioner compressor shut-off
when engine is heavily loaded
To improve acceleration and gas mileage, the air con-
ditioner compressor is designed to temporarily shut off
during air conditioner operation whenever the acceler-
ator is fully depressed such as during rapid accelera-
tion or when driving on a steep upgrade. �„ Refrigerant for your climate control
system
Your air conditioner uses ozone friendly refrigerant
HFC134a. Therefore, the method of adding, changing
or checking the refrigerant is different from the method
for CFC12 (freon). Consult your SUBARU dealer for
service. Repairs needed as a result of using the wrong
refrigerant are not covered under warranty.Air filtration system (if equipped)
If your vehicle’s air conditioning system is equipped
with an air filtration system, replace the filter element
according to the replacement schedule shown below.
This schedule should be followed to maintain the fil-
ter’s dust collection ability. Under extremely dusty con-
ditions, the filter should be replaced more frequently. It
is recommended that you have your filter checked or
replaced by your SUBARU dealer. For replacement,
use only a genuine SUBARU air filter kit.
Replacement schedule:
Every 12 months or 7,500 miles (12,000 km) whichev-
er comes first
Page 245 of 477
6-10
Interior equipment
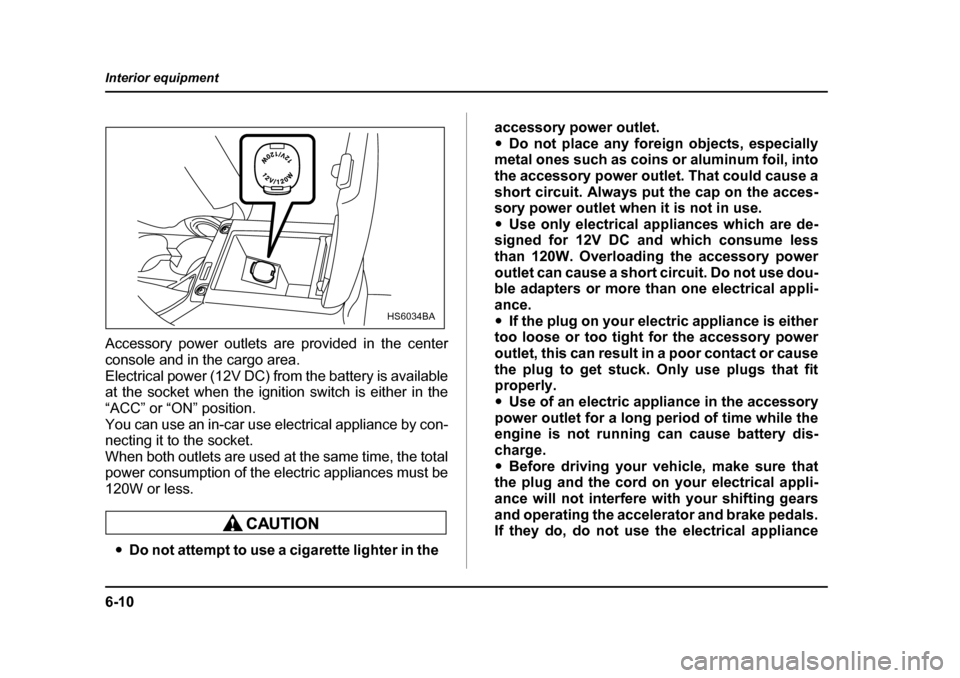
Accessory power outlets are provided in the center
console and in the cargo area.
Electrical power (12V DC) from the battery is available
at the socket when the ignition switch is either in the
“ACC” or “ON” position.
You can use an in-car use electrical appliance by con-
necting it to the socket.
When both outlets are used at the same time, the total
power consumption of the electric appliances must be
120W or less.
�y
Do not attempt to use a cigarette lighter in the accessory power outlet. �y
Do not place any foreign objects, especially
metal ones such as coins or aluminum foil, into
the accessory power outlet. That could cause a
short circuit. Always put the cap on the acces-
sory power outlet when it is not in use. �y Use only electrical appliances which are de-
signed for 12V DC and which consume less
than 120W. Overloading the accessory power
outlet can cause a short circuit. Do not use dou-
ble adapters or more than one electrical appli-
ance. �y If the plug on your electric appliance is either
too loose or too tight for the accessory power
outlet, this can result in a poor contact or cause
the plug to get stuck. Only use plugs that fit
properly.�y Use of an electric appliance in the accessory
power outlet for a long period of time while the
engine is not running can cause battery dis-
charge. �y Before driving your vehicle, make sure that
the plug and the cord on your electrical appli-
ance will not interfere with your shifting gears
and operating the accelerator and brake pedals.
If they do, do not use the electrical appliance
HS6034BA
Page 248 of 477
6-13
Interior equipment
– CONTINUED –
Do not hold the lighter pushed in, because it
will overheat.
�„ Using as an accessory power outlet
Electrical power (12V DC) from the battery is available
at the socket when the ignition switch is either in the
“ACC” or “ON” position.
If you use the socket as an accessory power outlet,
take the following precautions.
When the socket is not in use, always put the cap on
the socket to prevent any foreign object from entering
it.
�y Use only in-car use electrical appliances
which are designed for 12V DC and which con-
sume less than 120W. Overloading the socket
can cause a short circuit. Do not use double
adapters or more than one electrical appliance. �y If the plug on your electric appliance is either
too loose or too tight for the socket, this can re-
sult in a poor contact or cause the plug to get
stuck. Only use plugs that fit properly. �y
Use of an electric appliance in the socket for
a long period of time while the engine is not
running can cause battery discharge. �y Before driving your vehicle, make sure that
the plug and the cord on your electrical appli-
ance will not interfere with your shifting gears
and operating the accelerator and brake pedals.
If they do, do not use the electrical appliance
while driving.
If the socket has been used for electrical appliances,
damage may have been done to the internal mecha-
nism that causes a cigarette lighter to “pop out” after
its element has been heated. For that reason, a ciga-
rette lighter, even if it is a genuine part, should not be
used in the socket. If you want to use the socket for a
cigarette lighter again, or to protect your purchaser be-
fore you sell your vehicle, have your SUBARU dealer
replace the socket with a new one.
Page 258 of 477

7-1
7
Starting and operating
Fuel ................................................................ 7-2 Fuel requirements ............................................. 7-2
Fuel filler lid and cap ........................................ 7-4
State emission testing (U.S. only) ............... 7-7
Preparing to drive ......................................... 7-9
Starting the engine ....................................... 7-9 Manual transmission vehicle ........................... 7-9
Automatic transmission vehicle ...................... 7-10
Stopping the engine ..................................... 7-12
Manual transmission .................................... 7-12 Shifting speeds ................................................. 7-13
Driving tips ........................................................ 7-14
Automatic transmission ............................... 7-15 Selector lever for automatic transmission ..... 7-16
Shift lock release .............................................. 7-20
Rear viscous limited slip differential (LSD) (if equipped) .................................... 7-21
Power steering .............................................. 7-21
Braking .......................................................... 7-22 Braking tips ....................................................... 7-22
Brake system ..................................................... 7-22
Disc brake pad wear warning indicators ........ 7-23
ABS (Anti-lock Brake System) .................... 7-23 ABS system self-check .................................... 7-24
ABS warning light ............................................. 7-24
Electronic Brake Force Distribution (EBD) system (if equipped) ...................... 7-26Steps to take if EBD system fails .................... 7-26 Vehicle Dynamics Control system
(if equipped) ............................................... 7-28Vehicle Dynamics Control system monitor .... 7-30
Vehicle Dynamics Control OFF switch ........... 7-33
Parking your vehicle ..................................... 7-34 Parking brake .................................................... 7-34
Parking tips ....................................................... 7-34
Hill holder (for manual transmission – if equipped) ................................................ 7-36
Cruise control (if equipped) ......................... 7-38 To set cruise control ........................................ 7-38
To temporarily cancel the cruise control ....... 7-40
To turn off the cruise control ........................... 7-41
To change the cruising speed ......................... 7-41
Self-leveling rear suspension (if equipped) ............................................... 7-43
Page 259 of 477
7-2
Starting and operating
Starting and operatingFuel
Use of a fuel which is low in quality or use of an
inappropriate fuel additive may cause engine
damage.
�„ Fuel requirements
�T Non-turbo models
The 2.5-liter engine is designed to operate using un-
leaded gasoline with an octane rating of 87 AKI or
higher. �T Turbo models
The 2.5-liter turbo engine is designed to operate using
premium unleaded gasoline with an octane rating of
91 AKI or higher. If premium unleaded gasoline is not
available, regular unleaded gasoline with an octane
rating of 87 AKI or higher may be temporarily used.
For optimum engine performance and driveability, it is
required that you use premium grade unleaded gaso-
line. �T
Fuel octane rating
This octane rating is the average of the Research Oc-
tane and Motor Octane numbers and is commonly re-
ferred to as the Anti Knock Index (AKI).
Using a gasoline with a lower octane rating can cause
persistent and heavy knocking, which can damage the
engine. Do not be concerned if your vehicle some-
times knocks lightly when you drive up a hill or when
you accelerate. See your dealer or a qualified service
technician if you use a fuel with the specified octane
rating and your vehicle knocks heavily or persistently. �T Unleaded gasoline
The neck of the fuel filler pipe is designed to accept
only an unleaded gasoline filler nozzle. Under no cir-
cumstances should leaded gasoline be used because
it will damage the emission control system and may
impair driveability and fuel economy. �T Gasoline for California-certified LEV
Your vehicle was certified to California’s low emission
vehicle (LEV) standards as indicated on the under-
hood tune-up label. It is designed to optimize engine
and emission performance with gasoline that meets
the clean burning low-sulfur California gasoline speci-
fications. If you live in any other state than California,
your vehicle will operate on gasoline meeting Federal
specifications. Gasoline sold outside California is per-
Page 260 of 477

7-3
Starting and operating
– CONTINUED –
mitted to have higher sulfur levels, which may affect
the performance of your vehicle’s catalytic converter
and may produce a sulfur exhaust odor or smell.
SUBARU recommends that you try a different brand of
unleaded gasoline having lower sulfur to determine if
the problem is fuel related before returning your vehi-
cle to an authorized dealer for service. �TMMT
Some gasoline contains an octane-enhancing additive
called MMT (Methylcyclopentadienyl Manganese Tri-
carbonyl). If you use such fuels, your emission control
system performance may deteriorate and the CHECK
ENGINE warning light/Malfunction indicator lamp may
turn on. If this happens, return to your authorized
SUBARU Dealer for service. If it is determined that the
condition is caused by the type of fuel used, repairs
may not be covered by your warranty. �T Gasoline for cleaner air
Your use of gasoline with detergent additives will help
prevent deposits from forming in your engine and fuel
system. This helps keep your engine in tune and your
emission control system working properly, and is a
way of doing your part for cleaner air. If you continu-
ously use a high quality fuel with the proper detergent
and other additives, you should never need to add any
fuel system cleaning agents to your fuel tank. Many gasolines are now blended with materials called
oxygenates. Use of these fuels can also help keep the
air cleaner. Oxygenated blend fuels, such as MTBE
(Methyl Tertiary Butyl ether) or ethanol (ethyl or grain
alcohol) may be used in your vehicle, but should con-
tain no more than 15% MTBE or 10% ethanol for the
proper operation of your SUBARU.
In addition, some gasoline suppliers are now produc-
ing reformulated gasolines, which are designed to re-
duce vehicle emissions. SUBARU approves the use of reformulated gasoline.
If you are not sure what the fuel contains, you should
ask your service station operators if their gasolines
contain detergents and oxygenates and if they have
been reformulated to reduce vehicle emissions.
As additional guidance, only use fuels suited for your
vehicle as explained below.�y
Fuel should be unleaded and have an octane rating
no lower than that specified in this manual.�y Methanol (methyl or wood alcohol) is sometimes
mixed with unleaded gasoline. Methanol can be used
in your vehicle ONLY if it does not exceed 5% of the
fuel mixture AND if it is accompanied by sufficient
quantities of the proper cosolvents and corrosion in-
hibitors required to prevent damage to the fuel system.
Do not use fuel containing methanol EXCEPT under
Page 262 of 477
7-5
Starting and operating
– CONTINUED –
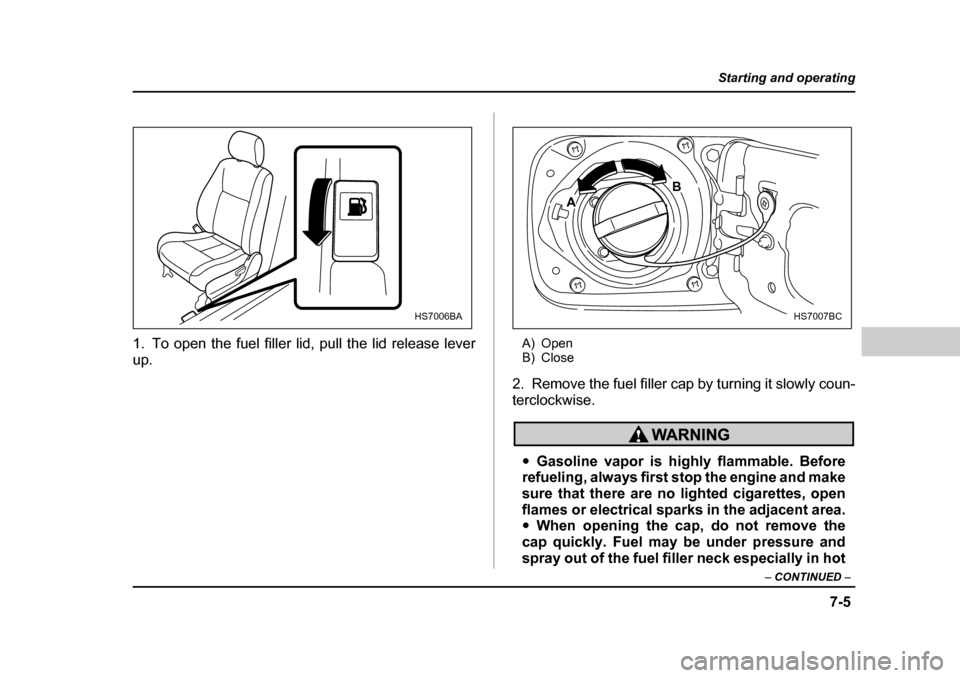
1. To open the fuel filler lid, pull the lid release lever
up. A) Open
B) Close
2. Remove the fuel filler cap by turning it slowly coun-
terclockwise.
�y Gasoline vapor is highly flammable. Before
refueling, always first stop the engine and make
sure that there are no lighted cigarettes, open
flames or electrical sparks in the adjacent area. �y When opening the cap, do not remove the
cap quickly. Fuel may be under pressure and
spray out of the fuel filler neck especially in hot
HS7006BA
A B
HS7007BC