Page 249 of 469

7-14
Starting and operating
pery surface can lead to wheel locking; as a
consequence, control of the vehicle may be lost
and the risk of an accident increased.
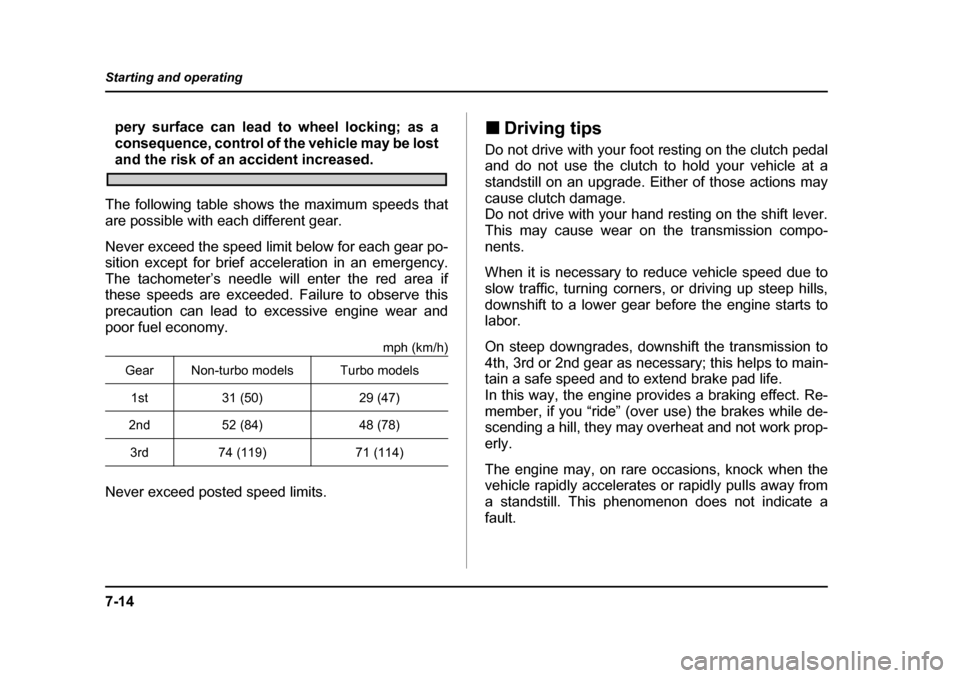
The following table shows the maximum speeds that
are possible with each different gear.
Never exceed the speed limit below for each gear po-
sition except for brief acceleration in an emergency.
The tachometer’s needle will enter the red area if
these speeds are exceeded. Failure to observe this
precaution can lead to excessive engine wear and
poor fuel economy. mph (km/h)
Never exceed posted speed limits. �„
Driving tips
Do not drive with your foot resting on the clutch pedal
and do not use the clutch to hold your vehicle at a
standstill on an upgrade. Either of those actions may
cause clutch damage.
Do not drive with your hand resting on the shift lever.
This may cause wear on the transmission compo-
nents.
When it is necessary to reduce vehicle speed due to
slow traffic, turning corners, or driving up steep hills,
downshift to a lower gear before the engine starts to
labor.
On steep downgrades, downshift the transmission to
4th, 3rd or 2nd gear as necessary; this helps to main-
tain a safe speed and to extend brake pad life.
In this way, the engine provides a braking effect. Re-
member, if you “ride” (over use) the brakes while de-
scending a hill, they may overheat and not work prop-
erly.
The engine may, on rare occasions, knock when the
vehicle rapidly accelerates or rapidly pulls away from
a standstill. This phenomenon does not indicate a
fault.
Gear Non-turbo models Turbo models
1st 31 (50) 29 (47)
2nd 52 (84) 48 (78)
3rd 74 (119) 71 (114)
Page 250 of 469

7-15
Starting and operating
– CONTINUED –
Automatic transmission (Non-turbo
models)
Do not shift from the “P” or “N” position into
the “D”, “3”, “2”, “1” or “R” position while de-
pressing the accelerator pedal. This may cause
the vehicle to jump forward or backward.
�yShift into the “P” or “R” position only after
the vehicle is completely stopped. Shifting
while the vehicle is moving may cause damage
to the transmission.�y Do not race the engine for more than five sec-
onds in any position except the “N” or “P” po-
sition when the brake is set or the tires are on
blocks. This may cause the automatic transmis-
sion fluid to overheat. �y Avoid shifting from one of the forward driving
positions into the “R” position or vice versa un-
til the vehicle has completely stopped. Such
shifting may cause damage to the transmis-
sion.
The automatic transmission is electronically controlled
and provides 4 forward speeds and 1 reverse speed.
NOTE
Immediately after a disconnected battery is recon-
nected or ATF (automatic transmission fluid) is re-
placed, you may feel that the automatic transmis-
sion operation is somewhat unusual.
This results from erasure or invalidation of data
the on-board computer has collected and stored in
memory to allow the transmission to shift at the
most appropriate times for the current condition
of your vehicle. Optimized shifting will be restored
as the vehicle continues to be driven for a while.
Page 276 of 469

7-41
Starting and operating
– CONTINUED –
press the control lever downward in the “SET,
COAST” direction once. Now the desired speed is set
and the vehicle will keep running at that speed without
depressing the accelerator pedal. �„Cruise control set indicator light
�T Non-turbo models
The light comes on when vehicle speed has been set. �T Turbo models
The Cruise set indicator light comes on when the igni-
tion switch is turned to the “ON” position and goes out
after about three seconds.
The light comes on when vehicle speed has been set.
NOTE �y If you move the cruise control lever while turn-
ing the ignition switch “ON”, the cruise control
function is deactivated and the cruise control set
indicator light flashes. To reactivate the cruise
control function, turn the ignition switch back to
the “ACC” or “LOCK” position, and then turn it
again to the “ON” position.�y If this indicator light and the “ ” indicator
light flash simultaneously during driving, have the
vehicle checked by your nearest SUBARU dealer.
Page 352 of 469

11 - 1
11
Maintenance and service
Maintenance schedule ................................. 11-3
Maintenance precautions ............................ 11-3 Before checking or servicing in the engine compartment .................................................. 11-4
When you do checking or servicing in the engine compartment while the engine is
running ............................................................ 11-5
Engine hood .................................................. 11-5
Engine compartment overview ................... 11-8 Non-turbo models ............................................. 11-8
Turbo models .................................................... 11-9
Engine oil ...................................................... 11-10 Checking the oil level ....................................... 11-10
Changing the oil and oil filter .......................... 11-12
Recommended grade and viscosity ................ 11-15
Recommended grade and viscosity under severe driving conditions .............................. 11-16
Cooling system ............................................. 11-17 Hose and connections ...................................... 11-18
Engine coolant .................................................. 11-18
Air cleaner element ...................................... 11-23 Replacing the air cleaner element ................... 11-23
Spark plugs ................................................... 11-25 Recommended spark plugs ............................. 11-26
Drive belts ..................................................... 11-26
Manual transmission oil ............................... 11-27 Checking the oil level ....................................... 11-27
Recommended grade and viscosity ................ 11-28
Automatic transmission fluid ...................... 11-29 Checking the fluid level .................................... 11-29
Recommended fluid ......................................... 11-31
Front differential gear oil (AT vehicles) ...... 11-32 Checking the oil level ....................................... 11-32
Recommended grade and viscosity ............... 11-32
Rear differential gear oil ............................... 11-33 Checking the gear oil level .............................. 11-33
Recommended grade and viscosity ............... 11-35
Power steering fluid ...................................... 11-36 Checking the fluid level .................................... 11-36
Recommended fluid ......................................... 11-37
Brake fluid ..................................................... 11-38 Checking the fluid level .................................... 11-38
Recommended brake fluid ............................... 11-39
Clutch fluid (MT vehicles) ............................ 11-39 Checking the fluid level .................................... 11-39
Recommended clutch fluid .............................. 11-40
Brake booster ................................................ 11-41
Brake pedal .................................................... 11-41 Checking the brake pedal free play ................ 11-41
Checking the brake pedal reserve distance ... 11-42
Clutch pedal (Manual transmission vehicles) ............... 11-42Checking the clutch function .......................... 11-42
Checking the clutch pedal free play ............... 11-43
Replacement of brake pad and lining ......... 11-43 Breaking-in of new brake pads and linings .... 11-44
Parking brake stroke .................................... 11-45
Tires and wheels ........................................... 11-45
Page 362 of 469
11-11
Maintenance and service
– CONTINUED –
Non-turbo models
1) Notch
2) Upper level
3) Lower level Turbo models
1) Notch
2) Upper level
3) Lower level
4. Pull out the dipstick again and check the oil level on
it. If it is below the lower level, add oil to bring the level
up to the upper level.
Use only engine oil with the recommended
grade and viscosity.
1 2
3
UGB081BB
1 2
3
UGB082BB
Page 374 of 469

11 -2 3
Maintenance and service
– CONTINUED –
Air cleaner element
Do not operate the engine with the air cleaner
element removed. The air cleaner element not
only filters intake air but also stops flames if the
engine backfires. If the air cleaner element is
not installed when the engine backfires, you
could be burned.
The air cleaner element functions as a filter screen.
When the element is perforated or removed, engine
wear will be excessive and engine life shortened.
The air cleaner element is a viscous type. It is unnec-
essary to clean or wash the element. �„ Replacing the air cleaner element
�T Non-turbo models
Replace the air cleaner element according to the
maintenance schedule in the “Warranty and Mainte-
nance Booklet”. Under extremely dusty conditions, re-
place it more frequently. It is recommended that you
always use genuine SUBARU parts.
0
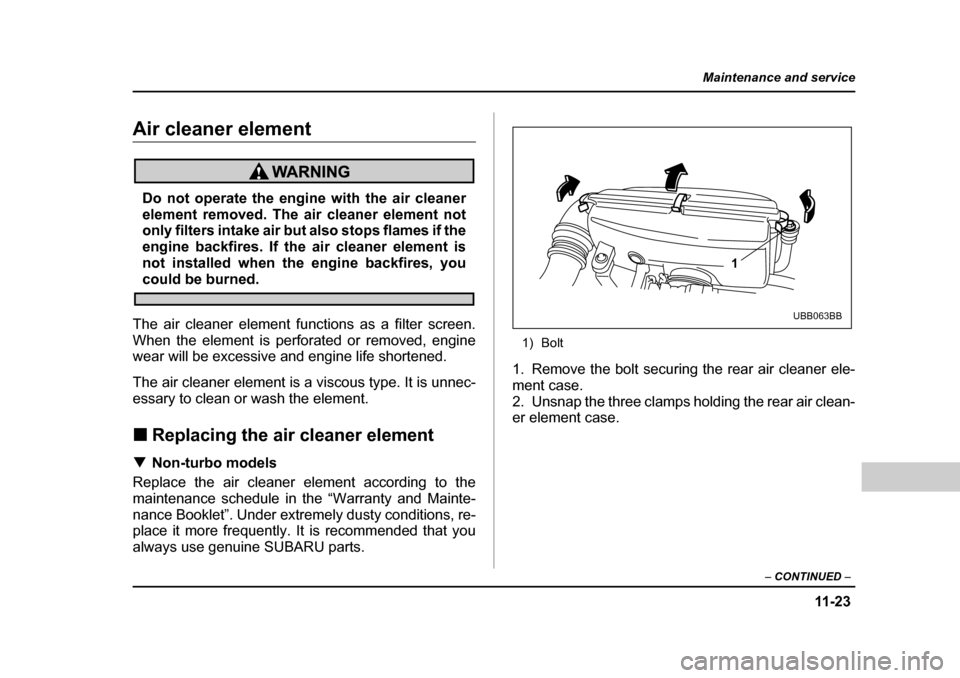
1) Bolt
1. Remove the bolt securing the rear air cleaner ele- ment case.
2. Unsnap the three clamps holding the rear air clean-
er element case.
1
UBB063BB
Page 377 of 469
11 - 2 6
Maintenance and service
The spark plugs should be replaced according to the
maintenance schedule in the “Warranty and Mainte-
nance Booklet”. �„
Recommended spark plugs
Non-turbo models:
RC10YC4 (Champion)
BKR6E-11 (NGK)
BKR5E-11 (NGK)
Turbo models:
ILFR6B (NGK)
Drive belts
The alternator, power steering pump, and air condi-
tioner compressor depend on drive belts. Satisfactory
performance requires that belt tension be correct.
1) Power steering pump pulley
2) Air conditioner compressor pulley
3) Crank pulley
2
3 A
B
1
HSB033BB
Page 379 of 469
11 - 2 8
Maintenance and service
Turbo models
1. Park the vehicle on a level surface and stop the en-
gine.
2. Pull out the dipstick, wipe it clean, and insert it
again. 1) Upper level
2) Lower level
3. Pull out the dipstick again and check the oil level on
it. If it is below the lower level, add oil through the dip-
stick hole to bring the level up to the upper level. �„ Recommended grade and viscosity
Each oil manufacturer has its own base oils and addi-
tives. Never use different brands together.
Oil grade:
API classification GL-5
UGB001JA
L F
F
L1
2 1
2
USB526BB