Page 9 of 50

Radio / CD / Sound
8Radio / CD / SoundRadio Overview
Information is given here on how to select and store stations.The following radio functions are selected via the function k eys:•
– Scans stations or stores those stations with the strongest
reception ⇒
page 8, “Scan/AS”,
•
– Calls up station list or manual frequency input ⇒
page 10,
“Station selection from a list (FM only)”,
•
– Sets the waveband and traf fic radio, mute function
⇒
page 9,
“Setting waveband/Muting”,
•
– Set-up for RDS functions ⇒page 11 Settings.
Scan/AS
The stations with the strongest reception are either scanned
or stored automatically.Playing stations briefly
– Briefly press ⇒
fig. 5 .
Autostore on the second memory level (FM2 or AM2)
– Press for longer than 2 seconds to allocate tho se
stations with the strongest reception in the selected waveban d
(FM2 or AM2) to the upper 6 function keys.
Fig. 4 Radio main menu
Scan/_ASList/_MANBandAjustes
Fig. 5 Autostore AS
Scan/_AS
Scan/_AS
radionaving Seite 8 Mittwo ch, 30. März 2005 12:26 12
Page 10 of 50

– Press for longer than 10 seconds to alloca te those
stations with the strongest reception in all
wavebands to the
uppe")
Radio / CD / Sound9
Autostore for all memory levels (Initial Autostore)
– Press for longer than 10 seconds to alloca te those
stations with the strongest reception in all
wavebands to the
upper 6 function keys.
The selected function will be shown on the screen and can be stopped by
pressing again.
A scan in the FM waveband will play through the lis t of registered stations. A
scan in AM will play all stations with a high quality rec eption. Each station
scan lasts 8 seconds. Press the menu knob or if you would like to
hear the station currently being played.
Note
Use the function “Initial Autostore” if you are using th e unit for the first time
or when selecting new stations in th e waveband. Any station names on the
station buttons will be overwritten. The process of sea rching for and storing
the station names takes a few seconds.
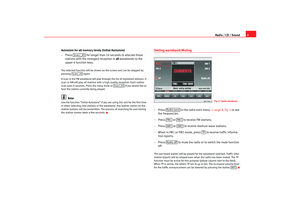
Setting waveband/Muting– Press in the radio main menu ⇒
page 8, fig. 4 to see
the frequencies.
– Press or to receive FM stations.
– Press or to receive medium wave stations.
– When in FM1 or FM2 mode, press to receive traffic informa-
tion reports.
– Press to mute the radio or to switch the mu te function
off.The last heard station will be played for the waveband selected. Traffic infor-
mation reports will be relayed even wh en the radio has been muted. The TP
function must be active for this purp ose (yellow column next to the field).
When TP is active, the letters TP are lit up in red. The increased volume level
for the traffic announce ment can be lowered by pressing the button .
Scan/_ASScan/_AS
Scan/_AS
Fig. 6 Radio waveband
Radio bandFM1
FM2
AM1
AM2
TP
Radio off
INFO
radionaving Seite 9 Mittwo ch, 30. März 2005 12:26 12
Page 11 of 50

The MFD2 radio navigation system will automatically compile
and store a list of receivable FM stations, after the unit is
switched on.�")
Radio / CD / Sound
10Station selection from a list (FM only)
The MFD2 radio navigation system will automatically compile
and store a list of receivable FM stations, after the unit is
switched on.– Press in the radio main menu ⇒ page 8, fig. 4
to see
the stored stations.
– Select a station by turning and pushing the menu knob or by
using the right-hand function keys.
– Select a station from the list by turning and pushing the me nu
knob. You can scroll through several pages of the list u sing the
scroll markers , , and and confirm your selec tion by
pressing .
Station selection from memory or by entering frequencyStation selection from memory
– Briefly press button or to listen to the stored station.
Station selection by entering frequency
– Press the button , ⇒
page 4, fig. 1 or for
longer than 2 seconds. A station frequency in a red frame will
appear in the middle of the screen. The frequency will change as
long as the buttons or are pressed and held.
– For fine tuning, release the button or and press th e buttons
or again within 2 seconds to set the exact frequency.The word manual appears on the screen during the frequency input. Th e
search will start in the direction that you have select ed in steps of
0.1 MHz (FM) or 9 kHz (AM). In this way you can enter a f requency that you
wish to listen to. The frequency can also be altered b y turning the menu
knob.Allocating the stations to the station buttons
Stations can be allocated to the buttons to make it easier to
select them quickly.– Press one of the upper 6 station buttons until you hear a signal
⇒ page 4, fig. 1 . The station you are listening to is now
stored on the button.A total of six stations can be stored on the station bu ttons for each mode;
FM1, FM2 or AM1 or AM2. The short form of the stati on name or the station
Fig. 7 List of stations
List/_MAN
OK
A5
Lista/_MAN
A4
radionaving Seite 10 Mittwoch, 30. März 2005 12:26 12
Page 12 of 50

Radio / CD / Sound11
frequency will appear next to the button. Press one of the buttons if you wish
to listen to one of the stored stations.
Note
The memory on a button will be overwr itten if a new station is stored there.RDS system settings
Some stations transmit text and information in addition to the
station name.– Press in the Radio main menu ⇒
page 8, fig. 4 .Further text information as running text will not be displayed on the screen,
in addition to the station name, for all RDS stations .
A tick
will indicate which options have been selected. Function keys
– fixed : Only appears the station name. variable
: Displays infor-
mation in continous text form.
– Auto : The selected regional programme of a station broa d-
casting over a wide area will continue to be displayed ev en when you enter
the broadcasting area of another regional progr amme of the same station.
⇒ page 42
WARNING
It is very important to always stay alert to the traffic and not b e distracted
with the continous text of the RDS stations.CDListening to an audio CD
Fig. 8 RDS functions
Settings
RDS NameRDS RegionalSystem settings
Fig. 9 Main menu CD
radionaving Seite 11 Mittwoch, 30. März 2005 12 :26 12
Page 13 of 50

Radio / CD / Sound
12
Listening to a CD
– Press the ⇒
page 4, fig. 1 button. If a CD is already in the
player, the last played track will be selected, otherwis e the
following will appear briefly on the screen: “No Audio CD”.
– Insert a standard 12 cm audio CD. The play function will s tart
automatically.
Playing the previous or next track
– Press button or briefly .
Fast forward/reverse
– Press and hold button or .
Ejecting a CD
– Press ⇒
page 4, fig. 1 .The number of the track and its length are shown on the screen.
TMC
lights
up in red when traffic bulletins are desired and TMC
indicates whether TMC
stations are being received ⇒page 11, fig. 9
Function keys during the play function: ... – Selects the corresponding disc of the CD changer
2).
– Plays the disc inserted in the reader.
– All tracks on the CD will be played for 8 seconds at a time.
– The tracks on the CD will be played in a random order .
⇒ page 42
WARNING
The CD player is a class 1 laser product. If it is opened, or i s faulty or
damaged, there is a risk of invisible laser beams escapin g from the unit.
The CD player contains no parts that have to be servic ed. Any repair work
that needs to be done should, therefor e, be carried out by an Official SEAT
Service exclusively.
Caution
•
Only 12 cm standard CDs should be used, avoid 8 cm "single" CDs. Only
round CDs should be inserted in the CD slot. “Spe cial shape CDs”), can not
be played and they will damage the CD player.
•
Slide the CD with the printed side up into the CD slot up t o the point where
it is drawn in automatically. Hold the CD at the sides. A void leaving finger-
prints on the CD. Clean CDs with a dry, lint-free cloth. When doing this, wipe
the CD from the centre outwards. Do not clean the CDs u sing alcohol or
solvents. Do not place the CDs near heat sources or in the direct sunlight. Do
not write on the CDs and do not attach stickers to them.Note
•
The upper 6 function keys are only active if a CD chan ger has been
connected.
•
CD-R and CD-RW formats can also be played, dependi ng on the quality of
the blanks.
•
If the text CD ?
is displayed in the small marking above the /
button, the CD inserted in the CD drive can not be read and may be
damaged.
2)Optional equipment
CD
A8
CD1
CD6
CD int.ScanMixSystem settings
CD6
NAVI
radionaving Seite 12 Mittwoch, 30. März 2005 12 :26 12
Page 14 of 50
Radio / CD / Sound13
Playing a CD from the CD changer
How to use the MFD2 radio navigation system to select a CD
in the CD changer.– Use the function key to select a CD from the chang er.Uneven road surfaces and strong vibrations may cause the CD to jump. The
CD play function should be switched off in this case.
Sound, sound focus and volumeThis section describes how the sound character and the
volume of different sound sources can be set individually.
Fig. 10 CDs currently in
the changer
CD6
Fig. 11 Sound main menuFig. 12 Volume settings
radionaving Seite 13 Mittwoch, 30. März 2005 12 :26 12
Page 15 of 50

Radio / CD / Sound
14
– Press the button ⇒
page 4, fig. 1 to open the Sound main
menu.Function keys in Sound main menu:
or – Treble or Bass settings ⇒
page 13, fig. 11 .
– Volume setting for the mid-range frequencies. – Sound focus setting left / right.
– Sound focus setting front / rear. – Opens the volume set-up where in dividual volume settings can be
made for the different audio sources ⇒
page 13, fig. 12 .
Function keys in the volumes set-up function: – The setting for the sensitivity of the speed-dependent v olume adjust-
ment (GALA). The greater the vehicle speed, more noise i s percieved in the
interior. This system increases the equipment volume h igher or lower
according to the position selected.
– Minimum volume of traffic announcements.
– Minimum volume for telephone conversations.
– Minimum volume for naviga tion system announcements.
– The traffic announcements are mu ted as long as a red bar can be
seen next to the function key.
– Sets the minimum volume for when the unit is switched on.
Note
By pressing buttons ⇒ page 4, fig. 1 , and status button
at the same time, you can reset the MFD2 radio na vigation system to the
factory settings. Appears the message Factory settings. Wait...
.
A3
Treble
Graves
MidBalanceFaderVolum eGALATA -M in .Tel ep h on eNAV-Min.Nav muteInitial volume
A3
TELE
A15
A10
radionaving Seite 14 Mittwoch, 30. März 2005 12 :26 12
Page 16 of 50

Navigation15
NavigationGeneral frameHow does the navigation system work, and how is it operated?
An optimal route is defined us ing sensors, satellites and
traffic reports and the driver is then guided to his or her desti-
nation.The current vehicle position is determined using a sy stem of satellites (GPS -
Global Positioning System). Sensors in the vehicle mea sure distances that
have been driven. Measured values are compar ed using the detailed map
material on the navigation CD and corrected with the assistance of TMC traffic
announcements as necessary. An optima l route to the destination is deter-
mined in this way.
Navigation announcements and direction arrows shown on the screen and in
the combi-instrument* guide you safely and conv eniently to your destination.
You can drive to a given address in towns you are un familiar with, or drive to
the nearest garage or be guided to a hotel.
In this chapter, answers can be found to the following ques tions:•
What rules do I have to keep to when using the navigation system?
⇒ page 16, “Safety”
•
How do I use the navigation CD? ⇒
page 16, “The navigation CD”
•
Can I listen to music when using the navigation syste m? ⇒
page 16,
“General notes”
•
What happens if I leave the recommended route? ⇒
page 16, “General
notes”
•
Can a navigation announcement be repeated? ⇒
page 39, “Announce-
ment of navigation recommendations”
•
How does the MFD2 radio navigation system respond when driving in an
underground car park or a tunnel? ⇒
page 16, “General notes”
•
How do I enter destinations? ⇒page 18, “Destination entry”
•
How can I enter garages, restaurants or hotels as dest inations?
⇒ page 22, “Special destinations close to the addres s”
•
Can I store destinations in a memory? ⇒page 24, “Destination memory”
•
What parameters can I set for route calculation? ⇒
page 27, “Parameters
for route calculation”
•
What can I see on the screen? ⇒
page 32, “Map and symbol displays”
•
Can I stop the route guidance functi on before I reach my destination?
⇒ page 38, “Route guidance”
radionaving Seite 15 Mittwoch, 30. März 2005 12 :26 12