Page 97 of 252

Lights and visibility95
Safety First
Operating instructions
Tips and Maintenance
Te c h n i c a l D a t a
•
Always note the corresponding warnings on ⇒page 180.Caution
In icy conditions, always check that th e wiper blades are not frozen to the
glass before using the wipers for the fi rst time. If you switch on the wipers
when the wiper blades are frozen to the windscreen, you could damage both
the wiper blades and the wiper motor.
Note
•
The windscreen wipers will only work when the ignition is switched on.
•
The heat output of the heated jets* is controlled automatically when the
ignition is switched on, dependi ng upon the outside temperature.
Rain sensor*
The rain sensor controls the frequency of the windscreen
wiper intervals, depending on the amount of rain.Switching on the rain sensor
– Move the windscreen wiper lever into position ⇒fig. 65
– Move the control to the left or right to set the sensitivity of the rain sensor. Switch to the right - high sensitivity. Switch to the
right - low sensitivityThe rain sensor is part of the interval wipe function. You will have to switch on
the rain sensor back on if you switch off the ignition. This is done by switching
the wiper intermittent function off and back on.
WARNING (continued)
Fig. 65 Windscreen wiper
leverA1
AA
ibiza_ingles Seite 95 Mittwoch, 5. Oktober 2005 5:17 17
Page 99 of 252
Lights and visibility97
Safety First
Operating instructions
Tips and Maintenance
Te c h n i c a l D a t a
Headlight washer system
The headlight washers clean the headlight lenses.The headlight washers are activated automatically when the windscreen
washer is used and the windscreen wiper lever is pulled towards the steering
wheel for at least 1.5 seconds – provided the dipped headlights or main
beams are switched on. Clean off stubborn dirt (insects, etc.) from the head-
lights at regular intervals, for instance when filling the fuel tank.
Note
•
To ensure that the headlight washers work properly in winter, keep the
nozzle holders in the bumper free of sn ow and remove any ice with a de-icer
spray.
•
To remove water, the windscreen wipers will be activated from time to
time, the headlight wipers will be activated every three cycles.
MirrorsInterior mirror
It is dangerous to drive if you cannot see clearly through the
rear window.Manual anti-dazzle function for interior mirror
In the basic mirror position, the lever at the bottom edge of the mirror should
be at the front. Pull the lever to the back to select the anti-dazzle function.
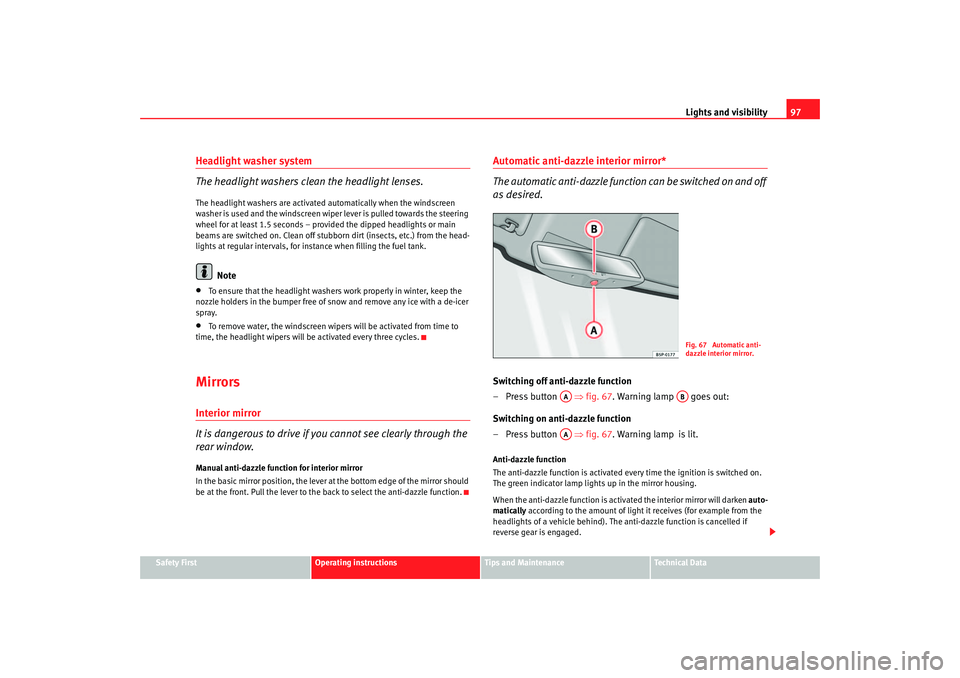
Automatic anti-dazzle interior mirror*
The automatic anti-da zzle function can be switched on and off
as desired.Switching off anti-dazzle function
– Press button ⇒ fig. 67. Warning lamp goes out:
Switching on anti-dazzle function
– Press button ⇒ fig. 67. Warning lamp is lit.Anti-dazzle function
The anti-dazzle function is activated every time the ignition is switched on.
The green indicator lamp ligh ts up in the mirror housing.
When the anti-dazzle function is activa ted the interior mirror will darken auto-
matically according to the amount of light it receives (for example from the
headlights of a vehicle behind). The anti-dazzle function is cancelled if
reverse gear is engaged.
Fig. 67 Automatic anti-
dazzle interior mirror.
AA
AB
AA
ibiza_ingles Seite 97 Mittwoch, 5. Oktober 2005 5:17 17
Page 101 of 252
Lights and visibility99
Safety First
Operating instructions
Tips and Maintenance
Te c h n i c a l D a t a
WARNING
•
The rear view convex or aspheric mirror increase the field of vision
however the objects appear smaller and further away in the mirrors. If you
use these mirrors to estimate the distance to vehicles behind you when
changing lane, you could make a mistake. Risk of accident.
•
If possible, use the interior mirror to estimate distances to vehicles
behind you.
•
Make sure that you do not get your finger trapped between the mirror
and the mirror base when folding back the mirrors. Risk of injury!For the sake of the environment
The exterior mirror heating should be switched off when it is no longer
needed. Fuel is wasted otherwise.
Note
•
If the electrical adjustment ever fa ils to operate, the mirrors can be
adjusted by hand by lightly pressing the edge of the mirror glass.
•
The following guideline applies to vehi cles with electric exterior mirrors:
If the mirror housing is moved as a result of exterior force (e.g. knocked when
parking the vehicle), the mirrors must be folded in electrically to the final
position. Do not readjust the mirror hous ing by hand, as this will interfere
with the mirror adjuster function.
•
The rear view mirrors can be adjusted separately or simultaneously, as
described before.
ibiza_ingles Seite 99 Mittwoch, 5. Oktober 2005 5:17 17
Page 103 of 252
Seats and stowage101
Safety First
Operating instructions
Tips and Maintenance
Te c h n i c a l D a t a
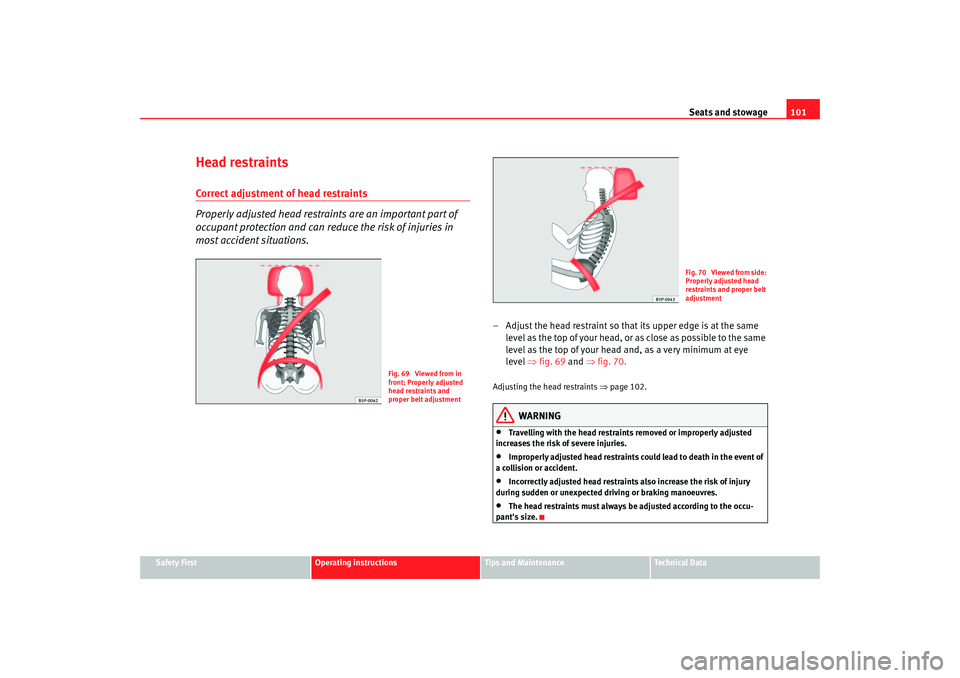
Head restraintsCorrect adjustment of head restraints
Properly adjusted head restraints are an important part of
occupant protection and can redu ce the risk of injuries in
most accident situations.
– Adjust the head restraint so that its upper edge is at the same
level as the top of your head, or as close as possible to the same
level as the top of your head and, as a very minimum at eye
level ⇒ fig. 69 an d
⇒ fig. 70.
Adjusting the head restraints ⇒ page 102.
WARNING
•
Travelling with the head restrain ts removed or improperly adjusted
increases the risk of severe injuries.
•
Improperly adjusted head restraints could lead to death in the event of
a collision or accident.
•
Incorrectly adjusted head restraints also increase the risk of injury
during sudden or unexpected driving or braking manoeuvres.
•
The head restraints must always be adjusted according to the occu-
pant's size.
Fig. 69 Viewed from in
front: Properly adjusted
head restraints and
proper belt adjustment
Fig. 70 Viewed from side:
Properly adjusted head
restraints and proper belt
adjustment
ibiza_ingles Seite 101 Mittwoch, 5. Oktober 2005 5:17 17
Page 105 of 252
Seats and stowage103
Safety First
Operating instructions
Tips and Maintenance
Te c h n i c a l D a t a
•
Never drive if the head restraints are in an unsuitable position, there is
a risk of serious injury.
•
After refitting the head restraint, you must always adjust it properly for
height to achieve optimal protection.
•
Please observe the safety warnings ⇒page 101, “Correct adjustment
of head restraints”.Note
•
To fit and remove the rear head restraints, gently tilt the seat back
forwards.
•
When fitting the head restraints again, insert the tubes as far as possible
into the guides without pressing the button.
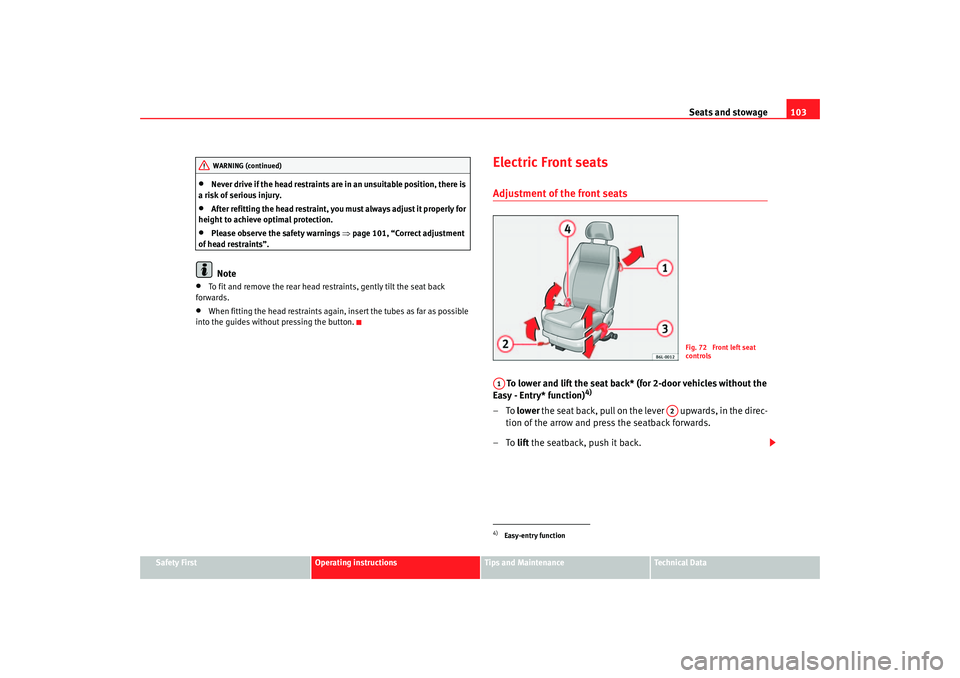
Electric Front seatsAdjustment of the front seats
To lower and lift the seat back* (for 2-door vehicles without the
Easy - Entry* function)
4)
–To lower the sea t back, pull on the le ver u pwards, in the direc-
tion of the arrow and press the seatback forwards.
–To lift the seatback, push it back.
WARNING (continued)
4)Easy-entry function
Fig. 72 Front left seat
controls
A1
A2
ibiza_ingles Seite 103 Mittwoch, 5. Oktober 2005 5:17 17
Page 107 of 252
Seats and stowage105
Safety First
Operating instructions
Tips and Maintenance
Te c h n i c a l D a t a
– Turn the appropriate thumb wheel ⇒page 104, fig. 73 to switch
on the seat heating. The seat heating is switched off in the 0
position.The seat heating only works when the ignition is switched on. The left thumb
wheel controls the left seat and the right thumb wheel the right seat.
Caution
To avoid damaging the heating elements, please do not kneel on the seat or
apply sharp pressure at a single poin t to the seat cushion and backrest.Rear seat benchFolding down rear seats
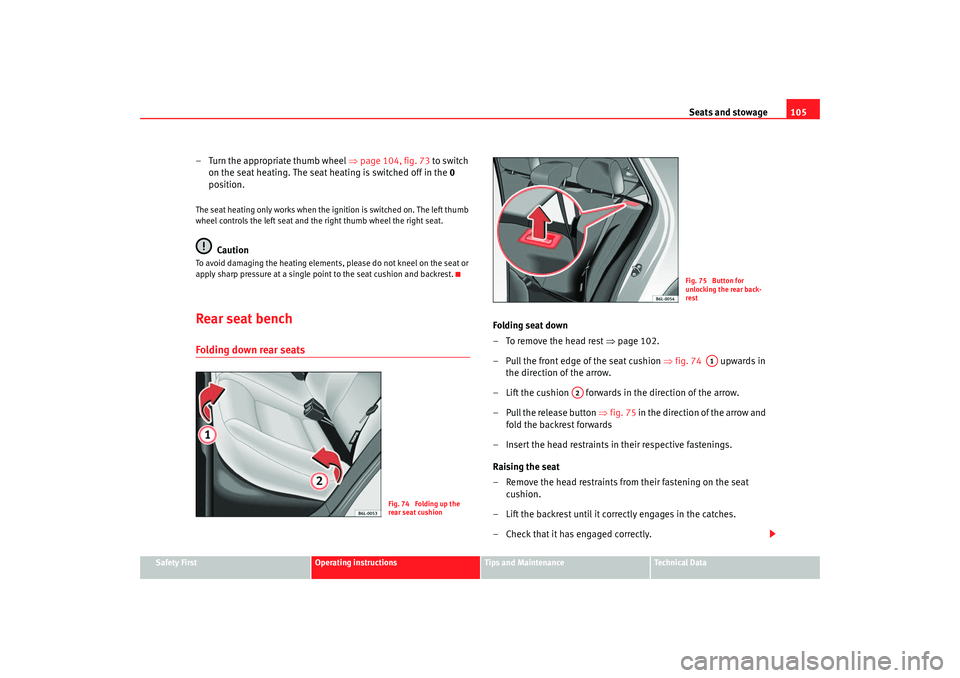
Folding seat down
– To remove the head rest ⇒ page 102.
– Pull the front edge of the seat cushion ⇒fig. 74 upwards in
the direction of the arrow.
– Lift the cushion forwards in the direction of the arrow.
– Pull the release button ⇒ fig. 75 in the direction of the arrow and
fold the backrest forwards
– Insert the head restraints in their respective fastenings.
Raising the seat
– Remove the head restraints from their fastening on the seat cushion.
– Lift the backrest until it correctly engages in the catches.
– Check that it has engaged correctly.
Fig. 74 Folding up the
rear seat cushion
Fig. 75 Button for
unlocking the rear back-
rest
A1
A2
ibiza_ingles Seite 105 Mittwoch, 5. Oktober 2005 5:17 17
Page 109 of 252
Seats and stowage107
Safety First
Operating instructions
Tips and Maintenance
Te c h n i c a l D a t a
Object compartment, driver's side
There is an object compartment on the driver's sideTo open the compartment, pu ll outwar
ds ⇒ fig. 77.
Stowage drawer under front right seat*To o p e n
– Press button and pull outwards, holding it with a hand.
To close
– Press inwards until it engages.
Fig. 77 Driver's side
compartment
Fig. 78 Stowage
compartment under the
front passenger seat
ibiza_ingles Seite 107 Mittwoch, 5. Oktober 2005 5:17 17
Page 111 of 252
Seats and stowage109
Safety First
Operating instructions
Tips and Maintenance
Te c h n i c a l D a t a
Ashtrays, cigarette lighter and electrical
socketsFront ashtrayOpening
–Press the lower part of the a shtray cover ⇒
fig.
81 and it will
open automatically with a spring action.
Emptying the ashtray
– Hold the ashtray on the right-hand side and pull upwards.
Replacement
– Push ashtray into holder. Closing
– Move the ashtray cover towards the gearstick until it engages.
WARNING
Never put paper in the ashtray. Hot ash could ignite the paper in the
ashtray.Cigarette lighter– Press on the cigarette lighter
⇒fig. 82 to activate it ⇒.
– Wait for the lighter to pop out slightly.
– Pull out the cigarette lighter and light the cigarette on the glowing coil.
Fig. 81
AA
Fig. 82 Cigarette lighter
ibiza_ingles Seite 109 Mittwoch, 5. Oktober 2005 5:17 17