2005 Seat Ibiza 5D maintenance
[x] Cancel search: maintenancePage 81 of 252

Unlocking and locking79
Safety First
Operating instructions
Tips and Maintenance
Te c h n i c a l D a t a
–Maximum time allowed for synchronising is 30 seconds.
– The normal key is used to activa te the ignition, and the key with
the remote control is the key to be programmed.
– Check that the car is open before commencing programming.
– Place the key without remote control in the contact inside the steering and ignition lock.
– Use the key with remote control and mechanically lock the vehicle from the driver's door.
– Open and close the driver's door lock mechanically, using the remote control key.
– At the same time press the button on the remote control key.
– Complete the procedure by removing the key from the contactIt is possible that the vehicle could no longer be opened and closed with the
remote control if the button is repeatedly pressed outside of the effective
range of the radio frequency remote cont rol. The remote control key will have
to be resynchronised.
Spare remote control keys are available from Authorised Service Centres, they
must be matched to the locking system.
Anti-theft alarm system*Description of anti-theft alarm system*
The anti-theft alarm triggers an alarm if unauthorised move-
ments are detected around the vehicle.The anti-theft alarm makes it more difficult to break into the vehicle or steal
it. Audible and visible alarms are triggered if the car is opened using the
mechanical key, or if unauthorised access is gained to the vehicle.
The anti-theft alarm system is automatically switched on when the vehicle is
locked. To lock the door either turn the key once in the lock towards the
locking position or press button on the radio-frequency remote
control*. The system is activated immediately and the indicator light located
on the driv er's door will flash along with the indica tors indicating that the
alarm and the locking security system (double lock) have been turned on.
When the vehicle is locked the indicator lamps light up only if the alarm has
been correctly activated (all the protec tion zones should be correctly closed).
If any of the doors or the bonnet are open, when the alarm is connected these
will not be included in the protection zones of the vehicle. If the door or
bonnet is subsequently closed, they will automatically be included in the
vehicle protection zones and the indicators will flash accordingly.
When does the system trigger an alarm?
The alarm system is triggered, in the locked vehicle, when:•
a door
•
the bonnet or
•
the tailgate
are unduly opened
•
or the ignition is switched on
A1
A2
ibiza_ingles Seite 79 Mittwoch, 5. Oktober 2005 5:17 17
Page 83 of 252

Unlocking and locking81
Safety First
Operating instructions
Tips and Maintenance
Te c h n i c a l D a t a
Note
•
If, after deactivating the volumetric sensor, the vehicle is locked using the
remote control or the key in the door lock in under 30 seconds, the volumetric
sensor will remain deactivated. The other functions of the antitheft alarm*
will remain activated. After this time , the deactivation function of the volu-
metric sensor is cancelled.
•
If the vehicle is relocked and the alarm is activated without the volumetric
sensor function, relocking will activate th e alarm with all its functions, except
the volumetric sensor. This function is reactivated when the alarm is next
switched on, unless it is deliberately switched off.
•
If the alarm has been triggered by the volumetric sensor, this will be indi-
cated by a flashing of the indicator on the driver's door. The flash is different
to the flash indicating the alarm is activated.
•
If the alarm is triggered three times by the volumetic sensor, the alarm
system is no longer triggered.
•
Triggering caused by other sensors (doors, boot opening, etc.) will
continue
ibiza_ingles Seite 81 Mittwoch, 5. Oktober 2005 5:17 17
Page 85 of 252

Unlocking and locking83
Safety First
Operating instructions
Tips and Maintenance
Te c h n i c a l D a t a
If the keyhole is in horizontal position, this implies that the tailgate is locked
and can only be opened using the main key.
WARNING
•
Always close the tailgate properly. Risk of accident or injury.
•
Do not close the tailgate by pushin
g it down with your hand on the
window. The glass could shatter. Risk of injury!
•
Ensure the tailgate is locked after closing. If not, it may open unexpect-
edly while driving.
•
Never allow children to play in or ar ound the vehicle. A locked vehicle
can be subjected to extremely high and low temperatures, depending on
the time of year. This could cause serious injuries/illness. It could even
have fatal consequences. Close and lock both the tailgate and all the other
doors when you are not using the vehicle.
•
Never close the tailgate without observing and ensuring it is clear, to do
otherwise could cause serious injury to you and others. Make sure that no
one is in the path of the tailgate.
•
Never drive with the tailgate open or half-closed, exhaust gasses may
penetrate into the interior of th e vehicle. Danger of poisoning!
•
If only the boot is opened then do not leave the key inside. The vehicle
may not be opened if the key is left inside.
WindowsOpening or closing the windows electrically
The front and rear electric windows can be operated using the
controls in the driver's door.Opening and closing the windows
– Press the button to open a window.
– Pull button to close a window ⇒.Always close the windows fully if you park the vehicle or leave it unattended
⇒ .
You can use the electric windows for approx. 10 minutes after switching off
the ignition if neither the driver door nor the front passenger door has been
opened and the key has not been removed from the ignition.
Fig. 52 Section of the
driver door: controls for
the front and rear
windows
ibiza_ingles Seite 83 Mittwoch, 5. Oktober 2005 5:17 17
Page 87 of 252

Unlocking and locking85
Safety First
Operating instructions
Tips and Maintenance
Te c h n i c a l D a t a
– Use the key to lock the vehicle from outside and hold the key in
the lock position for at least one second. The one-touch function
is now ready for operation.The buttons ⇒ page 83, fig. 52 and have two levels for opening the
window and two for closing it. This makes it easier to open or close windows
to the desired position.
One-touch closing does not work when the ignition has been switched off,
even if the key is in the ignition.
The automatic open and close function wi ll not work if the battery has been
temporarily disconnected, or if the battery is flat. The function then has to be
reactivated.
The one-touch function and roll-back fu nction will not work if there is a
malfunction in the electric windows. Contact an Authorised Service Centre.Roll-back function
The windows have a roll-back function. This reduces the risk
of injuries when the windows are closing.•
If a window is obstructed when closing automatically, the window stops
at this point and lowers immediately ⇒ .
•
If this happens, check immediately (within 10 seconds) why the window
could not be closed before attempting to close it again. After 10 seconds the
normal automatic function resumes.
•
If the window is still obstructed, the window stops at this point.
•
If there is no obvious reason why the window cannot be closed, try to
close it again within five seconds.
If you wait longer than 10 / 5 seconds, the window will open fully when you
operate one of the buttons. One-touch closing is reactivated. The one-touch function and roll-back function will not work if there is a
malfunction in the electric windows. Contact an Authorised Service Centre.
WARNING
•
Incorrect use of the electric windows can result in injury.
•
Always take the key with you when leaving the vehicle, even if you only
intend to be gone for a short time. Plea se ensure that children are never left
unsupervised in the vehicle.
•
The electric windows will work until the key has been removed from the
ignition and one of the front doors has been opened.
•
Never close the tailgate without observin g and ensuring it is clear, to do
otherwise could cause serious injury to you and others. Make sure that no
one is in the path of a window.
•
Never allow people to remain in th e vehicle when you close the vehicle
from the outside. The windows cannot be opened even in an emergency.Note
The roll-back function is deactivate d if the windows are closed from the
outside of the vehicle using the ignition key for convenience closing
⇒ page 85.Convenience opening and closing*Using the door lock
– Hold the key in the door lock of the driver door in either the
locking or the unlocking position until all windows are either
opened or closed.
– Release the key to interrupt this function.
A1
A2
ibiza_ingles Seite 85 Mittwoch, 5. Oktober 2005 5:17 17
Page 89 of 252

Unlocking and locking87
Safety First
Operating instructions
Tips and Maintenance
Te c h n i c a l D a t a
Convenience closing*Using the door lock
– Hold the key in the door lock of the driver's door in the locking
position until the sliding/tilting sunroof is closed.
– Release the key to interrupt this function.
NoteThe sliding/tilting sunroof rotary button remains in the last position selected
if the roof is closed using convenience closing from outside the vehicle and
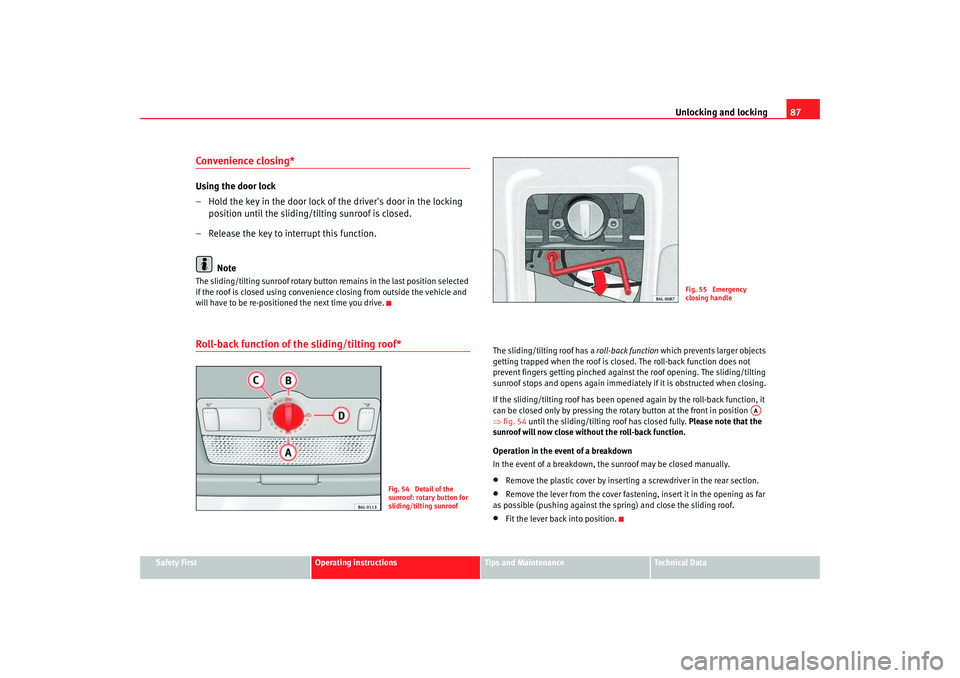
will have to be re-positio ned the next time you drive.Roll-back function of the sliding/tilting roof*
The sliding/tilting roof has a roll-back function which prevents larger objects
getting trapped when the roof is closed. The roll-back function does not
prevent fingers getting pinched against the roof opening. The sliding/tilting
sunroof stops and opens again immediately if it is obstructed when closing.
If the sliding/tilting roof has been opened again by the roll-back function, it
can be closed only by pressing the rotary button at the front in position
⇒ fig. 54 until the sliding/tilting roof has closed fully. Please note that the
sunroof will now close without the roll-back function.
Operation in the event of a breakdown
In the event of a breakdown, the sunroof may be closed manually.•
Remove the plastic cover by inserting a screwdriver in the rear section.
•
Remove the lever from the cover fastening, insert it in the opening as far
as possible (pushing against the spring) and close the sliding roof.
•
Fit the lever back into position.
Fig. 54 Detail of the
sunroof: rotary button for
sliding/tilting sunroof
Fig. 55 Emergency
closing handle
AA
ibiza_ingles Seite 87 Mittwoch, 5. Oktober 2005 5:17 17
Page 91 of 252

Lights and visibility89
Safety First
Operating instructions
Tips and Maintenance
Te c h n i c a l D a t a
•
The rear fog light is so bright that it can dazzle drivers behind you. You
should use the rear fog light only when visibility is very poor.
•
If you are towing a trailer equipped with a rear fog light on a vehicle with
a factory-fitted towing bracket, the rear fog light on the car will automatically
be switched off.
•
The use of the lighting described here is subject to the relevant statutory
requirements.
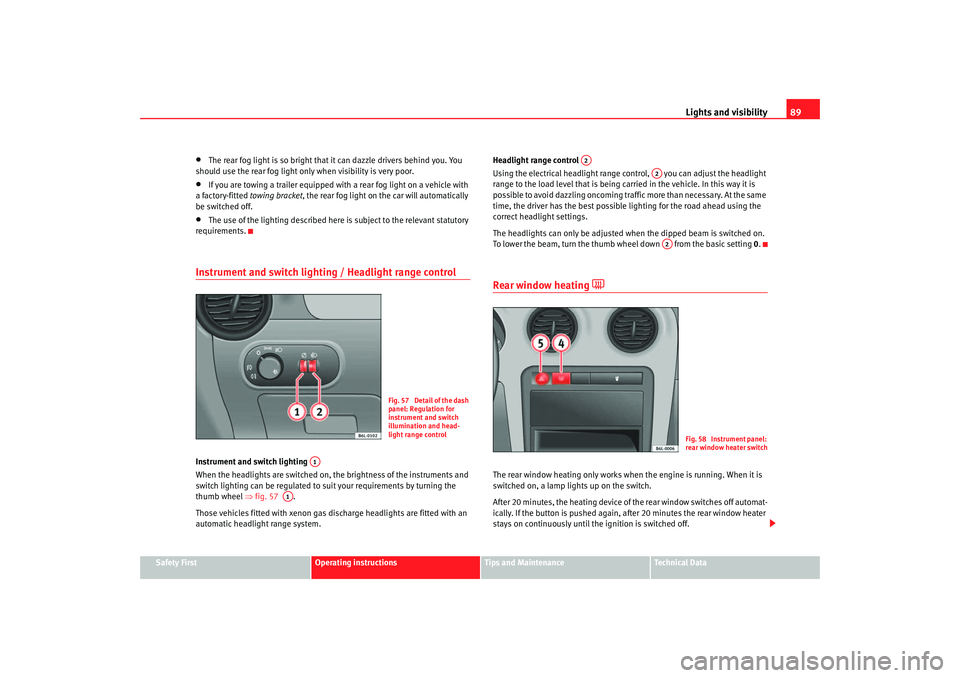
Instrument and switch lighting / Headlight range controlInstrument and switch lighting
When the headlights are switched on, the brightness of the instruments and
switch lighting can be regulated to suit your requirements by turning the
thumb wheel ⇒fig. 57 .
Those vehicles fitted with xenon gas discharge headlights are fitted with an
automatic headlight range system. Headlight range control
Using the electrical headlight range control, you can adjust the headlight
range to the load level that is being carried in the vehicle. In this way it is
possible to avoid dazzling oncoming traffic more than necessary. At the same
time, the driver has the best possible
lighting for the road ahead using the
correct headlight settings.
The headlights can only be adjusted when the dipped beam is switched on.
To lower the beam, turn the thumb wh eel down from the basic setting 0.
Rear window heating
The rear window heating only works when the engine is running. When it is
switched on, a lamp lights up on the switch.
After 20 minutes, the heating device of the rear window switches off automat-
ically. If the button is pushed again, after 20 minutes the rear window heater
stays on continuously until the ignition is switched off.
Fig. 57 Detail of the dash
panel: Regulation for
instrument and switch
illumination and head-
light range control
A1
A1
A2
A2A2
Fig. 58 Instrument panel:
rear window heater switch
ibiza_ingles Seite 89 Mittwoch, 5. Oktober 2005 5:17 17
Page 93 of 252

Lights and visibility91
Safety First
Operating instructions
Tips and Maintenance
Te c h n i c a l D a t a
•
Never park where the catalytic converter could come into contact with
inflammable materials under the vehicle, for example dry grass or spilt
petrol. This could start a fire!Note
•
The battery will run down if the hazard warning lights are left on for a long
time, even if the ignition is switched off.
•
The use of the hazard warning lights d escribed here is subject to the rele-
vant statutory requirements.
Turn signal and main beam headlight lever
The turn signal and main beam lever also operates the
parking lights and the headlight flasher.
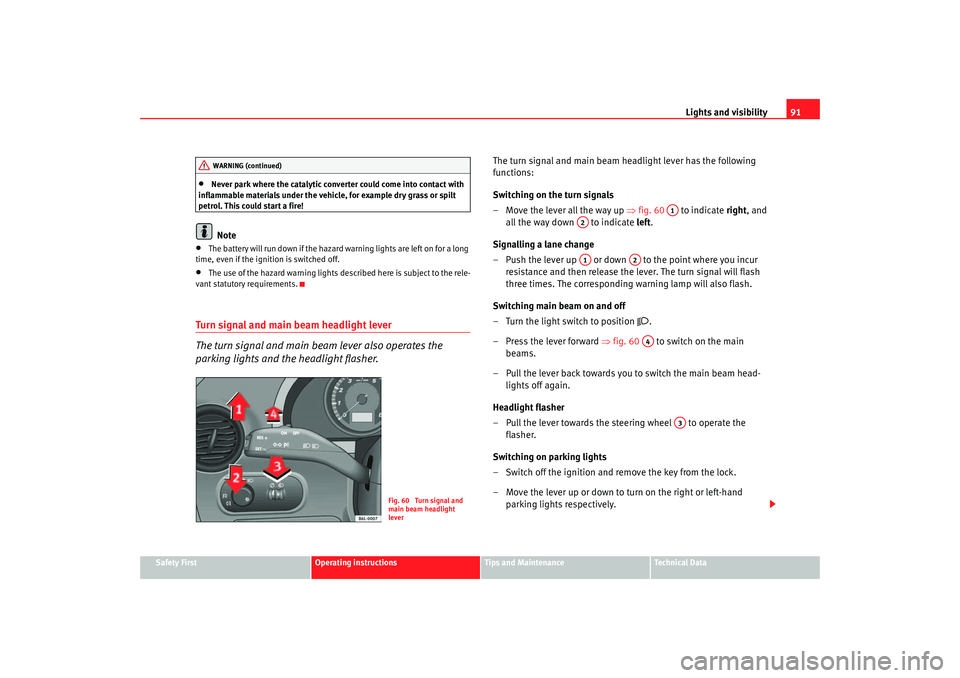
The turn signal and main beam headlight lever has the following
functions:
Switching on the turn signals
– Move the lever all the way up ⇒fig. 60 to indicate right, and
all the way down to indicate left.
Signalling a lane change
– Push the lever up or down to the point where you incur resistance and then release the lever. The turn signal will flash
three times. The corresponding warning lamp will also flash.
Switching main beam on and off
– Turn the light switch to position
.
– Press the lever forward ⇒fig. 60 to switch on the main
beams.
– Pull the lever back towards you to switch the main beam head- lights off again.
Headlight flasher
– Pull the lever towards the steering wheel to operate the flasher.
Switching on parking lights
– Switch off the ignition and remove the key from the lock.
– Move the lever up or down to turn on the right or left-hand parking lights respectively.
WARNING (continued)
Fig. 60 Turn signal and
main beam headlight
lever
A1
A2A1
A2A4
A3
ibiza_ingles Seite 91 Mittwoch, 5. Oktober 2005 5:17 17
Page 95 of 252

Lights and visibility93
Safety First
Operating instructions
Tips and Maintenance
Te c h n i c a l D a t a
Note
If not all the vehicle doors are closed, the interior lights will be switched off
after approx. 10 minutes, providing the key has been removed and the cour-
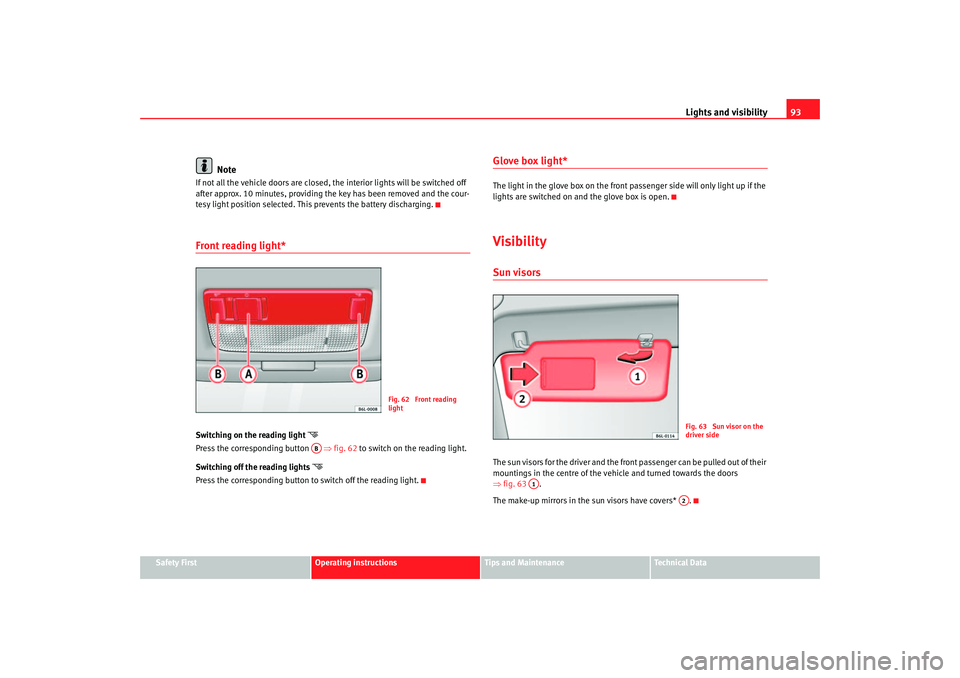
tesy light position selected. This prevents the battery discharging.Front reading light*Switching on the reading light
Press the corresponding button ⇒fig. 62 to switch on the reading light.
Switching off the reading lights
Press the correspondin g button to switch off the reading light.
Glove box light*The light in the glove box on the front passenger side will only light up if the
lights are switched on and the glove box is open.VisibilitySun visorsThe sun visors for the driver and the front passenger can be pulled out of their
mountings in the centre of the vehicle and turned towards the doors
⇒fig. 63 .
The make-up mirrors in the sun visors have covers* .
Fig. 62 Front reading
light
AB
Fig. 63 Sun visor on the
driver side
A1
A2
ibiza_ingles Seite 93 Mittwoch, 5. Oktober 2005 5:17 17